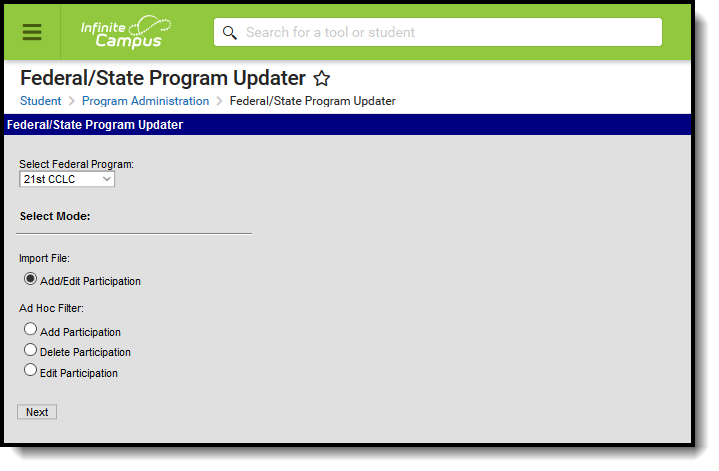
The Federal/State Program Updater allows State Edition and District Edition users to import federal or state program participation data using an import file. Users can also add, edit, or delete federal or state program participation data using an Ad hoc filter
 Federal/State Program Updater
See the Federal/State Program Update Wizard Tool Rights article for information about available tool rights.
Import File: Add/Edit Participation
This section provides information on importing federal/state program participation data for a selected federal/state program using an import file.
I. Import File: Create, Edit, or Delete an Import Mapping
This section provides information on creating, editing or deleting an import mapping for participation in a federal/state program.
 Import File: Add/Edit Participation
Import Mapping Editor
Field | Definition |
|---|---|
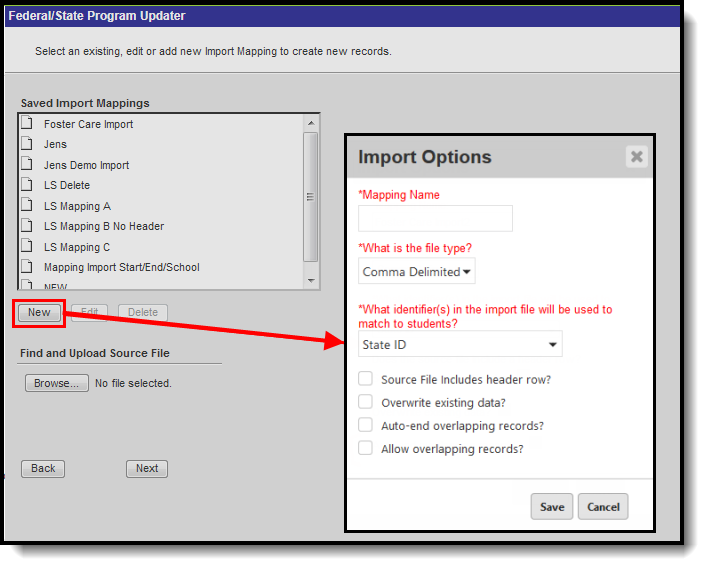
Saved Import Mappings | Lists previously created mappings. |
New | Users are able to create a new mapping. |
| Edit | Users can modify the details of an existing mapping in the Saved Mappings window. |
| Delete | Users can remove an existing mapping from the Saved Mappings window. |
| Find and Upload Source File | Allows users to select and upload the file that contains the records for the program import. |
| Back | Allows users to navigate back to the start screen. |
| Next | Allows users to proceed to the next screen. |
| Mapping Name | Indicates the name of the mapping. A unique name must be given to each mapping. |
| What is the file type? | Indicates if the import file is formatted as comma or tab delimited. |
| What identifier(s) in the import file will be used to match to students? | Indicates the student identifier field that is used to match students from the import file to Campus fields. Student identifiers are the link that allows importing federal/state program participation to student records. The options are to match either on the student’s State ID, Person ID, or a combination of the student’s First Name, Last Name and Birth Date. |
| Source File Includes header row? | Indicates if the file being imported contains a header. If this is checked, the first row of the source file will be ignored on import. |
| Overwrite existing data? | When marked, existing records in Campus are overwritten with data from the import file. In order for records to be overwritten, the start date of the existing record and the start date on the import file record must be identical. The ownership of the record (both state records or district records with same District ID) must also be identical in order for records to be overwritten. Leave this checkbox unmarked if existing data should not be overwritten. |
| Auto-end overlapping records? | When marked, an existing record in Campus is ended if the end date is blank and a new record is found in the import file. The start date of the record on the import file must be after the start date of the existing record and ownership of the record (both state records or district records with same district id) must be identical to auto end a record. The existing record will be given an end date one day less then the start date of the new record from the import file. Leave this field unmarked if you do not want to end existing records. |
| Allow overlapping records? | When marked, new records are allowed to overlap existing records. Leave this field unchecked if you do not want to allow overlapping records. The Overwrite existing data and Auto-end overlapping records checkboxes will override this selection. Note: This option is only available in states and programs that allow overlapping program participation records. |
To create a new mapping:
 Create a New Mapping
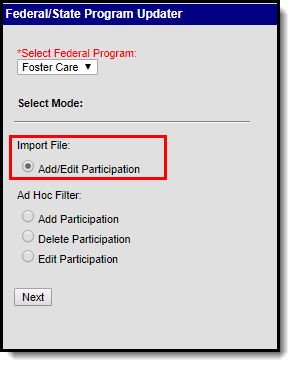
- Select the appropriate Program.
- Mark the Add/Edit Participation radio button in the Import File section.
- Click Next.
- To create a new mapping, click New. An Import Options window displays.
- Enter the Mapping Name. A unique name must be given to each mapping.
- Select the type of file that is being imported under the What is the file type? field. Only comma delimited and tab delimited files are accepted.
- Select the student identifier used to match student records in Campus to records in the import file under the Which identifier(s) in the import file will be used to match students? field.
- If the import file contains a header, mark the Source File Includes Header checkbox.
- If existing Campus data should be overwritten and replaced with data from the import file, mark the Overwrite existing data checkbox.
- If overlapping records should automatically be ended, mark the Auto end overlapping records checkbox.
- If overlapping records are allowed to be imported, mark the Allow overlapping records checkbox. Note: This option is only available in states and programs that allow overlapping program participation records.
- Click Save. The new mapping displays in the Saved Import Mappings window and is highlighted.
- Click Browse and select the appropriate file which contains the records for the import. Only comma delimited and tab delimited files are accepted.
- Click Next to proceed to mapping student identifiers and Campus fields.
To edit an existing mapping:
 Edit Existing Mapping
- Select the appropriate Program.
- Mark the Add/Edit Participation radio button in the Import File section.
- Click Next.
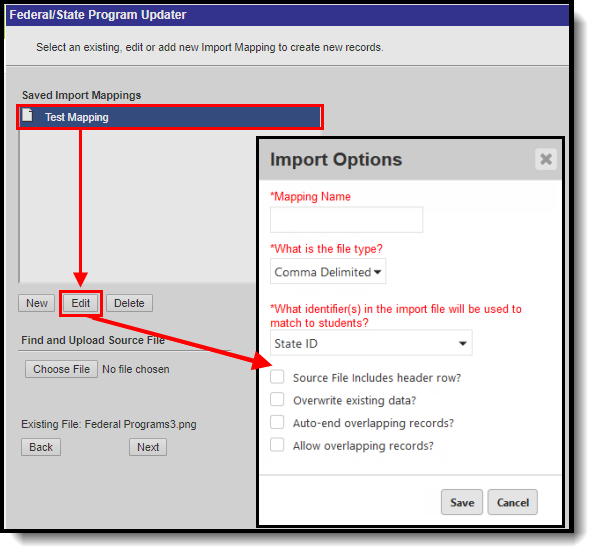
- Select the mapping that needs to be updated from the Saved Import Mappings window.
- Click Edit.
- Edit the details in the Import Options window.
- Click Save.
- If desired, click Browse and select a different file for the import. Only comma delimited and tab delimited files are accepted.
- Click Next to proceed to mapping student identifiers and Campus fields.
To delete an existing mapping:
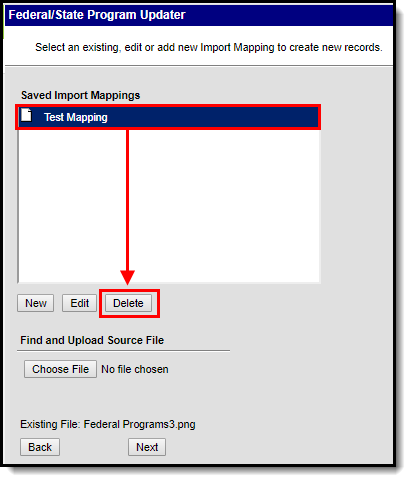 Delete an Existing Mapping
- Select the appropriate Program.
- Mark the Add/Edit Participation radio button in the Import File section.
- Click Next.
- Select the mapping that needs to be removed from the Saved Import Mappings window.
- Click Delete.
- Click OK to delete the mapping. The selected mapping is removed from the Saved Import Mappings window.
II. Import File: Mapping Student Identifiers
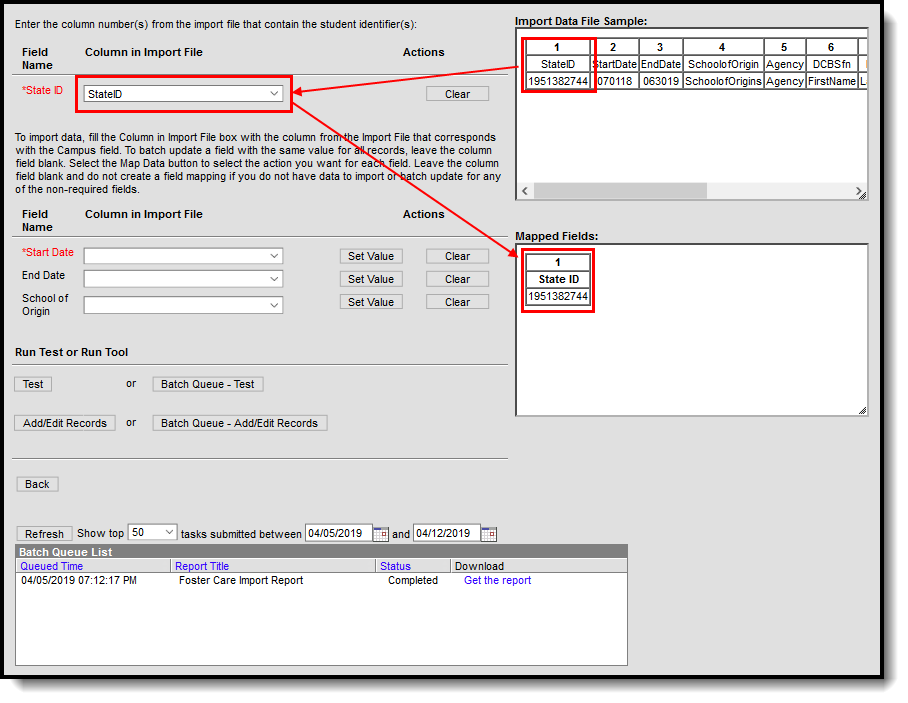
The student identifier is the link that allows importing federal/state program participation to student records. Correctly importing/linking the student identifier is vital to the success of the import. A record will only be created if there is an exact match on the Student's State ID, PersonID, or First Name, Last Name, Birth Date combination.
The Import Data File Sample displays the columns and first ten rows from the import file. A bold sequence number appears at the top of each column in the Import Data Field Sample, for identification purposes. The Column in Import File droplist is used to select the column in the import file that will be used for the mapping.
 Map Student Identifiers
Mapping Student Identifier Editor
Field | Definition |
|---|---|
Field Name (Student Identifier) | Lists the student identifier(s) selected for the import. A record is only created if there is an exact match on the Student's State ID, PersonID, or First Name, Last Name, Birth Date combination. The State ID and Person ID options do not require any format selection, but if a Name/Date of Birth combination is used for IDing, the Date of Birth needs to have a date format mapped. |
Column in Import File (Student Identifier) | Indicates the column from the Import Data File Sample used to link to the student identifier. |
| Import Data File Sample | Displays the columns and first ten rows of data from the import file. |
| Mapped Fields | Displays the columns being mapped. |
To map student identifier fields:
- Enter the bold column number from the Import Data File Sample in the Column in Import File field for the student identifier.
- Once a field has been mapped, the field displays in the Mapped Fields window.
- Proceed to mapping import data columns to Campus Fields and Batch Updating Campus Fields.
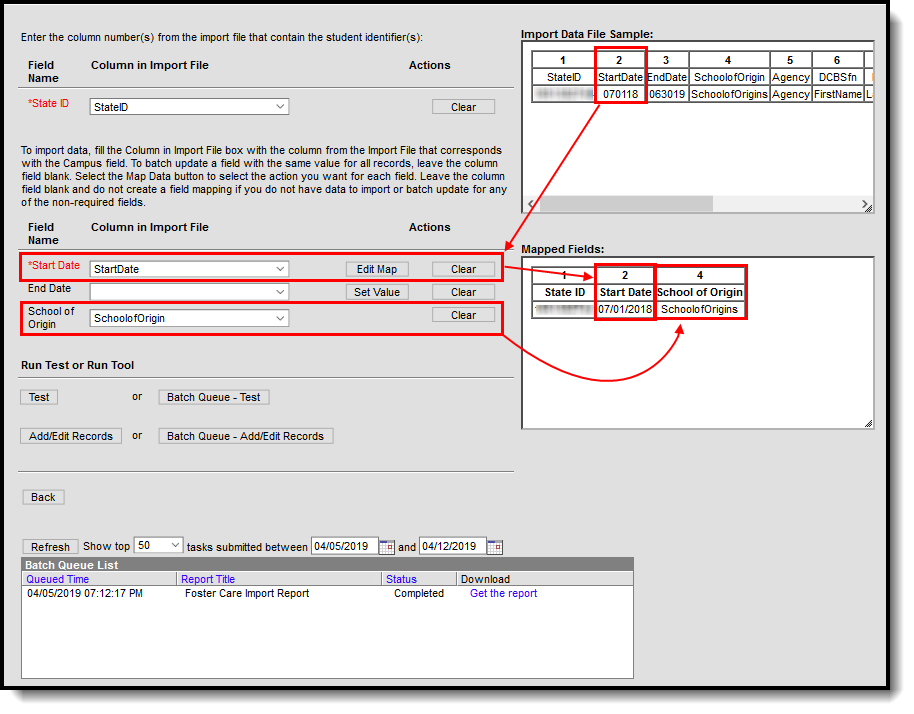
III. Import File: Mapping Import Data Columns to Campus Fields and Batch Updating Campus Fields
If users are going to import data, the fields in the Import Data File Sample (the file that was uploaded) need to be mapped to the appropriate fields in the user interface. Users can also batch update fields with the same value for all records.
 Map Import Fields to Campus Fields
Mapping Import Data Column and Batch Update Editor
Field | Definition | ||
|---|---|---|---|
Field Name | Indicates the Campus fields to which data can be mapped. Only active core fields and attributes that appear on the selected federal/state program tab appear in the mapping section. Fields in red are required. If a non-required field does not need to be mapped, do not create a field mapping for the field. | ||
Column in Import File | Indicates the column from the Import Data File Sample used to link to the Campus field. To batch update a field with the same value for all records, leave this field blank. | ||
| Actions | Set Value | Allows users to batch update a Campus field with a value for all records. When Set Value is selected, an additional field displays in which the user must indicate the new value for the field that will be set for all records. | |
| Edit Value | Allows users to batch edit a Campus field with a value for all records. The Edit Value option displays after the value has initially been set using the Set Value option. An additional field displays in which the user must indicate the new value for the field that will be set for all records. | ||
| Map Field | Allows the user to map the field. Map Field is only available when all of the following criteria are met:
| ||
| Edit Map | Displays after a field has been mapped and can be used to edit the mapping. | ||
| Import | Allows the user to import the file. This option is only for dataTypes that can be directly imported without formatting. | ||
| Clear | Clears the value in the selected field. | ||
| Mapped Fields | Displays the columns being mapped or updated. | ||
To map import data columns to Campus fields:
- Enter the column number from the Import Data File Sample in the Column in Import File field.
- Click the Map Field button for the field being mapped.
- If the Column in Import File is not NULL, the data will be automatically mapped if the dataType is unambiguous or a Mapping button will be available if the data Type requires formatting/mapping.
- Additional information may need to be entered depending on the type of field being mapped. For example, when importing a date, the format of the date in the source file needs to be selected.
- Once a field has been mapped, the field displays in the Mapped Fields window.
- Fields that are not being mapped should have the Column in Import File field left blank and not have an action selected.
- Repeat these steps for each field that needs to be mapped.
To batch update a Campus field with the same value for all records:
- If a batch update is going to be performed to update a field with the same value for all records, leave the Column in Import File field blank.
- Click the Map Field button for the field being updated.
- If the Column in Import File is not NULL, the data will be automatically mapped if the dataType is unambiguous or a Mapping button will be available if the dataType requires formatting/mapping.
- Enter or select the value being set in the field for all records.
- Once a batch update has been selected for a field, the field displays in the Mapped Fields window.
- Fields that are not being updated should have the Column in Import File field left blank and not have an action selected.
- Repeat these steps for each field that needs to be updated.
IV. Import File: Run Test or Run Tool.
When the data from the Import Data File Sample has been mapped to the selected data fields, the information is ready to be imported.
 Run Test or Run Tool
- It is recommended to perform a Test on the import prior to the actual importing of data. This reduces the amount of cleanup action needed after the program data has been imported. No data is written to the database when a test is performed. When testing, a report displays listing the records being imported and any potential issues. See Report Results below for more details. If a large amount of data is being imported, it is recommended to perform a Batch Queue - Test. When the process is complete, a message appears in the user's Process Alerts (formerly Process Inbox).
- To perform the import, click Add/Edit Records or Batch Queue - Add/Edit Records. The Batch Queue - Add/Edit Records option is recommended when importing a large amount of data. When the process is complete, a 'Get Report' link displays in the Batch Queue List and a message appears in the user's Process Alerts (formerly Process Inbox).
A results report generates displaying all records that failed and all records that imported. See Report Results below for more details.
State Linked Customers Only: After running an import, it is highly recommended to perform a resync to (re)synchronize batches of district-level data to the state. Please review the Resync article for more detailed information.
Ad Hoc Filter
This section provides information on adding, deleting, and editing federal/state program participation data using an Ad hoc filter.
I. Ad Hoc Filter: Add Participation
This section provides information on adding participation for a federal/state program using a previously created Ad hoc filter.
 Foster Care: Add Participation
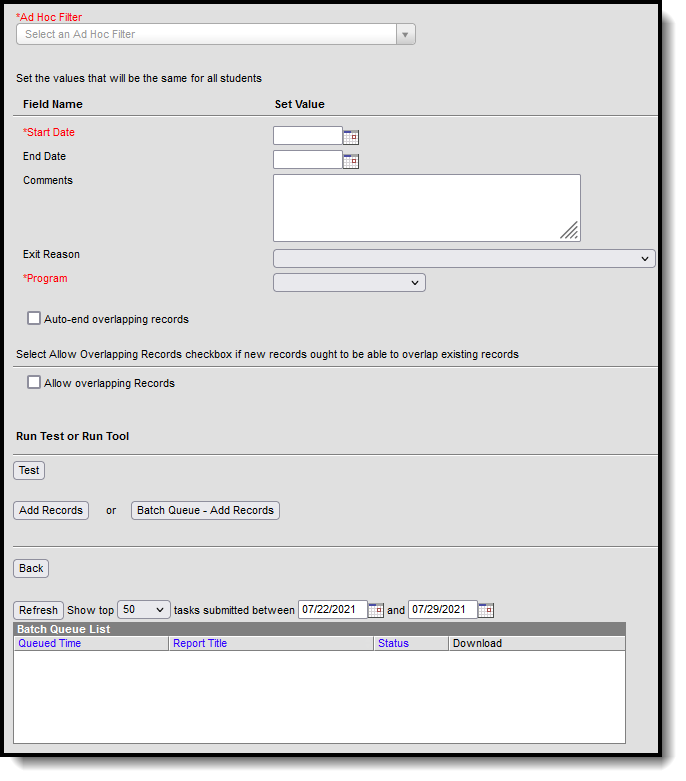 Ad Hoc Filter: Add Participation
Ad Hoc Filter: Add Participation Editor
Field | Definition |
|---|---|
Ad Hoc Filter | Indicates the Ad hoc filter which contains student records being created using the Federal/State Program Updater. |
Field Name | Indicates the Campus fields to which data can be added. All active core fields and attributes that appear on the selected program tab display. Fields in red are required. |
| Set Value | Indicates the value for the Campus field being updated. All records for students in the selected Ad hoc filter are updated with this value when importing. |
| Auto-end overlapping records | When marked, an existing record in Campus is ended if the end date is blank and a new record is found in the Ad Hoc Filter. The start date of the record in the filter must be after the start date of the existing record and ownership of the record (both state records or district records with same district id) must be identical to auto end a record. The existing record will be given an end date one day less then the start date of the new record from the import file. Leave this field unmarked if you do not want to end existing records. |
| Allow overlapping records | When marked, new records are allowed to overlap existing records. Leave this field unchecked if you do not want to allow overlapping records. Note: This option is only available in states and programs that allow overlapping program participation records. |
| Test | Performs a test on the information being added. No data is written to the database. |
| Add Records | Adds the records to the database. |
| Batch Queue - Add Records | If a large number of records are being added, the import can be scheduled for a specific date and time. When the process is complete, a 'Get Report' link displays in the Download column of the Batch Queue List and a message appears and a message appears in the user's Process Alerts (formerly Process Inbox). |
| Back | Returns the user to the previous screen. |
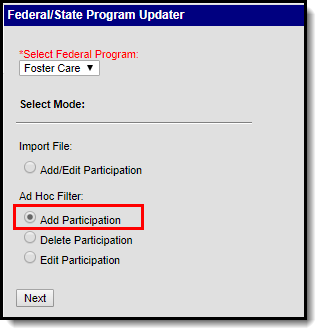
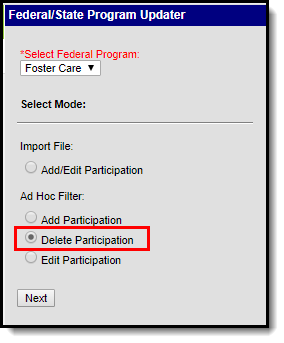
To add federal/state program participation using an Ad hoc filter:
- Select the appropriate Program.
- Mark the Add Participation radio button in the Ad Hoc Filter section.
- Click Next.
- Select the appropriate Ad hoc filter.
- Enter the values that need to be updated in the Set Value fields. This tool updates the federal/state program records for all students in the selected Ad hoc filter with the entered values. Fields in red are required. If a record should not be updated, leave the field blank.
- If overlapping records are allowed to be imported, mark the Allow overlapping records checkbox. Note: This option is only available in states and programs that allow overlapping program participation records.
- It is recommended to perform a Test prior to the actual importing of data. This reduces the amount of cleanup action needed after the federal/state program data has been imported. When testing, a report displays listing the potential issues. See Report Results below for more details.
- Click Add Records or Batch Queue - Add Records.
A results report generates that displays all records added along with any errors that occurred. See Report Results below for more details.
II. Ad Hoc Filter: Delete Participation
This section provides information on removing participation in a federal/state program using a a previously created Ad hoc filter.
 Ad Hoc Filter: Delete Participation
 Ad Hoc Filter: Delete Participation
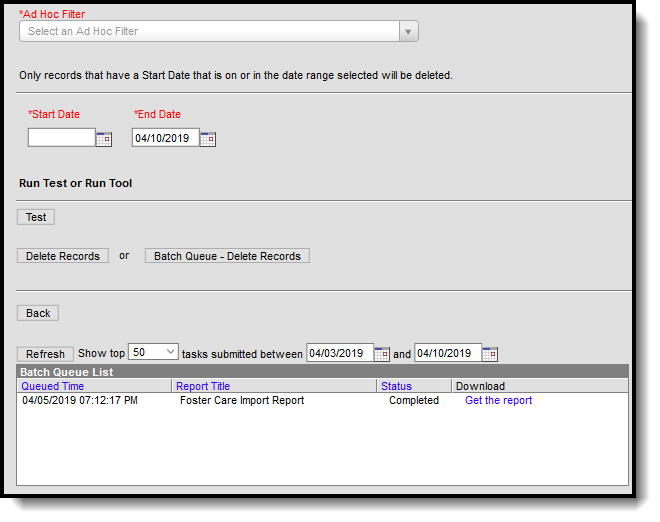
Ad Hoc Filter: Delete Participation Editor
Field | Definition |
|---|---|
Ad Hoc Filter | Indicates the Ad hoc filter which contains student records being removed using the Federal/State Program Updater. |
Start Date | The Start Date field is required. Only records that have a start date that is on or within the date range selected are deleted. |
| End Date | The End Date field is required and indicates the end date for the date range in which records are deleted. The End Date field automatically defaults to the current date. If a future start date is entered, an end date that is on or after the start date must be entered. |
| Test | Performs a test on the information being deleted. No data is removed from the database. |
| Delete Records | Deletes the records from the database. |
| Batch Queue - Delete Records | If a large number of records are being removed, the deletion can be scheduled for a specific date and time. When the process is complete, a 'Get Report' link displays in the Download column of the Batch Queue List and a message appears in the user's Process Alerts (formerly Process Inbox). |
| Back | Returns the user to the previous screen. |
To delete participation in a federal/state program using an Ad hoc filter:
- Select the appropriate Program.
- Mark the Delete Participation radio button in the Ad Hoc Filter section.
- Click Next.
- Select the appropriate Ad hoc filter.
- Enter the Start Date and End Date. Only records that have a start date that is on or within the date range selected delete.
- It is recommended to perform a Test prior to the actual deleting of data. This reduces the amount of cleanup action needed after the federal/state program data has been removed. When testing, a report displays listing the potential issues. See Report Results below for more details.
- Click Add Records or Batch Queue - Add Records.
A results report generates displaying all records deleted along with any errors that occurred. See Report Results below for more details.
III. Ad Hoc Filter: Edit Participation
This section provides information on modifying participation data in a federal/state program using a previously created Ad Hoc filter.
 Ad Hoc Filter: Edit Participation
 Ad Hoc Filter: Edit Participation
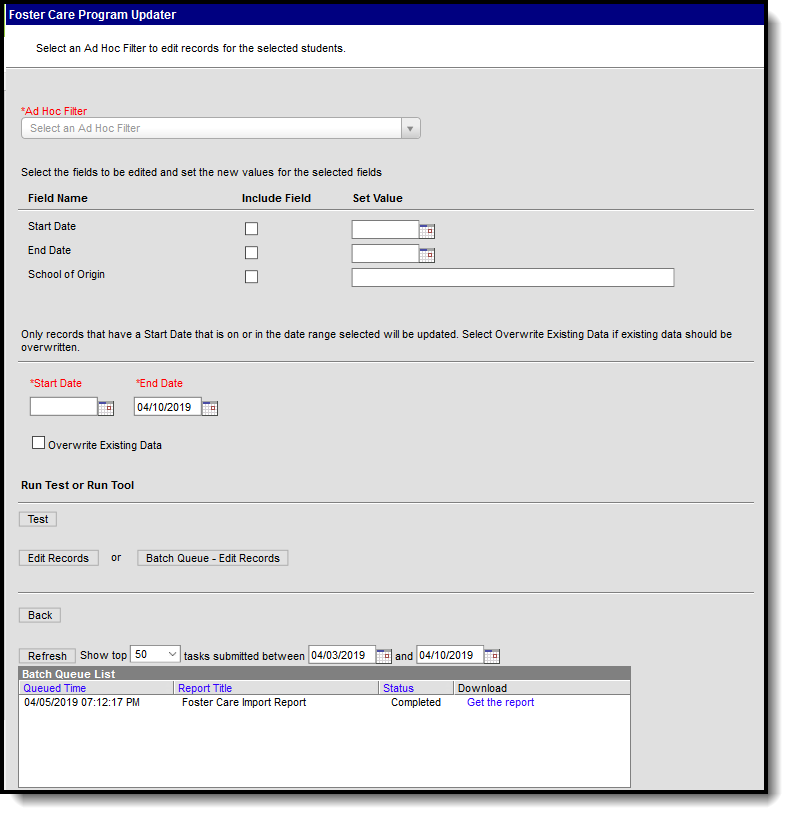
Ad Hoc Filter: Edit Participation Editor
Field | Definition |
|---|---|
Ad Hoc Filter | Indicates the Ad hoc filter which contains student records being updated using the Federal/State Program Updater. |
Field Name | Indicates the Campus fields in which data can be updated. All active core fields and attributes that appear on the selected federal/state program tab display. |
| Include Field | When marked, the selected field is included in the import. If a value is entered in the Set Value field, the Include checkbox is automatically selected. If the Include Field is checked for a field and the Set Value is NULL, existing data in the database will be deleted. |
| Set Value | Indicates the value for the Campus field being updated. All records for students in the selected Ad hoc filter are updated with this value. |
| Start Date | The Start Date field is required. Only records that have a start date that is on or within the date range selected are updated. |
| End Date | The End Date field is required and indicates the end date for the date range in which records are updated. The End Date field automatically defaults to the current date. If a future start date is entered, an end date that is on or after the start date must be entered. |
| Overwrite Existing Data | When marked, the selected fields are updated if the field is blank or has data already saved. When not marked, the selected fields are only modified if the field is blank. |
| Test | Performs a test on the information being updated. No data is written to the database. |
| Edit Records | Updates the records with the values entered in the Set Values fields. |
| Batch Queue - Edit Records | If a large number of records are being edited, the update can be scheduled for a specific date and time. When the process is complete, a 'Get Report' link displays in the Download column of the Batch Queue List and a message appears and a message appears in the user's Process Alerts (formerly Process Inbox). |
| Back | Returns the user to the previous screen. |
To edit participation in a federal/state program using an Ad hoc filter:
- Select the appropriate Program.
- Mark the Edit Participation radio button in the Ad Hoc Filter section.
- Click Next.
- Select the appropriate Ad hoc filter.
- Select the fields being updated by marking the Include checkbox and entering a new value in the Set Value field.
- Enter the Start Date and End Date. Only records that have a start date that is on or within the date range selected update.
- If desired, mark the Overwrite Existing Data checkbox.
- It is recommended to perform a Test prior to the actual editing of data. This reduces the amount of cleanup action needed after the federal/state program data has been updated. When testing, a report displays listing the potential issues. See Report Results below for more details.
- Click Edit Records or Batch Queue - Edit Records.
A results report generates displaying all records updated along with any errors that occurred. See Report Results below for more details.
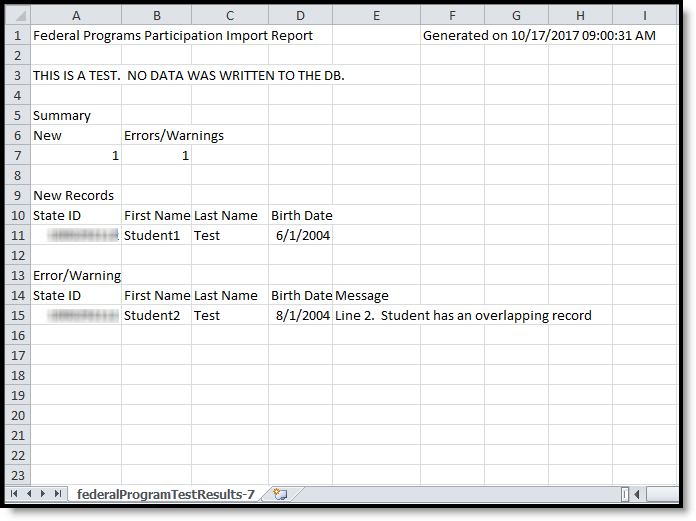
Report Results
After running the Federal/State Program Updater, a report generates in csv. format and lists any records created, edited, or deleted along with any errors that occurred. Details of the student identifiers are also listed. The report indicates if it was generated on a Test or Run of the tool. If an error occurred, the line number and reason is indicated under the Error/Warning section.
 Report Results
