Schedule Wizard: Mass Schedule Students - Study Guide
Last Modified on 01/26/2023 2:49 pm CST
In This Article
After course requests and course preparations have been completed for the upcoming year, the Schedule Wizard can be used to further configure scheduling parameters prior to mass-loading students into courses based on their requests.
Tool rights to the Schedule Wizard and access to Trials should only be given to staff who are part of the scheduling process.
Scheduling Process and Checklist
The Schedule Wizard can be used to create the master schedule and load student requests into the master schedule. The following content gives an overview of the scheduling process and the role the Schedule Wizard plays in creating a master schedule.
Documentation
Preparing for the scheduling season includes the creating of new school calendars, processing enrollments, reviewing existing schedules, modifying courses, opening the course registration and scheduling students into courses.
This document is aligned with training materials provided during Scheduling Bundle training. If you are interested in this training, have your authorized support contact submit a support case with Scheduling Bundle in the subject line, and the Infinite Campus Training Department will be in contact.
This checklist assumes that all appropriate and necessary parties have been involved in discussions that may have altered calendars and day schedules for the next school year.
The Scheduling Center provides an overview of a school's progress towards completion of scheduling-related tasks. It is modeled after this checklist and can be used to track percentages and review tasks that need attention.
Part 1. Calendars and Enrollments, Calendar Rights, Departments
Modify Term structure (quarter, trimester, etc.) and Dates on all calendar and/or schedule structures.
Review existing Period Schedules and determine if additional schedules are necessary to allow for period schedules for Responsive Scheduling days and for days that may have a different schedule (shortened days, final exam testing, etc.)
If necessary (depending on your state), update School Months for the new school year.
Reset days on all calendars and/or schedule structures.
Rotate days on all calendars and/or schedule structures, if applicable.
Responsive Scheduling
Before implementing Responsive Scheduling as a part of the school's offerings, review your business processes and discuss this opportunity with the appropriate individuals. This affects all areas of a school, including administrators, attendance clerks, teachers, counselors, curriculum directors, etc. Consider the benefits and consequences involved with the following:
Calendar changes (new periods, different schedule structures, period length, instruction minutes, etc.)
New programs/courses to offer
Course placement
Attendance tracking
Done
Task
Responsible Party
Review your overall approach to educating students prior to implementing this tool.
(If necessary), create a separate period schedule for the responsive courses.
Mark which periods in the period structure can be marked as responsive, indicating responsive courses can be scheduled into them.
Other tasks are necessary to complete the Responsive Scheduling process. The items above are needed to build calendars and courses for this process properly.
Enrollments
Done
Task
Responsible Party
Communicate to office staff that enrollments will be rolled forward. State Reporting enrollment changes made to the current enrollment record will also need to be made in next year’s enrollment record.
Review the Course Planner and become familiar with its functions.
Review the Staff Planner and become familiar with its functions.
Create a copy of a Trial based on the previous year's trial.
Every time you create a new trial, name it and specify what is happening in the trial and add a date. For example, Second Build - 3/31 would be the second time you added courses on the 31st of March.
Use Request and Rosters to place students in one section of a calendar into another section in another calendar.
Use the Fill Teams wizard to assign scheduling teams to students.
When participating in Cross-Site Enrollment, schedule students into Cross-Site Courses at the very last step in the scheduling process.
As part of the overall Scheduling process, enrolling students in Cross-Site Courses occurs AFTER all other Scheduling at both the Home School and the Serving School is complete and the Scheduling Trial is marked Active.
Video
This video provides an overview of the processes involved in completing the master schedule for a school.
Trials
Scheduling Trials are created when a calendar is rolled from a previous year, when a new school and calendar are created or when the Schedule Wizard is used to create a new trial. Multiple trials can be used when creating a master schedule. Pay special attention to security and data precautions when working with trials.
Trials (Schedule Wizard)
Trials may be created and manipulated in the Schedule Wizard.
Documentation
Video
Trials are versions of the school's schedule (courses, sections, rosters, teachers, etc.). A trial is created when the school's calendar is rolled and/or the Schedule Wizard is used to build the schedule.
Trials
Trials may be created and manipulated from the main Scheduling tools.
Documentation
Classic View: Scheduling > Trials
Search Terms: Trials
A trial is a version of a schedule for a school, including sections of courses and rosters for those particular sections. Trials are created when a calendar is rolled over from a previous year or when the Schedule Wizard is utilized. Trials connect the calendar to the course listing and are used in several data tables and reports. See the Scheduling Wizard Trials article for detailed information.
Access to this tool should be restricted. Inadvertently deleting trials causes all data in the selected calendar to be deleted and can only be restored with the aid of Campus Hosting services.
Scheduling Trials
Read - View existing scheduling trials for the selected school.
Write - Modify the Locked checkbox, add a comment, and save changes.
Add - Modify the Locked checkbox, add a comment, and save changes.
Delete - Remove trials for a school.
See the Tool Rights section below for more details on what actions can be performed with each right.
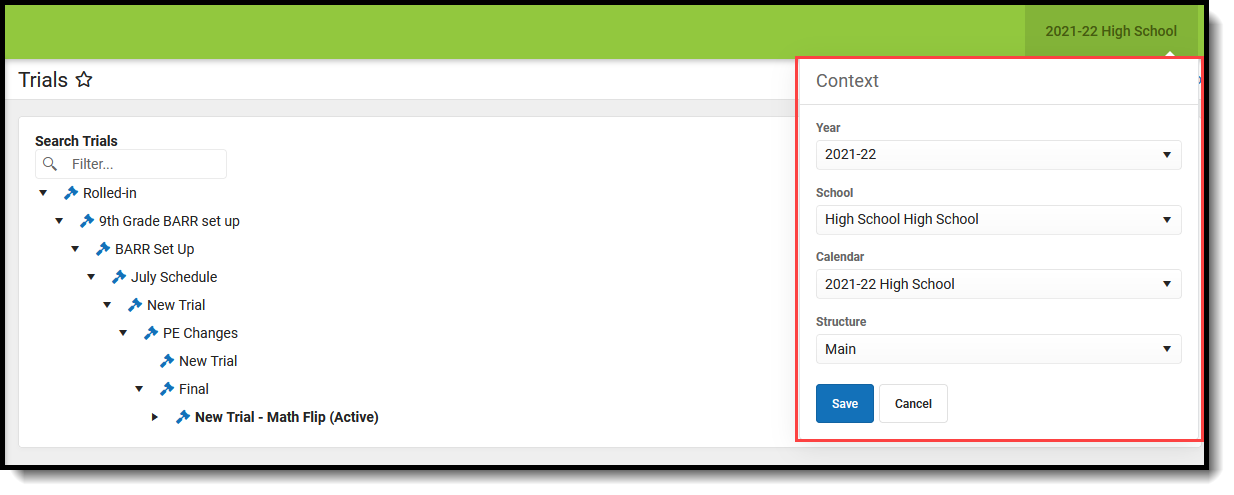
When viewing the Trials from within Campus (NOT from the Schedule Wizard), a list of each trial displays for the selected Year, School, Calendar, and Schedule Structure. These options must be selected in order to display the list of trials.
Context Selection
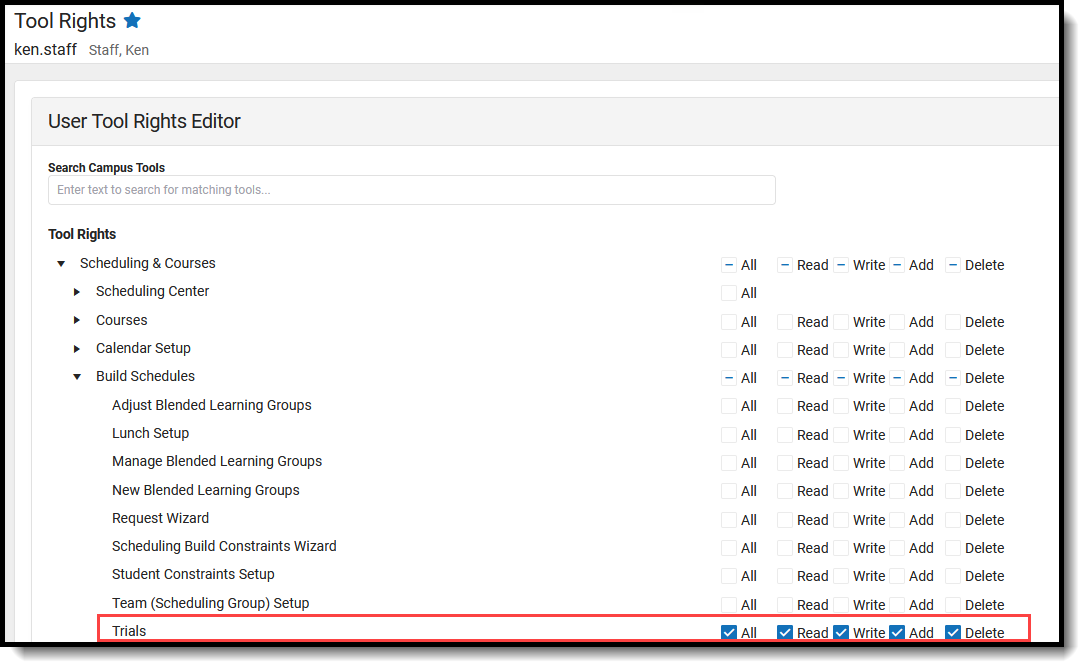
Tool Rights
For full access to Trials, users must be assigned RWAD rights to Scheduling > Trials.
Read rights allow users to view the list of Trials.
Write rights allow users to view the list of Trials, edit Comments for the Trial and modify the Locked checkbox.
Add rights allows the same access as Write rights.
Delete rights allows users to delete the selected Trial. Note that deleting an active Trial is not allowed, and a Trial cannot be deleted when it is locked.
Trials Tool Rights
Trials Navigation
This Trials tool should be considered read only. Most of the information tied to Trials is managed in the Schedule Wizard and changes to courses and related information is done there.
Use the Search Trials filter to locate a specific trial without searching through a long list of trials. The list of trials is filtered to match the entered text.
Search Trials Filter
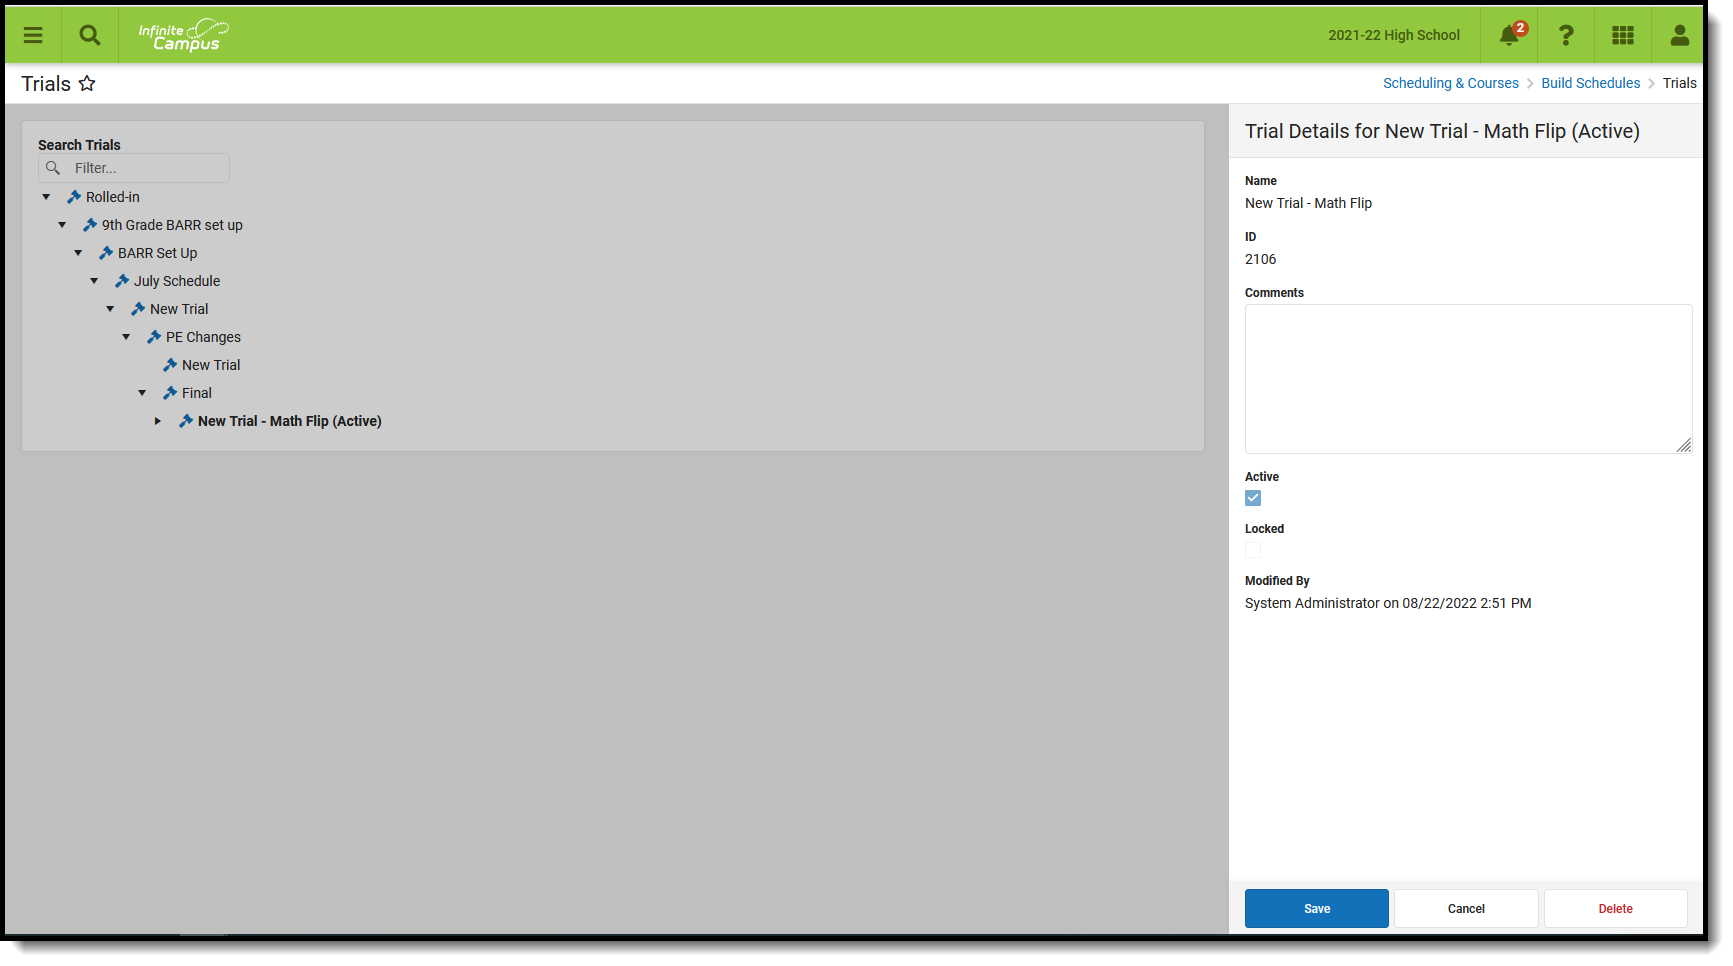
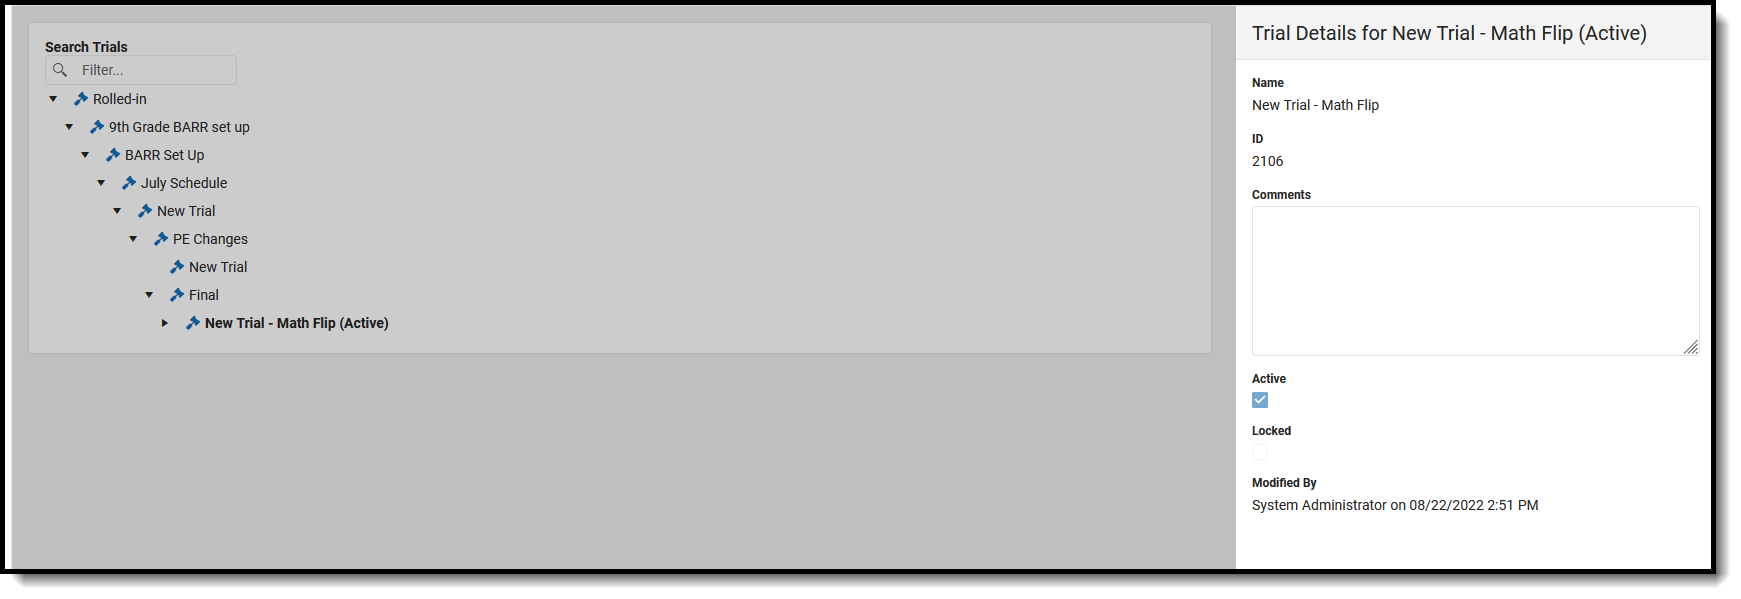
Select a Trial and view details about it. A side panel displays with the following information:
The Name of the trial. The name can be simple, like Trial 1, or 1A, etc. It can also provide information on what was done to the courses, like Math First or Re-Organizing Activities.
The Trial ID, which cannot be modified but is used to address any issues with the trial behind the scenes.
Any Comments that were entered for the trial - e.g., what school it applies to, why it was created.
Modified By information, which lists the staff person who created it and when it was created. (date and time)
Indication of the trial being the Active trial. Active trials display in the list of trials in bold with the word 'Active' in parentheses, and cannot be deleted as those trials hold all of the course information for the selected school year.
Indication of the trial being Locked, meaning changes cannot be made to it as someone is currently working in that trial.
Trials Side Panel
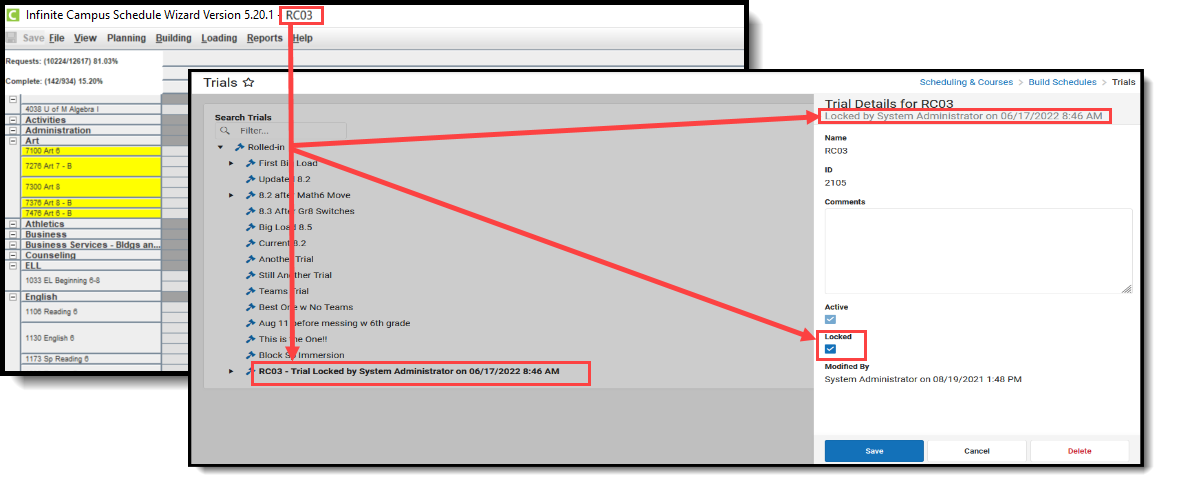
Locked Trials
When users are working in the Schedule Wizard, those with access to view Trials in Campus can see who is currently working in trials. The name of the user displays next to the trial and the Locked checkbox is marked. No other users can access this trial when it is locked.
Locked Trial Display
If the person who was in the trial forgets to unlock it (save trial changes) or does not exit the Schedule Wizard, an administrator can unlock the trial from here by removing the Locked checkmark and clicking Save. This opens the trial up for additional changes in the Schedule Wizard.
Video
Staff Planner
After the calendars for the upcoming school year have been created, enrollments rolled forward and student requests entered, staff information and student constraints can be entered. These things should be completed prior to entering course planner information.
Set Values, Restrictions And Constraints
Description of the topic. Example: Attendance for individual students can be entered and edited from this location.
Documentation
Video
When creating a new schedule, the Staff Planner tool allows users to set up teacher to course, teacher to room, and teacher placement constraints. This video demonstrates how to do so.
Edit Teacher Course Load
The Staff Planner grid may be used to edit teacher course load information.
Video
This video explains how to use the Staff Planner grid to edit a teacher's course load information as well as what the different fields of the grid represent.
Course Planner
The Course Planner uses requests to determine how many sections of each course are needed and compares these numbers to last year's to see how staffing needs may be impacted. The Course Planner can then be used to modify other settings such as course constraints, room placement and teacher assignment.
Values, Restrictions, Constraints And Parameters
The Course Planner can be used to modify other settings such as course constraints, room placement and teacher assignment.
Documentation
Video
The course planner allows users to mass edit values, restrictions and constraints in the Scheduling Wizard. This video demonstrates how to use the course planner tools to set values, restrictions and constraints.
Video
The Course Planner allows the user to view and manage all the course data, requests from the walk in scheduler, section information and constraints that exist. This video demonstrates how to use the course planner.
Rules, Constraints And Placement Restrictions
Constraints On Selected Course
The Course Planner can be used to adjust an individual course's scheduling constraints.
Video
The rules and constraints on the course planner allow users to select specific rules, teachers, rooms or to block out periods where course sections should not meet. This video demonstrates how to manage rules and constraints for a selected course.
Student-to-Student Placement Restrictions
The Student Constraints tool is used to restrict particular students from being placed in the same course section with each other.
Documentation
Video
The Student Constraints tool is used to create restrictions between students. This video demonstrates how to prevent students from being scheduled in the same section with both strict and non-strict constraints.
Configure Loading Preferences
Schedule Builder Configuration
The Schedule Wizard includes tools used to build, unbuild and configure parameters for building the master schedule.
Documentation
Video
The Builder Configuration tool in the Schedule Wizard helps to determine how course sections will be built when we run a full build in the Wizard. This video explains how to use this tool.
Request Loading And Preferences
Preferences can be set that impact how requests are handled during the loading process.
Documentation
Video
This video explains how to use the Autoloader configuration tool in the Schedule Wizard, which gives users the ability to configure preferences for loading student requests prior to running the Schedule Wizard.
Section Balancing Configuration
The Section Balancing Configuration tool allows the scheduler to prioritize several different factors the loader uses to balance how students are placed into sections.
Video
The Section Balancing Config tool in the Schedule Wizard allows users to set preferences for balancing course sections with regards to total number of students, student gender balance, minority balance, behavior event balance, and special ed balance.
Build And Load
Build And Retain Sections
Schedule building tools use the information entered in the Course and Staff planner to build out the course and section display on the Schedule Wizard whiteboard.
Documentation
Video
Using the Schedule Wizard, course sections can be added or deleted manually or automatically. This video demonstrates the different ways to build and edit courses in the Schedule Wizard.
Load And Retain Sections
Schedule building tools use the information entered in the Course and Staff planner to build out the course and section display on the Schedule Wizard whiteboard.
Documentation
Video
The Schedule Wizard can be used to load and retain student course requests when building a master schedule. This video demonstrates how to do so.
Other Scheduling Tools
Once the trial that best satisfies student requests has been determined, other tools can be used to adjust or complete student schedules.