Advanced assignment tools are available as part of the Campus Learning premium offering and require the Enhanced Curriculum Editor tool right, including the Summary, Attach Content, and Add a Task areas of the Assignment editor.
Location: Click Add or List button in tools throughout Instruction, including Grade Book, Planner > My Planner, Assignment Overview, and Progress Monitor
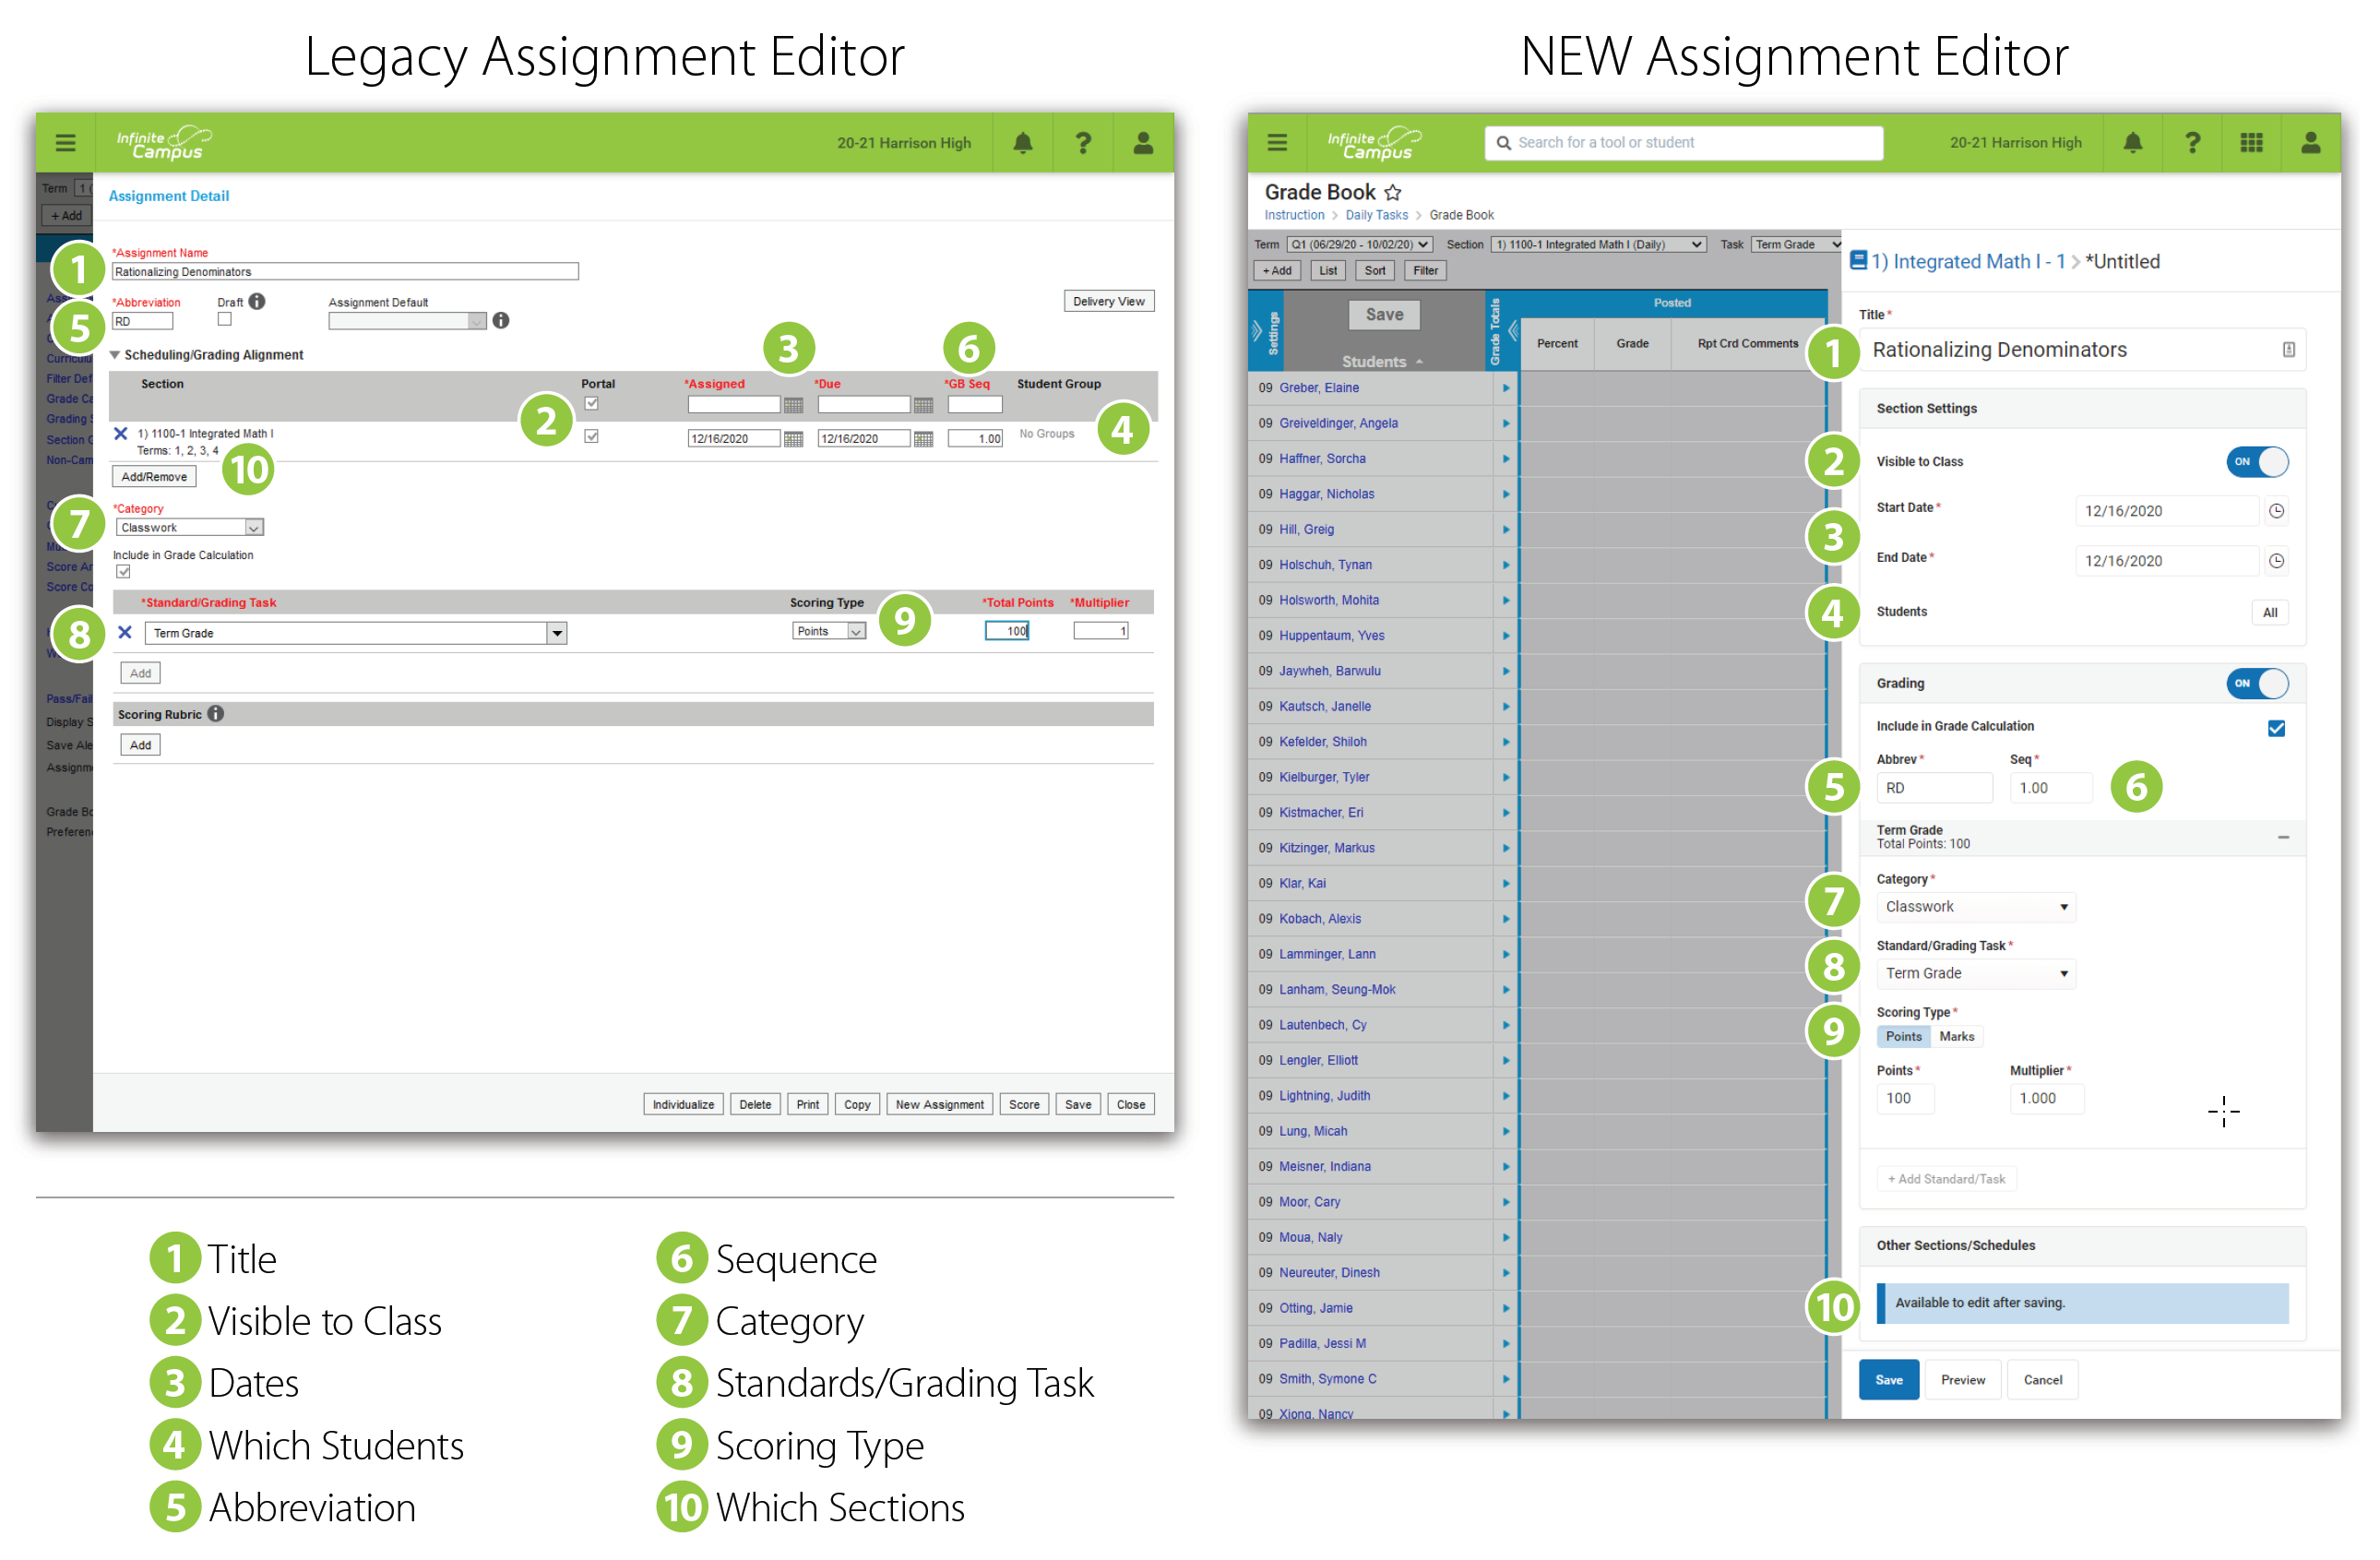
Access assignments in various places throughout Instruction. Regardless of what tool you're in, the editor looks the same.
Available Actions
CreateCreate an assignment or resource anywhere you see an Add button (in the Planner, it's called New)
Click +Add to add an assignment, or click the arrow on the right of the button to add a Folder or a Resource, or to add an assignment starting with a Discussion, Quiz, or Submission.
Categories must exist before assignments can be created. |
ModifyTo modify an assignment, open it by clicking the name or abbreviation and then click the Edit button
Click Edit to modify the item, or click the arrow on the right of the button to move the assignment to a different folder or delete it.
When editing an item that is in multiple sections, you'll have the option of whether changes should be made to all instances or just the current one. |
Access to assignments requries tool rights to a grading tool, such as Grade Book, Planner, or Progress Monitor. Additionally, the Enhanced Curriculum tool right in Additional Access Rights > Instruction Tools grants access to advanced assignment options.
See the Instruction Tool Rights article for more information.
Other Edit Options
Click the arrow next to the edit button to access other options:
| Duplicate | Move | Delete |
| Creates a duplicate of the current item. | Allows you to select a different parent folder in the curriculum structure. | Removes the current item. Be aware that deleting an assignment cannot be undone, even one with submissions or scores. |
Everything moved, help!
Recent improvements included redesigning the assignment editor. But don't worry, it's the same fields, just in different places. Expand below for a comparison of the old assignment editor and the new one:
What are Resources?
| Resources are, essentially, assignments that will not be scored. They allow teachers to share information with parents and students within the context of section curriculum.
When creating an item, toggle Grading on to make it an assignment, or off to make it a resource. Because resources are not scored, they do not display in the Grade Book.
|
 |
Resources can be grouped within whatever folder structure you use to manage your curriculum. Consider creating a Course Resources folder to collect section-wide or often used materials, such as a syllabus.
Content, Details, and Reflections
Assignments and resources are made up of three tabs:
- Content: Information such as Dates, Grading, and the content of the assignment. This article describes this tab.
- Details: Metadata used when sharing curriculum to the Curriculum Library. See the Curriculum Details article for more information.
- Reflections: Records of how curriculum was used in your class. See the Reflections article for more information.
Areas of the Editor
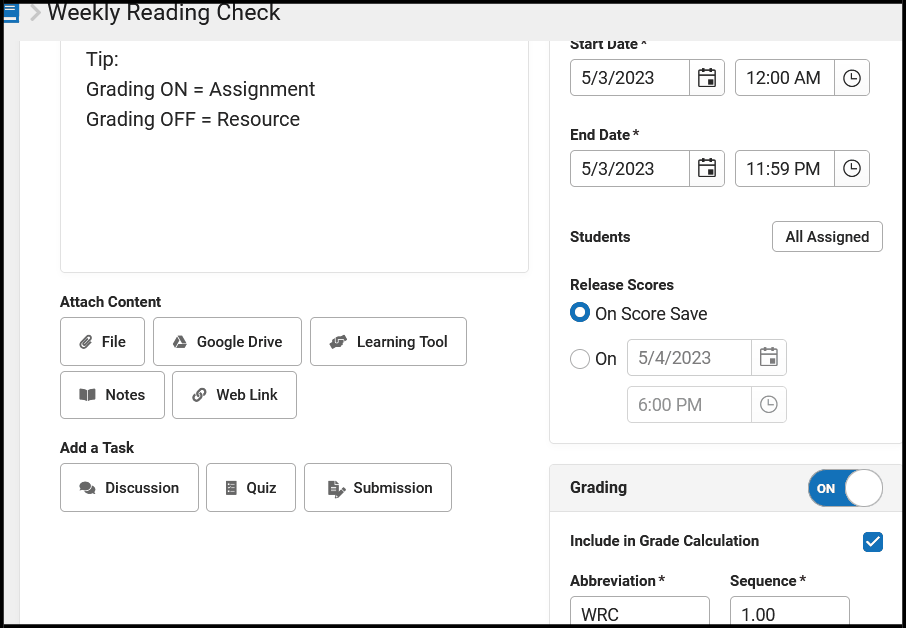
Every assignment or resource needs a Title. Let's walk through each of the sections in the assignment editor:
In a hurry? Don't have Campus Learning or the Enhanced Curriculum Editor tool right? See The Basics: Assignments. |
Section Settings
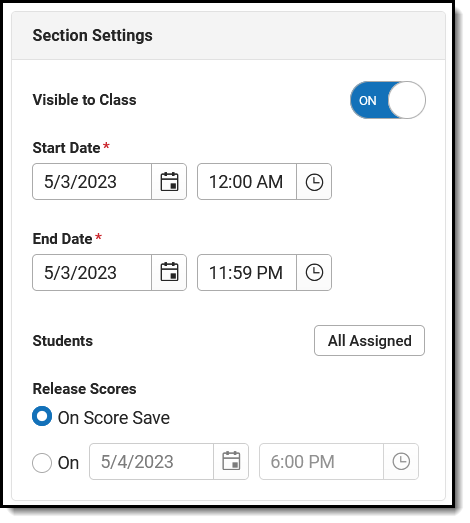 |
Visible to Class indicates if this item is visible on Campus Student and Campus Parent. Click the Preview button at the bottom of the editor to see what the assignment will look like for parents or students.
Start and End Dates default to today. Click the date to type or select another day. To set both dates easily, click the date to open the calendar, then click the Start Date you want and then the End Date, without closing the calendar. Dates are not required if Grading is toggled off. For the most part, dates are informational, but they do control the following:
|
To enter a time, such as for a quiz only available during a class period, click the clock icon. By default, an assignment is available to all students in a section. To change this, click the All Assigned button next to Students. From here, select an existing student group or use the Assigned checkboxes to indicate which students should be assigned. All students not assigned will be marked as Exempt on the assignment. Campus Learning customers can also individualize dates for students. See the Individualized Assignments section for more information. The Release Scores setting determines when an assignment's score will be visible to parents and students. Leave the On Score Save option selected to keep scores visible as soon as they are entered. Or select a date for Release Scores On to schedule when scores will be made available to parents and students. This date must be after the End Date entered for the assignment. See the Release Scores article for more information about this option. | |
Grading
If Grading is toggled on, you're working on an assignment. If Grading is off, it's a resource. Include in Grade Calculation is marked by default - unmark this checkbox if the assignment will be scored but that score should not be included when calculating grades, such as for a practice test. If not marked, the assignment displays with an * in scoring screens like the Grade Book and Progress Monitor.
The Abbreviation for the assignment populates as you enter a title. The Sequence defaults to 1. Modify if desired, up to 7 digits: XXXXX.XX. The abbreviation is used to identify assignments in the Grade Book and the sequence is used to sort.
Grading alignments display in collapsible sections, with basic information in the heading.
Select a Category for the assignment. Categories are groupings of related assignments, such as Homework or Formative. If Default Scoring options are setup for a category, the Scoring Type, Points, and/or Multiplier may auto-populate based on the category selected. These details are still editable. See the Categories article for more information. Standards and Grading Tasks are item to which grades are posted. The Standard/Task of your current context, such as what's selected in the Grade Book, is selected by default. Only alignments available in your current section display.
Select a Scoring Type to indicate how the assignment will be scored. Options are: |
 Select applicable grading information for the assignment.
|
If desired, change the Multiplier if using points or marks, which determines how the assignment affects students' grades. For example, a 50 point assignment with a Multiplier of 2 counts as a 100 point assignment.
Add additional scoring alignments by clicking Add Standard/Task. Multiple alignments are most commonly used in standards-based grading, where a single assignment may demonstrate mastery in multiple standards.
The Add Scoring Rubric button displays for Campus Learning users who have the Enhanced Curriculum tool right. Scoring Rubrics allow teachers to communicate expectations for assignments with students and evaluate how well student work met those expectations. See the Create Scoring Rubrics article for more information. | |
Other Sections/Schedules
Adding an assignment to other sections is only available once the assignment has been saved.

To add the assignment to other sections, click Add/Edit and then the Add Sections button:
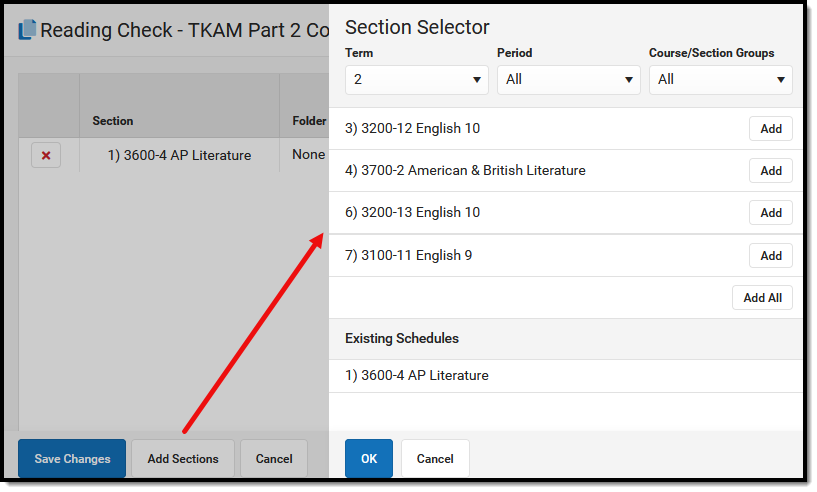 Add the assignment to other sections you teach.
|
Filter this section list by Term, Period, or Course/Section Groups at the top.
Click Add next to any section to add it to the assignment.
Any sections that already include this assignment are listed at the bottom in Existing Schedules.
Click OK when finished.
| |
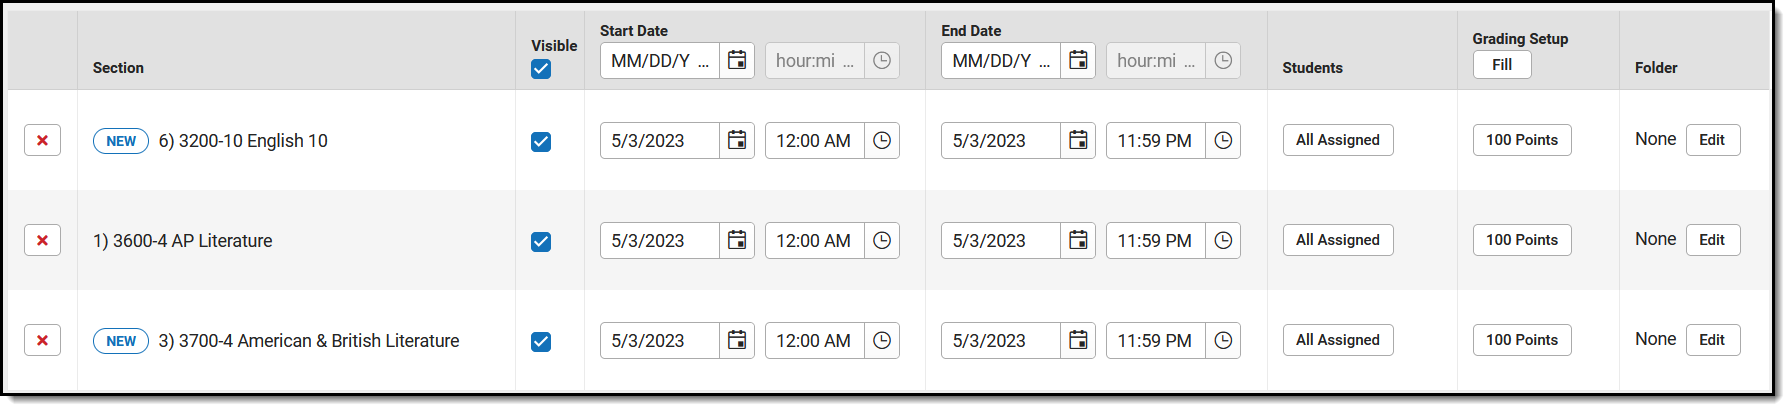
Once added to the list, make any needed updates to each instance of the assignment, including the Folder (Campus Learning only), whether it's Visible on Campus Student & Parent, the Start/End Dates, and the Grading setup. By default, these fields match the original assignment.
Click the red X next to a section to remove the assignment from it. Sections cannot be removed if the assignment has already been scored.
Note: Previously, assignments had to have the same grading setup across sections. In the new assignment editor, grading setup can be different in each instance of the assignment, including the task/standard, the category, and the scoring information.
Click the blue scoring link ("100 points" in the example image above) to view and modify Grading information for that instance.
Click Save Changes when finished. The Other Sections/Schedules area now lists other sections that include this assignment. | ||
Advanced Features
If your district has Campus Learning and has given you the Enhanced Curriculum Editor tool right, additional features display for assignments and resources.
Summary & Notes
The Summary is a text field where you can enter any information about the assignment that would be helpful to students, such as instructions, objectives, and lesson materials.
- Format the text as desired, including bold/italics, text colors, or bullets and numbering in the
 menu.
menu. - You can also add links, tables, images by clicking those icons in the editor.
- Click the equation button to build a math equation using common mathematical operators, characters, and formulas.
- Click the + button to see options for embedding videos, special characters, or any other embeddable content enabled by your district.
 menu.
menu. Content in the Summary panel displays for students and parents (if the assignment is Visible) just as you see it here in the editor.
Notes are additional text fields, which can be helpful for grouping entered content, slotting text between other attachments and tasks, and adding information that is only visible to other teachers.
| Adding Images To add an image, click the  and select a method for attaching an image: and select a method for attaching an image:
|
 |
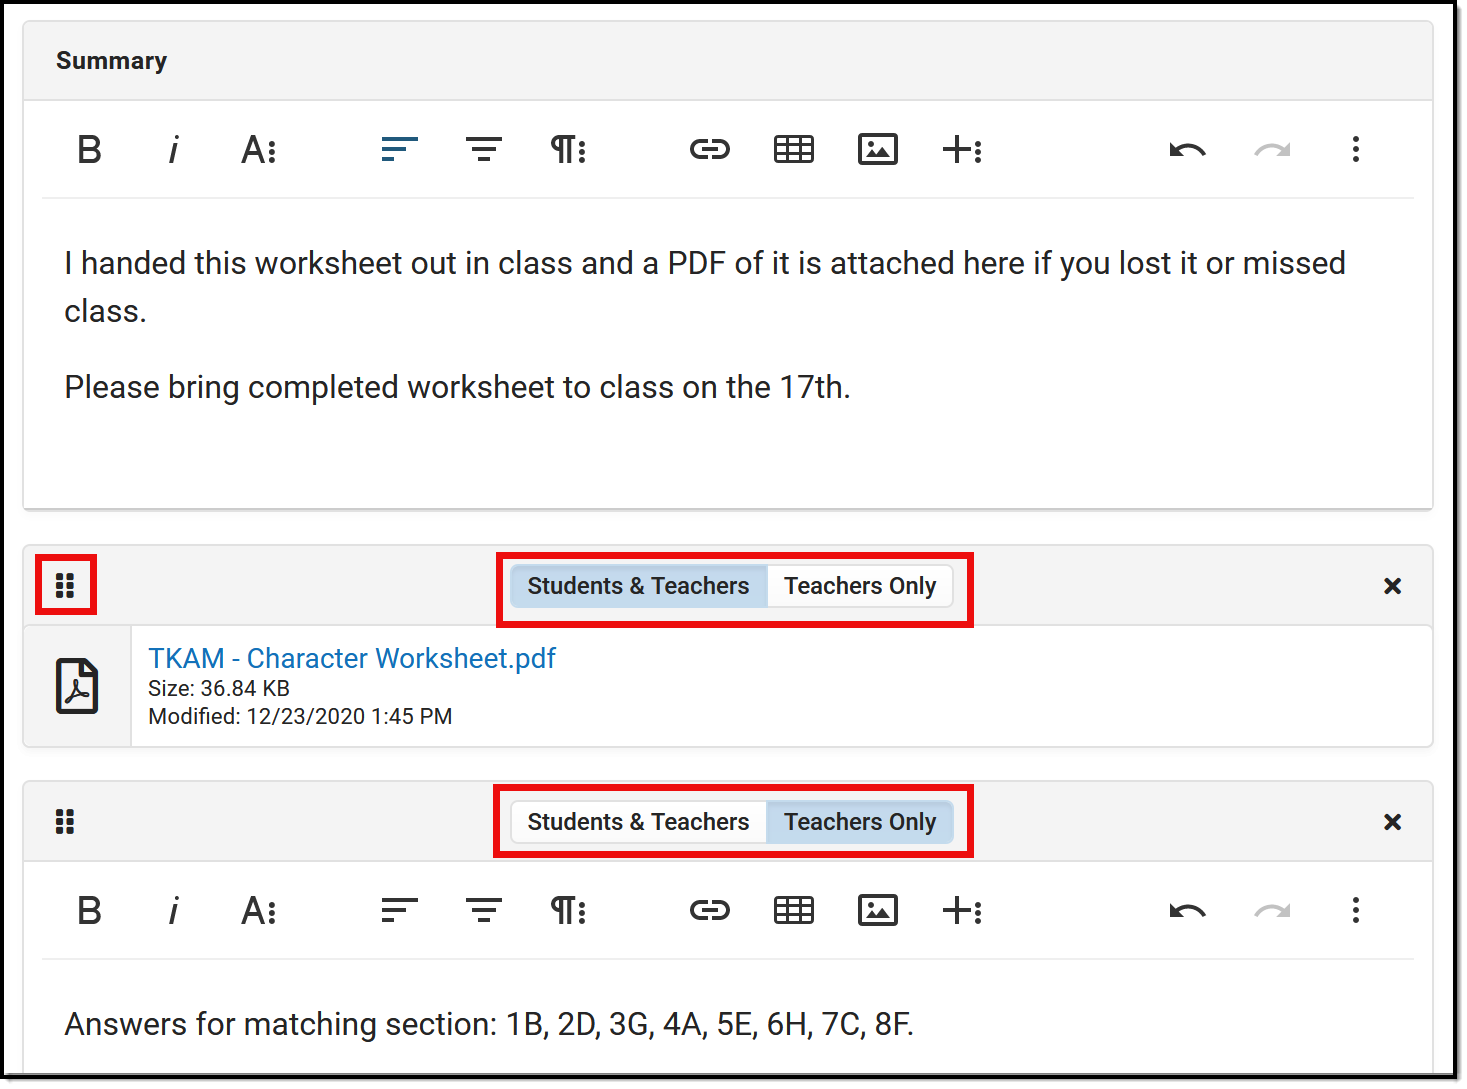 |
The Summary always displays above any additional content added to the assignment, such as files or notes.
If multiple attachments, notes, or tasks are added below the Summary, they can be rearranged by clicking the dots icon in the top left corner and dragging the segment into the desired order.
The Summary is visible to anyone who can see the assignment. Other attached content and notes can be visible to Student & Teacher or to Teachers Only, which may be a helpful option for content such as an answer key.
Click the Preview button at the bottom of the editor to see how the assignment will appear for students. |
Attach Content
Various options may be available in the Attach Content section, based on your district/schools setup. Options include:
Add a Task
Additional tasks can be aligned to an assignment or resource. Check out the following articles for more information:
'About' Section
The About section on an assignment, resource, or folder houses the metadata used to identify curriculum in the Curriculum Library.
This section includes the following fields:
|  |
Individualized Assignments
Individualizing assignments allows teachers to specify which students receive an assignment and each student's Start and End Dates. Assignments can be assigned to select students, as in the case of remedial or advanced work. Start and End Dates can also be individualized to give students the time they need to complete assignments. Quiz timers can also be individualized.
See the Individualized Assignments for more information.