Tool Search: Credit Group Setup
Credit Groups define the type of credits earned by students. These credits are counted on transcripts and are used to track a student's progress toward graduation. A Credit Summary that shows the number of credits attempted and earned for each credit type defined in the credit group displays at the bottom of printed student Transcripts. The Credit Summary tool also displays the number of credits a student has earned for each credit type in a credit group.
See the Reference section for more information about Credit Groups and how they are used in Campus.
If you are using the Academic Planning functionality, see the Best Practices section.
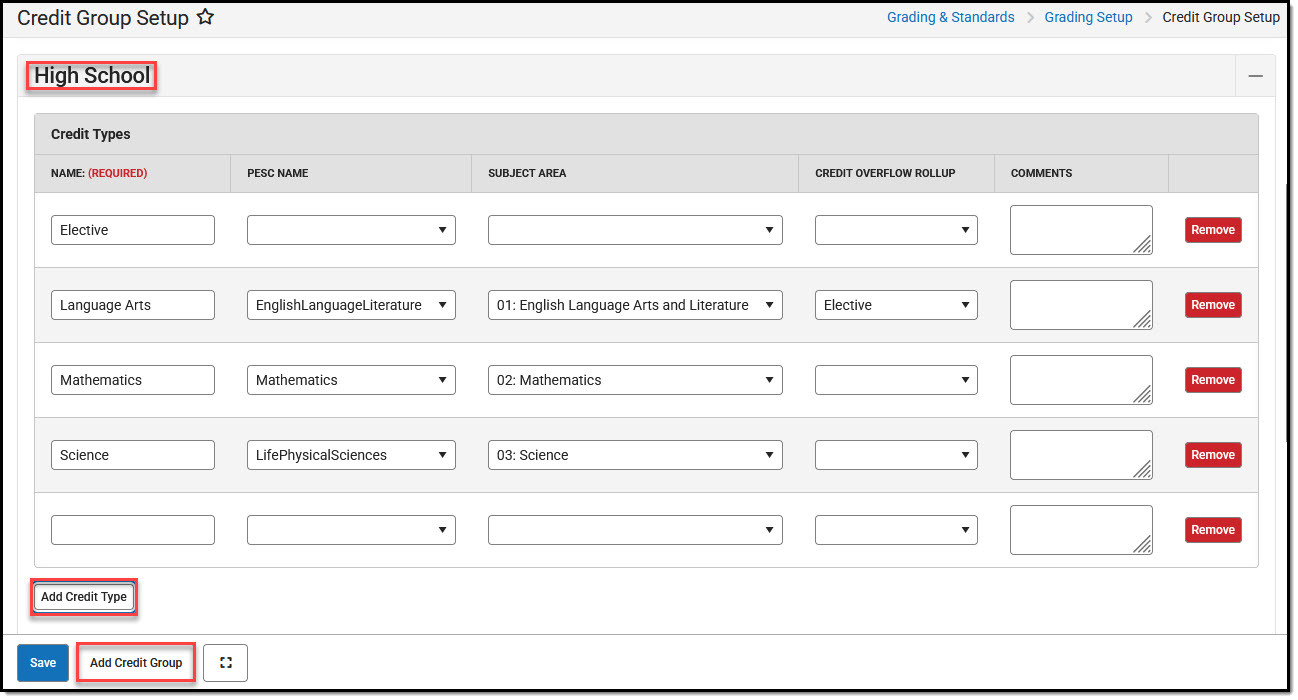 Credit Group Setup
See the Grading Setup Tool Rights article to learn about rights needed to use this tool.
District Edition
See the Credit Group Fields section for details about what each field in the editor represents.
 District Edition - Add/Edit Credit Group
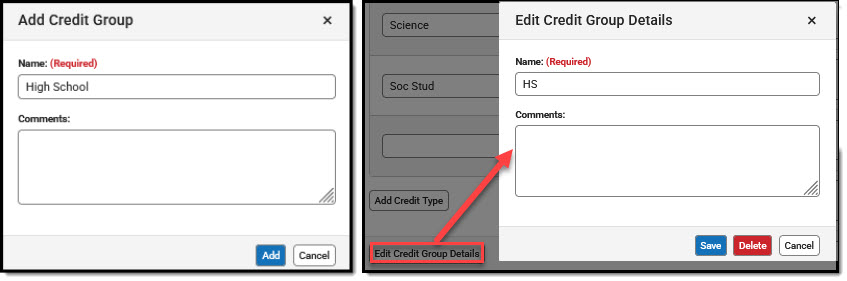
Add Credit Groups
- Click the Add Credit Group button to display the Add Credit Group editor.
- Enter the Name of the Credit Group.
- Use the Comments text field to enter information about the Credit Group if necessary.
- Click Add to save and add the new group to the list of credit groups.
Edit Credit Group Details
- Select an existing Credit Group.
- Click the Edit Credit Group Details button.
- To change Group details: edit information (group name, comments) and Save.
- To remove the group, choose Delete. Deleting a Credit Group also deletes the Credit Types associated it. They cannot be recovered.
- To exit the editor without saving, choose Cancel.
Add/Remove Credit Types
- Select the Credit Group you want to work with.
- Click the Add Credit Type button.
- Enter the Name of the Credit Type.
- Select the PESC Name from the dropdown list if desired.
- Align the credit type to a Subject Area, if appropriate.
- Select a Credit Overflow Rollup option if appropriate for any credit type. Excess credits a student earns for a credit type will flow into the Rollup credit type.
- Enter Comments about the credit type if you wish.
- The Remove button can be used to remove a credit type from the list.
- Click the Save button to finish creating the type.
State Edition (State Level)
State Edition customers may choose to create Credit Groups at the State level and publish them to districts.
 State Edition (State) - Add/Edit Credit Group
Add Credit Groups (State)
- Click the Add Credit Group button to display the Add Credit Group editor.
- Enter the Name of the Credit Group.
- Use the Comments text field to enter information about the Credit Group if necessary.
- Click Add to save and add the new group to the list of credit groups.
Edit Credit Group Details (State)
- Select an existing Credit Group.
- Click the Edit Credit Group Details button.
- To change Group details: edit information (group name, comments) and Save.
- To remove the group, choose Delete.
- Deleting a Credit Group also deletes the Credit Types associated it.
- Deleting a Credit Group at the State level deletes the mappings at the district level.
- There is no need to Publish after deleting a Credit Group.
- To exit the editor without saving, choose Cancel.
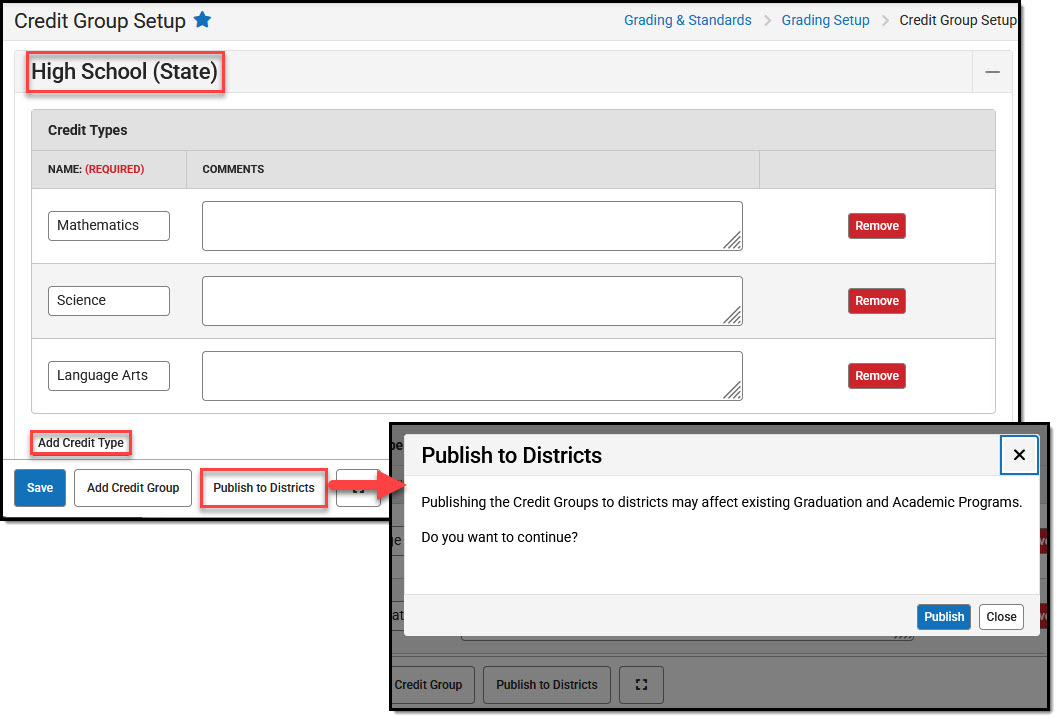 Add Credit Type/Publish to Districts
Add/Remove/Publish Credit Types (State)
- Select the Credit Group you want to work with.
- Click the Add Credit Type button.
- Enter the Name of the Credit Type.
- Enter Comments about the credit type if you wish.
- The Remove button can be used to remove a credit type from the list.
- Click the Save button to finish creating the type.
- Select Publish to Districts to make the credit group immediately available to districts for alignment to local Credit Types.
Publishing edited credit types may impact existing Graduation and Academic Programs. For example, if a Credit Group is republished with a Credit Type removed that had been used in a program's criteria, that criteria will no longer be valid.
State Edition (District)
State Edition customers creating Credit Groups at the District level must align their credit types correctly to those in State level credit groups in order for state managed Academic and Graduation Programs to function properly.
 State Edition (District) - Credit Group/Type
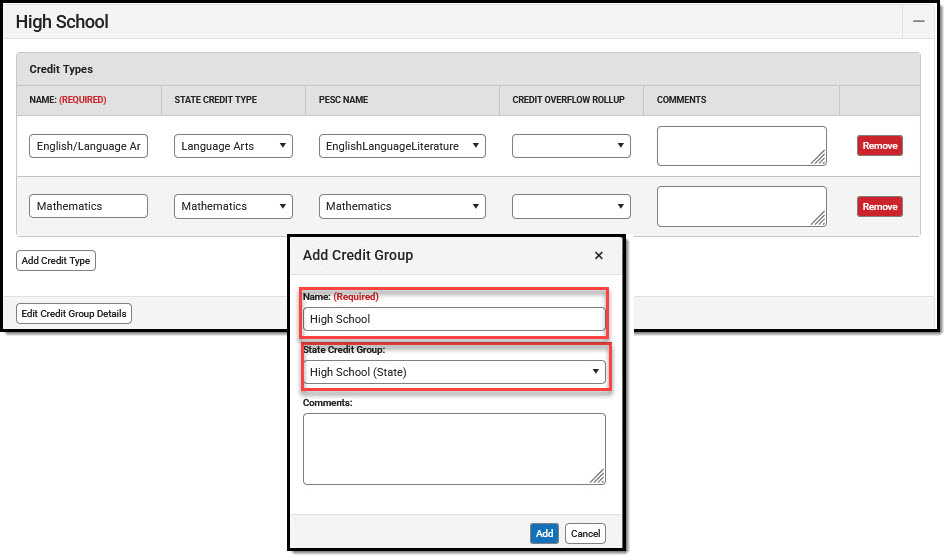
Add Credit Groups (SE-District)
- Click the Add Credit Group button to display the Add Credit Group editor.
- Enter the Name of the Credit Group.
- Select the State Credit Group to which this group is aligned.
- Use the Comments text field to enter information about the Credit Group if necessary.
- Click Add to save and add the new group to the list of credit groups.
Edit Credit Group Details (SE-District)
- Select an existing Credit Group.
- Click the Edit Credit Group Details button.
- To change Group details: edit information (group name, comments) and Save.
- To remove the group, choose Delete. Deleting a Credit Group also deletes the Credit Types associated it. They cannot be recovered.
- To exit the editor without saving, choose Cancel.
Add/Remove Credit Types (SE-District)
- Select the Credit Group you want to work with.
- Click the Add Credit Type button.
- Enter the Name of the Credit Type.
- Select the State Credit Type to which the local Credit Type is aligned.
- Select a Credit Overflow Rollup option if appropriate for any credit type. Excess credits a student earns for a credit type will flow into the Rollup credit type.
- Enter Comments about the credit type if you wish.
- The Remove button can be used to remove a credit type from the list.
- Click the Save button to finish creating the type.
Reference
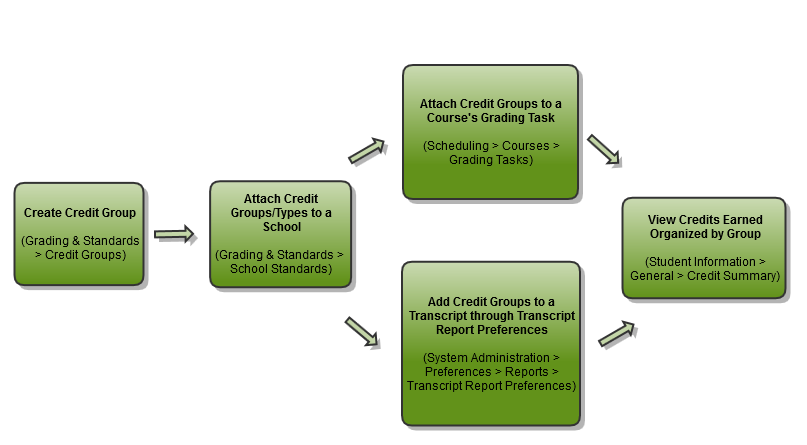
Credit Groups/Types in Campus
- Credit Groups are attached to a School on the
School Standard Setup tool, which alphabetically lists all Credit Groups and Standards Groups. If a School is selected in the Campus toolbar when you create a Credit Group, that group will be marked by default on that school's School Standards tab.
- If a Credit Group is NOT marked on the School Standards tab for ANY school, the Credit Group is considered inactive. Any scores on the student's Transcript associated with an inactive credit group will display as such in the Transcript Credit Editor when entering a new transcript entry or editing an existing entry. The word INACTIVE is displayed only behind the name of the Credit Group; the transcript does not print this word.
- Credit Types are attached to Grading Tasks when aligned to Courses. The number of credits earned for that Grading Task is also indicated.
- Credit Groups can be included in Transcripts by selecting the appropriate checkboxes when creating the Transcript Report Preferences. Credit Groups do not need to be selected for a specific School to be added to a Transcript Report.
- Credit Groups are used in Academic Planning (Student Information) to define required credits and indicate a student's progress toward completing an academic program.
- The student Credit Summary tab organizes the number of credits the student has earned in each Credit Group and Credit Type. To be included on this tab, Credit Groups must be selected in the Transcript Report Preferences AND scores posted to the Grading Task that includes the Credit Group.
 Credit Groups and Credit Types in Campus
Credit Groups vs. Credit Types
Credit Groups are buckets of credit types. They help organize the credit types. A Group might be high enough to be at the school level—High School, Middle School, etc. This setup would create a credit type for each area where students receive credit—History/Social Studies, English, Science, Mathematics, etc.
A Credit Group must be created before Credit Types can be added to it.
Credit Group Fields
| Field | Description |
|---|---|
| Name | Displays the name of the credit group/type. |
| State Credit Type(State Edition only) | This droplist contains state credit types that have been published for districts to align to their own credit types. Districts must do this in order for Academic and Graduation Programs managed by the state to function properly when assigning credit types. |
| PESC Name | PESC Standards are used in the eTranscript process to validate transcript records. See the eTranscript article for more information.
If your district uses the eTranscript functionality, a value from this dropdown must be populated. |
| Subject Area | The general area of instruction addressed in the course. |
| Parent Group | The selection indicates the credit group associated with this new credit type.
Leave the Parent Group field blank when creating a group. This field is only populated when creating a type. |
| Credit Overflow Rollup | This section indicates where the student receives credit when the student has met the credit requirement of the designated credit type and where the additional credit should now be placed. For example, a student takes 4 years of Math, and only 3 years are required. The additional credit earned will overflow to Electives. Infinite Campus supports n-tiers of credit roll-ups, so Math can roll up to Academic Electives, which roll up to General Electives.
This should only be populated on Credit Types.
Logic exists to eliminate the possibility of users creating an infinite loop of credit overflow assignments. For example, History Course A overflows to Government and Government Course B overflows to History, a loop is created. To eliminate this, a validation exists when saving the entry to check for any potential loops that may occur. Users must change the selections that are causing the loops before saving.
See the Credit Overflow Rollup section for more information on how it relates to academic planning. |
| Comments | Enter any comments related to this new group or credit. |
Best Practices for Credit Groups and Credit Types
If you are using Academic Planning functionality:
- Set up a district-wide credit structure. This means all high schools within the district will have the same credit groups, and all middle schools that allow students to earn high school credits will have the courses aligned to high school credits. This structure also allows for a student's academic plan to be easily updated if he transfers schools within the district.
- Ensure Credit Types are granular enough to support all programs offered in the district. If a Credit Group is named High School, the Credit Types should be named according to each area of study where a student can receive credit. This granularity does not need to be at the grade level; it is just the topic of credit (i.e., English, Math, Science).
Credit Overflow Rollup
This is necessary if you are using Academic Planning.
The Credit Overflow Rollup field will redirect excess credits from the current credit type. Once the current credit type has met its credit requirements, any additional credits will be placed in the credit type designated by the Credit Overflow Rollup field value.
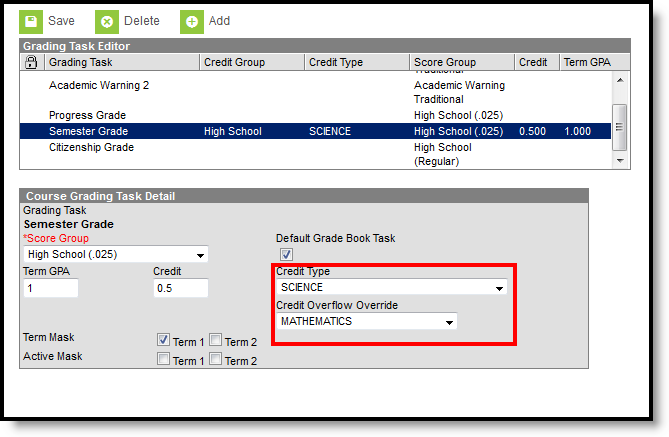
The Credit Overflow Override field is set for a single course Grading Task. It is used to roll credits when the current credit type has met its credit requirements. The credits from the course will first try to roll up to the override credit type. If that credit type has met its requirements, it will look at the overflow setup for the course's credit type.
Credit Overflow Rollup Example
Taking four years of math meets the state's credit requirement of three years. The extra credit is used to meet the elective credit requirement using the Credit Overflow Rollup field.
Campus supports n-tiers of credit rollups, so Math can roll up to Academic Electives, which roll up to General Electives. Campus also supports n-trees of credit rollups, so it is possible for Math to roll up to Academic Electives and then Physical Education to roll up to General Electives for two separate end buckets.
Credit Overflow Override in Practice
A particular course may be able to count towards more than one credit type. For example, a CTE course may fulfill a science or math credit. This course would be set up with its default credit type of Math and an override rollup credit type of Science.
If the student has completed their math requirement, this course would be counted as a science credit (only if a science credit was still needed). If both credit requirements were met, the default rollup would occur, likely going from math to elective credit.
 Course Grading Task Detail - Credit Overflow
Best Practices for Credit Overflow
- If a credit is moved from overflow in one credit type to another, and the second credit type is full, the credit keeps moving until a credit type is found that hasn't met the minimum credit amount or doesn't have the Credit Overflow Rollup set.
- The Grad Progress tool will display the correct credits for:
- each credit group total
- each grade level/credit group field
- each grade level total
- each overflow total
- and the overall total
- The Course Plan displays the correct credits for:
- each credit group
- each grade level
- each overflow credit that is counted in the correct credit group
- all completed courses
Set Credit Overflow Override
- Search for a Course and navigate to the Grading Tasks tab.
- Select the Grading Task where the student receives credit (usually a Semester or Trimester grading task)
- Verify the selected Credit Type is correct. If not, select the correct one
- Set the desired credit type option for the Credit Overflow Override field. This selection is used when the student receives credit if they have met the required credits.
State-Specific Information
Some states may require Credit Groups to be entered a certain way. Always follow those procedures.
