This article will guide you through the process of importing MTAS results into Campus. This process involves setting up a series of assessments which provide the foundation for mapping MTAS results so they can properly import into Campus.
The example layouts detailed below are based off layouts provided to us from Pearson and are intended for the Pre-ID files.
Step 1. Set Up Math MTAS Tests within Campus
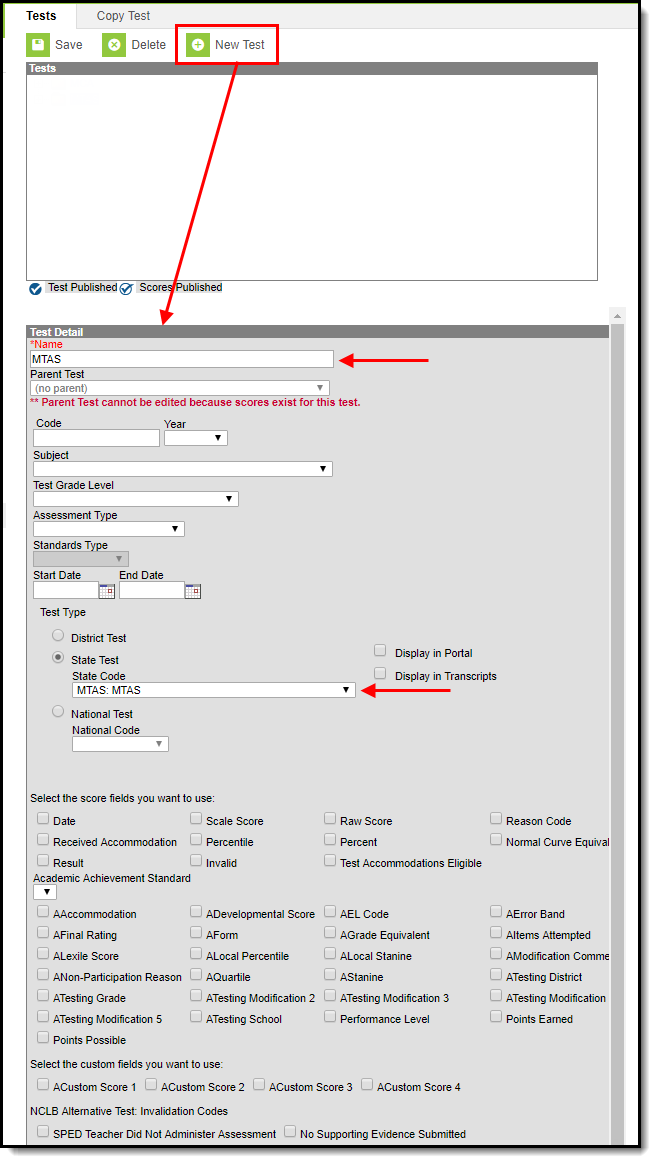
The first step to importing Math MTAS results is to create an MTAS parent test within Test Setup (Assessments > Test Setup). To create this test, click the New Test icon and enter the following values in the fields defined below.
| MTAS Parent Test | Field | Value |
|---|---|---|
| Name | MTAS |
| Parent Test | No Parent | |
| State Test | Selected | |
| State Code | MTAS: MTAS | |
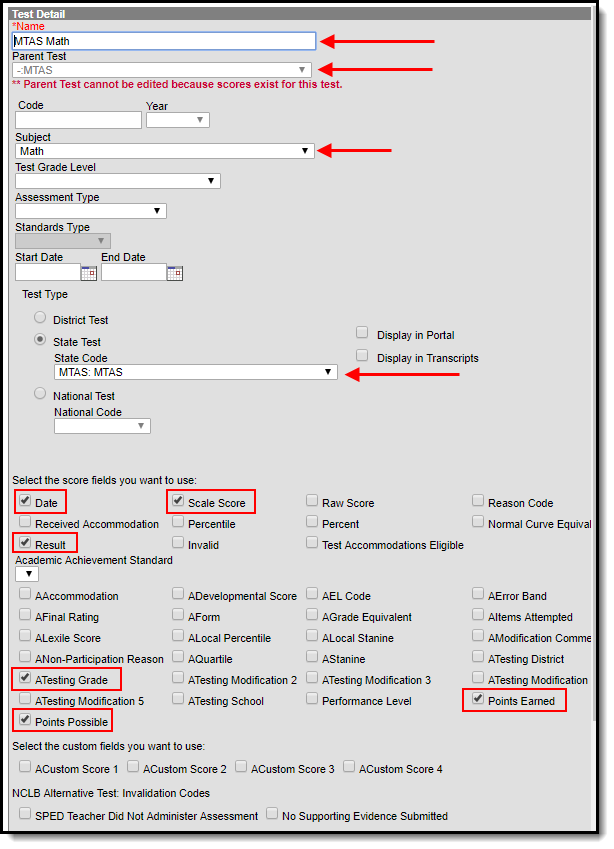
Now that a parent MTAS test has been created, we need to now create the MTAS Math parent test below the MTAS parent test. To create this test, click the New Test icon and enter the following values in the fields defined below.
| MTAS Math Parent Test | Field | Value |
|---|---|---|
| Name | MTAS Math |
| Parent Test | MTAS | |
| Subject | Math | |
| State Test | Selected | |
| State Code | MTAS: MTAS | |
| Date | Checked | |
| Scale Score | Checked | |
| Result | Checked | |
| ATesting Grade | Checked | |
| Points Earned | Checked | |
| Points Possible | Checked | |
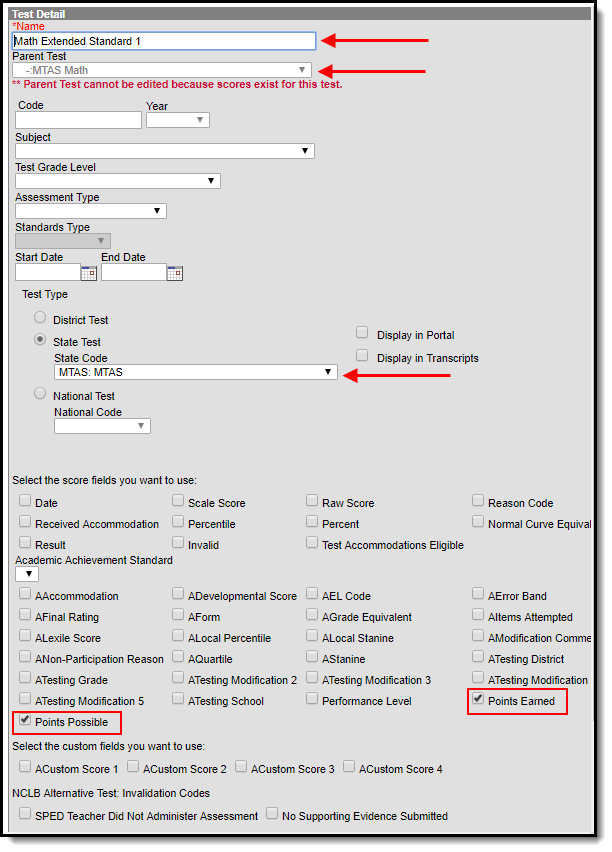
Now that the MTAS Math parent test has been created, we now need to create four extended Standard tests. To create this Standard test 1, click the New Test icon and enter the following values in the fields defined below.
| MTAS Math Extended Standard 1 | Field | Value |
|---|---|---|
| Name | Math Extended Standard 1 |
| Parent Test | MTAS Math | |
| State Test | Selected | |
| State Code | MTAS: MTAS | |
| Points Earned | Checked | |
| Points Possible | Checked | |
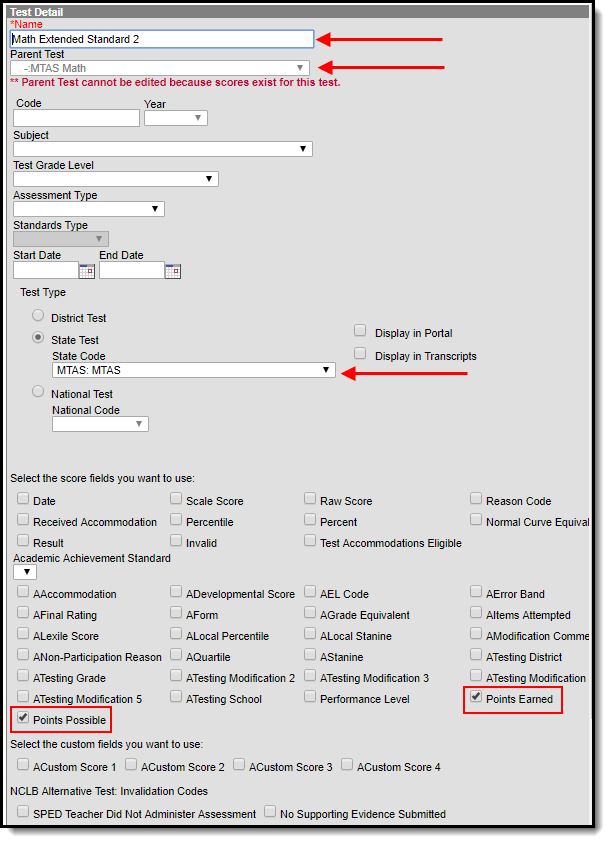
Standard test 2 now needs to be created. To create this test, click the New Test icon and enter the following values in the fields defined below.
| MTAS Math Extended Standard 2 | Field | Value |
|---|---|---|
| Name | Math Extended Standard 2 |
| Parent Test | MTAS Math | |
| State Test | Selected | |
| State Code | MTAS: MTAS | |
| Points Earned | Checked | |
| Points Possible | Checked | |
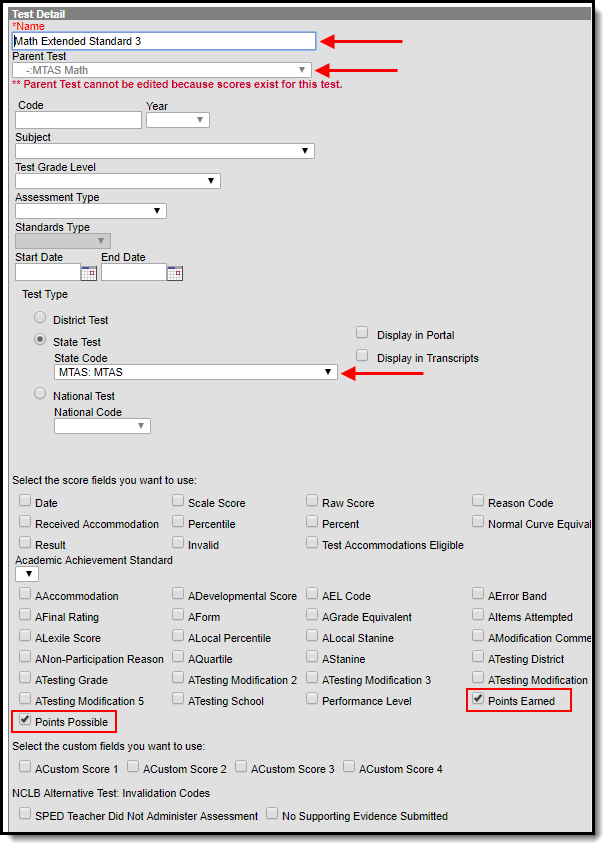
Now create Standard test 3. Click the New Test icon and enter the following values in the fields defined below.
| MTAS Math Extended Standard 3 | Field | Value |
|---|---|---|
| Name | Math Extended Standard 3 |
| Parent Test | MTAS Math | |
| State Test | Selected | |
| State Code | MTAS: MTAS | |
| Points Earned | Checked | |
| Points Possible | Checked | |
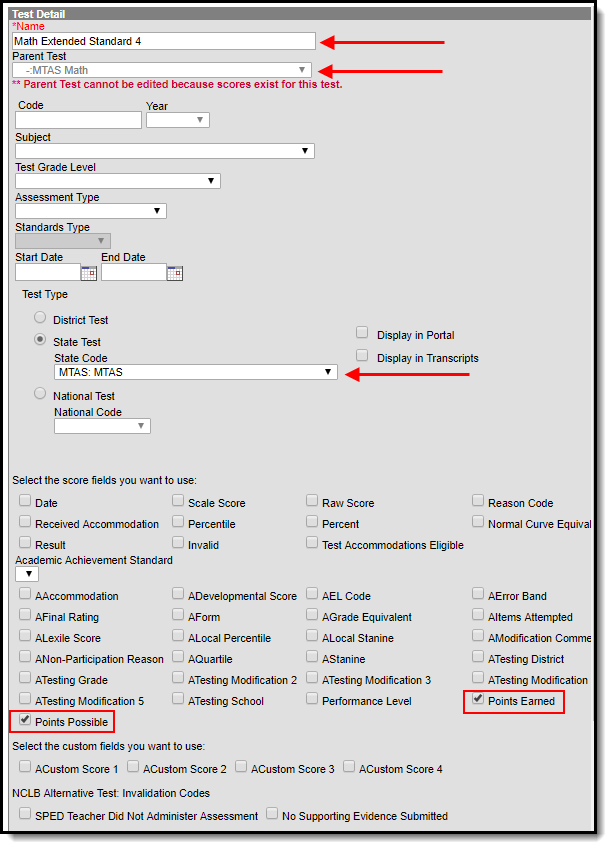
And finally, create Standard test 4. Click the New Test icon and enter the following values in the fields defined below.
| MTAS Math Extended Standard 4 | Field | Value |
|---|---|---|
| Name | Math Extended Standard 4 |
| Parent Test | MTAS Math | |
| State Test | Selected | |
| State Code | MTAS: MTAS | |
| Points Earned | Checked | |
| Points Possible | Checked | |
Once all MTAS math tests have been created, they should appear like the image below. Move onto Step 2.

Step 2. Set Up Reading MTAS Tests within Campus
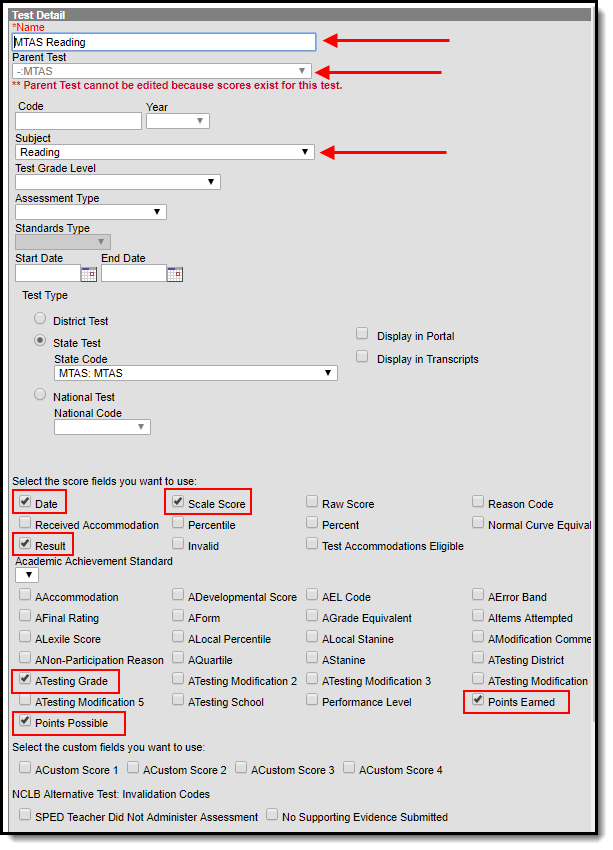
Just as we set up MTAS Math tests, MTAS Reading tests now need to be created in Campus. Create the MTAS Reading Parent Test by clicking the New Test icon and entering the following values in the fields defined below.
| MTAS Reading Parent Test | Field | Value |
|---|---|---|
| Name | MTAS Reading |
| Parent Test | MTAS | |
| Subject | Reading | |
| State Test | Selected | |
| State Code | MTAS: MTAS | |
| Date | Checked | |
| Scale Score | Checked | |
| Result | Checked | |
| ATesting Grade | Checked | |
| Points Earned | Checked | |
| Points Possible | Checked | |
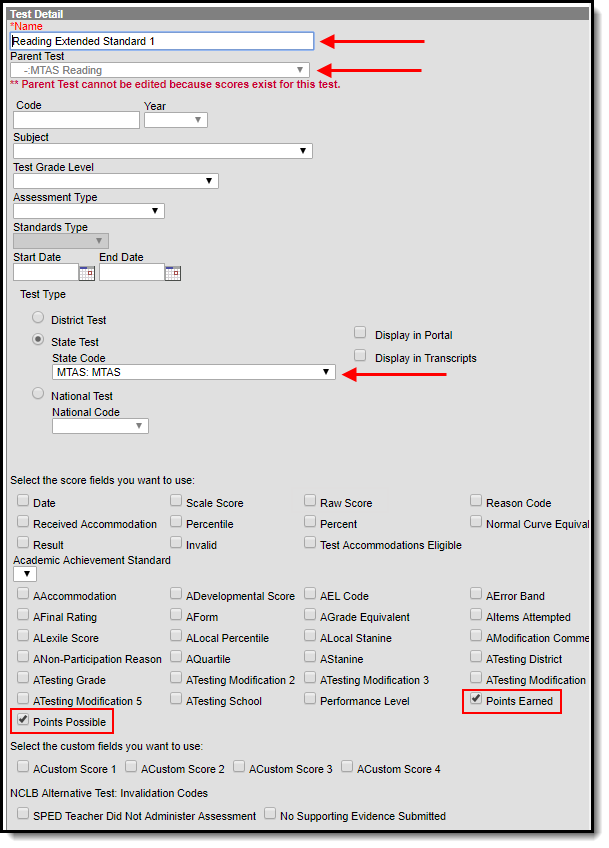
Once the parent MTAS Reading test has been created, we now need to create Reading Extended Standard 1. Click the New Test icon and enter the following values in the fields defined below.
| MTAS Reading Extended Standard 1 | Field | Value |
|---|---|---|
| Name | Reading Extended Standard 1 |
| Parent Test | MTAS Reading | |
| State Test | Selected | |
| State Code | MTAS: MTAS | |
| Points Earned | Checked | |
| Points Possible | Checked | |
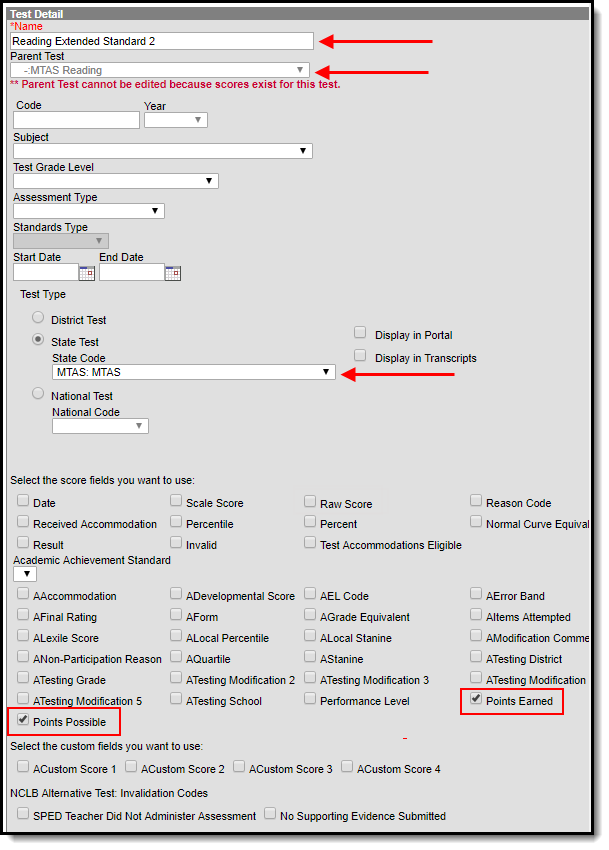
Create Reading Extended Standard 2. Click the New Test icon and enter the following values in the fields defined below.
| MTAS Reading Extended Standard 2 | Field | Value |
|---|---|---|
| Name | Reading Extended Standard 2 |
| Parent Test | MTAS Reading | |
| State Test | Selected | |
| State Code | MTAS: MTAS | |
| Points Earned | Checked | |
| Points Possible | Checked | |
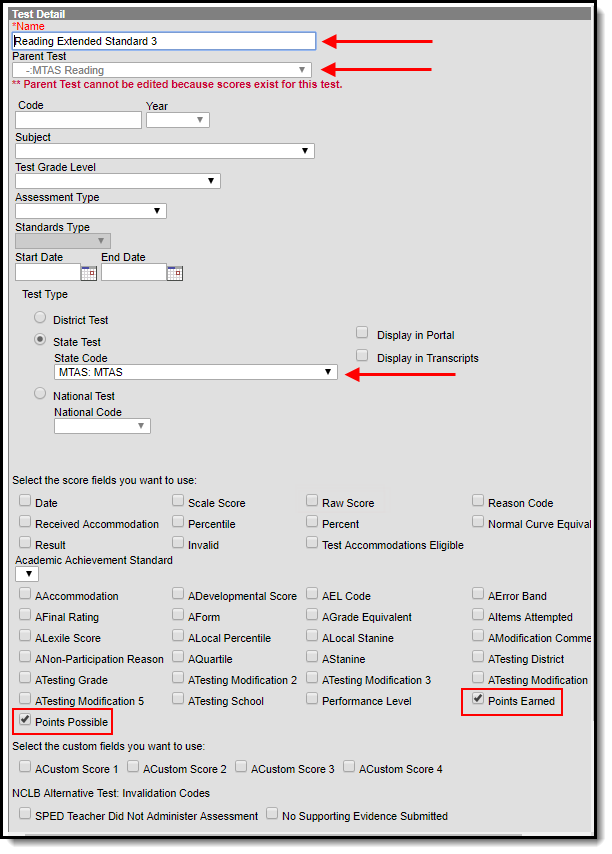
Create Reading Extended Standard 3. Click the New Test icon and enter the following values in the fields defined below.
| MTAS Reading Extended Standard 3 | Field | Value |
|---|---|---|
| Name | Reading Extended Standard 3 |
| Parent Test | MTAS Reading | |
| State Test | Selected | |
| State Code | MTAS: MTAS | |
| Points Earned | Checked | |
| Points Possible | Checked | |
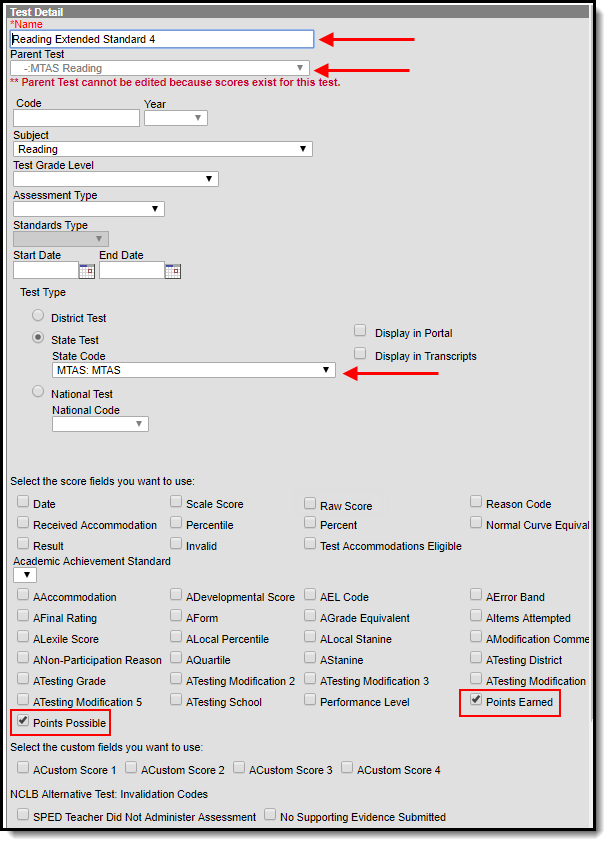
And finally, create Reading Extended Standard 4. Click the New Test icon and enter the following values in the fields defined below.
| MTAS Reading Extended Standard 4 | Field | Value |
|---|---|---|
| Name | Reading Extended Standard 4 |
| Parent Test | MTAS Reading | |
| State Test | Selected | |
| State Code | MTAS: MTAS | |
| Points Earned | Checked | |
| Points Possible | Checked | |
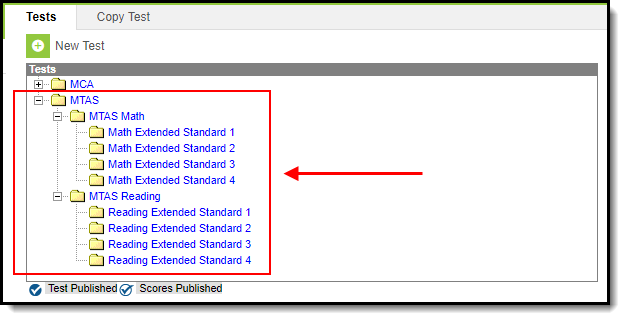
Once all MTAS reading tests have been created, they should appear like the image below. Move onto Step 3.
Step 3. Import MTAS Results via Assessment Import Wizard
Now that MTAS assessments are entered into Campus, you are now ready to map MTAS results to these tests and import the data into Campus.
See the following sections below for step-by-step instructions on importing MTAS math and reading results:
Using the Score Import Wizard to Import Results
In order import your MTAS results into Campus, you need to map the data from the MTAS file to the assessments created in Steps 1 and 2 above. This process is done in the Score Import Wizard. The information below will walk you through the general process for using this tool to map and import the data, with the assumption that you then apply this process to the information described in the Import MTAS Math Results and Import MTAS Reading Results sections below.
To begin:
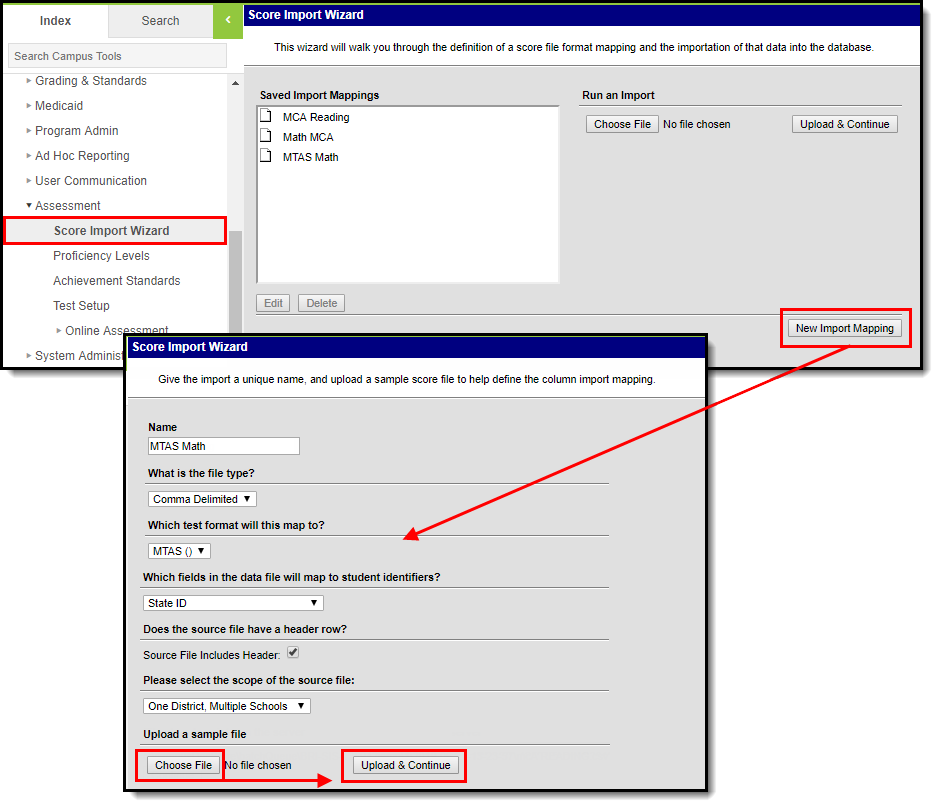
- Navigate to the Score Import Wizard (Assessment > Score Import Wizard)
- Click New Import Mapping.
- Enter the Name of the import (MTAS Math or MTAS Reading, depending on which one you are doing).
- Set the remaining fields to match the values described in the image below.
- Select Choose File, locate and select the MTAS data file on your local hard drive or network.
- Once the file is uploaded, select Upload & Continue.
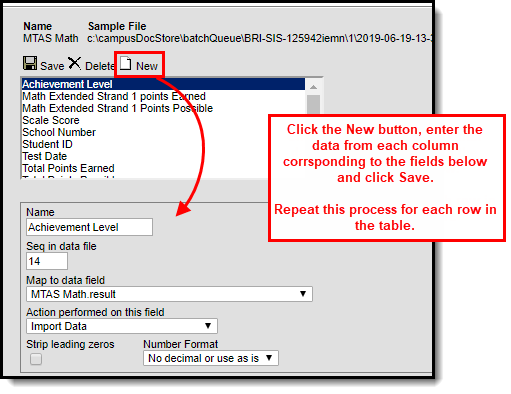
You should see the data file loaded into the Raw Data File Sample window on the right-hand side of the screen (see example in the image below). You know need to map each field from the raw data file to the assessment. To begin this process, click the New icon.
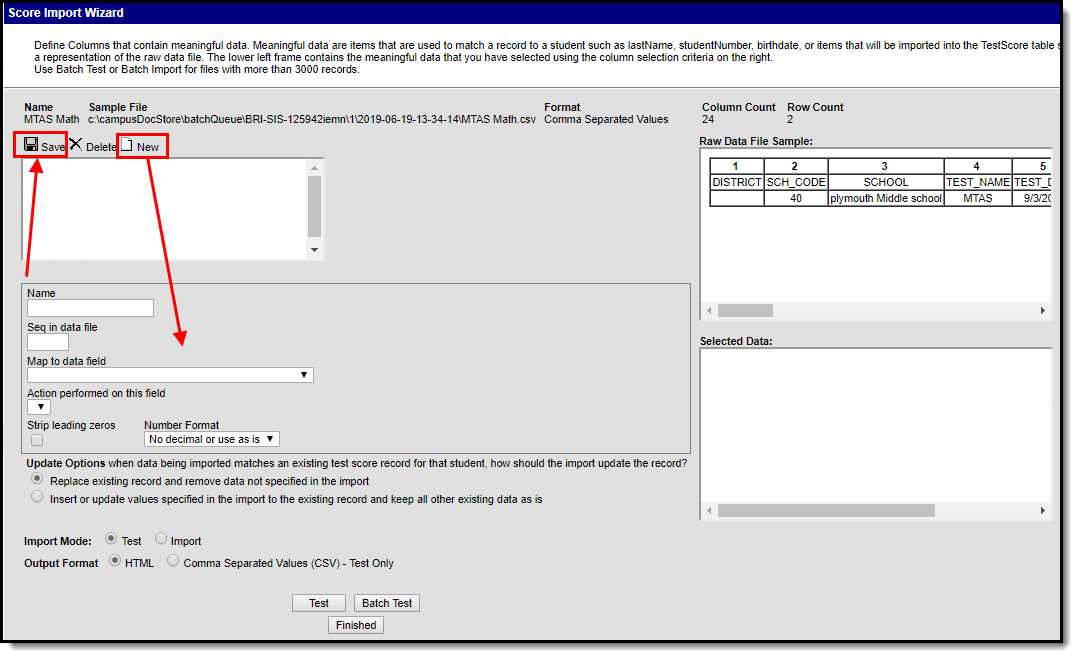
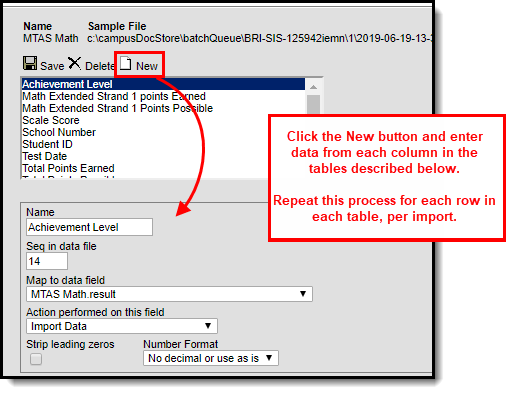
Once New is selected, several fields will appear which need to be defined so that raw data from the file will be inserted into the proper fields on the assessment. Follow the tables described in the Import MTAS Math Results and Import MTAS Reading Results sections for a breakdown of how you need to create and map each field per assessment.
For each field that needs to be mapped, click the New icon, enter the proper values for each field and click Save. Repeat this process for every row in the tables found in the the Import MTAS Math Results and Import MTAS Reading Results sections. Please keep in mind each table in these sections is its own assessment import. Once all fields for a single table are mapped, you are ready to import the data. Do not create and add mappings for more than one table at the time.
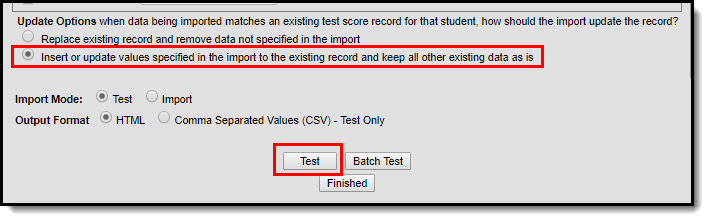
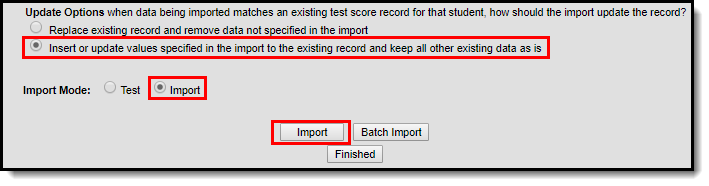
Once all data is mapped:
- Click the Insert or update values specified in the import to the existing record and keep all other existing data as is radio button.
- Select an Import Mode of 'Test'.
- Select an Output Format.
- Select Test.
Review the import test results to ensure its accuracy and correct any identified issues.
If you have already gone through this process and are importing this data for a second (or third, or fourth, etc) time, click the Replace existing record and remove data not specified in the import radio button.
Once you have reviewed the data and are ready to import:
- Click the Insert or update values specified in the import to the existing record and keep all other existing data as is radio button.
- Select an Import Mode of 'Import'.
- Select the Import button.
MTAS data has now been properly imported into Campus. Repeat this process for each Math and Reading Standard until all raw data has been imported into Campus.
Import MTAS Math Results
The section below describe the field values required when mapping raw file data to assessments created in Steps 1 and 2. Once all fields for a single table are mapped, you are ready to import the data. Do not create and add mappings for more than one table or section at the time.
To begin mapping data for Math results:
- Click the New icon.
- Start with row 1 in the table below and enter field values as they are defined in the table.
- Once all values for a row are entered into the Campus fields. Click the Save icon.
- Click New and begin this process again, starting with the next row in the table.
Name | Seq in Data File | Map to Data Field | Date Format | Action Performed on this Field | Strip Leading Zeros | Number Format |
|---|---|---|---|---|---|---|
| Achievement Level | 14 | MTAS Math.result | Ignore - not a selectable field | Import Data | Unchecked | No decimal or use as is |
| Math Extended Standard 1 Points Earned | 15 | Math Extended Standard 1.pointsEarned | Ignore - not a selectable field | Import Data | Unchecked | No decimal or use as is |
| Math Extended Standard 1 Points Possible | 16 | Math Extended Standard 1.pointsPossible | Ignore - not a selectable field | Import Data | Unchecked | No decimal or use as is |
| Math Extended Standard 2 Points Earned | 17 | Math Extended Standard 2.pointsEarned | Ignore - not a selectable field | Import Data | Unchecked | No decimal or use as is |
| Math Extended Standard 2 Points Possible | 18 | Math Extended Standard 2.pointsPossible | Ignore - not a selectable field | Import Data | Unchecked | No decimal or use as is |
| Math Extended Standard 3 Points Earned | 19 | Math Extended Standard 3.pointsEarned | Ignore - not a selectable field | Import Data | Unchecked | No decimal or use as is |
| Math Extended Standard 3 Points Possible | 20 | Math Extended Standard 3.pointsPossible | Ignore - not a selectable field | Import Data | Unchecked | No decimal or use as is |
| Math Extended Standard 4 Points Earned | 21 | Math Extended Standard 4.pointsEarned | Ignore - not a selectable field | Import Data | Unchecked | No decimal or use as is |
| Math Extended Standard 4 Points Possible | 22 | Math Extended Standard 4.pointsPossible | Ignore - not a selectable field | Import Data | Unchecked | No decimal or use as is |
| Scale Score | 13 | MTAS Math.scaleScore | Ignore - not a selectable field | Import Data | Unchecked | No decimal or use as is |
| School Number | 2 | Score.schoolID | Ignore - not a selectable field | Import Data | Unchecked | No decimal or use as is |
| Student ID | 8 | student.stateID | Ignore - not a selectable field | Import Data | Unchecked | No decimal or use as is |
| Test Date | 5 | MTAS Math.date | MM/DD/YY or MM/DD/YYYY | Import Data | Unchecked | No decimal or use as is |
| Total Points Earned | 23 | MTAS Math.pointsEarned | Ignore - not a selectable field | Import Data | Unchecked | No decimal or use as is |
| Total Points Possible | 24 | MTAS Math.pointsPossible | Ignore - not a selectable field | Import Data | Unchecked | No decimal or use as is |
Once all data is mapped:
- Click the Insert or update values specified in the import to the existing record and keep all other existing data as is radio button.
- Select an Import Mode of 'Test'.
- Select an Output Format.
- Select Test.
Review the import test results to ensure its accuracy and correct any identified issues.
If you have already gone through this process and are importing this data for a second (or third, or fourth, etc) time, click the Replace existing record and remove data not specified in the import radio button.
Once you have reviewed the data and are ready to import:
- Click the Insert or update values specified in the import to the existing record and keep all other existing data as is radio button.
- Select an Import Mode of 'Import'.
- Select the Import button.
MTAS Math data has now been properly imported into Campus. Move onto the Import MTAS Reading Results section.
Import MTAS Reading Results
Now that MTAS Math assessments are entered into Campus, you are now ready to map MTAS Reading results to these tests and import the data into Campus.
To begin mapping data for Reading Extended Standard 1:
- Click the New icon.
- Start with row 1 in the table below and enter field values as they are defined in the table.
- Once all values for a row are entered into the Campus fields. Click the Save icon.
- Click New and begin this process again, starting with the next row in the table.
Name | Seq in Data File | Map to Data Field | Date Format | Action Performed on this Field | Strip Leading Zeros | Number Format |
|---|---|---|---|---|---|---|
| Achievement Level | 14 | MTAS Reading.result | Ignore - not a selectable field | Import Data | Unchecked | No decimal or use as is |
| Reading Extended Standard 1 Points Earned | 15 | Reading Extended Standard 1.pointsEarned | Ignore - not a selectable field | Import Data | Unchecked | No decimal or use as is |
| Reading Extended Standard 1 Points Possible | 16 | Reading Extended Standard 1.pointsPossible | Ignore - not a selectable field | Import Data | Unchecked | No decimal or use as is |
| Reading Extended Standard 2 Points Earned | 17 | Reading Extended Standard 2.pointsEarned | Ignore - not a selectable field | Import Data | Unchecked | No decimal or use as is |
| Reading Extended Standard 2 Points Possible | 18 | Reading Extended Standard 2.pointsPossible | Ignore - not a selectable field | Import Data | Unchecked | No decimal or use |
| Reading Extended Standard 3 Points Earned | 19 | Reading Extended Standard 3.pointsEarned | Ignore - not a selectable field | Import Data | Unchecked | No decimal or use as is |
| Reading Extended Standard 3 Points Possible | 20 | Reading Extended Standard 3.pointsPossible | Ignore - not a selectable field | Import Data | Unchecked | No decimal or use |
| Reading Extended Standard 4 Points Earned | 21 | Reading Extended Standard 4.pointsEarned | Ignore - not a selectable field | Import Data | Unchecked | No decimal or use as is |
| Reading Extended Standard 4 Points Possible | 22 | Reading Extended Standard 4.pointsPossible | Ignore - not a selectable field | Import Data | Unchecked | No decimal or use |
| Scale Score | 13 | MTAS Reading.scaleScore | Ignore - not a selectable field | Import Data | Unchecked | No decimal or use as is |
| School Number | 2 | Score.schoolID | Ignore - not a selectable field | Import Data | Unchecked | No decimal or use as is |
| Student ID | 8 | student.stateID | Ignore - not a selectable field | Import Data | Unchecked | No decimal or use as is |
| Test Date | 5 | MTAS Reading.date | MM/DD/YY or MM/DD/YYYY | Import Data | Unchecked | No decimal or use as is |
| Total Points Earned | 23 | MTAS Reading.pointsEarned | Ignore - not a selectable field | Import Data | Unchecked | No decimal or use as is |
| Total Points Possible | 24 | MTAS Reading.pointsPossible | Ignore - not a selectable field | Import Data | Unchecked | No decimal or use as is |
Once all data is mapped:
- Click the Insert or update values specified in the import to the existing record and keep all other existing data as is radio button.
- Select an Import Mode of 'Test'.
- Select an Output Format.
- Select Test.
Review the import test results to ensure its accuracy and correct any identified issues.
If you have already gone through this process and are importing this data for a second (or third, or fourth, etc) time, click the Replace existing record and remove data not specified in the import radio button.
Once you have reviewed the data and are ready to import:
- Click the Insert or update values specified in the import to the existing record and keep all other existing data as is radio button.
- Select an Import Mode of 'Import'.
- Select the Import button.
MTAS data has now been properly imported into Campus. Move onto the next Standard.
