Tool Search: Course Categories
Categories are used in Campus Instruction to sort assignments into groups. Categories must be created before assignments can be created.
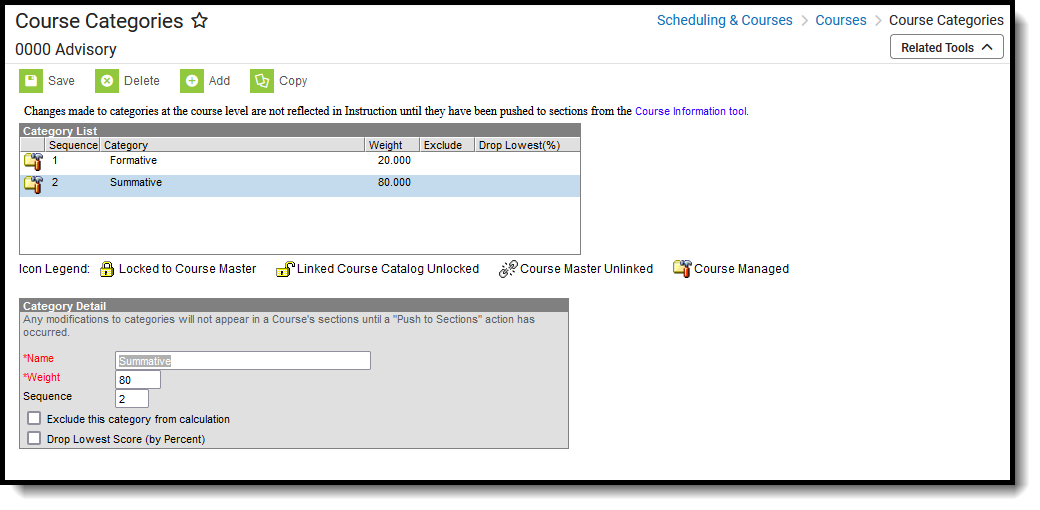 Course Categories
See the Course Categories Tool Rights article for information about rights needed to use this tool.
When Categories are assigned at the Course level, every teacher who teaches the course can use same Categories. This ensures all assignments in a category have the same weight and calculations are all done the same way. Teachers can use these categories if they choose, or create their own categories (if they have proper tool rights assigned).
Use the Push to Sections option to push categories from the course level to sections, or push categories for a group of courses using the Push All Courses tool
Categories can also be managed at the Course Master level. Icons in the Category List provide more information about each category:
| Icon | Text | Description |
|---|---|---|
 |
Locked to Course Master | Indicates that the category corresponds to a category at the Course Master level. These categories are not editable in this tool. |
 |
Linked Course Catalog Unlocked | Indicates that categories are unlocked for the whole Course Catalog. These categories are editable in this tool. |
 |
Course Master Unlinked | Indicates that the category is associated with a category at the Course Master level, but that the link with that category is broken. Categories can be relinked using the Push All Course Masters tool, selecting a Push Mode of Overwrite and leaving Categories marked in the Data to be Pushed section. |
 |
Course Managed | Indicates that the category is managed at the Course level and does not have a corresponding record at the Course Master level. |
The best time to implement district-level Categories is at the beginning of the school year.
Add New Categories
- Click the Add button. A Category Detail section displays.
- Enter the category Name. This name displays on assignments and in the Grade Book , Planner, and Assignment Overview. Names should be unique (as in, Categories cannot be named the same as another category).
- Enter the category Weight. The weight of a category determines the effect of each category on the final grade, in relation to other Categories. Weights are calculated as a ratio based on the other weights entered. Weights only influence calculation if the Weight Categories option is selected in the Grade Calculation Options in the teacher's Grade Book.
- Enter the category Sequence. Categories display in sequence order.
- If the category should be excluded from calculations, mark the checkbox accordingly.
- If the lowest score from any assignment should be dropped from the calculation, mark the checkbox accordingly. See the Drop Lowest Score Logic for more information.
- Click the Save button when finished. The new category displays in Sequence order in the Category List section.
Categories can be set up at the Course Master level when courses are linked to the Course Master. This provides the district the ability to lock Categories, if desired.
When the Course Catalog is marked to lock the editing of Categories, Course Categories display with a lock icon, indicating changes to those cannot be made.
If teachers have tool rights to Categories, they can create their own categories and edit categories pushed from the course. If a course is linked to a course master, the Categories field must also be unlocked on the Course Catalog for teachers to edit pushed categories.
Modify Categories
Users with proper tool rights have the ability to modify Categories at the Course level. Edits can be made to the entered Categories by selecting it from the Category List, making the necessary changes and saving the changes. Categories can also be deleted completely by selecting the category and clicking the Delete button. This removes the category completely from the Course.
If a category that has been pushed to sections is deleted, instances of the category that have assignments will be converted to section-owned categories. These categories function the same as any created by the teacher and are no longer tied to a category at the course level.
Category additions and modifications should be made at the beginning of the year.
Drop Lowest Score Logic
The Drop Lowest Score feature marks as dropped the lowest scored assignment (by percentage) for a category for each student.
The dropped score is determined through a series of steps:
First, the feature creates a list of possible scores to drop for each student based on the following characteristics:
- The assignment must be active.
- The score field must be not null; in other words, some kind of score must be entered, including an entered shortcut such as M: Missing.
- The score must not be flagged as exempt.
Next, the feature assigns a percentage value to each acceptable score based on the following logic:
- If the Score Type is Assignment Marks and the score does not equal a valid mark score, or if the Score Type is Points and the score is not a shortcut key or number, the score will not be considered among those to be dropped because it is not in a valid format that the calculation can consider.
- Assignments with valid scores entered will calculate as a percentage of points possible.
Assignments scored as M (Missing) or Ch (Cheating) will be assigned a percentage of 0. Scores flagged as missing or cheated using the Context Menu will not be considered in the calculation because the score is Null. Keep this in mind when using this feature. For example, if the score of a "cheated" assignment should not be among those considered to be dropped, mark it using the checkboxes in the context menu rather than the "ch" keyboard shortcut.
Finally, the feature marks the score with the lowest percentage value as "dropped" and removes the dropped flag from any other score for that student. As long as the Drop Lowest Score checkbox is marked, this calculation will run each time an assignment score is changed.
In the event of a tie between multiple assignments, the score with the highest points possible is dropped.
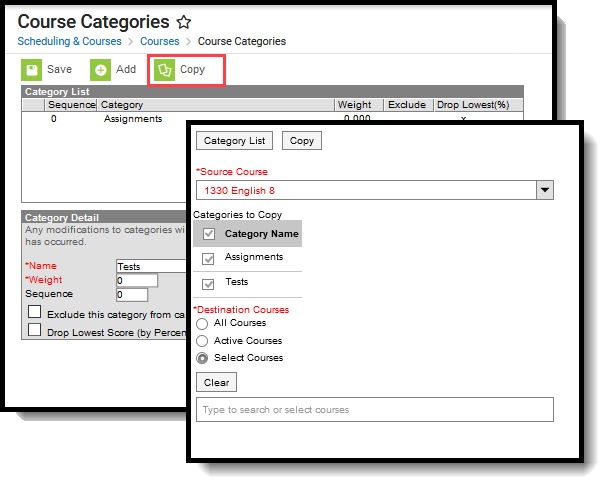
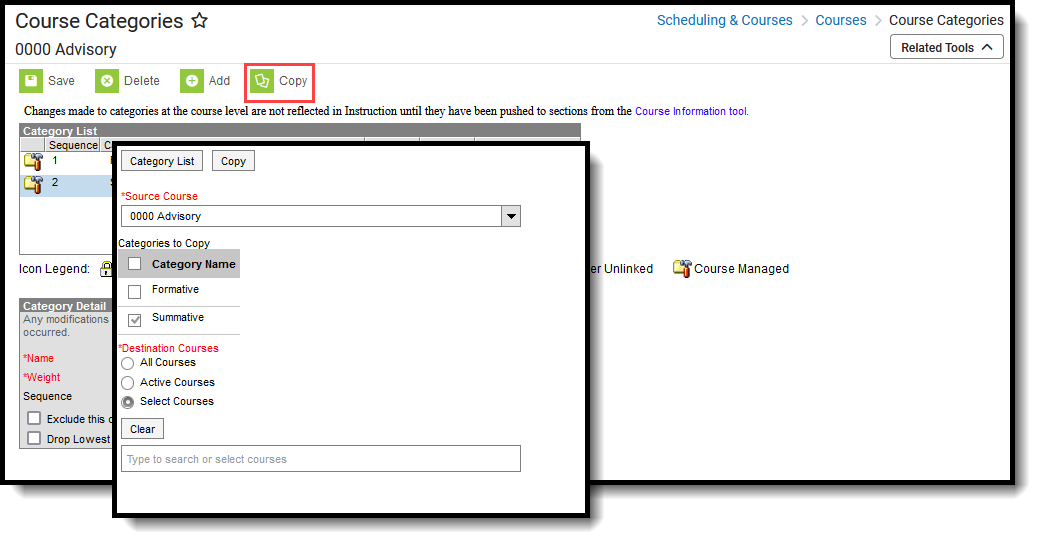
Copy Categories to Another Course
Use the Copy button to easily add the Categories associated with one Course (called the Source Course) to one or more other Courses (called Destination Course). The Copy button displays when proper tool rights are assigned.
When copying categories from one course to another:
- Categories can only be copied to courses that are in the same calendar year.
- Destination courses should NOT be linked to Course Masters. If they are, copy the categories at the Course Master level.
- Source courses and destination courses cannot have the same name.
 Copy Categories
 Copy Categories
- Select a specific category to copy or just click the Copy button. When a specific category is selected to copy, that category is the only one selected to copy; when no categories are selected to copy, all of the categories in that Course Master are automatically selected to copy.
- Select the Source Course from the dropdown list. This displays the currently selected course. To change this selection, begin typing in the dropdown field.
- Mark the Categories to Copy. Or, clear the selections by clicking the checkbox in the gray Category Name header.
- Select the Destination Course by typing in the search field. More than one destination course master can be selected, but the destination course should NOT be linked to a course master.
- All Courses: copies categories to all courses in the calendar.
- Active Courses: copies categories to all courses in the calendar that currently have the Active flag marked.
- Select Courses: copies categories to the selected courses. To select a course, type the Number or Name in the search field. Multiple courses can be selected. Click Clear to remove all courses from the list.
- Click the Next button.
- Click the Save button to copy the selected categories to the destination course.
When the copy is completed, an alert displays indicating the copy has been saved. If there are no categories to copy, an alert displays indicating all selected categories already exist in the destination course.
