Tool Search: Transcripts
A transcript is a historical record of a student's performance in a course. The information listed on the transcript can vary from district to district, depending on district preferences. Each district records the grade information that students receive on transcripts and report cards. Grade information is connected to a student's course schedule.
See the Transcript Information for Cross-Site Students for information on recording and posting transcripts when Cross-Site Enrollment is used at the district.
 Student Transcript
See the Transcripts Tool Rights article for information about rights needed to use this tool.
Home Screen
Navigation and Features
All transcript records for every school year and calendar are listed on the home screen. Click anywhere on the transcript record to modify additional details for the selected record. Alternatively, use the Edit button to quickly add or modify a record. Clicking anywhere on a transcript record opens the Detail view for that record; using the Edit button allows quick editing of the entire transcript. Only the two most recent groups of transcript records are listed in Edit mode. Click the Show All Records button to display all transcript records for the student.
| Feature | Image |
|---|---|
Get a quick view of the student's transcript by school year (automatic sort option). See the Column Grouping section for more information. Sorting happens within each grouping.
When records are grouped, you can sort them by clicking the dragged value in the header to ascend or descend. The records within those groups are sorted by clicking the table headers.
In the first image to the right, the Course Number column is sorted in ascending order (A-Z), and an up arrow indicates the sort has been changed. In the second image, the Course Number column is sorted descending (Z-A), and includes a down arrow. |
|
Group the column headings using click-and-drag technology. This resorts the transcript entries by the selected groupings.
The default sort option is Year. This is the school year in which the student took that course, and the score received was posted on the transcript. All transcript records are displayed in year order, with the most recent year first. You can remove this (click the X next to Year) or click and drag additional columns into the header.
The graphic to the right shows the Course Name added to the header. Now, the transcript records are sorted by Year and then by Course Name.
Each time a new column heading is added to the header, transcript data is sorted accordingly. Column headings can be moved to sort by, for example, Course Name and then by Year.
See the Column Grouping section for additional information. |
|
Collapse the group on the left side to display only the records for the desired year.
The image to the right displays transcript data for the 2017-18 school year, with the data for other school years collapsed. |
|
Click Edit to modify existing records quickly. Once opened, you can change current records and add new ones (by clicking Add Rows).
Use the Add Rows option like the Batch Add option on the original Transcript. An Add Rows pop-up displays where the number of rows can be entered. The number of Rows, School Year, School Name (may also be Transfer School Name), and Grade level are required. When you are finished, click Save to save the changes and return to the Main screen. Click Cancel to return to the Main screen.
|
|
| Once in Edit mode, only the two most recent groups of transcript records display. These groups can be records from the last two school years or the same school year, but from different calendars.
When there are more records to show, a note of Additional Records is hidden at the end of the two groups. Mark Show All Records to display more transcript entries. When all records are displayed, a note of End of Records displays. |
|
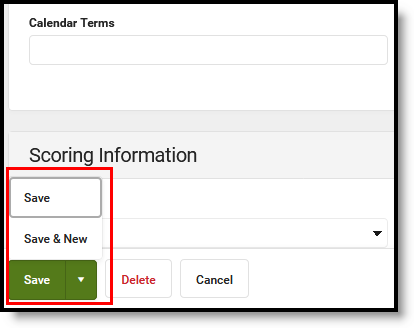
| Use the New Details button to add a new record. When finished, click the arrow next to the Save button, then choose either Save to save the record and return to the Main screen, or Save & New to save the record and add another. | |
| Add transcript-related documents using the Documents option. See the Documents section for more information. | |
| Print the student's transcript from the Main screen by clicking the Reports button. See the Reports section for more information. | |
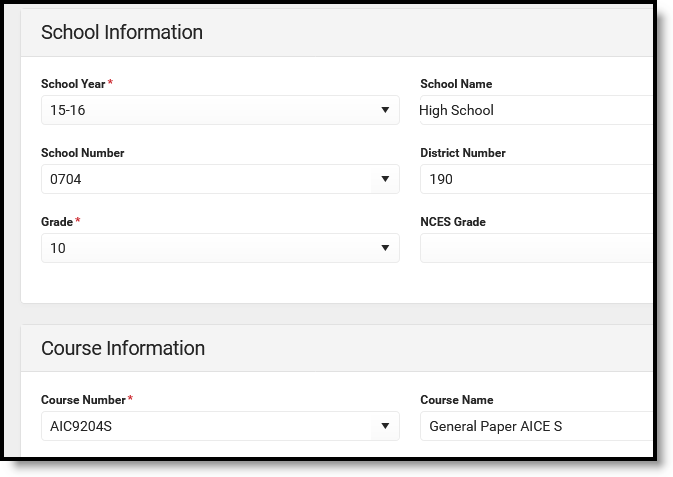
On the Detail screen, transcript information is organized into cards - School Information, Course Information, Scoring Information, Transcript Credit Information, and Additional Information.
Localized fields and district-defined fields are displayed on the Additional Information card, which is collapsible. |
|
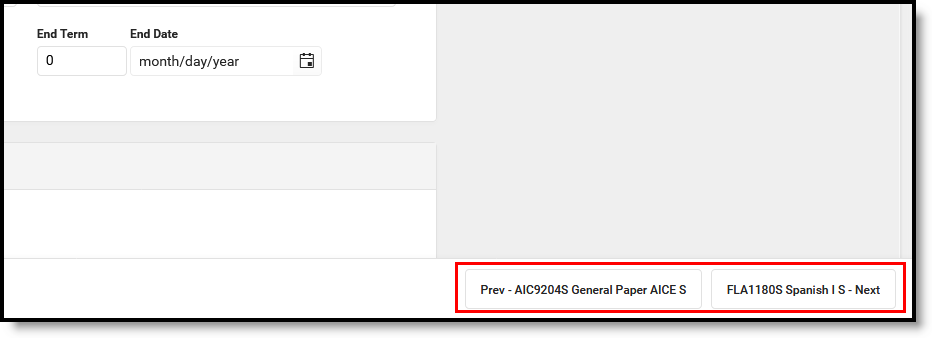
| When viewing the details of an existing record, navigate to the next record by clicking the name of the next course record in the lower right-hand corner, or view the previous transcript record by clicking the name of the previous course record. |
|
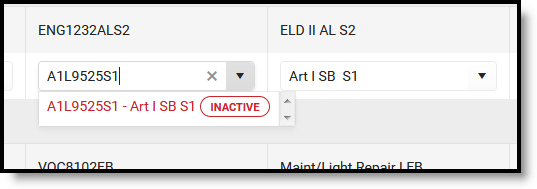
Inactive courses are displayed in the field dropdown lists with an INACTIVE label in both the Main and Detail screens.
When printing the Transcript, the INACTIVE label does NOT print. |
|
| Scores are organized into Score Groups and Rubrics. When GPA Values and/or GPA Unweighted Values are added to a Score Group, they are displayed in parentheses behind the score name.
Score groups and rubrics associated with the selected course for the record are displayed first in the dropdown list. Identical Score Group/Rubrics When identically named Score Groups and Rubrics exist, the group type is appended to the group name. For example, a Score Group named Habits of Engaged Learner and a Rubric named Habits of Engaged Learner would be listed in the score dropdown as Habits of Engaged Learner—Score Group and Habits of Engaged Learner—Rubric (see the second image for an example). When identically named Score Groups or Rubrics have the same name and scores, only one entry is listed for the group, and the scores display as duplicates (see the third image for an example). When there are two identical Score Groups and an identically named Rubric, one entry is listed for the Rubric, and one entry is listed for the duplicate Score Groups; the scores of the Score Group are duplicated (see the fourth image for an example). |
|
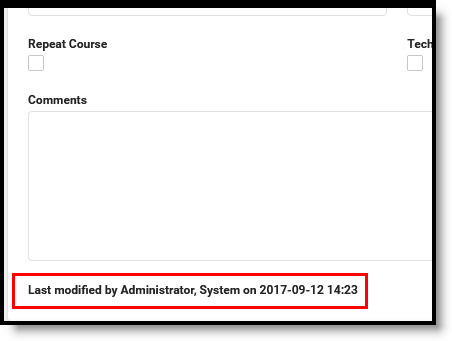
Modified By information displays at the end of the transcript record as part of the Additional Information card. It indicates the last user to change the transcript and when (date and time). This does not display for transferred records or converted district data. |
|
Add a new detail record by manually populating the cards with the appropriate information. When ready to save, click the Save icon or click the down arrow next to the Save icon to save the entry or save the entry and add a new entry (Save & New). |
|
| Use the Auto-fill Course Fields Based on Course Number Selection preference to automatically populate other course-related fields. This is available when adding a new Detail record, adding new Rows, and editing existing records. Removing the checkbox turns it off (other course fields will not auto-fill).
These fields are auto-filled:
|
|
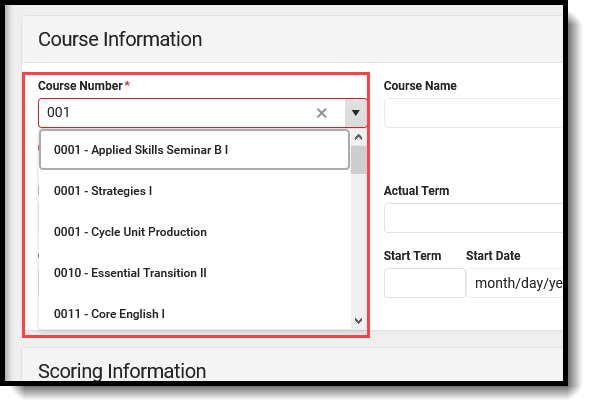
| When adding a new record, enter part of a course name or number (at least one character - symbols, letters, or numbers). Matching results display in the dropdown list for easy selection.
Course Names and Numbers are populated from the following:
When selecting a course number, the appropriate fields, including SCED and Online Learning, are auto-populated when adding a new record from either the Detail or the Main screen. GPA Weight, Credits Attempted, Credit Type, Terms Long, and Credit Overflow Override are also updated as Course Numbers are entered. Editing an existing record does not automatically update those values. The Free Form Entry sub-right applies to the Course Number, Course Name, School Number, and School Name fields. When assigned, any value can be entered into these four fields. An Original Value label is displayed next to the original values populated for the Course Number and Course Name (see the second image to the right). Re-selecting the original value does not populate the additional fields from the Course. |
|
| Error messages display when a field exceeds the maximum character limit, noting the correct field length. Records cannot be saved until the correct field length is entered. |

Things to Know
Grade Levels
- A grade level must exist within the calendar for it to be associated with a transcript record.
- When a grade level is marked as Exclude from GPA, courses taken by a student in that grade level may still display on the transcript (depending on other course setup scenarios). This only indicates that scores received for courses taken in that grade level are NOT factored into GPA calculations.
Refer to Grade Level Setup for additional information.
Course Name and Course Number
If the exact same course name and number are available in multiple course catalogs, all instances of that course name/course number populate the dropdown lists. Users can select the calendar/course catalog that best matches the Transcript record.
Course Name and Number values return as follows:
- When a new entry is added for a course taken at the same school selected in the Campus toolbar, the Course Name and/or Course Number fields are populated with the available courses at that school. Once a course name/course number is selected, the score field displays the score group associated with that course at the top of the list of all score groups/rubrics.
- When a new entry is added for a course not taken at the school selected in the Campus toolbar, the Course Name and Course Number values populate from the school where the student was previously enrolled. This occurs when the previous school is in the same district.
- The Course Master (Course Catalog) used at the district is also used to return applicable courses.
When adding or modifying a transcript record, the Course Catalog name appears after the course name or number.
![]() Course Number with Course Catalog Name
Course Number with Course Catalog Name
Transcript records are sorted by Course Number in ascending alphanumeric order, starting with 0, 1, 2, 3, A, B, C, then by Course Name in alphanumeric order, then by Actual Term number, numeric ascending (12 is after 2), then by the transcript ID. For example:
- 000123 - Algebra
- 0001234 - Algebra
- 000200
- 02
- 123 - Algebra
- ALG123 - 123Algebra
- ALG123 - Algebra
Credit Type
Credit types are sorted in the following order.
- Credit Groups and Standards associated with the selected School name on the Transcript Record sort first. These are selected on the School Standards tool.
- Credit Groups and Standards not associated with the selected School name follow and include a label of NOT IN USE.
When entering transcript records by typing in the School field (not selecting options from a dropdown list), Credit Groups and Standards display as if a School is selected on the Transcript record.
Column Grouping
Transcript entries are grouped by Year, School Name, and Grade Level. Each column can be re-sorted by clicking on the column header. In addition to those options, you can group the transcript by clicking and dragging the column headers into the top row to suit your preferences.
Click the column header you wish to add to the group option and drag it to the group row. The transcript is sorted by the headers listed. Refreshing the browser restores the grouping to the default, where records are grouped by Year, School Name, and Grade Level.
![]() Click and Drag Grouping
Click and Drag Grouping
When grouped, records can be sorted by clicking the dragged value in the header to sort in ascending or descending order. The records within those groups are sorted by clicking the table headers.
Edit an Existing Transcript Record
When editing a Course Name or Course Number, enter at least one character to return a list of matching values.
Two options exist for editing existing records:
- Locate the record in the list of transcript items, click on it to open the Detail Screen, and modify the information (option 1); OR
- Click the Edit button to convert each row of the existing records into editable fields (option 2).
Option 1
Hover over the row that needs to be modified. Click anywhere in that row to view or edit the record. This opens the record in the Detail Screen, where updates can be made to any available field.
- Click the Save button when finished; or
- Click the arrow next to the Save button to Save & New, where changes are made to the record, and a new Details screen displays for the addition of another transcript record; or
- Use Save & Next, where changes are made to the record, and the next record in the transcript is displayed for editing.
![]() Click Transcript Record to Edit the Details
Click Transcript Record to Edit the Details
Option 2
Click the Edit button. This changes the read-only view of the transcript record to an editable format. Update the fields as needed. Use the tab key to move through the fields and rows.
Click Save when finished.
![]() Choose Edit to modify all rows of the Transcript
Choose Edit to modify all rows of the Transcript
From this view, additional rows can be added for a quick batch add of transcript data. See the section below for more information.
Add New Rows to the Transcript Record
When in Edit mode, where every existing row is editable, an option exists to add rows to the transcript. This feature can be used to add multiple transcript records simultaneously, which is particularly useful when entering basic transcript information for a new transfer student.
- From the Main screen, click the Edit button, then click the Add Rows button. An Add Rows pop-up will display, where you can enter the number of rows needed.
- In the pop-up, select the school year, school name, grade level, and the number of rows. The School Year and School Name are prepopulated with the school selected in the Campus toolbar, and the Grade Level is prepopulated with the student's current grade level or enrollment.
- Click the Add Rows button. The empty rows are displayed at the top of the Transcript record for the selected school year, school, and grade level.
- Enter the appropriate information for the new transcript records. Use the tab keys to move through the rows.
- Click Save when finished. The new transcript records are saved.
Repeat these steps as needed. There is no limit to the number of rows that can be added.
Note the following when modifying information in the Add Rows pop-up:
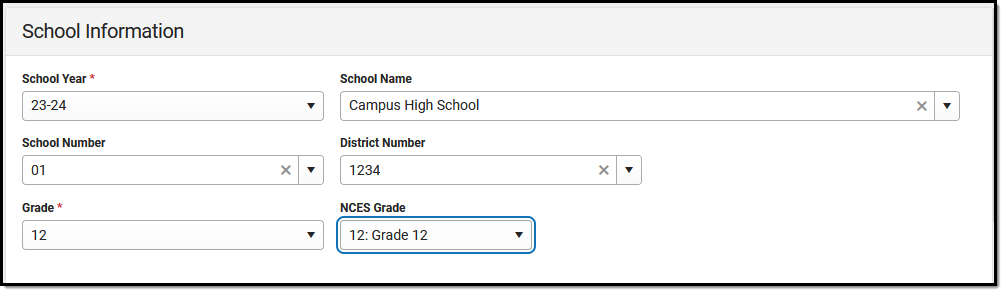
- When changing the School Name, if the School Number or District Number has not yet been changed, those fields are automatically updated to the associated values related to the newly changed School Name.
- When changing the Grade Level, if the NCES Grade Level has not yet been updated, that field is automatically updated to the associated value for the newly changed Grade Level.
- Each time the Add Rows button is selected, the values in the pop-up default to the last information used to add rows. This enables faster addition of multiple records at once (Batch Add).
- When canceling the Add Rows pop-up and then selecting Add Rows again, the values in the Add Rows fields revert to the associated values for the calendar selected in the Campus toolbar.
Add as many rows as needed. Only those that are populated are saved. Any rows that do not have the fields populated are removed when saving the record. Any new records with an existing group (School Year, School Name, Grade Level) are merged with others in that group upon saving.
![]() Add Rows
Add Rows
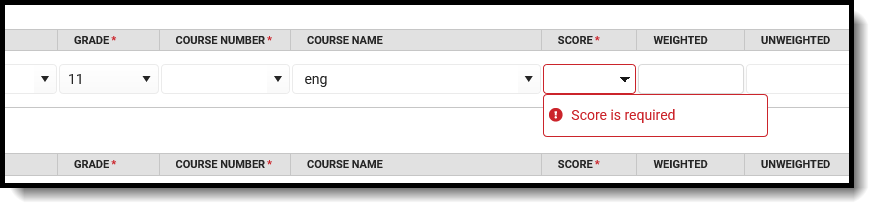
A new row or a new record cannot be saved until all required fields are populated. Field popups appear when required fields are missing data.
 Required Entry Message Display on Main Screen
![]() Required Entry Message Display on Detail Screen
Required Entry Message Display on Detail Screen
Add a New Detail Record
From the Main screen, click the New Details button. This opens the Detail screen, where a new transcript record can be entered. See the Detail Screen Card Descriptions section for information on the available cards and fields.
When you're finished adding the record, click Save to save it and return to the Main screen. Then, click the arrow next to the Save button for Save & New, which saves the entered information and opens a new Details record to add another record. Alternatively, click Cancel to not save any information. Using the Save & New option carries overall school information from this record to a new record.
![]() Add a New Details Record
Add a New Details Record
Delete a Transcript Record
When a record needs to be permanently removed, select (click) the record's row on the Main screen. The Transcripts Detail Screen loads when the Delete button is selectable. Acknowledge the pop-up that indicates the record will be permanently removed after deletion. To avoid deleting the record, click Cancel.
![]() Delete Transcript Record
Delete Transcript Record
Detail Screen Card Descriptions
Expand the items below to see descriptions of the fields available on the transcript.
School Information Fields
School Information fields provide information on where the student was enrolled when the selected course was taken.
 School Information Fields
| Field | Description | Auto-Fill Behavior | Ad hoc Field Name |
|---|---|---|---|
| School Year | Identifies the year the student received the score for the selected courses. School years are sorted in descending order (i.e., 2017-18, 2016-17, etc.). | This field auto-fills with the current year value. | transcriptDetail.startYear, transcriptDetail.endYear
Returns the start and end year in which the student took the course in YYYY format. |
| School Name / Transfer School Name |
Identifies the name of the school where the student took the course.
This state-designated name populates from the selected school/calendar when the score is posted to the transcript. School names are sorted alphabetically. The Free Form Entry sub-right applies to this field. When assigned, any value can be entered here. See the School Name Attribute section below for more information. |
This field auto-fills on the School Number value. | transcriptDetail.schoolName |
| School Number | Identifies the state-assigned school number where the student took the course.
This populates from the selected school/calendar when the score is posted to the transcript. School numbers are sorted in numeric (ascending) order. The Free Form Entry sub-right applies to this field. When assigned, any value can be entered here. |
This field auto-fills on the School Name value. | transcriptDetail.schoolNumber |
| District Number | Identifies the district where the student took the course. When the score is posted to the transcript, this field populates from the selected school/calendar. | This field auto-fills with the School Name value. | dist.number |
Grade |
Indicates the grade level at which the student enrolled when they received the score for the course. Grade levels are sorted by the assigned sequence. | This field auto-fills on the student's current grade level value. | transcriptDetail.grade |
| NCES Grade | Indicates the NCES (National Center for Education Statistics) grade level when the score was received.
The NCES Grade Level mapping is set using the Grade Level Definitions tool. NCES grades are sorted by the sequence assigned to the grade level. This field is required to send transcripts using the eTranscript tool. |
N/A | enrollmentHistory.ncesGrade |
School Name Attribute
When necessary, users can modify options for certain transcript fields in the Core Attribute/Dictionary. The district maintains dictionary values entered in the Attribute/Dictionary. Note that when users are assigned the Free Form Entry sub-right, any value can be entered for the School Name (as well as School Number, Course Name, and Course Number).
![]() Transcript Course Attributes
Transcript Course Attributes
The Data Type selection determines the behavior of the School Name attribute.
When TranscriptCourse.schoolName has a Data Type of textfield, the School Name and School Number lists in the Transcript Editor are populated from the Schools editor list. A Data Type of textfield is the default option.
When TranscriptCourse.schoolName has a Data Type of drop-down list, the School Name and School Number lists on the Transcript Editor populate with the Name (School Name) and Code (School Number) from the associated dictionary (first image) of the attribute, plus the School Name and Number on the School editor (second image).
|
School Editor
|
The list of available school names on the Transcript editor is sorted into groups for Transfer and District. Values from the attribute dictionary are included in the Transfer group, and values from the Schools editor are included in the District group.
![]() School Name Attribute Groups
School Name Attribute Groups
Course Information Fields
Course Information fields provide details about the course. Course information auto-fills when the Auto-fill Course Fields Based on Course Number Selection preference is marked.
![]() Course Information Fields
Course Information Fields
Note the following information about the Auto-fill Course Fields Based on Course Number Selection Preference:
- When the preference is NOT set to auto-fill, if the course number is selected and the course name field is empty or unmodified, the course name still auto-fills from the selected course number.
- This preference is stored locally for each user. If the user removes the checkbox for the preference (auto-fill does not occur) and clears the browser cache, the preference defaults back to being marked the next time the user adds Transcript records.
- When the user removes the checkbox from the Add Rows modal, the preference is also not marked when adding a new Details record, and vice versa.
- The Course Number selection always respects the preference's current status. When it is marked and new rows are added, then remove the checkbox and add two more rows, the auto-fill does not occur.
Scoring Information Fields
Scoring Information fields detail the scores and GPA information the student received for the selected course.
![]() Scoring Information Fields
Scoring Information Fields
Transcript Credit Information Fields
Transcript Credit Information displays the number of credits the student earned and attempted for the course record, and to which credit category (type) it applies. Note that values for Credits Attempted, Credit Type, and Credit Rollup Overflow auto-fill on the populated Course Number Information.
When adding a new transcript record, a blank row of credit-related fields displays. This allows users to add the appropriate credit values without first adding a row.
![]() Transcript Credit Information Fields
Transcript Credit Information Fields
The Transcript Post tool posts the Credit Type assigned to the Grading Task of the course. If additional Credit Types are needed, they must be added to the course transcript record manually.
![]() Two Credit Types for One Course
Two Credit Types for One Course
The Credit Earned and Credits Attempted can be adjusted for each Credit Type on the Transcript Credit Information screen.
![]() Detail View for Two Credit Types
Detail View for Two Credit Types
Additional Information Fields
The Additional Information fields provide further details on the transcript entry and include localized fields (used for state reports) and district-defined fields (created by the district). This section is collapsible or expandable by clicking the minus/plus sign on the right-hand side.
Localized and district-defined fields are not included in this article. Instead, see your state's articles for more information on Transcript procedures for your state.
![]() Additional Information Fields
Additional Information Fields
Documents
Upload previous student transcript reports from other schools of enrollment for a particular student. This uses the Digital Repository features. There is no limit to the number of documents you can upload here, but be aware that your district may have set a maximum file size.
Only documents uploaded from the Transcript tool are displayed here. To view other types of uploaded documents, use the Person Documents tool.
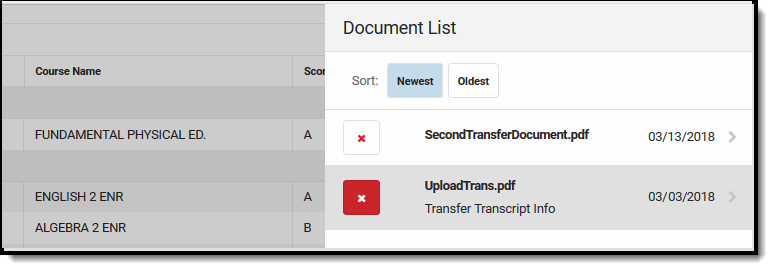
Mark the Consent statement (files cannot be saved unless this is marked), then click the Select File button to locate and upload documents. File names must be unique. Click the Save button when finished. A successful upload displays a Done checkmark next to the Select Files button. Close the side panel by clicking the Cancel button.
![]() Transcripts Document Upload
Transcripts Document Upload
Uploaded files can be sorted by Newest (most recently uploaded) or Oldest. Click the red X next to the file name to remove an uploaded document.
For more information on document upload, see the Managing Document Attachments article.
 Document Upload Delete
Reports
Click the Reports button on the main screen to print the student's transcript. This opens a side panel with all available Transcript Reports. The Default Report contains the standard transcript elements and can be printed without creating a transcript report in Report Preferences. The other reports listed here were created in Report Preferences.
Choosing any report from the side panel opens in a new browser window. Reports are in PDF format.
Control whether the Default Transcript Report displays as a print option by setting the Enable Default Transcript System Preferences.
![]() Print Transcript Record
Print Transcript Record
All transcript courses are displayed on the printed transcript regardless of how a student is scored and what transcript preference options were selected for credits and standards. This selection affects the credit/standard groups displayed in the Credit Summary and Standards Summary.
Note that In-Progress grades and planned courses are not counted in the Credit Summary.
A transcript is printed for each student's household with a guardian whose Mailing checkbox is marked. Only one transcript prints if all of the student's guardians are in the same household. If guardians reside in more than one household, the number of households they reside in determines how many transcripts are printed.
Transcript Information in Ad hoc Query Wizard
Transcript information is available in the Query Wizard for Student data types in the Student > Learner Portfolio > Transcript Detail folder.
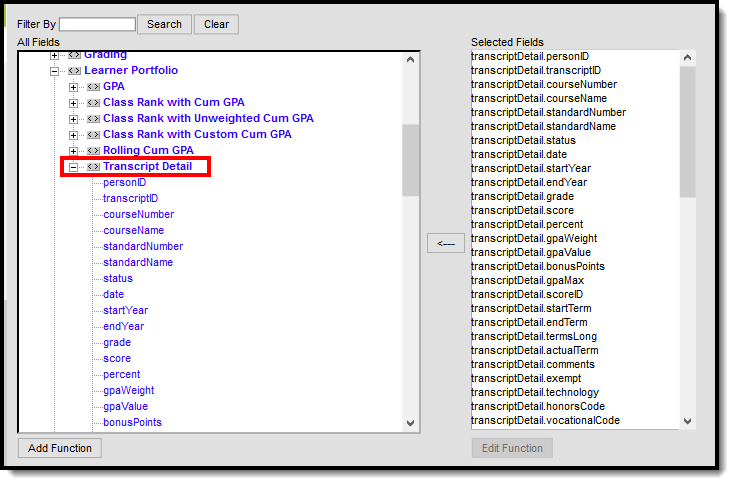 Transcript Ad hoc Fields
State-Specific Information
Fields may vary by state:
|
