You are viewing a previous version of this article. See Create New Activity for the most current information:
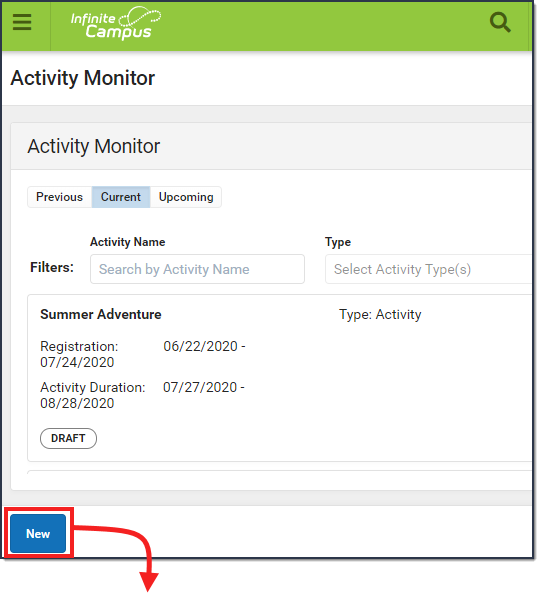
Tool Search: Activity Monitor
Use the Activity Monitor tool to add new activities to Campus.
- Add supplemental Activity Registration documents in the Custom Forms tool.
- Create an Ad Hoc filter for selecting eligible students.
This article walks you through the setup process step-by-step.
Tip
While using the Activity Builder, click Save & Hold to save the activity and return to the Activity Monitor. Click Save & Next to continue to the next step in the Activity Builder.
Step 1 - Create Activity
The first step in the Activity Builder is to define the parameters for the activity. To add an activity, click the New button in the action bar.
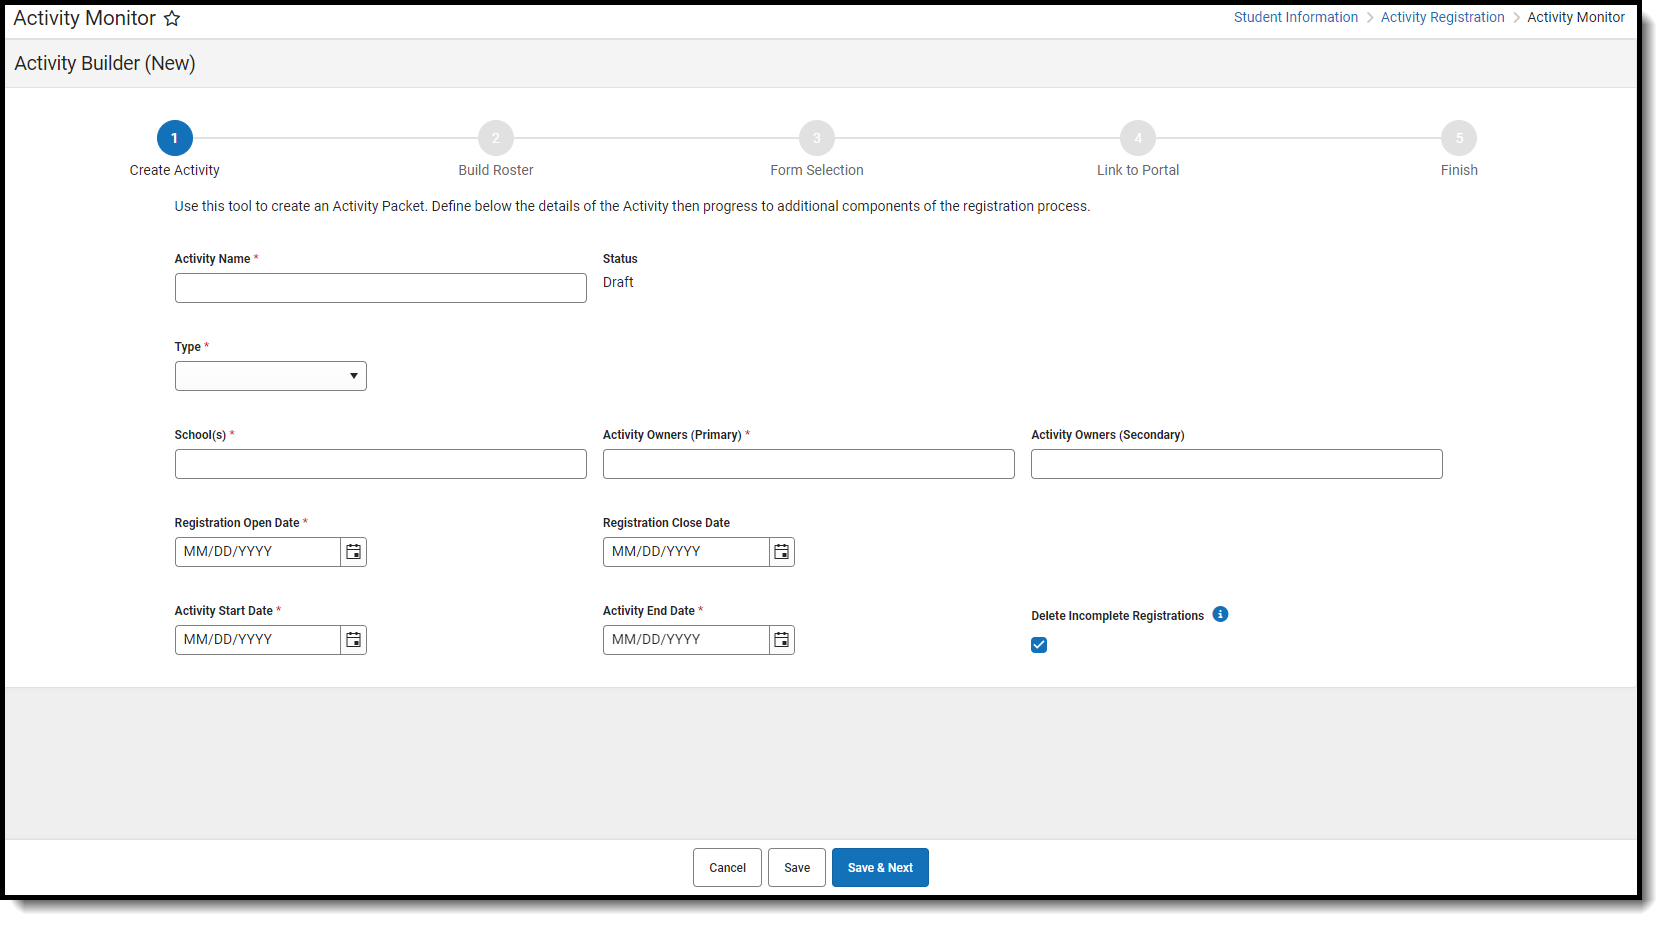
Use the following field descriptions to complete the Create Activity screen.
| Field | Description |
|---|---|
| Activity Name | A name for the activity you are creating. This is a required field. The Activity Name can be changed until registration is closed. If you have already associated a Product with this activity and the product has the same name, Campus gives you the option to change the product name too. If you change the Activity Name, any completed purchases/registrations that exist when you change the name will still use the original name (name at the time the purchase was made) in School Store reports. |
| Type | The activity Type is provided by Campus. Options include the following:
This is a required field. |
| Activity Level | Activity Levels are another way to identify different kinds of activities. This field only displays if you have added Activity Levels in the Attribute Dictionary and is optional unless the Required checkbox is also marked in the Attribute Dictionary. 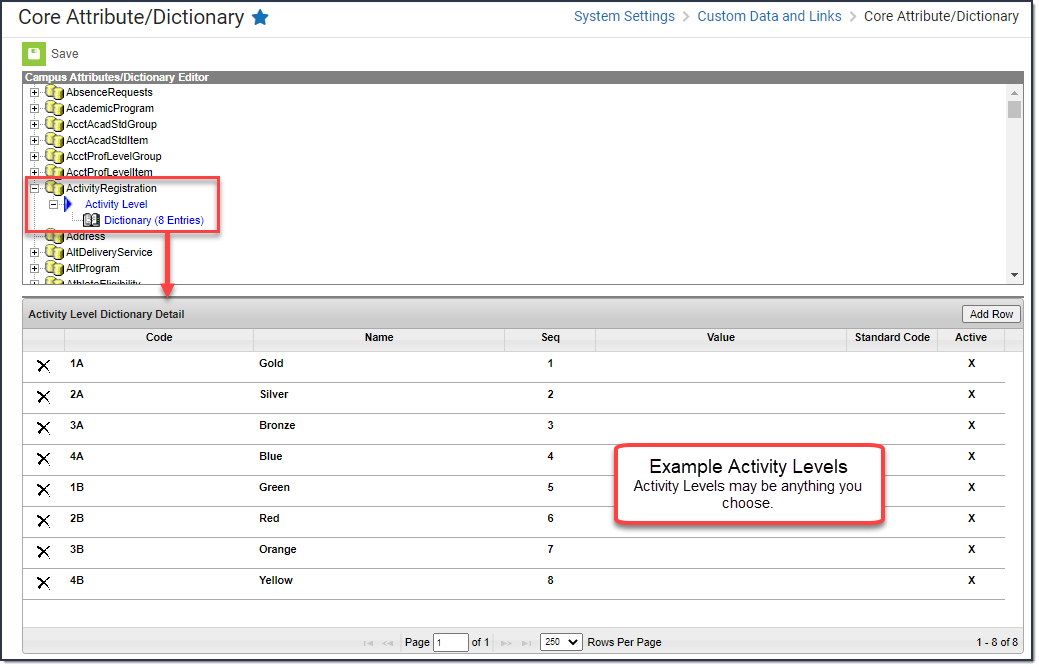
|
| International | The International checkbox only displays when the Activity Type is Field Trip. If the activity needs preapproval, marking this checkbox ensures Campus routes your activity request to the correct approver(s). |
| Status | The Activities status. This is a read-only field.
If the Registration Closed Date is after the Activity Start Date, the Status is Active - Registration Open. |
| School(s) | The school(s) to which you can associate the Activity. Only schools to which you have tool rights display. This is a required field. |
| Activity Owners (Primary) | The primary person(s) responsible for the Activity. To appear in this field, the person must have an active assignment in the selected school and
You may select more than one person in the field. For access to attendance and messaging options, the person must also have Teacher marked on their District Assignment or be assigned the Teacher role on their Work Assignment (HR Only). When a Primary Owner is not the person who created the activity and changes the Primary Owner to another person, they will not have access to the activity after they save their changes. When a Primary Owner is not the person who created the activity and adds themselves as the Activity Owner (Secondary), they will only have read-only access to the activity after they save their changes. |
| Activity Owners (Secondary) | The secondary person(s) responsible for the Activity. To appear in this field, the person must have an active assignment in the selected school and
You may select more than one person in the field. For access to attendance and messaging options, the person must also have Teacher marked on their District Assignment or be assigned the Teacher role on their Work Assignment (HR Only). |
| Registration Open Date | The first day the Activity is displayed in the School Store and people can register for the Activity. The date must be before the Activity Start Date and Registration Close Date. This is a required field. |
| Registration Close Date | The last day on which the Activity is displayed in the School Store. The date must be after the Registration Open Date and prior or equal to the Activity End Date. If you do not enter a date, Campus automatically uses the Activity End Date. |
| Activity Start Date | The date on which the Activity begins. The date cannot be before the Registration Open Date or after the Activity End Date. This is a required field. |
| Activity End Date | The date on which the Activity ends. The date cannot be before the Activity Start Date or Registration Close Date. This is a required field. |
| Delete Incomplete Registrations | When turned on, this setting will automatically delete activity registrations on the day after an activity ends if those registrations have been started without completing the purchase and the student never participated in the activity. |
Step 2 - Build Roster
Define eligible participants by selecting a saved Ad Hoc filter.
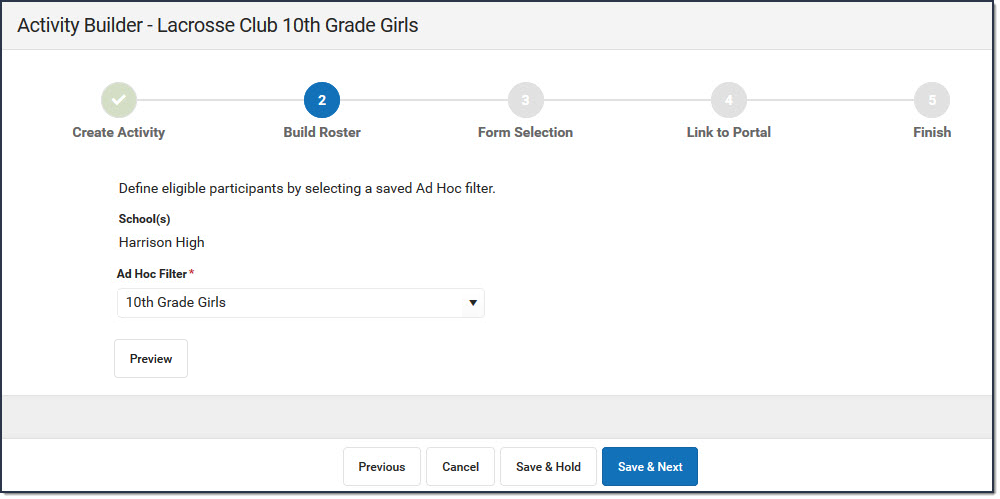
Use the following field descriptions to complete the Build Roster screen.
| Field | Description |
|---|---|
| School(s) | This field displays the school(s) that were selected in Step 1 - Create Activity. |
| Ad Hoc Filter | The Ad Hoc filter for selecting eligible students. Campus only allows students who are included in the Ad Hoc filter and have an active enrollment in the school(s) associated with the activity to register for the activity. This is a required field. |
| Preview | Click this button to preview roster information in a side panel. The panel displays an estimate of the total number of students listed by school then provides the student's names. If a student has multiple enrollments and Campus cannot identify the primary enrollment, an asterisk (*) displays behind the student's name. Use the Preview Future Enrollments checkbox to allow you to see who would be included if you choose to enable Include Future Enrollments under Eligibility on step 4 of the builder. Students with an applicable future enrollment will be added to the preview if their enrollment falls within the Days from Registration Close Date. These students will display with the status of Future. To refresh the preview with updated results, click Generate. IF your district includes a school in its Ad hoc filter, verify the same school is selected on Step 1 - Create Activity. If the Ad hoc filter and the activity are associated with different schools, the Preview displays irregular results. If you do not have access to the ad hoc filter that is assigned to the activity, the Preview button does not display. 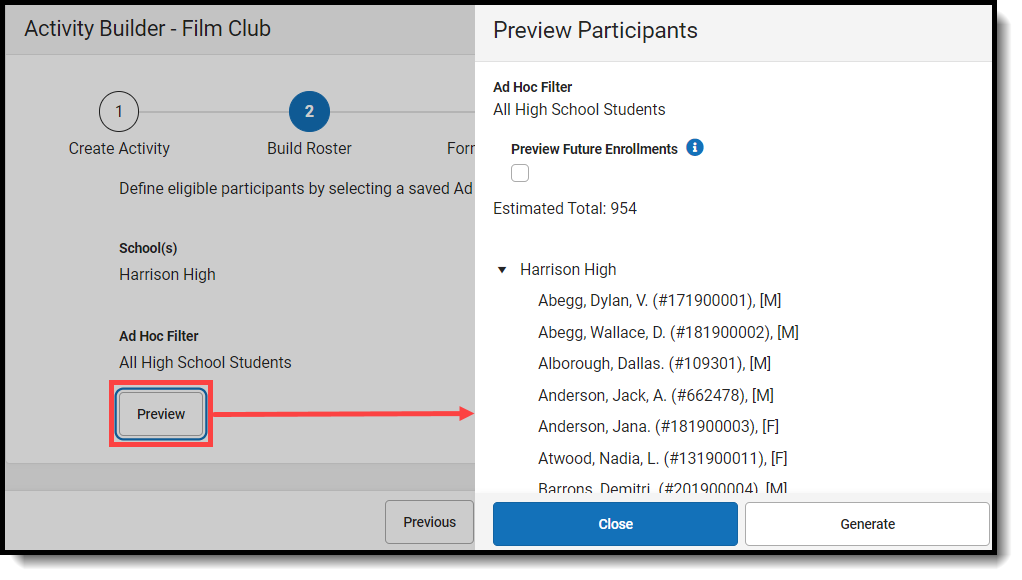 |
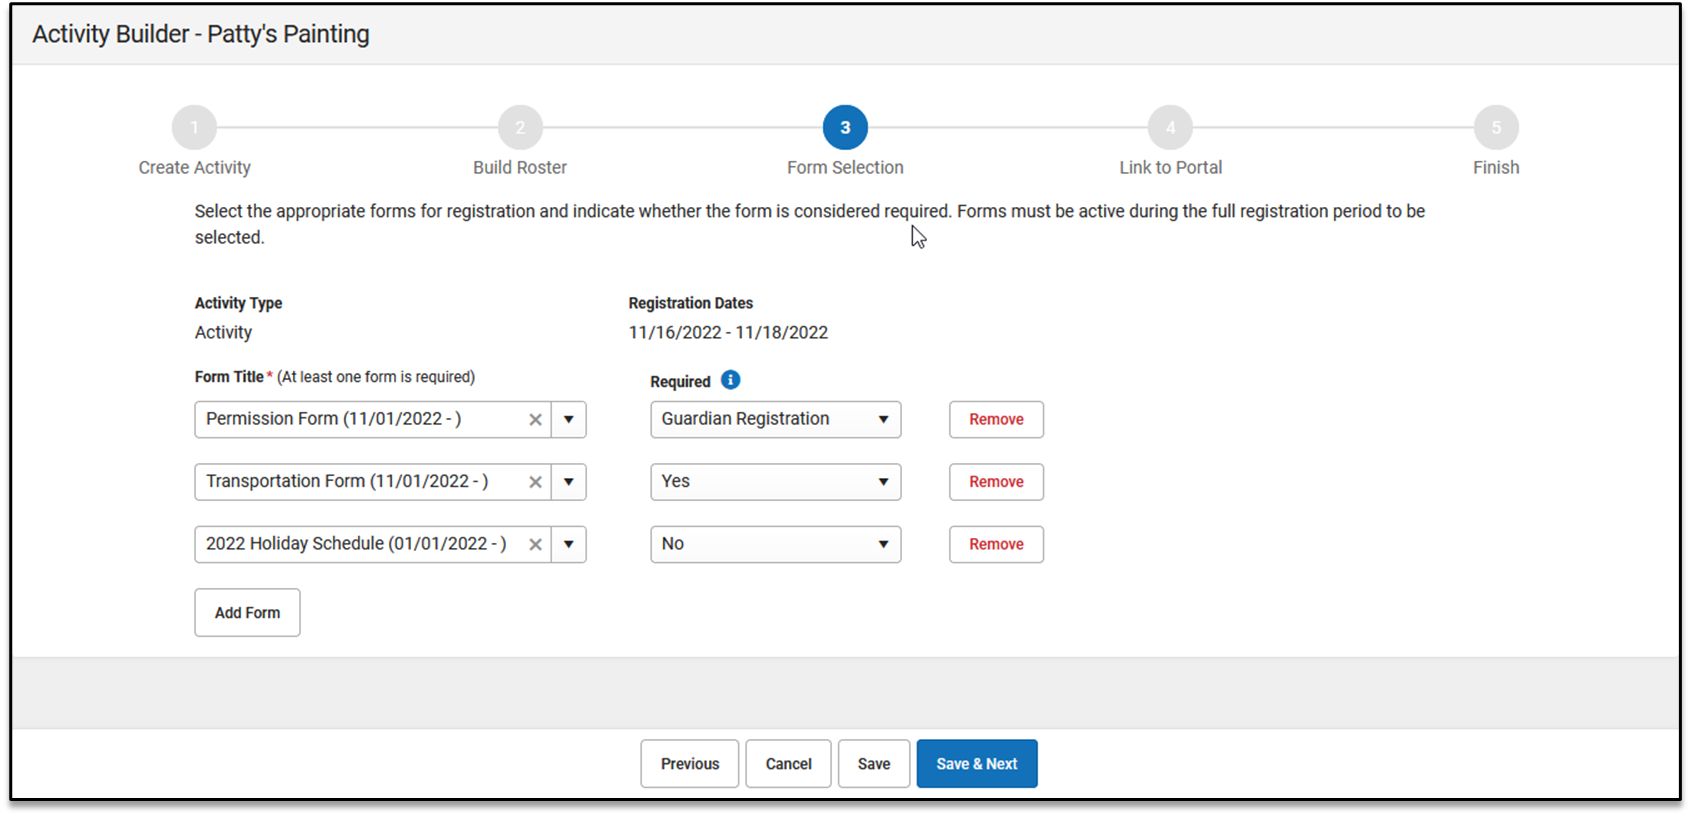
Step 3 - Form Selection
Adding a form is optional.
Select the appropriate forms for registration and indicate whether the form is considered required.
Once a form has been assigned out, it can no longer be edited for the Activity.
Use the following field descriptions to complete the Form Selection screen.
| Field | Description | ||||||||
|---|---|---|---|---|---|---|---|---|---|
| Activity Type | This field displays the Activity Type that were selected in Step 1 - Create Activity.
| ||||||||
| Form Title | This field displays the custom forms associated with the Activity Type. You must select at least one form. You can add multiple forms by clicking the Add Form button. Tip: If the form title is grey and cannot be selected, check the form's active dates. The form must be active for the full time that your activity has registration open.
| ||||||||
| Required | Some forms may require information or an eSignature from the parent or student before it can be purchased in the School Store. Select an option from the Required dropdown list to determine whether information or signatures are required.
Depending on the option selected, one or two red stars appear next to the form in the School Store. The following image demonstrates how this appears in the store. 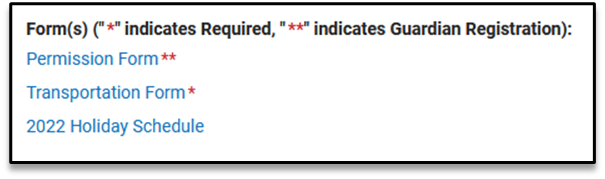 |
Declining a Signed Form
If a form has the option Guardian Registration selected, the guardian must sign the form. If he or she declines the signature, this message appears when the guardian clicks the Add to Cart button.
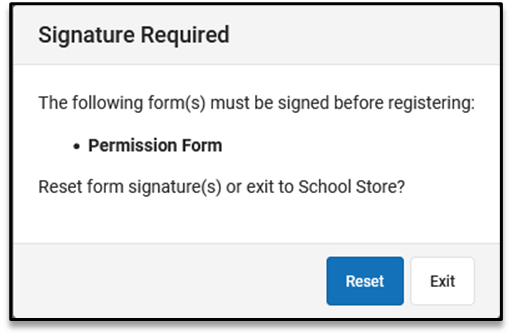
| Option | Description |
| Reset | When the guardian clicks the Reset button, he or she has another chance to sign the form by clicking the name of the form, signing it, and then submitting it. The guardian can now click the Add to Cart button to purchase the activity. |
| Exit | When the Exit button is clicked, the activity is placed back into the School Store, and the guardian must start over with the registration process to purchase the activity. |
Step 4 - Link to Portal
On this screen, configure how the activity should display in the School Store and set up the associated costs.
Once an Activity has been purchased, the Associated Costs cannot be modified.
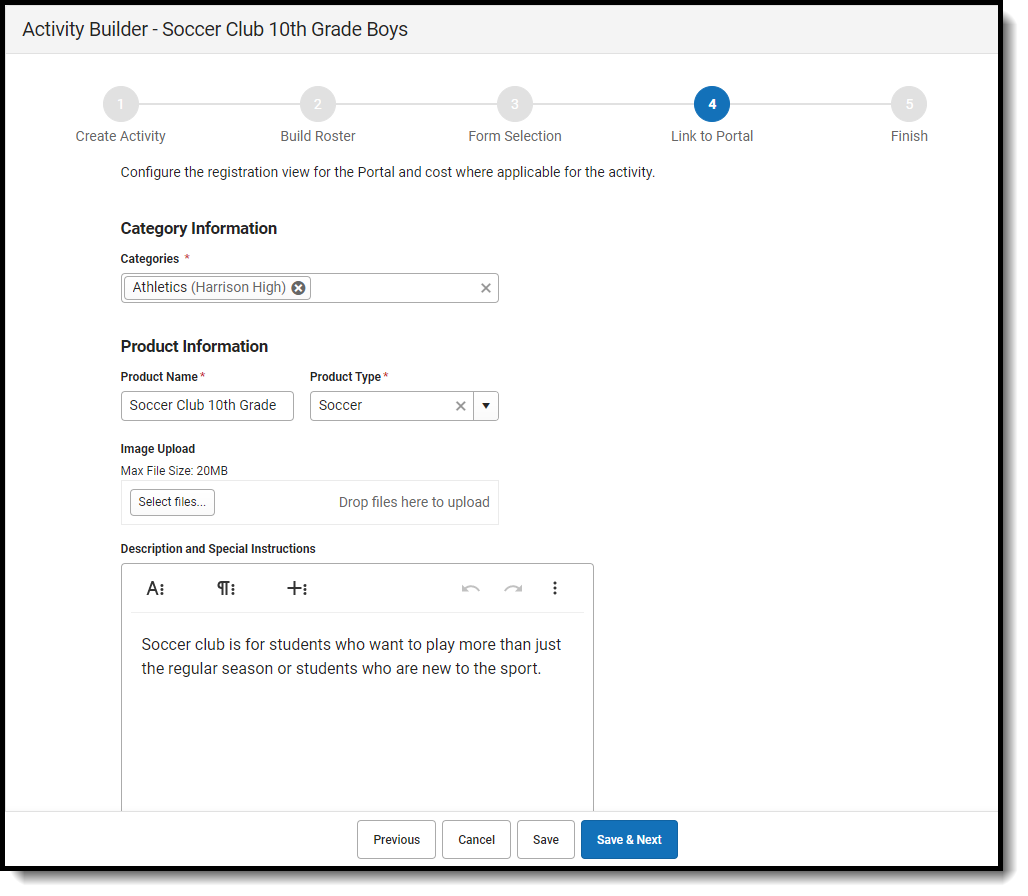
Use the following field descriptions to complete the Link to Portal screen.
| Field | Description |
|---|---|
| Category Information | |
| Category | Categories are how similar products are grouped together in the store. When a portal user selects a category, only the products assigned to that category display. This is a required field. See the Categories (School Store) article for more information about managing categories. |
| Product Information | |
| Product Name | The name that displays in the store. This is a required field. |
| Product Type | Product Types are assigned to products and to Fund Accounts. When a product is purchased, funds are deposited into the bank associated with the Fund Account that is assigned to the same Product Type. Product Types are set up in the School Store: System Administration > School Store > Product Types. This is a required field. |
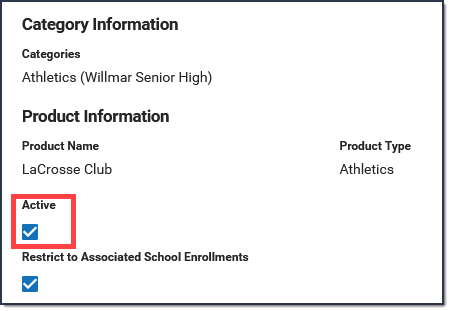
| Active | When this checkbox is marked, the product displays on the School Store. However, if this checkbox is not marked, the product is not available even if registration is currently open. This checkbox is most useful for troubleshooting issues in the School Store. If the Category associated to the activity is inactivated, this checkbox is automatically unmarked. The Active checkbox does NOT display when the Activity is in a Draft or Cancelled status.
|
| Image Upload | This option allows you to add a picture of the product.
|
| Product Description and Special Instructions | Detailed information about the product. This description appears below the picture of the product. Tip Use this area to provide more information about the activity like meeting times, locations, and contact information. You could also provide special instructions such as how to turn in the forms. |
| Customer Comments | When this checkbox is marked, customers can add information to their purchase before they check out.
|
| Eligibility | |
| Restrict to Associated School Enrollments | When this checkbox is marked, the Recipient dropdown list will only display students who have an enrollment in the active school year at the school to which the activity is attached. This includes primary, secondary, and enrollments with a future end date. Example If you have an Activity attached to the High School only and this checkbox is marked, parents will only be able to select their student(s) with primary and secondary High School enrollments in the active school year as well as enrollments with a future end date. Please note that if the same Activity is associated with multiple schools; e.g., a middle school and a high school, parents can select both middle and high school students in both stores. |
| Include Future Enrollments | When this checkbox is marked, this will allow users to look ahead for future enrolled students that also meet the criteria of the Ad Hoc filter from Step 2. Restrict to Associated School Enrollments must be selected to use Include Future Enrollments. |
| Days from Registration End Date | The number of days (between 1 and 365) into the future that enrollments can be viewed. |
| Associated Costs | |
| Track Limits | Mark this checkbox if you want to track the number of openings or items you have available or if you want to cap the number of students allowed to enroll. When this checkbox is marked, Campus calculates the amount of inventory you have available after a purchase is made through the School Store. Marking this checkbox enables the Inventory Limit field and makes it required. Do NOT mark this checkbox if you do not want to limit the number of registrations that can be sold. |
| Partial Refunds | When this checkbox is marked, partial refunds can be issued in the Payments Reporter for the activity. If this Partial Refunds checkbox is marked and the Track Limits option is also selected, the Payments Reporter will allow you to increase the number of available openings or items when you make a partial refund. |
| Item Name | The Product Name automatically displays here but can be changed. This is a required field. If more than one option is available for users to select, this is the name of the option that displays under the Product in the School Store. |
| Selling Price | The price customers see and pay in the School Store. The price can be $0.00. This is a required field. |
| Reduced Price | The price students with Reduced eligibility status whose guardians have given permission to share it with School Store the pay and see. The price can be $0.00. To use this feature, the Allow Free and Reduced Pricing checkbox must be marked in the School Store setup. |
| Free Price | The price students with a Free eligibility status whose guardians have given permission to share it with the School Store pay and see. The price can be $0.00. To use this feature, the Allow Free and Reduced Pricing checkbox must be marked in the School Store setup. |
| Inventory Limit | This field is only available if you marked the Track Limits checkbox. Enter the maximum number that may be purchased. Once this number is reached, the product does not display in the School Store. If you process a refund during registration, Campus returns the inventory for purchase. If a student is manually registered for an activity within the Activity Roster and the Option Purchased is set to an item with an inventory limit, it will affect Inventory Limits. This is a required field when tracking limits. |
| Add (button) | Click the Add button to add another item that may be purchased for this product. In the following example, an option was added that includes an activity bus.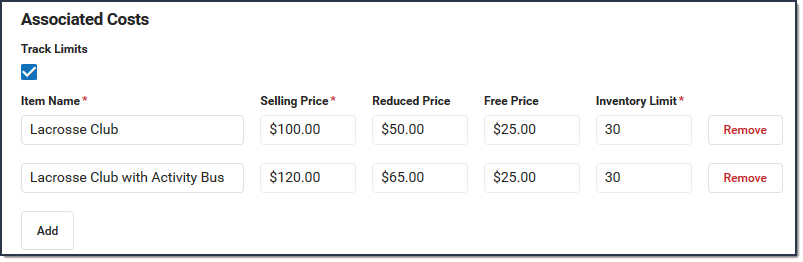 |
| Receipt Comments | This field allows you to enter comments or special instructions that you want on the customer's receipt. For example, you could add reminders for event times, meeting places, or what to bring. |
Step 5 - Finish
Review the Activity Registration product display for the Campus School Store and validate the appropriate Custom Forms are attached. Click Finish to complete the process. After you click Finish, the Activity is in a Ready or Registration Open status. Editing is limited when an activity is in a Registration Open status. Most fields cannot be changed.
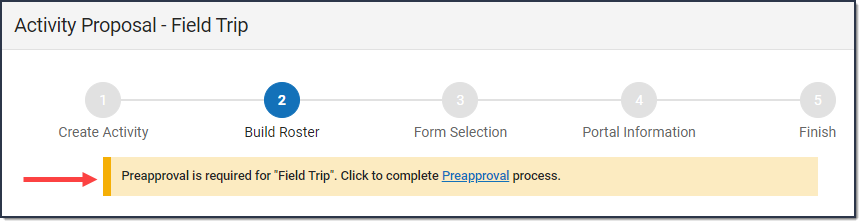
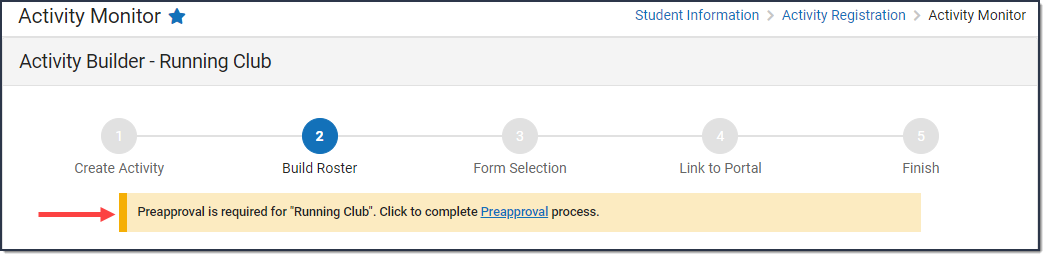
 When the Finish button is unavailable, you can NOT complete this step because your activity requires preapproval.
See the Submit an Activity Request for Preapproval topic for more information.
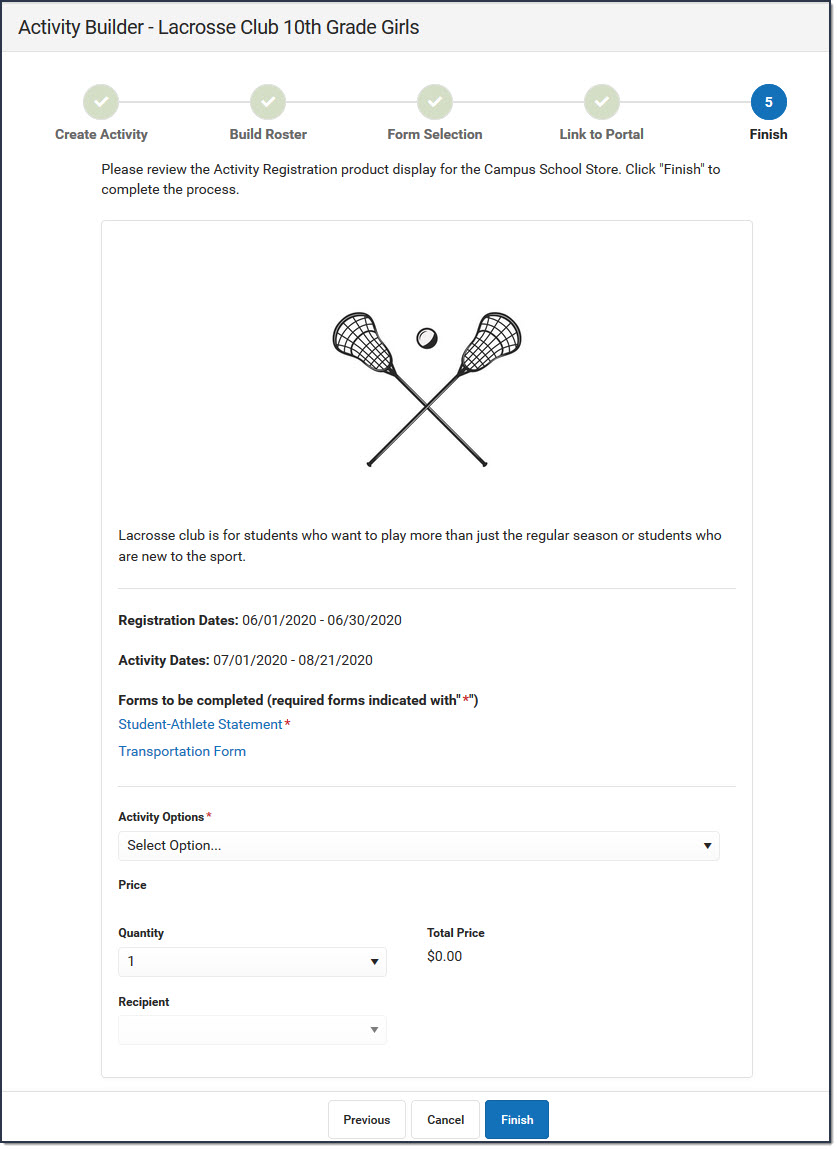
The following image is an example of this activity on the School Store. Once a student has registered for an activity, that activity no longer appears for them in the School Store.

Submit an Activity Request for Preapproval
If your activity requires preapproval before it can be created, a yellow banner displays under the progress tracker after Step 1. Create Activity or it displays on the Proposed tab with the status Preapproval Required - Proposal. You can submit your activity request for preapproval at any time but the activity must be approved before you can complete Step 5. Finish.
- Click the Preapproval link in the banner.
Result: The Preapproval panel displays.
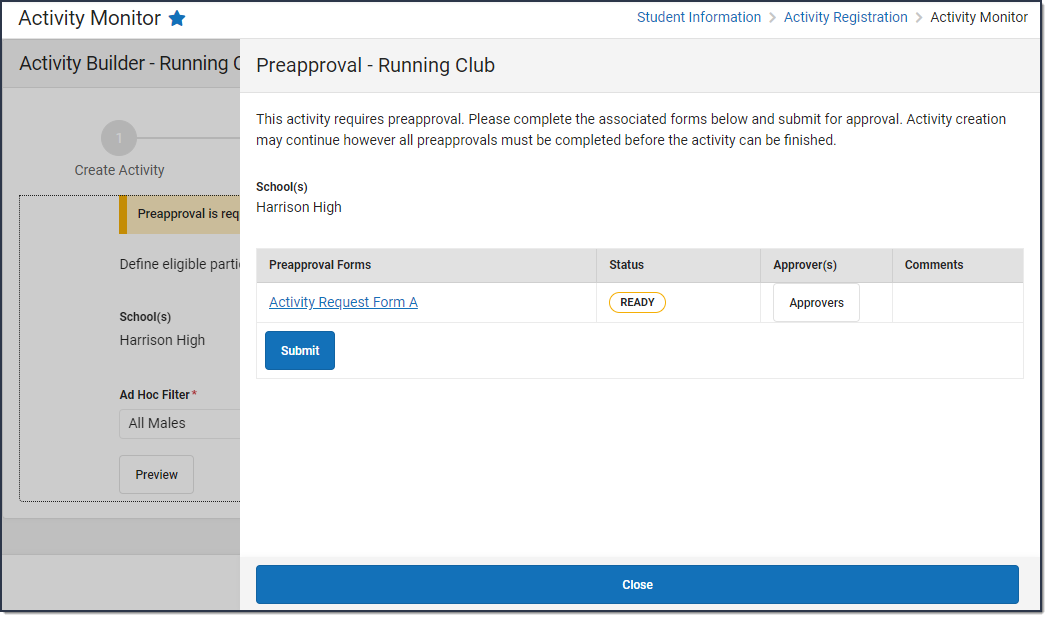
- Click the links for the Preapproval Form(s) (there may be more than one), fill in the required fields, and then click Save in the action bar. Repeat this step for each form.
Result: The status changes to Pending. - Click Submit.
Result: The form status changes to Submitted and the Submit button changes to Rescind. - Click Close to close the panel and return to the activity.
Result: The activity status changes to Preapproval Pending - Proposal. You can continue setting up your activity or click Cancel. Campus saves your activity and changes color the color of the forms alert based on the preapproval status.If your activity request is... Then... Approved you will receive a notification that your activity request was approved and you may complete Step 5. Finish. The Activity Proposal is also assigned the Preapproval Complete - Proposal status.
Returned you will receive a notification that your activity request was returned. The activity request is assigned the Preapproval Returned - Proposal status and Campus unlocks the custom form(s) so that you can make changes and submit the activity request again for preapproval.
Declined you will receive a notification that your activity request was declined. The activity request is assigned the Preapproval Declined status and moved to the Previous tab in the Activity Monitor.