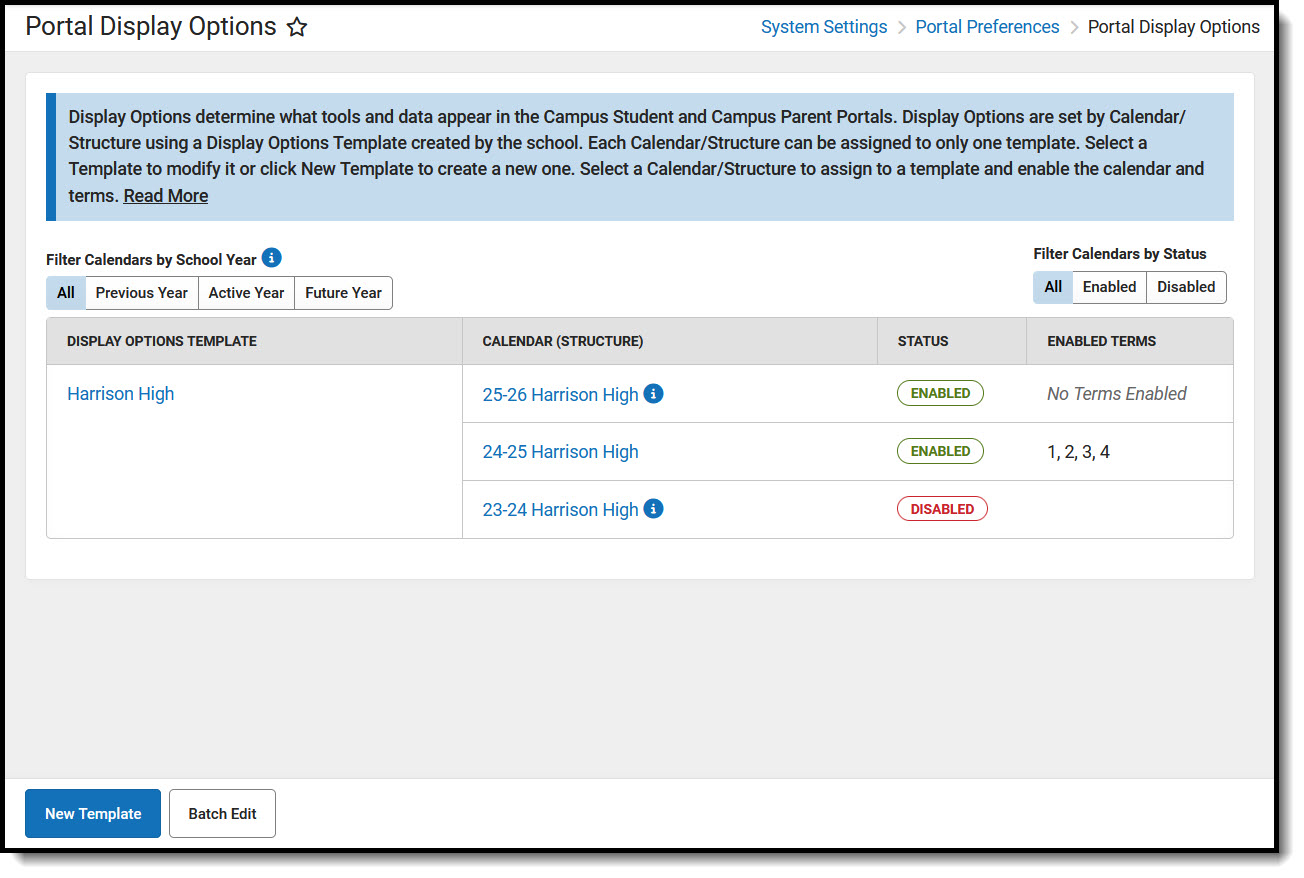
Tool Search: Display Options
The Portal Display Options allow schools to determine which tools and data are available in the Campus Student and Campus Parent Portals. This tool is scoped to the school selected in the Campus toolbar.
Options are managed by creating templates and assigning calendars (and schedule structures) to that template. This tool also contains Batch Edit options to simplify updating multiple templates or schools.
 Portal Display Options
See the Portal Display Options Tool Rights article for suggested tool rights.
Understand the Portal Display Options Tool
The primary view of the Portal Display Options tool lists the Templates created for the school and the Calendar(s) assigned to each template. Click the name of the template or calendar to view more information.
For each template, a Status and, if applicable, which terms are enabled are displayed. The status indicates whether portal data is enabled for the calendar assigned to the template.
Use the filter options above the table to filter the list by calendars in the Previous, Active, and Future school years or by calendar status.
| The Active year is the School Year currently marked as Active in the School Year Setup tool. |
What does 'Enabled' mean?
If a Calendar (Schedule Structure) is enabled, data is available on the Campus Student and Campus Parent Portals for that calendar. The available data is determined by the display options marked in the template to which the calendar is assigned.
If a Term is enabled, Assignment, Attendance, Grades, and Schedule data for that term are available, depending on which display options are enabled.
Which calendars can be enabled?
Calendars can be enabled if they are for the current, active school year, the prior (previous) school year, or the next (future) school year.
Calendars from the previous school year can be enabled for only 90 days from the Calendar End Date. This is done by extending the enabled status of the calendar. See the Calendar & Term Settings section below for information about enabling previous calendars.
For enabled calendars in the active and previous school years, the data available on the Portals is determined by the Display Options selected. For calendars in the future school year, only the Display Options for Academic Plan, Activity Registration, Course Registration, Documents, and Schedule tools are applicable. All other data is hidden from enabled calendars in future school years.
Questions? Check out the Portal Preferences FAQ article.
Create a Template
To create a new display options template, click the New Template button at the bottom of the tool. Alternately, open an existing template, click the arrow next to the Save button, and then Save & Copy to create a copy of that template as a starting point.
 Manage display options by first creating a template.
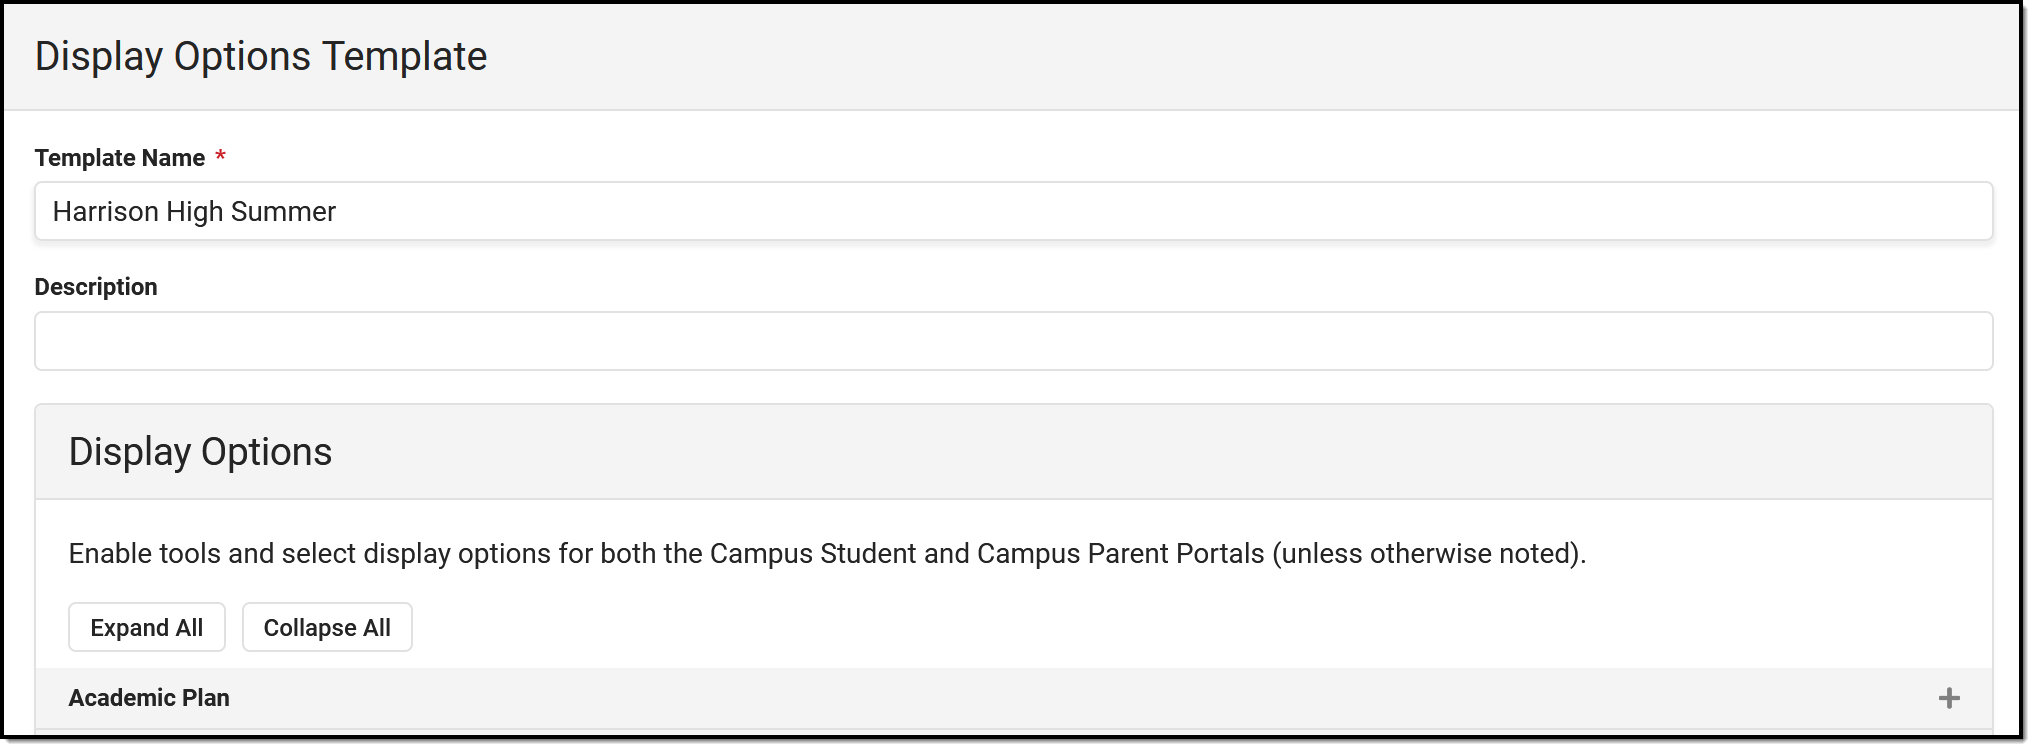
Enter a unique Template Name. This is the name displayed in the Portal Display Options tool and when assigning calendars. Enter a Description if desired. Currently, this description is only displayed in this tool. It may help provide more information about what data is enabled in the template and how it should be used.
Display Options are grouped in expandable sections by tool. Click Expand All to view all options. When enabled tools are collapsed, an indication in the section heading indicates if the tool is enabled.
For many tools, display options can be set individually for Campus Student and Campus Parent. For some tools, additional options are displayed for specific settings when the tool is enabled. See the Display Options section below for a breakdown of each tool, its related settings, and examples from the apps. |
Once the desired options for this template are marked, click Save to complete the template. The next step is assigning calendars to the template.
Assign Calendars to a Template
To assign calendars to a template, click the Manage Calendars button at the bottom of the template. Click Assign next to the calendar(s) to assign to this template. Calendars can also be assigned by clicking the calendar name from the main display options screen.
Calendars can only be assigned to one template at a time.
 Next, calendars to the template
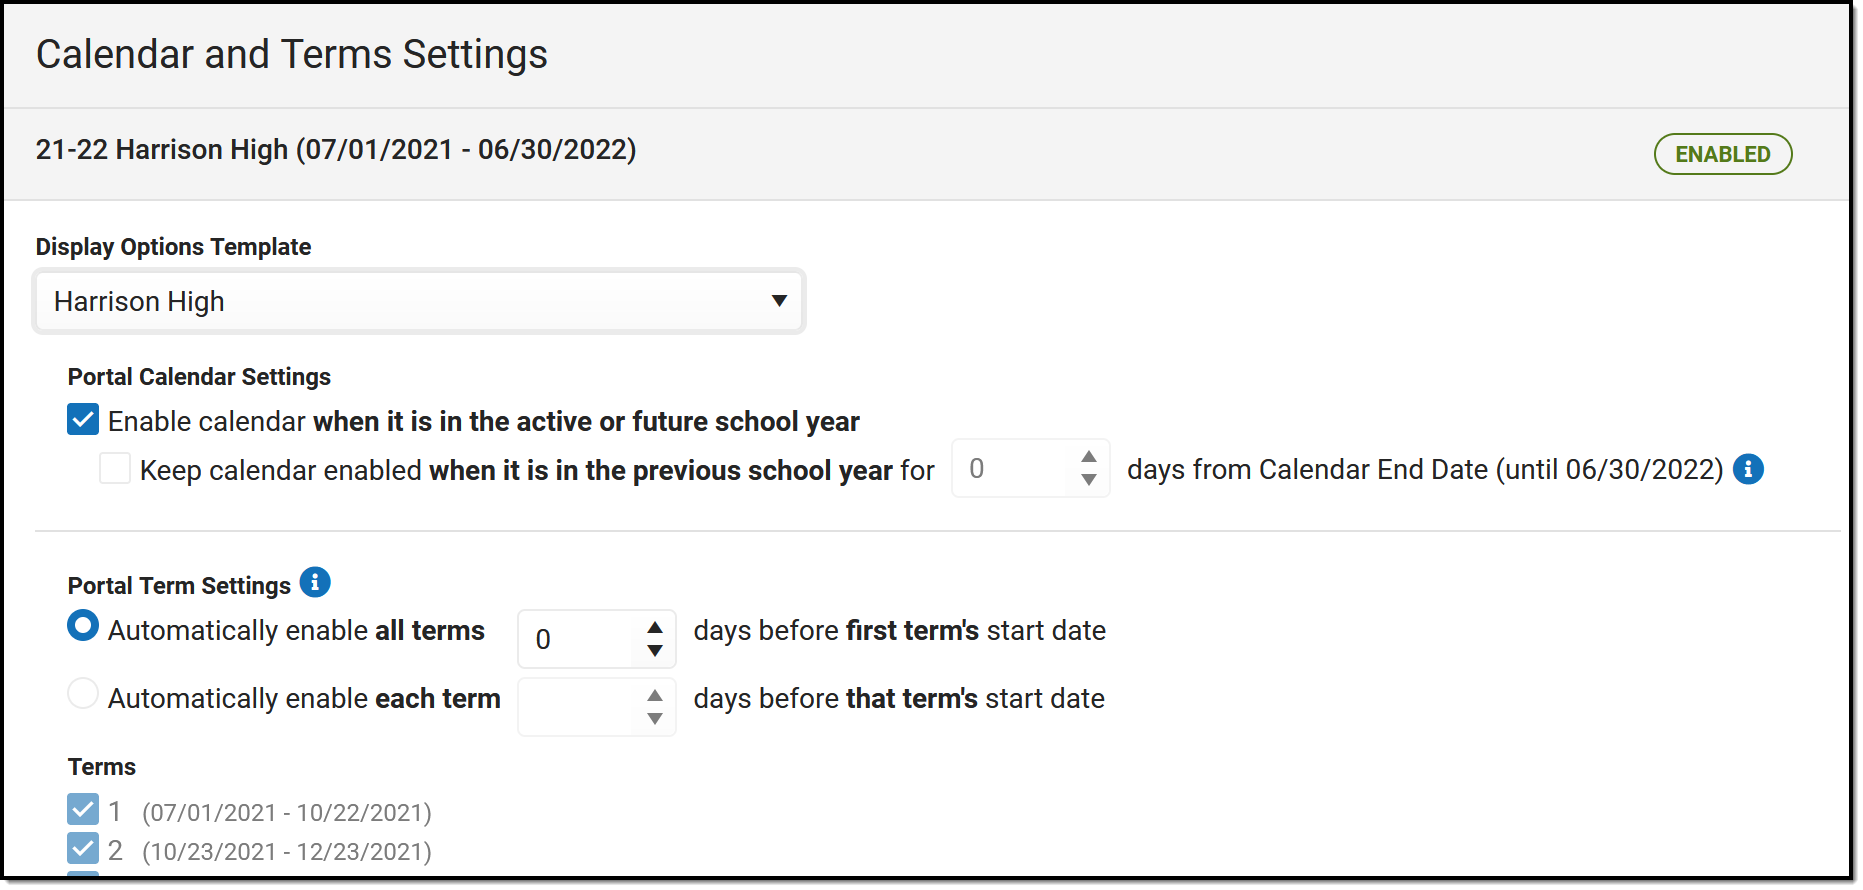
Calendar and Term Settings
When a calendar is assigned to a template, additional settings display:
Enable calendar when it is in the active or future school year.
When a calendar is enabled, data in that calendar is available in the portals, depending on the options selected. This setting to enable a calendar applies to calendars in the active or future school year. The Active year is the School Year currently marked as Active in the School Year Setup tool. The future school year is the next one.
Keep calendar enabled when it is in the previous school year for X days from Calendar End Date
Keeping a calendar enabled allows parents and students to access a calendar's data past its end date. This option is especially helpful for data such as Grades and Assignment scores.
Access can be extended up to 90 days past the Calendar End Date. After that date, the calendar will no longer be listed in the Portal Display Options tool and cannot be made available.
Portal Term Settings
Term-specific settings control access to Assignments, Attendance, Grades, and Schedule data.
Terms are automatically enabled based on the term's Start Date based on the automatic preferences selected. Automatically enable all terms according to the first term's Start Date, or enable each term according to its own Start Date. Select the number of days before the Start Date for which the terms should be enabled.
Display Options Summary
Below the list of terms is the Display Options Summary, which indicates the template selected for the calendar and which options are enabled.
Display Options
The following describes the available options to display in Campus Student and Campus Parent. An example of the option is provided in the last column.
See the Campus Student and Campus Parent articles for examples of what these apps look like.
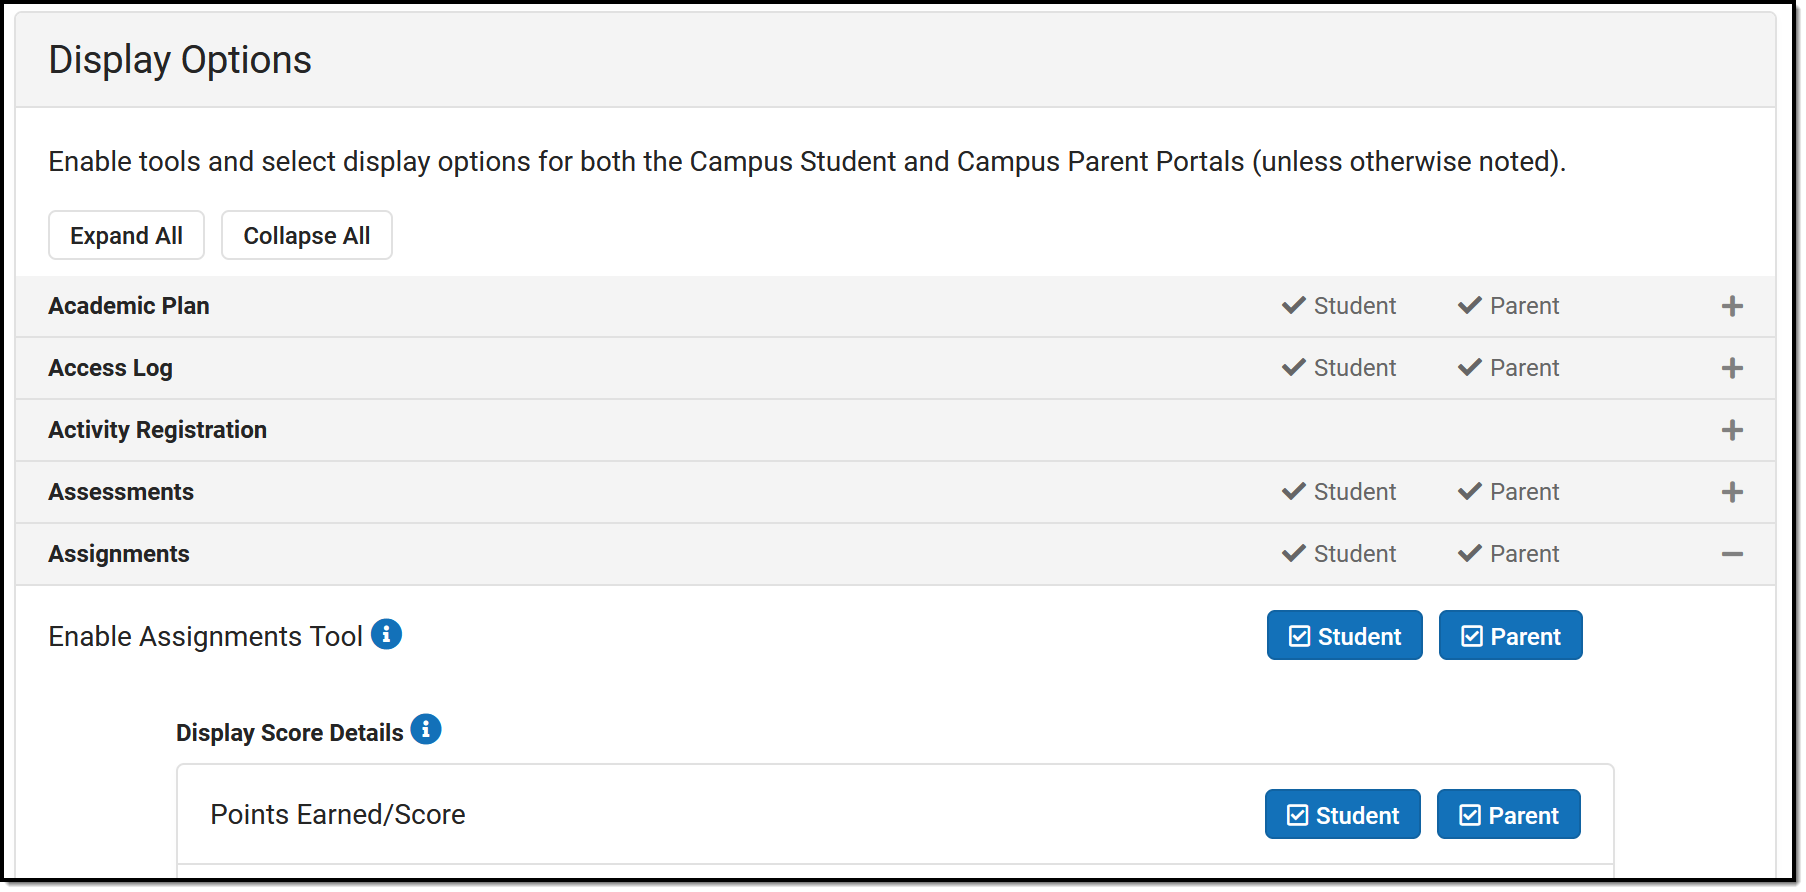 Expand sections of the display options to enable tools and specific data elements to display in the portals.
Attention districts who update their Portal Display Options via custom scripts:
Campus has provided a prism call to refresh the portal cache. This call should be run after a script updates options using the Task Scheduler. The prism call is: x=portal.PortalDisplay-reloadPortalDisplayOptionsCache
Schedule the task as desired in the Scheduler. The Tool Code for this tool is resources.PortalOptions. Select a Task Type of Java (Prism URL call) and enter the text above in the text box.
| Option | Description | Campus Student and Campus Parent |
|---|---|---|
| Academic Plan | ||
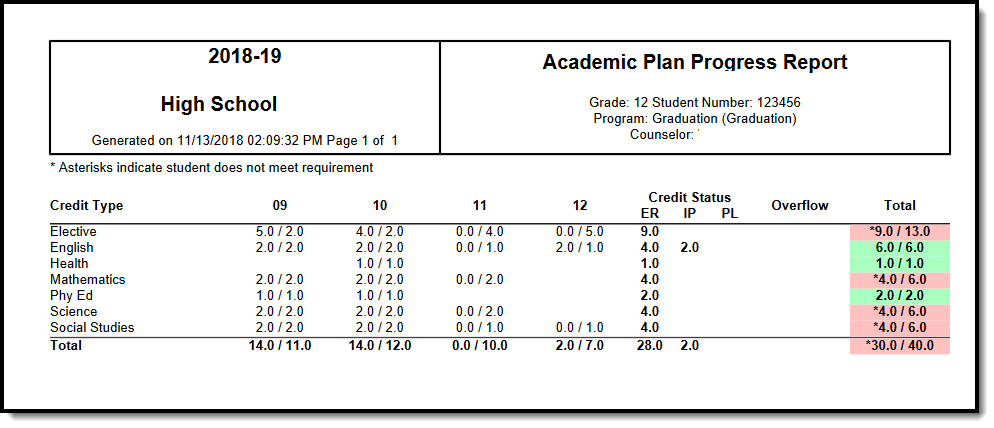
| Enable Academic Plan Tool | Displays information related to a student's course plan.
The Academic Planner and Course Registration options can be turned on at the same time, but it is not recommended. It is best to have a window of time when students can add courses to their course plans and a window of time when students can enter course requests. This eliminates the risk of overwriting course requests or planned courses. |
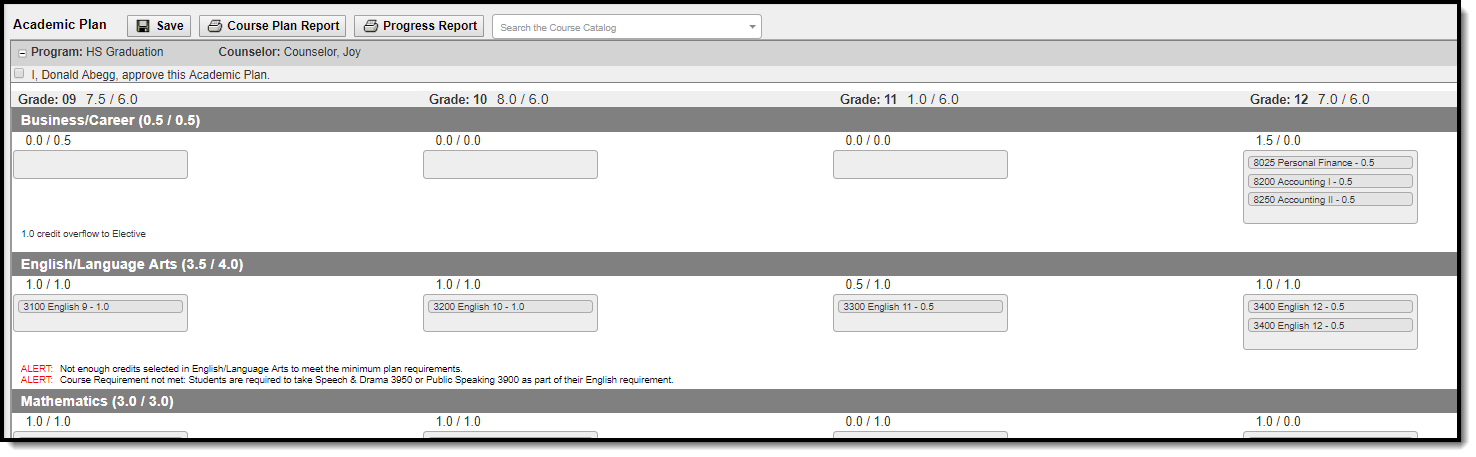 Click to enlarge |
| Enforce All Rules | When marked, students can only save their academic plan if ALL planning rules and requirements have been fulfilled.
When it is not marked, students can save their plan without meeting all requirements, but all planning rules must still be met. Warning messages from failed requirements and failed planning rules are displayed so users can see the issues but still save the entry. |
|
| Require approval by parent/legal guardian | When marked, parent/legal guardians can mark this box indicating they have reviewed the student's academic plan.
This field displays as marked when the student views the plan when logged into the portal and when the counselor views the student's Course Plan. Parents/guardians can review the student's academic plan and mark this checkbox without being able to change the programs or course plans. This is helpful in situations where a counselor has worked with the student to create a plan and finalize it but still wants parents/guardians to review the selections. |
|
| Display Course Fees | Any fees assigned to a course will be displayed when viewing that course in the Course Catalog search results. | |
| Allow portal users to change program | When marked, parents/guardians and students can select a different academic plan. When not marked, only district staff (counselors, graduation program planners, etc.) can change students' academic plans. | |
| Allow to change course plans | When marked for Campus Student or Campus Parent, students and/or parents can add or remove courses from the course planner. Parents/guardians can approve the student's course plan regardless of whether this checkbox is marked. When not marked, only district staff (counselors, graduation program planners, etc.) can change academic plans for students. | |
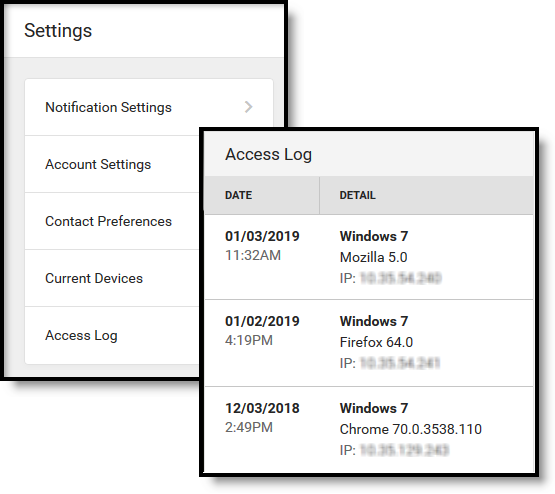
| Access Log | ||
| Enable Access Log tool | Displays the date, time, and IP address of successful login attempts. |
|
| Activity Registration | ||
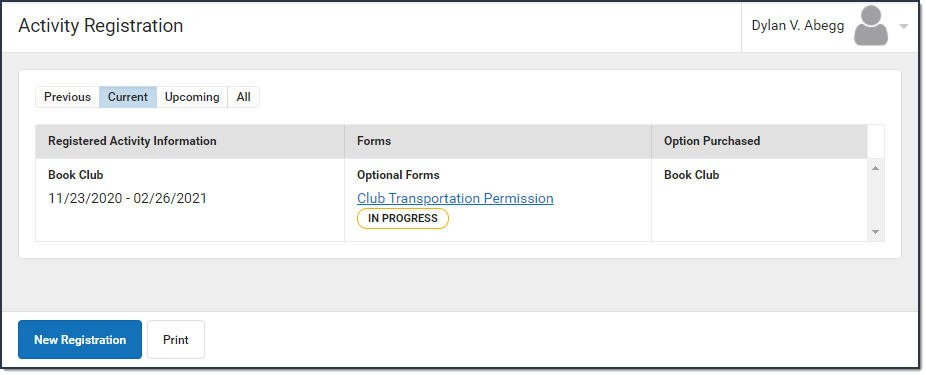
| Enable Activity Registration Viewing tool | Displays Activity Registration information in Campus Parent Portal and Campus Student Portal.
Campus finds the student's current enrollment record and checks that school's preference to determine whether Activity Registration information should display. If there isn't a current enrollment record, Campus will use a previous enrollment record to determine if the Activity Registration data can display. |
 Click to enlarge |
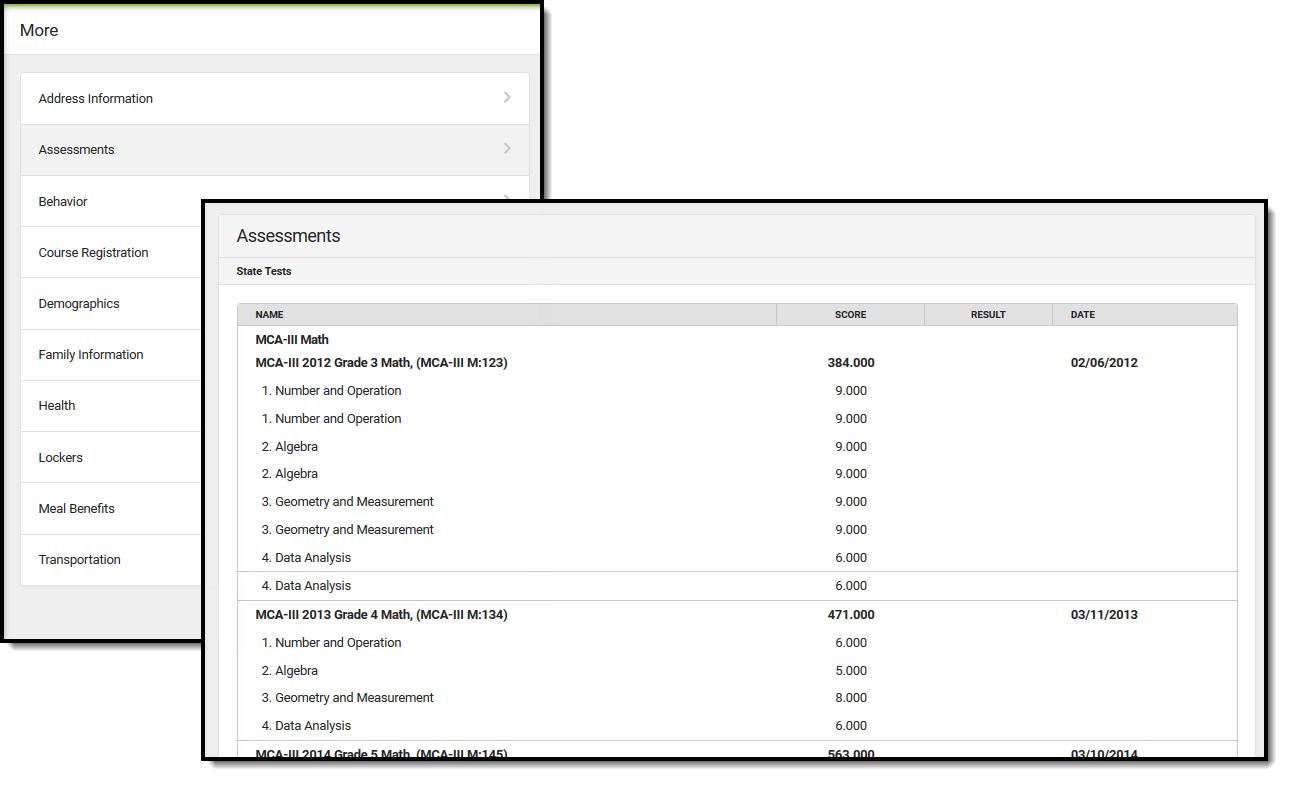
| Assessments | ||
| Enable Assessments tool | Displays a student's district, state, and national test scores. |
|
| Assessment Display Text - Student/Parent | Enter text in these two editors to display that text at the top of the Assessment tool in Campus Student and Campus Parent, respectively. | |
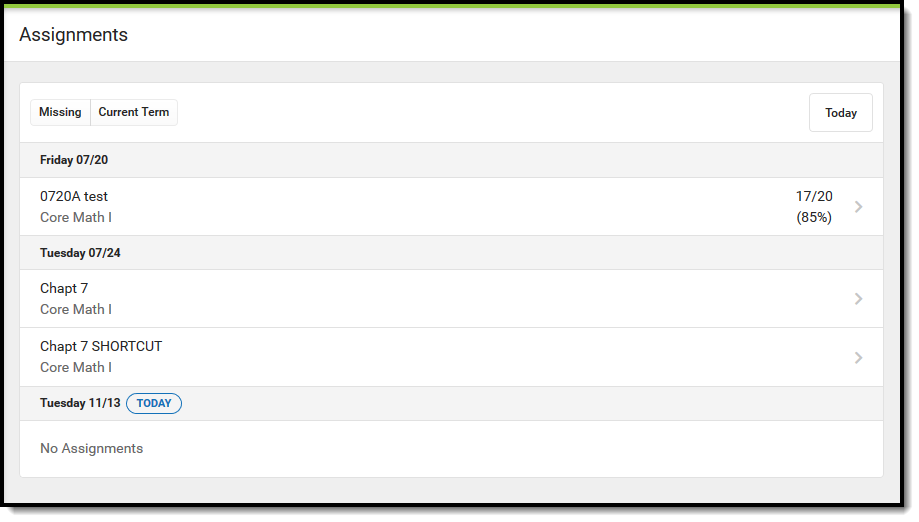
| Assignments | ||
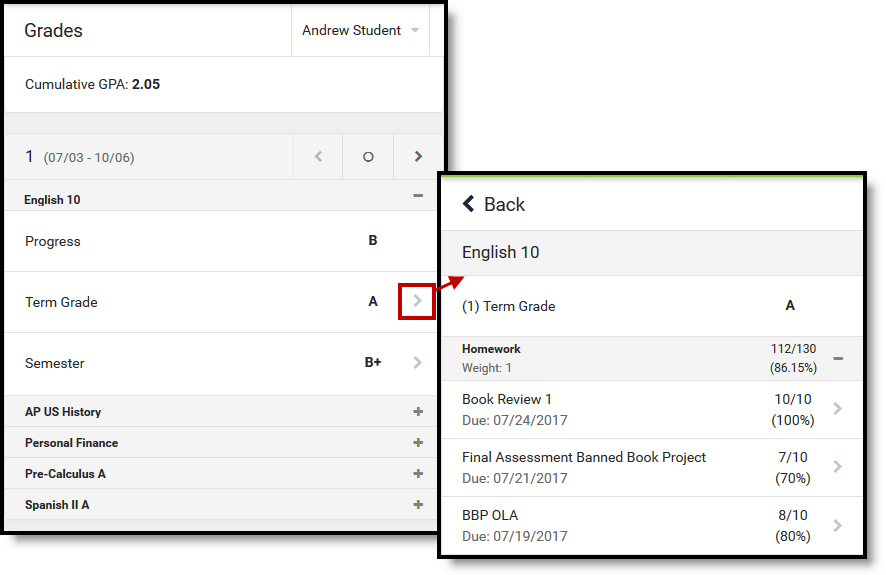
| Enable Assignments tool | Enables the tool that lists a student's assignments for the year. Students can view scores and submit work, as enabled by their teacher. Assignments are also displayed in other areas of Campus Student and Campus Parent, including Grade Book Updates, Today, and the Calendar, as well as the Course detail and Grade detail. |
|
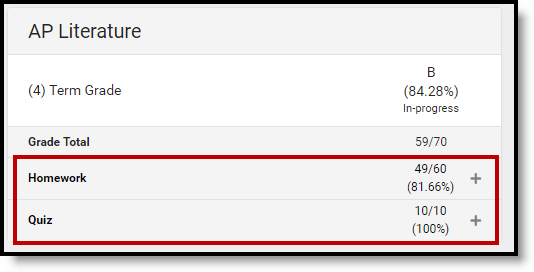
| Display Score Details | Displays the selected details about a student's score. Selecting these options also enables notifications when assignments are scored, based on student and parent settings.
| |
| Display Category Details | Displays category data in the grade detail, by clicking a specific task/standard in the Grades tool. Specific options include:
|
 Click to enlarge |
| Attendance | ||
| Enable Attendance Tool | Displays the student's attendance events for the school year in the Attendance tool and the Calendar. | 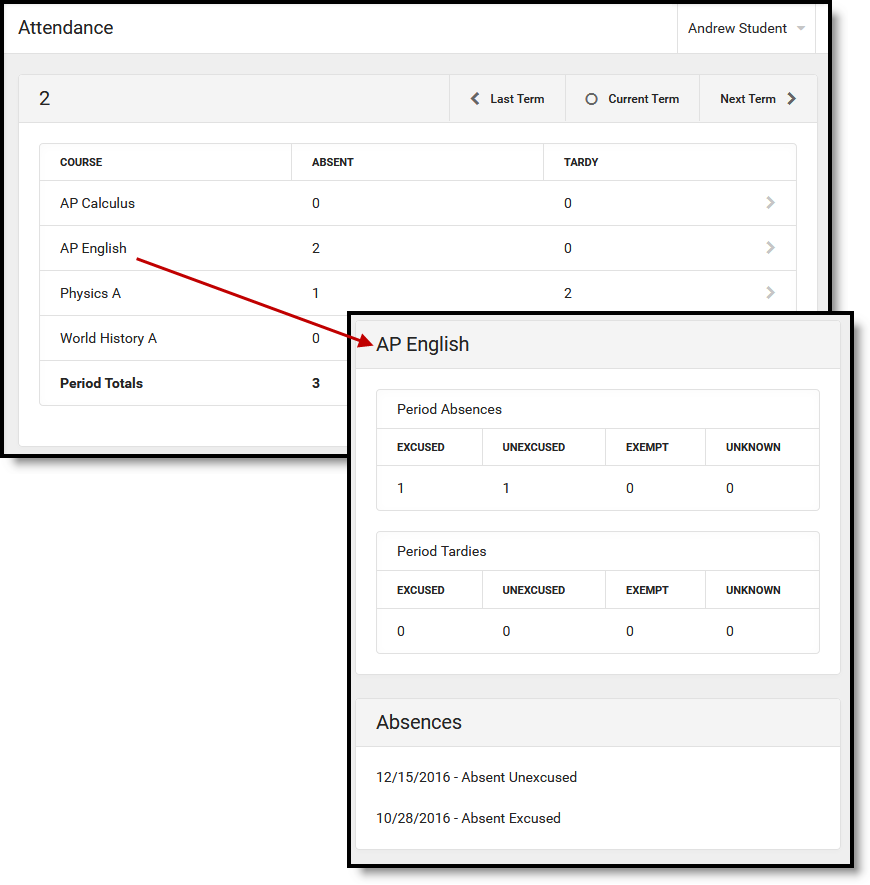 Click to enlarge |
| Display Attendance Comments | Displays the comments attached to attendance events (click second image) (NOT available for Kentucky districts). | |
| Display Positive Attendance Attendance tool only) | Displays attendance for any courses using Positive Attendance functionality (click third image). This option may not display for all states and districts. | |
| Show Unknown Attendance | Enables attendance with a status of Unknown to display within the Portal (ONLY available for Kentucky districts). | |
| Attendance Display Text - Student/Parent | Enter text in these two editors to display that text at the top of the Attendance tool in Campus Student and Campus Parent, respectively. | |
| Behavior | ||
| Enable Behavior Tool | Displays a student's behavior events for the school year. |  Click to enlarge |
| Behavior Display Text - Student/Parent | Enter text in these two editors to display that text at the top of the Behavior tool in Campus Student and Campus Parent, respectively. | |
| Contact Preferences | ||
| Enable Contact Preferences tool | Displays the parent/guardian's message contact information and gives access to the Change Contact Info tool. | 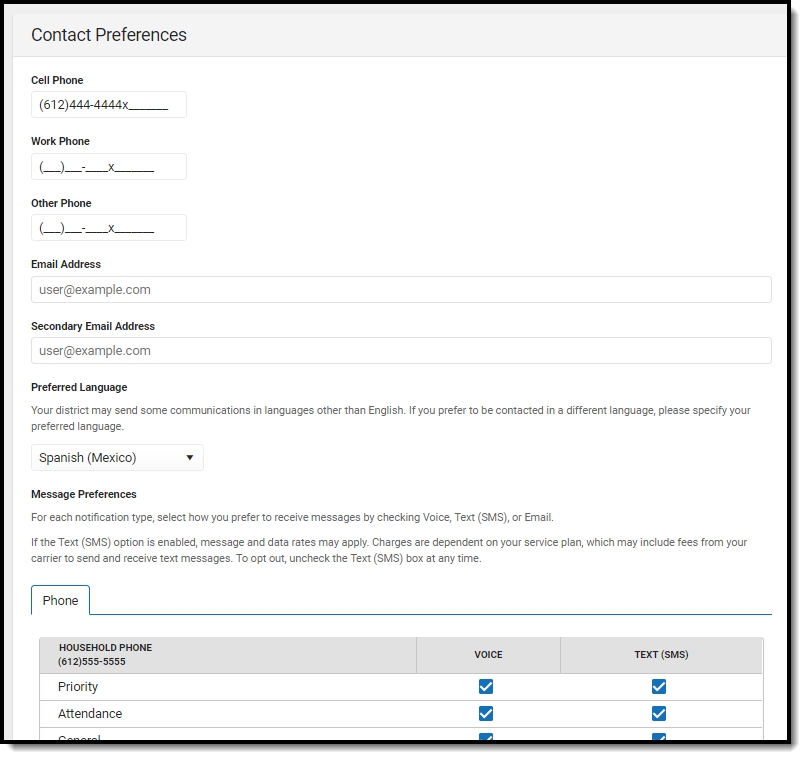 Click to enlarge |
| Allow Update | Students and Parents can update the following contact information from the Contract Preferences tool:
| |
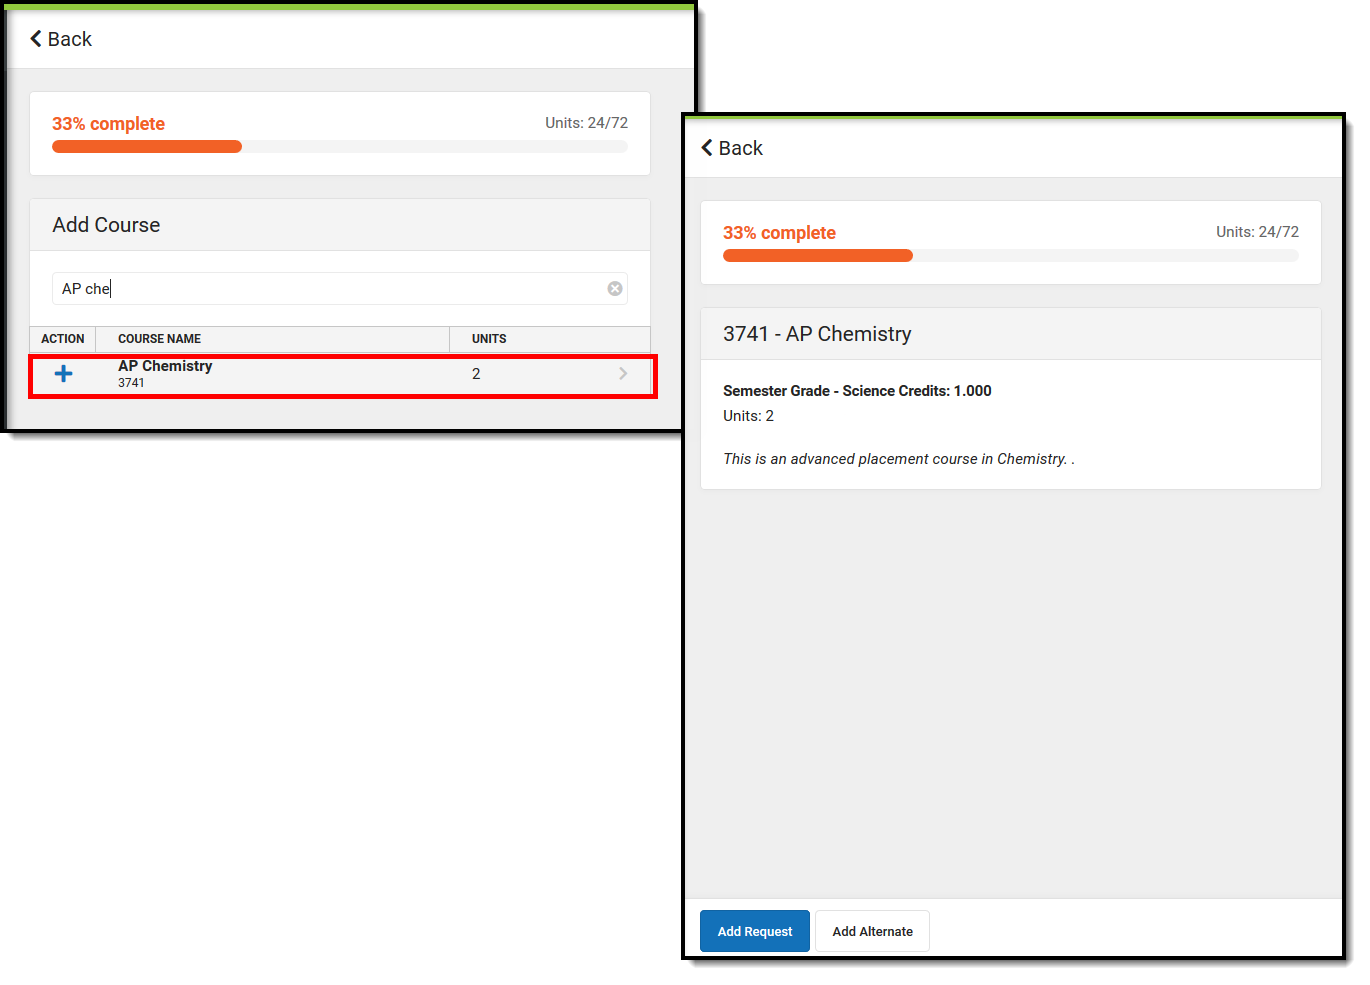
| Course Registration | ||
| Enable Course Registration Tool | Lists the requested courses for the next school year for students. It is recommended that this option be turned on only during registration time.
Both the Academic Planner and Course Registration options can be turned on at the same time, but it is not recommended. It is best to have a window of time when students can add courses to their course plan, and a window of time when students can enter course requests. This eliminates the risk of overwriting course requests or planned courses. In order for students (and parents) to enter course requests, the following must be done:
See the Course Registration article for information on requesting courses. |
|
| Documents | ||
| Enable Documents Tool | Allows users to access report cards, transcripts, custom forms, and other documents.
Note: Report Cards, Transcripts, and configured Schedule reports display in this tool if 'Available in Portal' is selected in the Report Preferences. For report cards, if the Portal - Historical option is marked in the Report Setup, report cards from previous school years will also be available in the Portals. |
Click to enlarge Academic Progress:
Click to enlarge |
| Reports and Plans | The following reports and plans can be enabled:
| |
| Custom Modules | Displays Custom Forms created in corresponding Custom Modules on Portal:
For eSignature Custom Forms to display on the Portal, the following setup must be completed. See each section of the document below for detailed instructions.
|
|
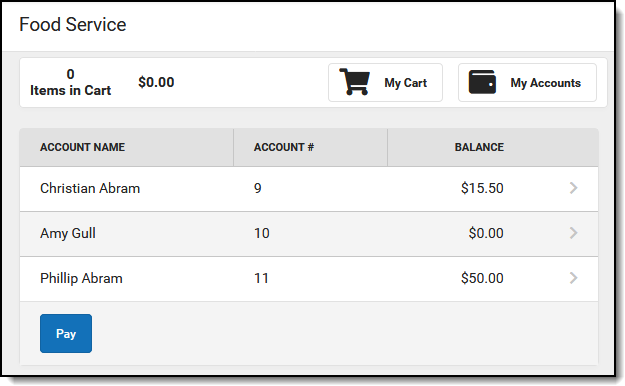
| Food Service | Food service options are only available for districts who are Food Service customers. | |
| Enable Food Service Tool | Displays Food Service Account information. This option only affects Food Service-enabled districts. Marking this option for non-Food Service districts has no effect. |
Click to enlarge |
| Display Food Service Balance on the Today screen | Displays the student's food service balance on the today screen. | |
| Food Service - Barcode | Food service options are only available for districts who are Food Service customers. | |
| Display Food Service PIN Barcode on the Today screen | Displays the student's Food Service PIN as a barcode in Campus Student and Campus Parent. Students and parents can use the barcode to make Food Service purchases.
If the option "Display Barcode of Student Number on Campus Student" is also selected, each barcode displays in its own collapsible area. 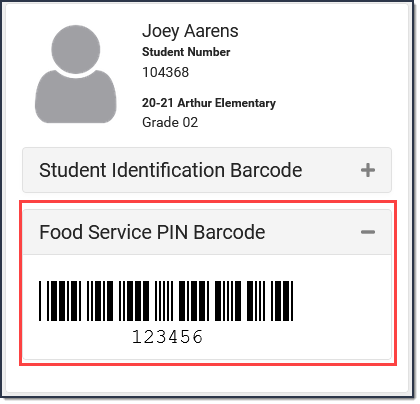 Point of Sale customers who set their student's PINs to be the same as their Student Number do not need this feature if the option "Display Barcode of Student Number on Campus Student" is selected. Point of Sale customers who set their student's PINs to be the same as their Student Number do not need this feature if the option "Display Barcode of Student Number on Campus Student" is selected. |
 Click to enlarge |
| Grades | ||
| Enable Grades tool | Enables the grades tool, which lists the tasks and standards aligned to the student's courses, as well as in-progress and posted grades (based on the additional options selected). | |
| Display Grade Type | Displays the following types of grades. Selecting these options also enables notifications for grade updates, based on student and parent settings.
| |
| Display Grade Total | Displays the selected Grade Totals:
| |
| Display GPA | Displays the selected grade point average:
| |
| Other |
| |
| Grades Display Text - Student/Parent | Enter text in these two editors to display that text at the top of the Grades tool in Campus Student and Campus Parent, respectively. | |
| Health | ||
| Enable Health Tool | The Health tool lists the student's recorded vaccinations, immunizations and screenings. Separate options display for the following tools:
|
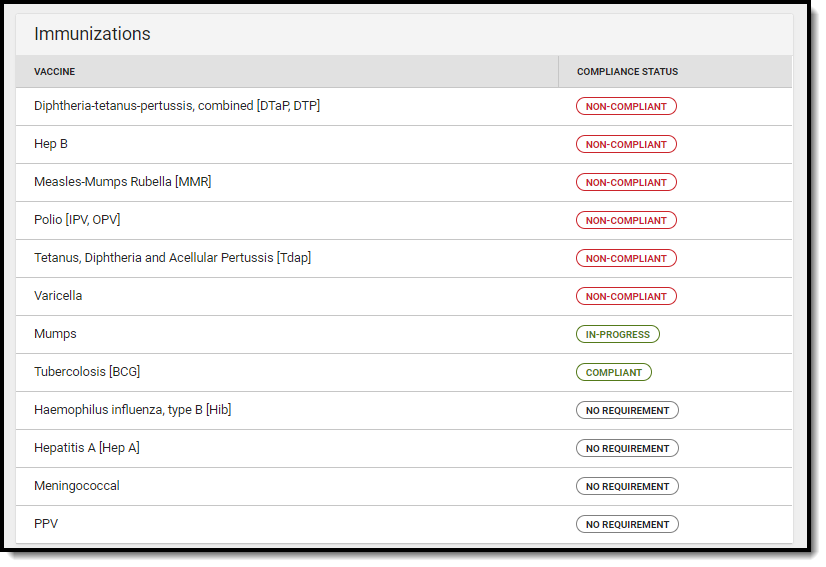 Click to enlarge |
| Learning Tools | ||
| Enable Learning Tools | Displays a list of enabled learning tools, from which students can access learning materials. Learning tools are enabled in the LTI Configuration tool. | |
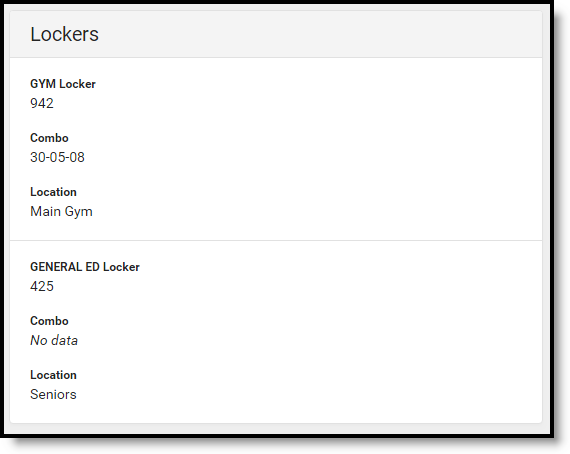
| Lockers | ||
| Enable Lockers Tool | Displays all Locker assignments for the student. |
Click to enlarge |
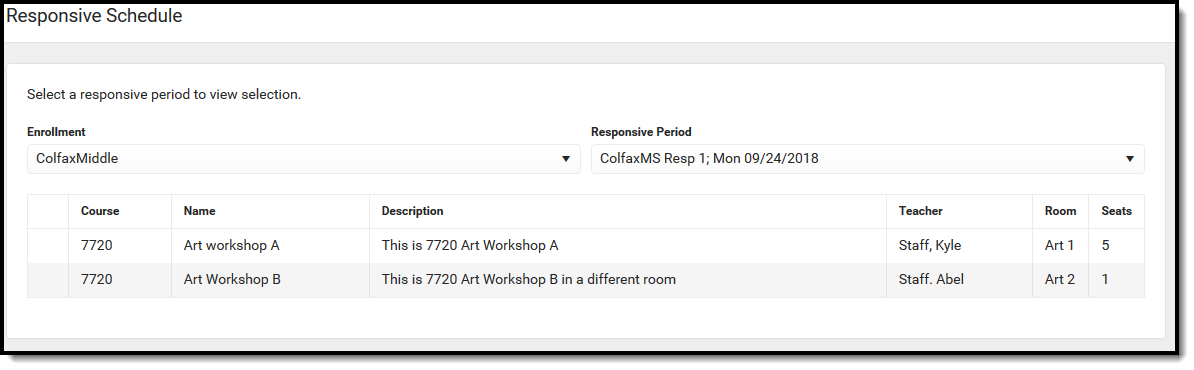
| Responsive Schedule | ||
| Enable Responsive Schedule Tool | Displays Responsive Scheduling offerings in Campus Student and Campus Parent.
NOTE: Additional setup for responsive scheduling courses is required. See the the Responsive Scheduling article for more information. |
Click to enlarge |
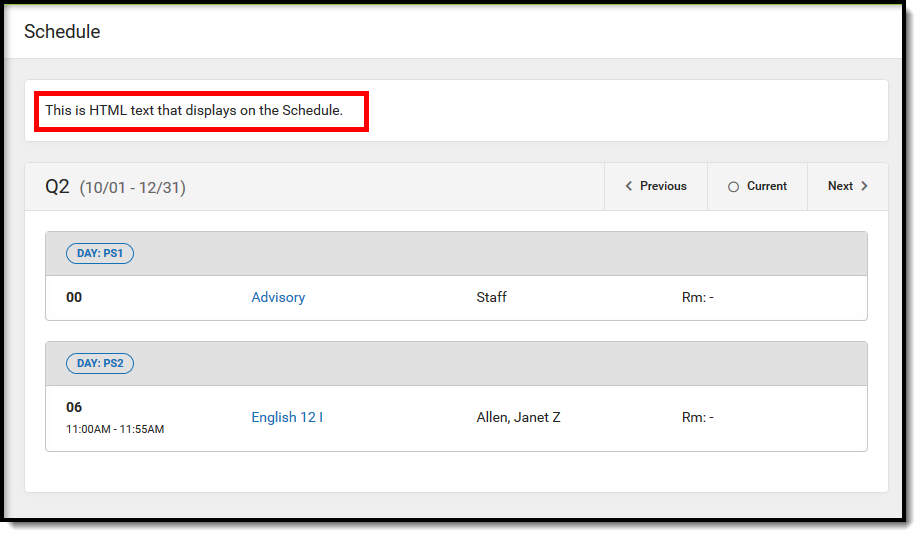
| Schedule | ||
| Enable Schedule Tool | Displays the student's schedule, both in the Schedule tool, and in the Today and Calendar views.
Schedules display for enabled terms only. Disable future terms to hide schedules until they are finalized. |
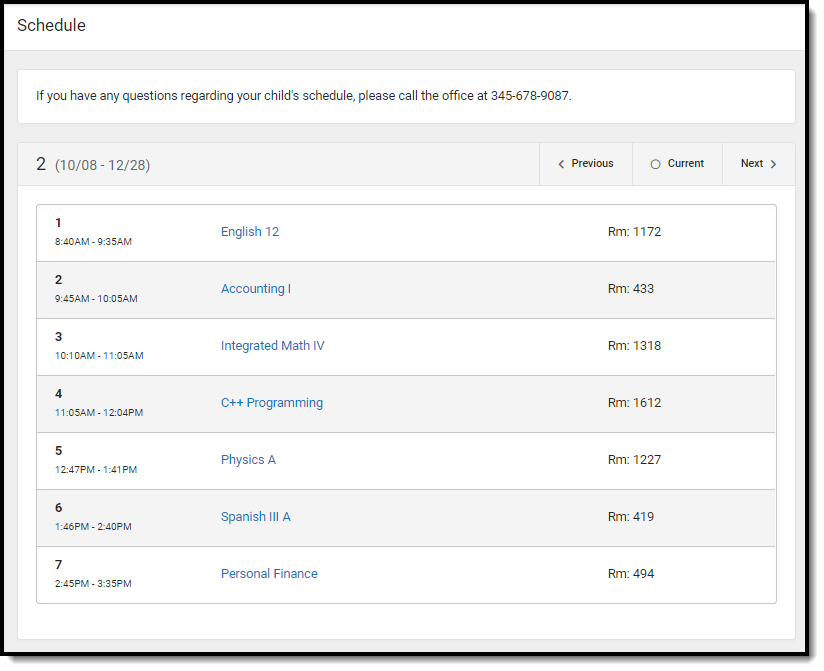 Click to enlarge |
| Display Period Times | Displays Period Times in the student's schedule. | |
| Schedule Display Text - Student/Parent | Enter text in these two editors to display that text at the top of the Schedule tool in Campus Student and Campus Parent, respectively. |
|
| School Choice | ||
| Enable School Choice Tool | Displays data related to school choice and allows parents to accept enrollment when the school has completed processing school choice applications. |
Click to enlarge |
| Section Feed | ||
| Enable Section Feeds | Enables the Section Feed tool for students and parents. |  Click to enlarge Click to enlarge |
| Display Other Students' Comments | Displays comments for other students in a section. (Campus Parent only) | |
| Display Other Students' Names | Displays the names of other students in a section with their comments. (Campus Parent only) | |
| Student Questions | ||
| Enable Student Questions | Allows students to ask questions of their teachers from the Today screen, which is displayed in the Control Center. | |
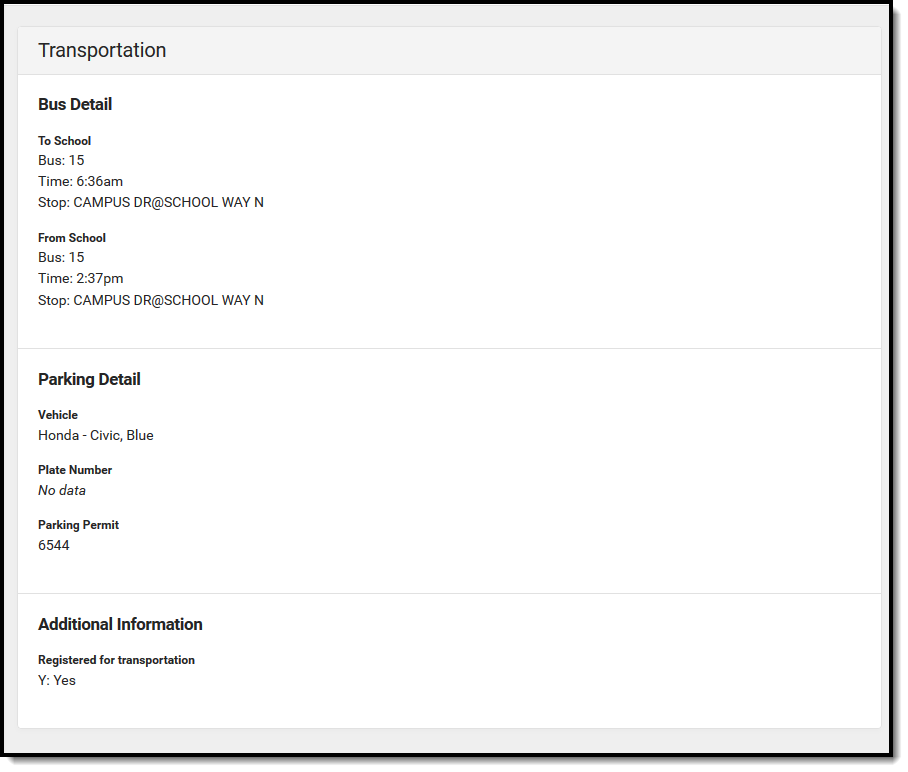
| Transportation | ||
| Enable Transportation Tool | Displays the bus(es) a student rides to and from school. |
Click to enlarge |
| Transportation Tool Display Text - Student/Parent | Enter text in these two editors to display that text at the top of the Transportation tool in Campus Student and Campus Parent, respectively. | |
| Tuition | ||
| Enable Tuition Tool | Displays the Tuition tool that enables parents to submit school tuition payments. | |
| Tuition Options | Displays a student's tuition balance on the Home Screen. | |
| Other Display Options | ||
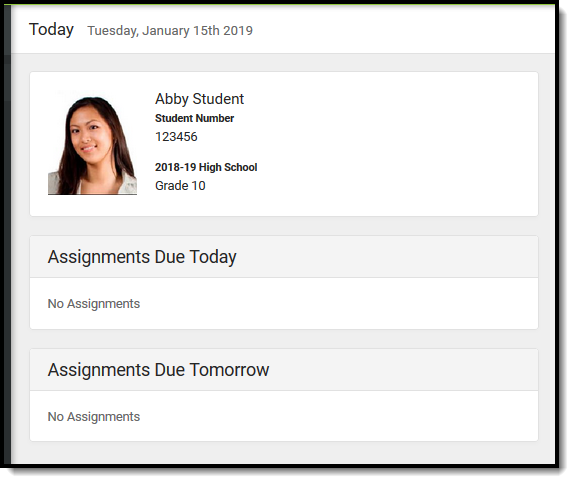
| Display Student Picture | Displays the student's current picture for parent and student users. |
|
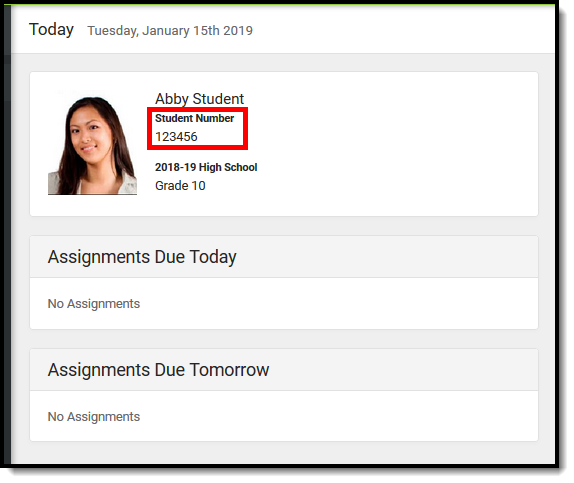
| Display Student Number | Displays the student's district-assigned student number. |
Click to enlarge |
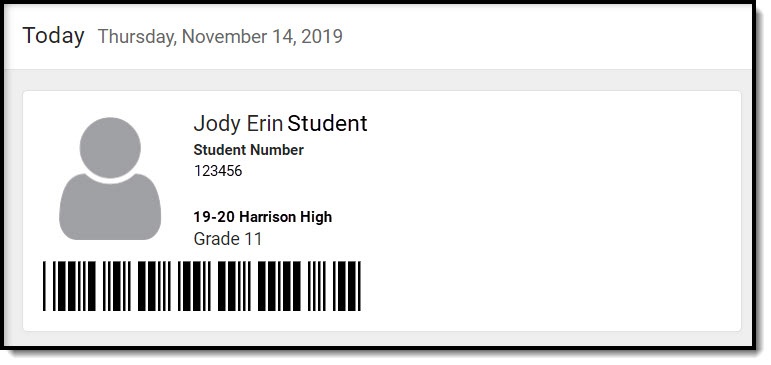
| Display Student State ID | Displays the student's State ID number on the Home page. | 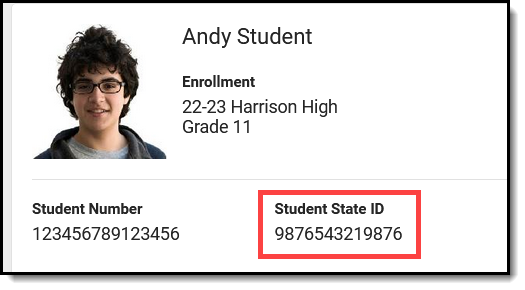 Click to enlarge Click to enlarge |
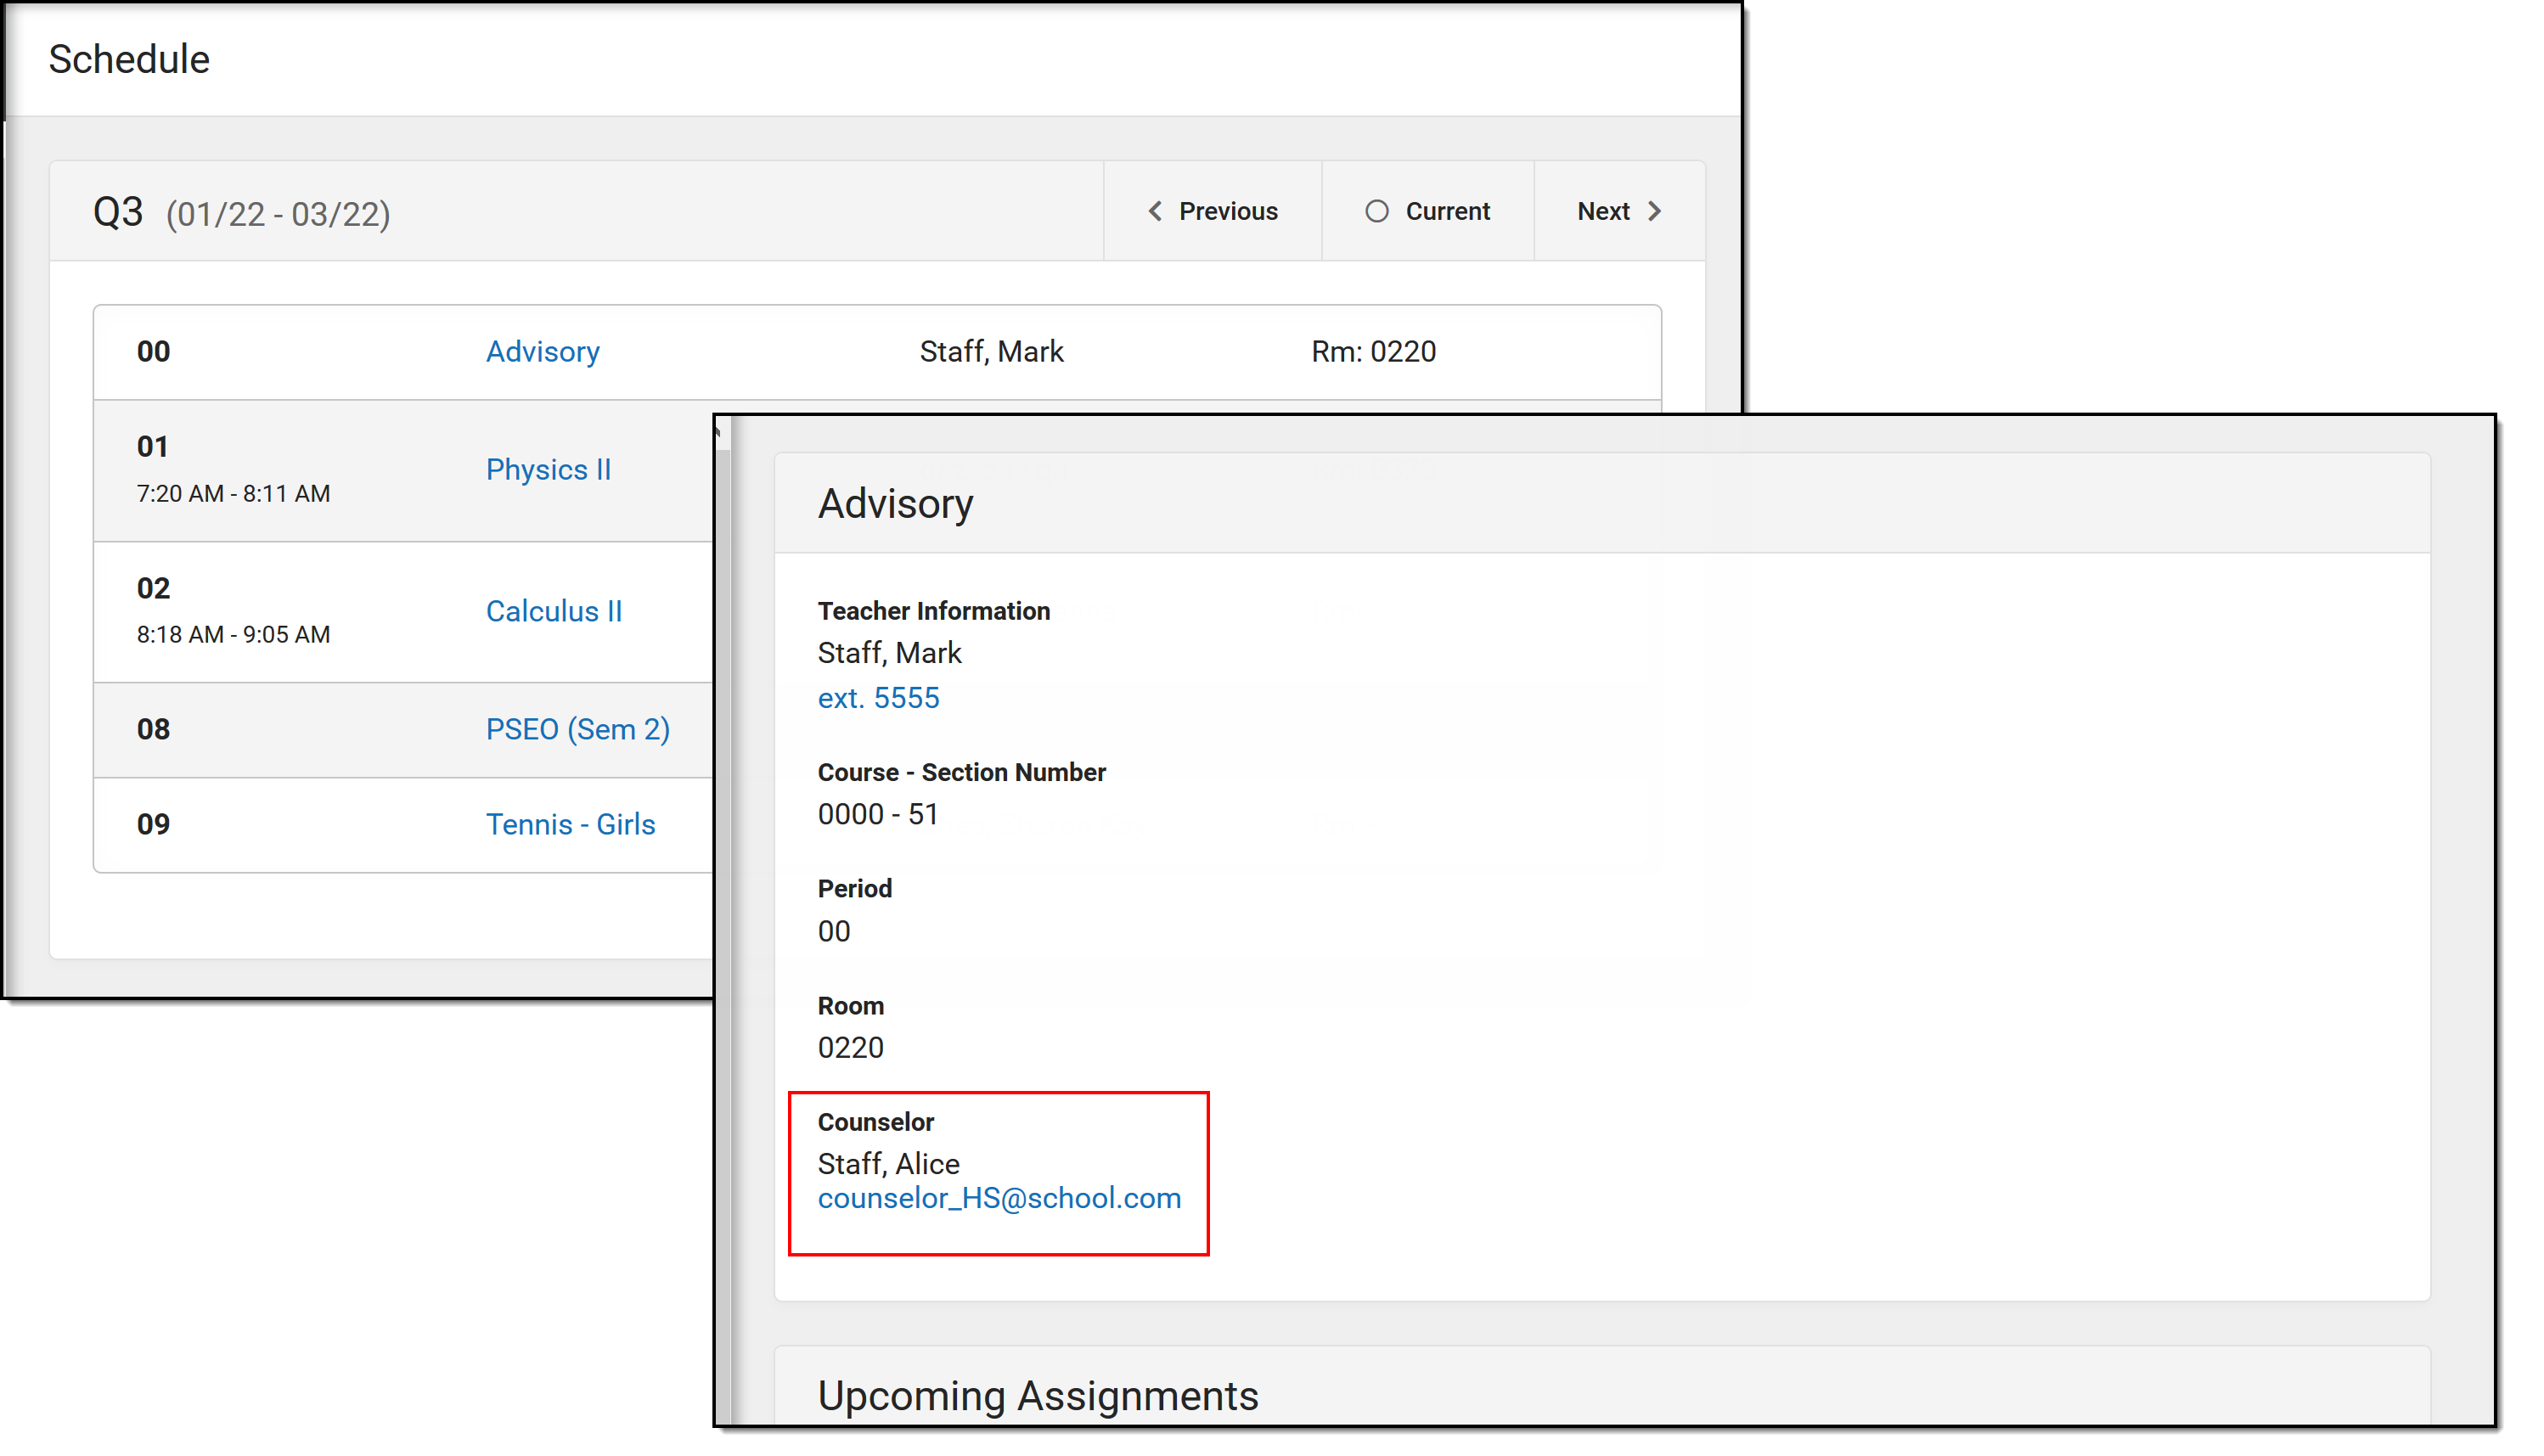
| Display Counselor Email on the Course screen | Displays the email address for the student's assigned guidance/academic counselor. When marked, students or parents can email the counselor to request schedule changes.
The counselor's email is displayed on the Course detail of the Schedule.
|
Click to enlarge |
| Display Blended Learning Group Name | Displays the blended learning group that is active for the student for that day on the Today screen. | 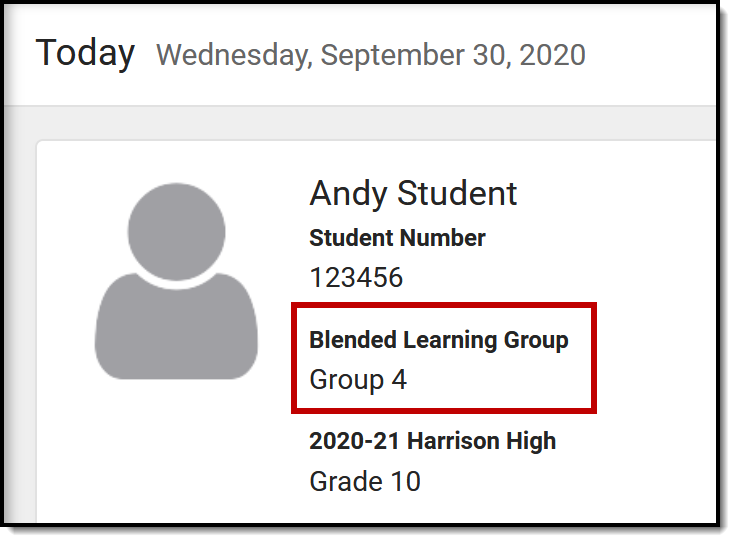 |
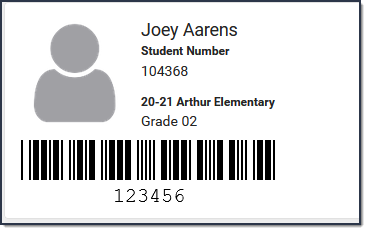
Display Barcode of Student Number on Campus Student
|
Displays a barcode of the student number after the student logs in. The barcode can be used for attendance scanning as part of the Campus Workflow Suite. This option is only available for districts who have purchased the Workflow suite.
Point of Sale customers who set their student's PINs to be the same as their Student Number can use this feature. If student PINs are the same as their student number, a terminal with a 2D scanner can read the student's barcode from their mobile device and process the transaction. This feature eliminates the need to distribute a paper barcode and allows contactless payment. |
Click to enlarge |