Classic View: Scheduling > Scheduling Center > Course Planner
Search Terms: Course Planner
The Course Planner displays request tallies, computes number of sections needed, and compares students requests and sections to last year's calendar to see how these changes may affect section staffing needs. Any scheduling related course item can be modified in the Course Planner, including course constraints, room placement and teacher assignment.
The Course Planner can be used throughout the scheduling process, but is best used after calendars for the next school year are created and enrollments have been rolled forward and student requests are entered.
The Course Planner tool that is available through the Schedule Wizard is still available and can be used interchangeably with this new Course Planner.
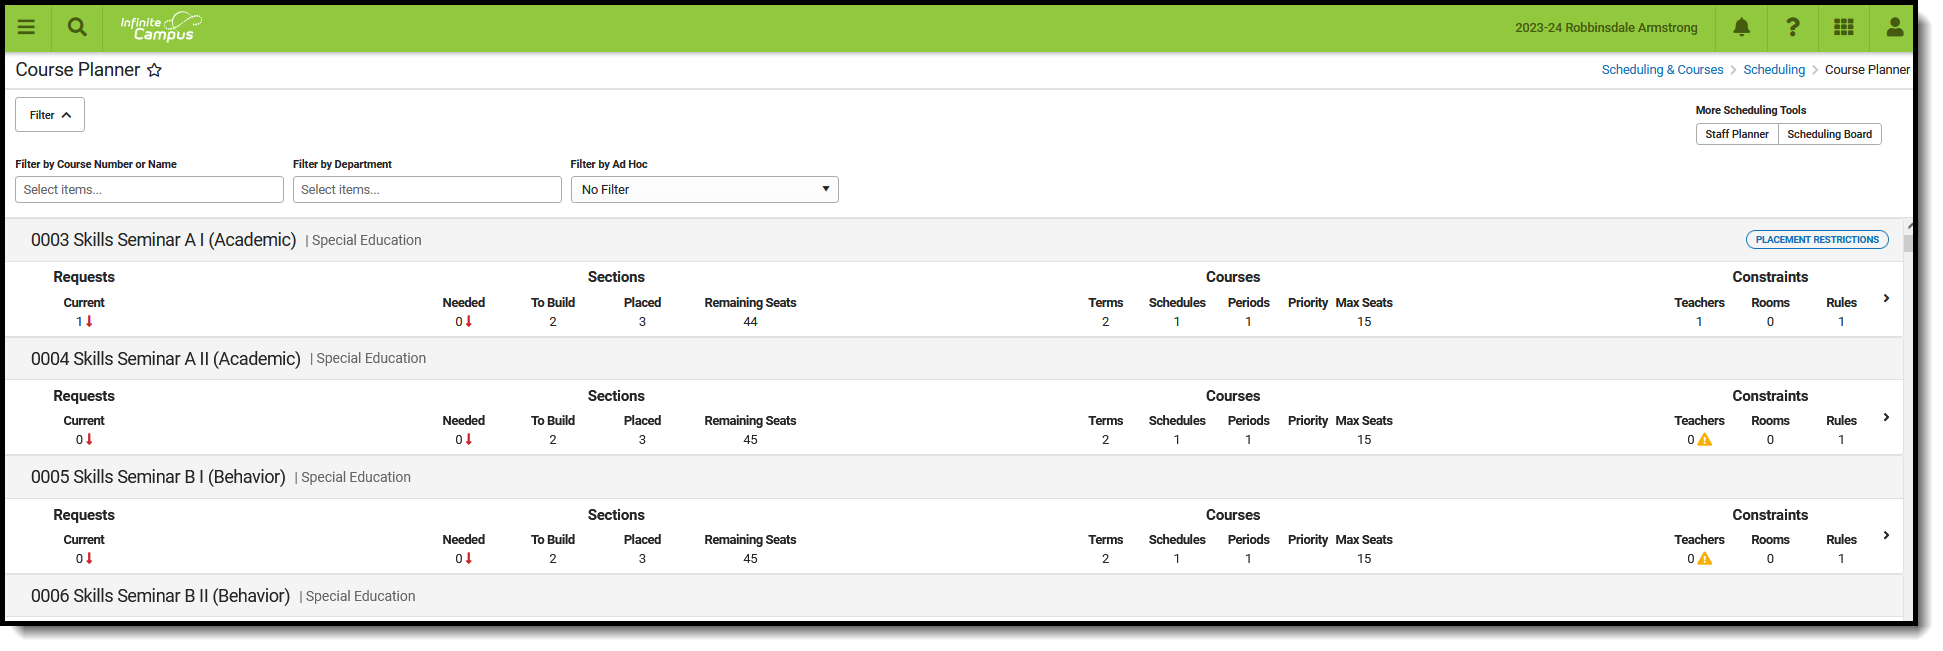 Course Planner
When to use the Course Planner:
- AFTER calendars for the next school year are created.
- AFTER enrollments have been rolled forward.
- AFTER student requests for the next year are entered.
- BEFORE and DURING the building and loading of courses when using the Scheduling Board.
Tool Rights
Classic View: System Administration > User Security > Users > Tool Rights > Scheduling > Scheduling Center > Course Planner
Access to the Course Planner requires the following:
Read Rights:
- Access Course Planner.
- View Course Planner cards, including detail information (list of courses, etc.).
- Filter list of courses.
- Open and view the Course Planner Side Panel.
- Navigate records in the Course Planner Side Panel.
- Print a CSV download of the courses.
- Use the Full Screen option.
Write Rights:
- Edit and save changes to the Course Planner Side Panel.
Add and Delete rights provide no additional functionality.
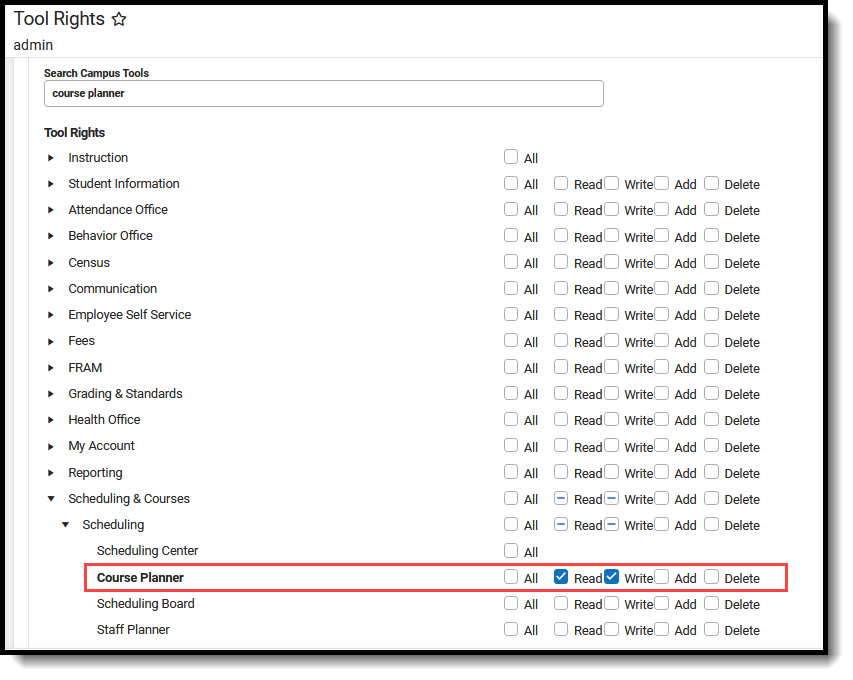 Course Planner Tool Rights
Tool Rights Conversion
As part of the Campus.2323 release, a script was included to modify tool rights to Course Planner.
- Users assigned tool rights to the new Course Planner as of the release of Campus.2315 and prior to the release of Campus.2323 were not modified when they were also assigned rights to Schedule Wizard.
- Users who were not assigned any tool rights to Course Planner but did have tool rights to Schedule Wizard are now assigned full tool rights (RW) to Course Planner.
Navigation of Course Planner
A Year, School and Calendar (and Structure when applicable) MUST be selected in the Campus toolbar in order to display information.
Locked Trial
When viewing the Course Planner for a Scheduling Trial that is currently locked (e.g., someone is working on that trial in the Scheduling Board), a banner displays at the top of the Course Planner indicating such. This banner displays only when navigating to the Course Planner from the outline (not using the quick access from the Scheduling Board.)
Changes made in Course Planner in a locked trial cannot be saved.
 Locked Trial Indicator
Filter Options
Use the Filter by Course Number or Name, Filter by Department and Filter by Ad hoc options to assign staff and rooms to a course or for an entire department. Begin typing in the field by entering a Course Number or Course Name, or the start of a course number or name, the start of a department name, etc. Matching results display and are further refined as more characters are entered. A message displays when no matching results are found.
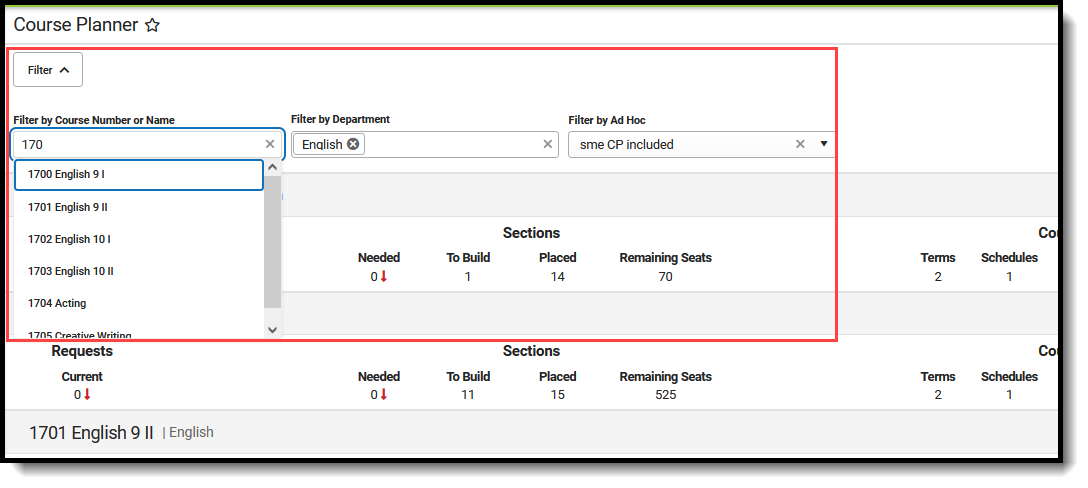 Course Planner Filter Options
Click the Filter toggle arrow up or down to show or hide the filter options.
- Filter by Course Number or Name. When a course is selected here, only that course's information displays. This is helpful when a course has specific constraints for the teacher or for the room. For courses like Physical Education or Cooking, where those courses meet are very specific - GYM or FOOD LAB. These courses often have a few teachers that can teach them, who may also have limited scheduled due to coaching responsibilities, for example.
- Filter by Department. Multiple departments can be selected at one time. Only those courses assigned to those departments are listed. This allows planning for ALL English courses or ALL Science courses, for example. Departments must be created (System Administration > Resources > Resources > Departments) and Departments must be assigned to the Course (Scheduling > Courses > Course > Course Information; Grading & Standards > Course Masters > Course Master Information).
- Filter by Ad hoc. Filters created in Filter Designer using the Data Type of Course/Section are available for selection. Any course included in the selected filter that is active in the selected school and calendar display.
Selected Filter By options remain when navigating to other tools for the next time the Course Planner is accessed.
Since the Department assignment is optional, courses that are not assigned to a department are listed in course number order (like other courses) without a department name.
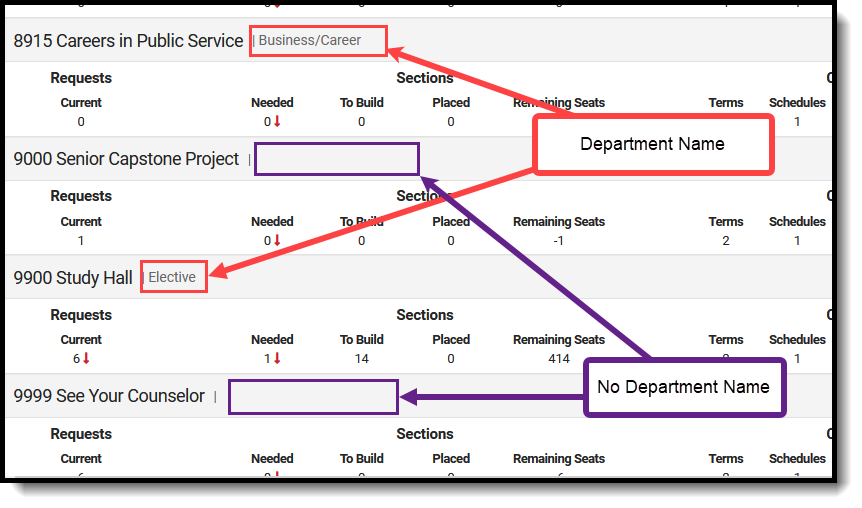 Course Planner - Department Name vs. No Department Name
More Scheduling Tools
Access the Staff Planner and the Scheduling Board from the Course Planner by clicking either of the options in the upper right corner.
This ONLY displays when navigating to the Course Planner from the Scheduling Board. When opening Course Planner from the index, More Scheduling Tools DO NOT display.
 Access to Staff Planner and Scheduling Board
Action Bar Options
Across the bottom of the Course Planner is the Action Bar. Available functions are the ability to print the course information and to view the Course Planner in full screen mode.
| The Print option generates a .csv export of the Course Planner grid. It lists the same information that is currently displayed, but in spreadsheet format. When the list of courses is filtered, only those courses that meet the filter options are included in the .csv export. In the example to the right, the Filter by Department field is set to English, so only courses assigned to the English department display in the tool AND in the spreadsheet. | 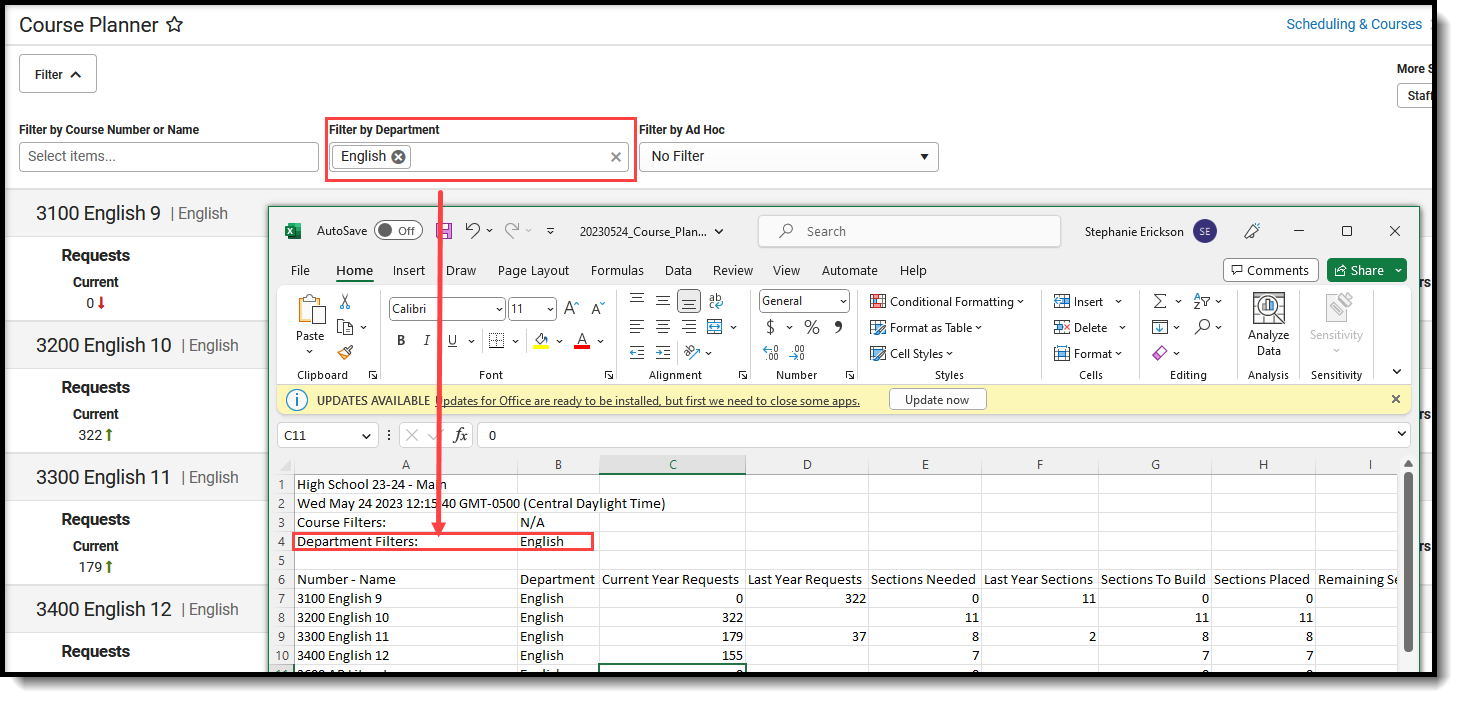 English Department Filter, Print |
| The Course Planner can be viewed in full screen if needed. Click the Full Screen button to remove Campus toolbar and tool header, as well as the Campus outline. Click the button again or use the ESC key to return to standard view. | 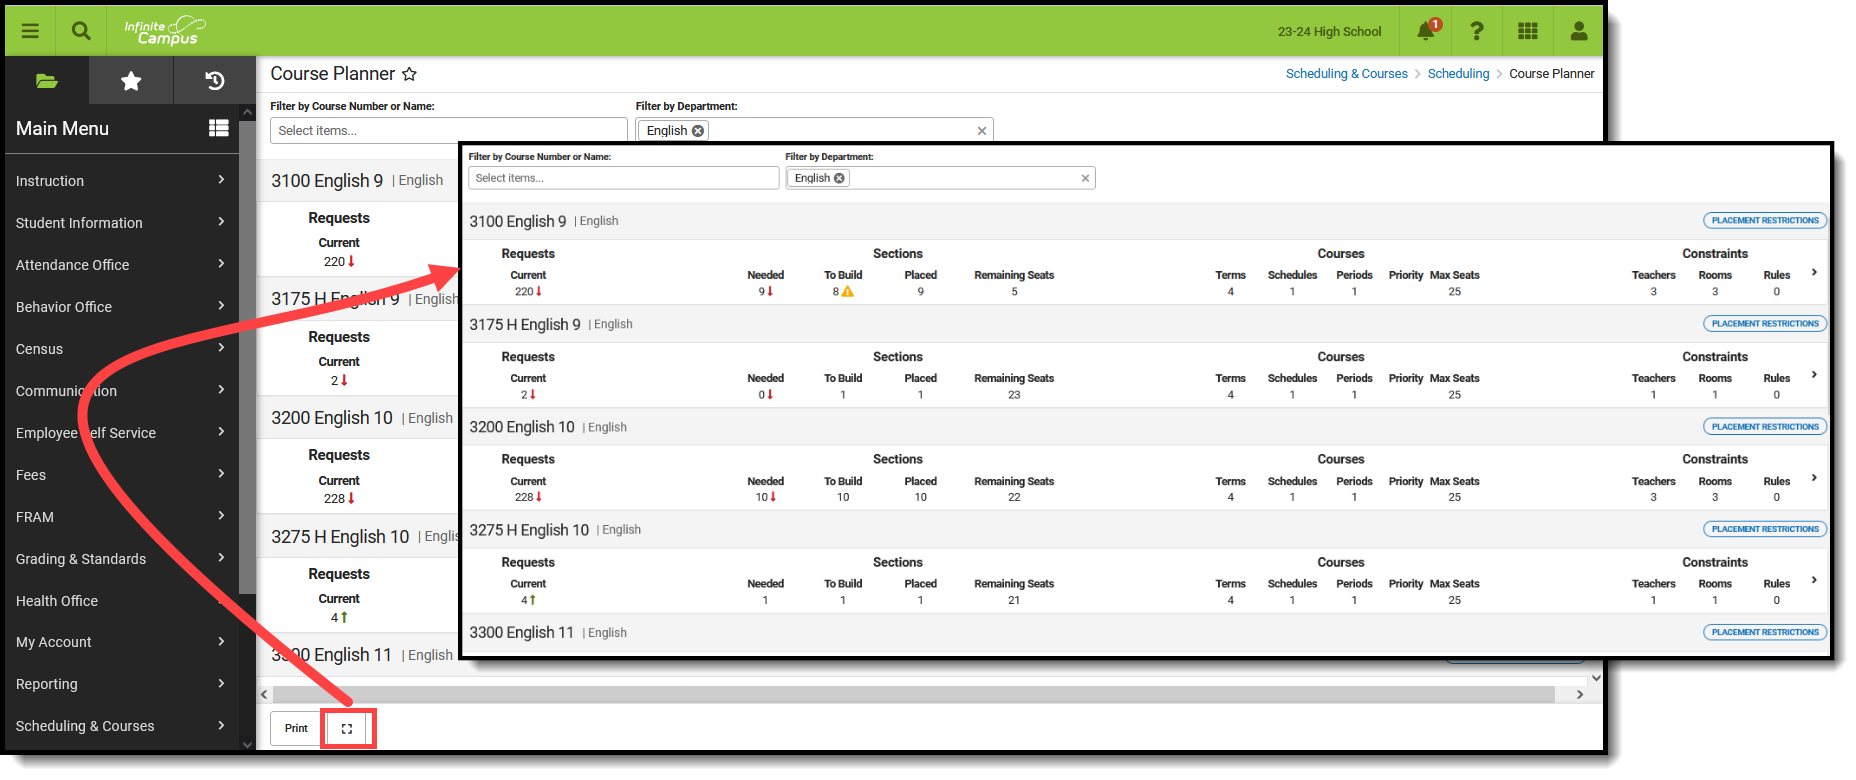 Full Screen Display |
Course Planner Layout
The Course Planner lists all active courses in the selected school and calendar (inactive courses are not listed). Information that displays is based on the Course Information fields, student requests and entered constraints that affect the placement of courses. With this information, the Scheduling Board places the Course Sections in the best location for the most students.
 Course Planner Layout
Main View
The main view of the course Planner lists the current number of Requests that have been made, basic Section information, basic Course information, and any constraints that are associated with that course.
A red down arrow, a green up arrow and a warning triangle may display with the Requests and Sections. Informational text displays for each of these.
- A red down arrow indicates the number of requests is lower than the number of Requests/Sections Needed in the last year.
- A green up arrow indicates the number of requests is higher than the number of Requests/Sections Needed in the last year.
- A yellow caution triangle indicates one of the following:
- The number of Sections to Build is less than the amount needed;
- The number of Terms is zero (0), the number of Periods is zero (0), the number of Schedules is zero (0);
- The Sections to Build is greater than the Teacher's maximum sections to teach.
![]() Course Planner Display
Course Planner Display
The Section Template Group and Max Seats under Courses and the To Build value under Sections reports the information from the Course Information editor.
When no Section Template Group is assigned to the Course, the Terms/Schedules/Periods/Max Seats values in under Courses and the To Build value under Sections reports the information from the Course Information editor.
- Max Seats (e.g., Max Students on the Course Information editor) must be populated with a field greater than zero.
- Priority (e.g., Schedule Load Priority on the Course Information editor) is used to meet the requests of courses needed for graduation and/or Academic Plan requirements.
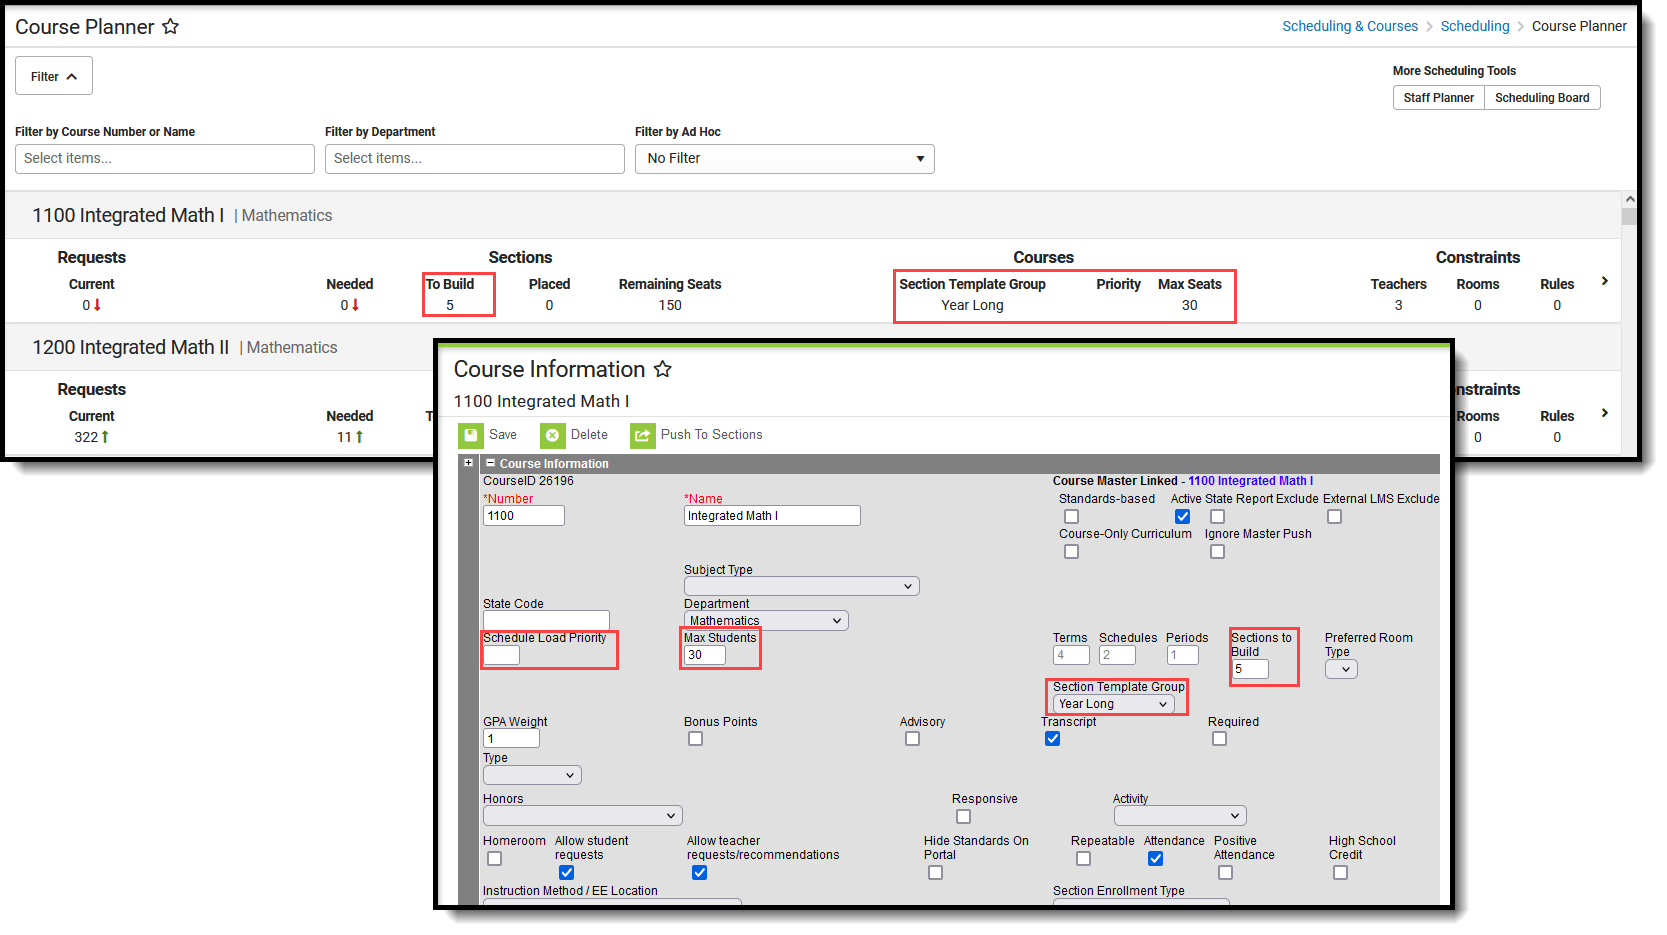 Course Planner, Course Information Fields with Section Template Group | 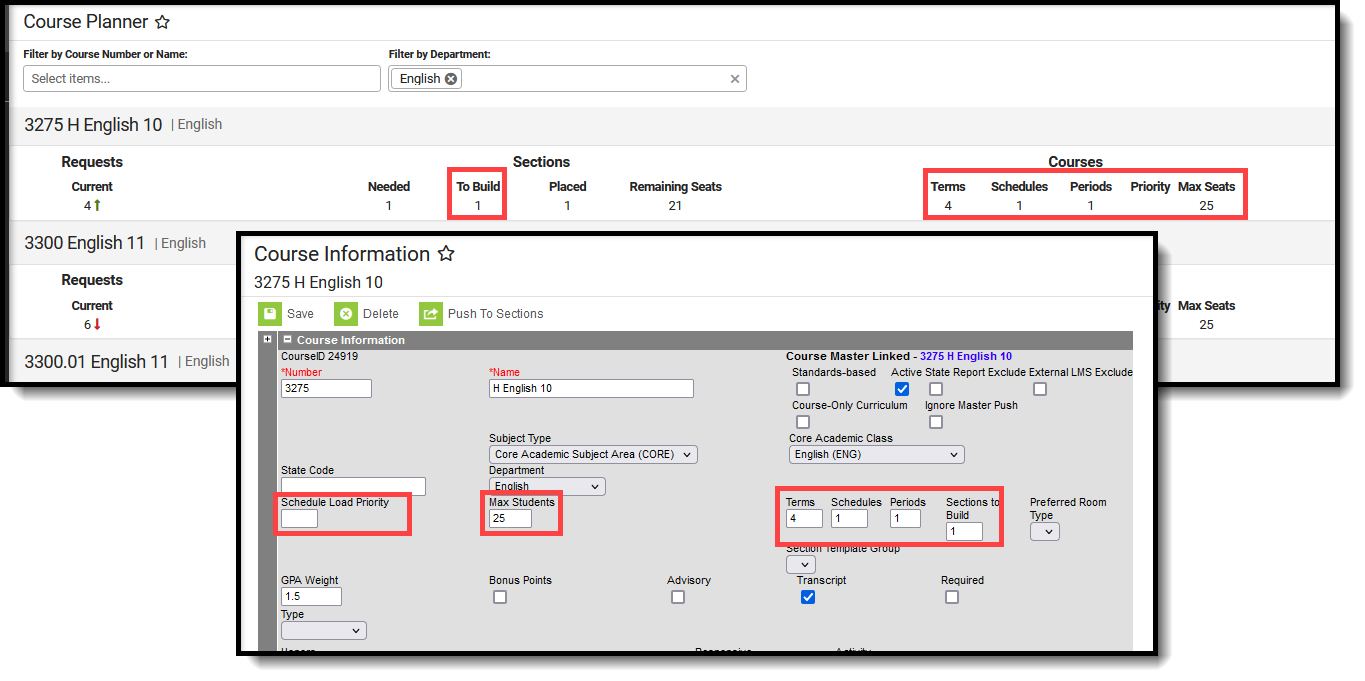 Course Planner, Course Information Fields without Section Template Group |
Course Planner Side Panel
Click anywhere on the Course row or click the chevron at the end of the row to display more information about the course. Modifications can be made in the side panel - assigning teachers, assigning rooms, etc.
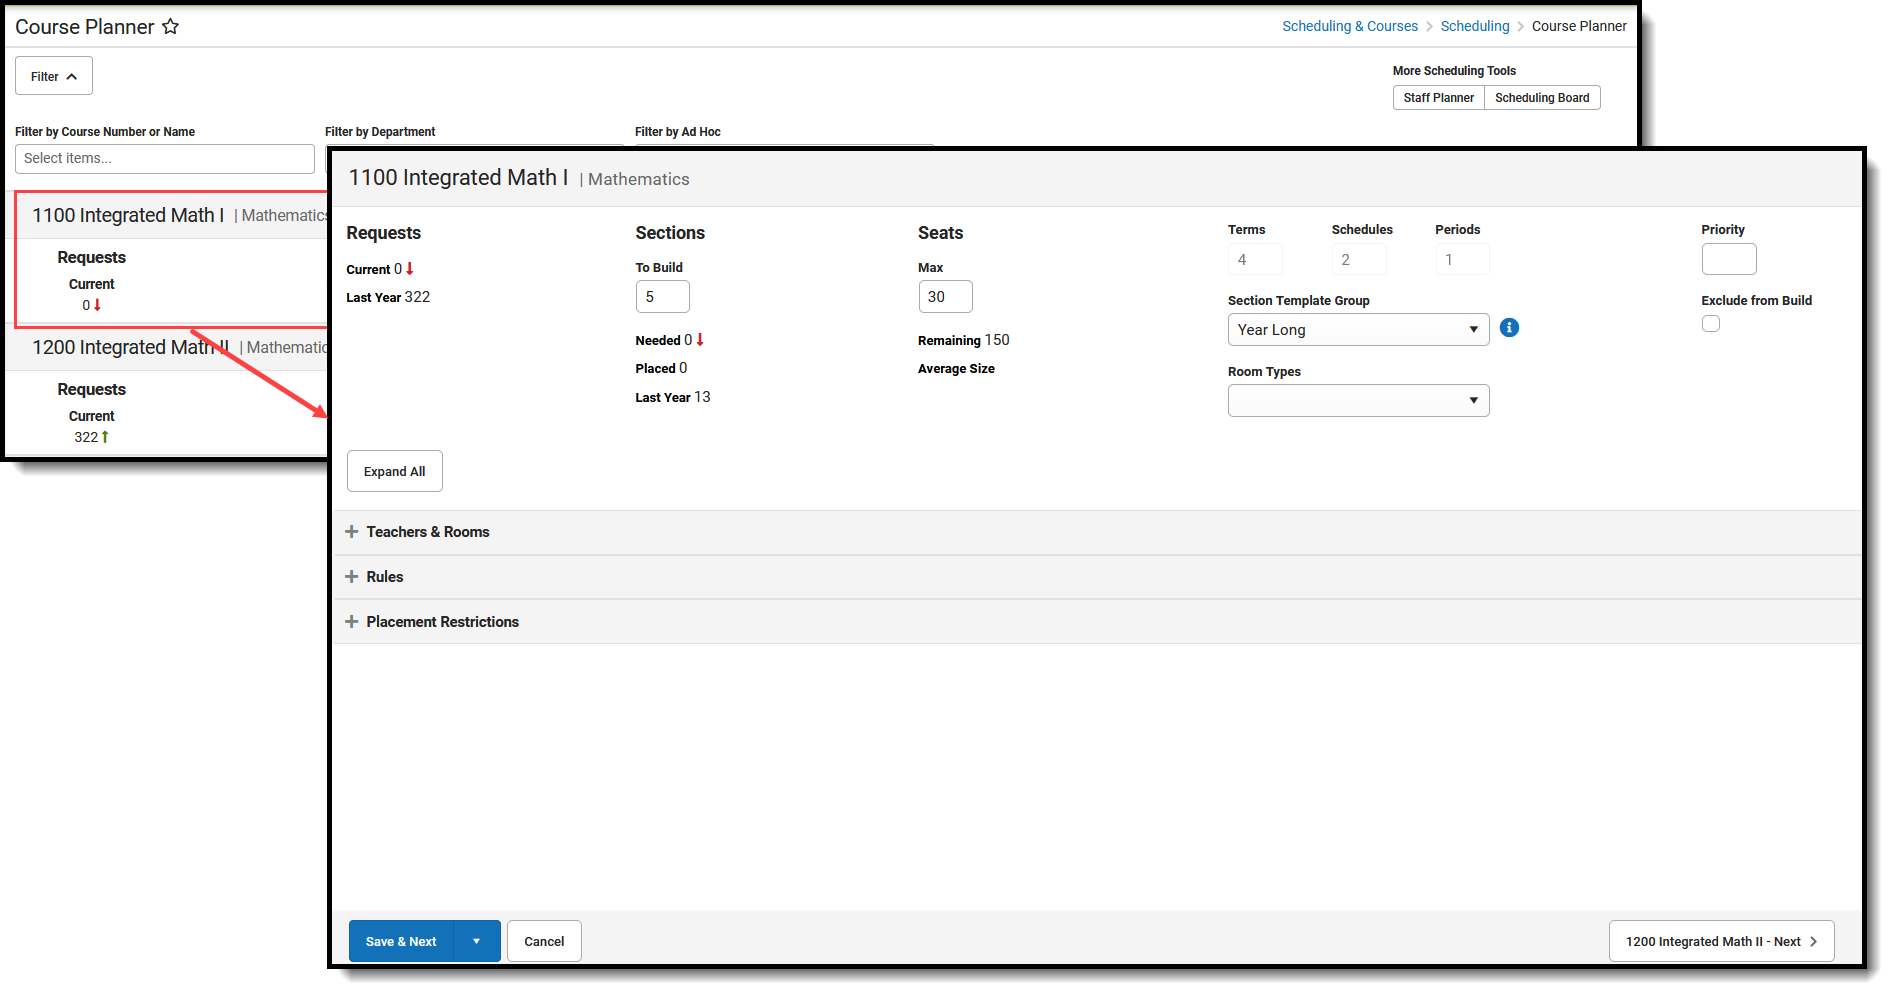 Course Planner Side Panel
Clicking the Course Number, Name, Department, or anywhere else in the gray header does nothing.
Collapse or Expand Course Planner Cards
Use the Expand All button to show the detail of the Teachers & Rooms card, the Rules card, and the Placement Restrictions card. The cards can be expanded one at a time by clicking the plus sign. Once either card is expanded, the Expand All button changes to Collapse All.
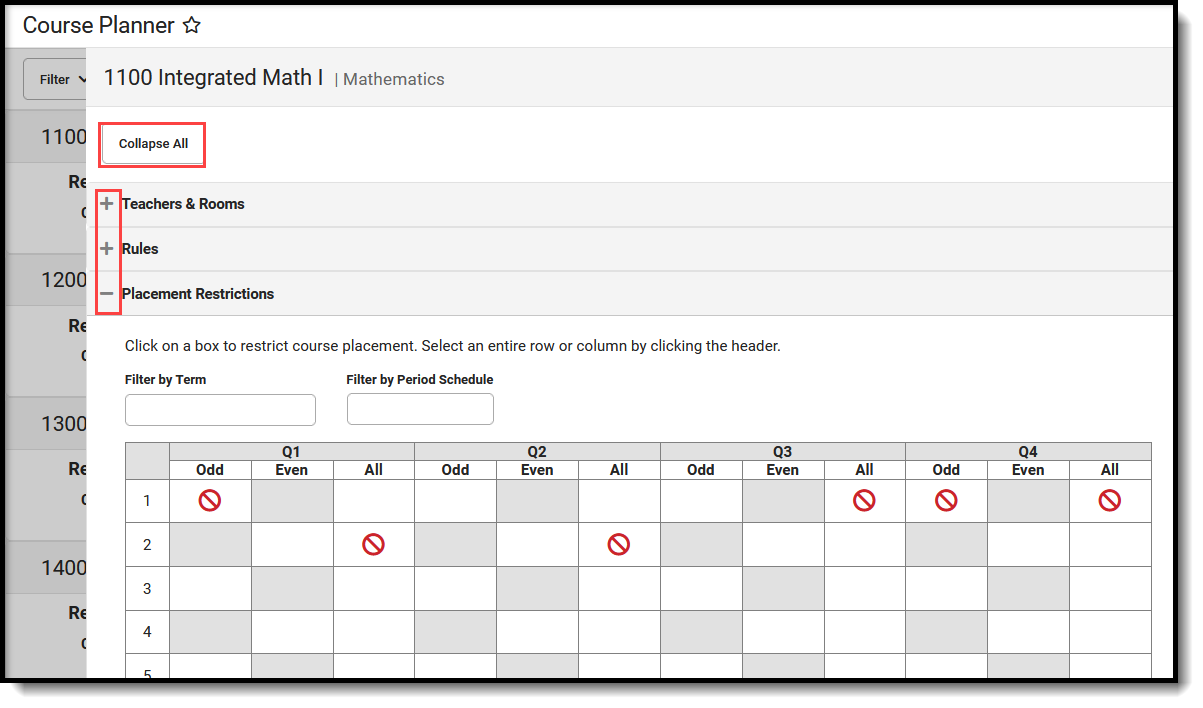 Expand or Collapse Course Planner Cards
When saving information on the side panel, there are three options:
- Save & Next. Saves the modified data on the selected course and then moves to the next course in the list, based on any filtering of courses from the main view. The next course is also listed in the far right corner of the side panel. Save & Next is the default save option, unless the last course in the list is displayed, in which case Save & Next is not available.
- Save & Stay. Saves the modified data on the selected course and then remains on that course for further updates.
- Save & Close. Saves the modified data on the selected course and then closes the side panel, displaying the main Course Planner view.
To not save any changes made in the side panel, click Cancel.
Teachers & Rooms
The Teachers & Rooms card lists all active teachers in the selected calendar and a list of AVAILABLE rooms displays. Both teachers and rooms can be narrowed to a smaller list by entering text in the Filter fields.
Teachers
Teachers who are already assigned to the course always display at the top of the list, whether or not they are part of any filtering that is done for teachers.
 Assigning Teachers to a Course
Filter the list of teachers by their Name (first name or last name) or Department name, or Team (Scheduling Group). The filter fields are dynamic, meaning any text entered into them instantly filters the options to list matching results.
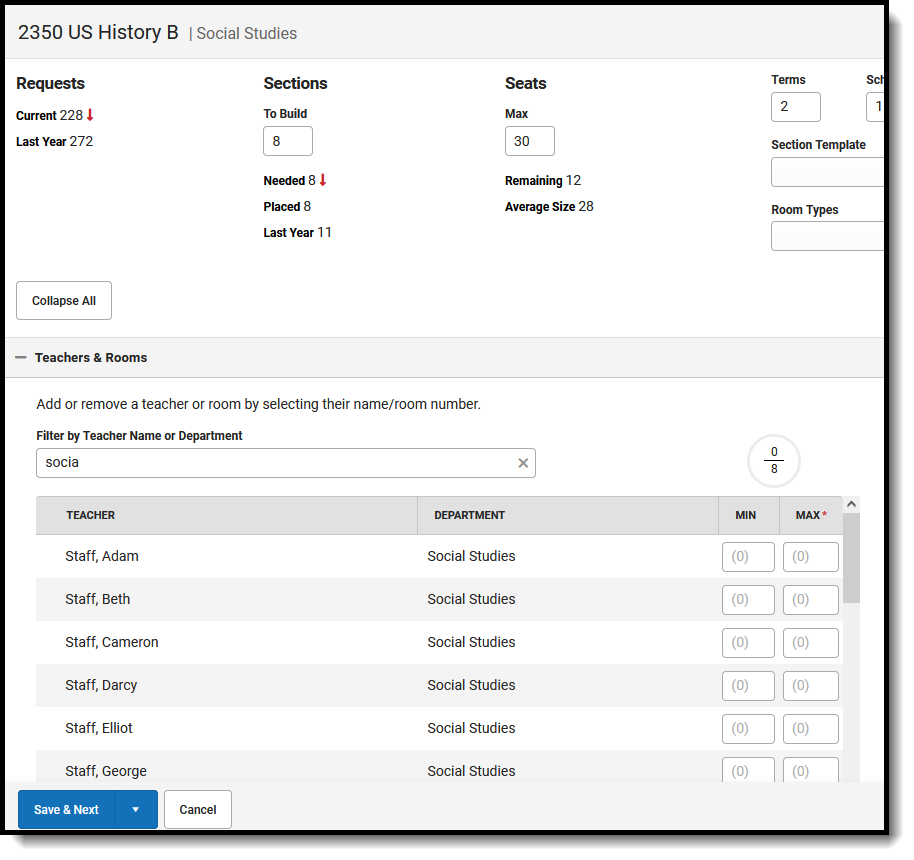
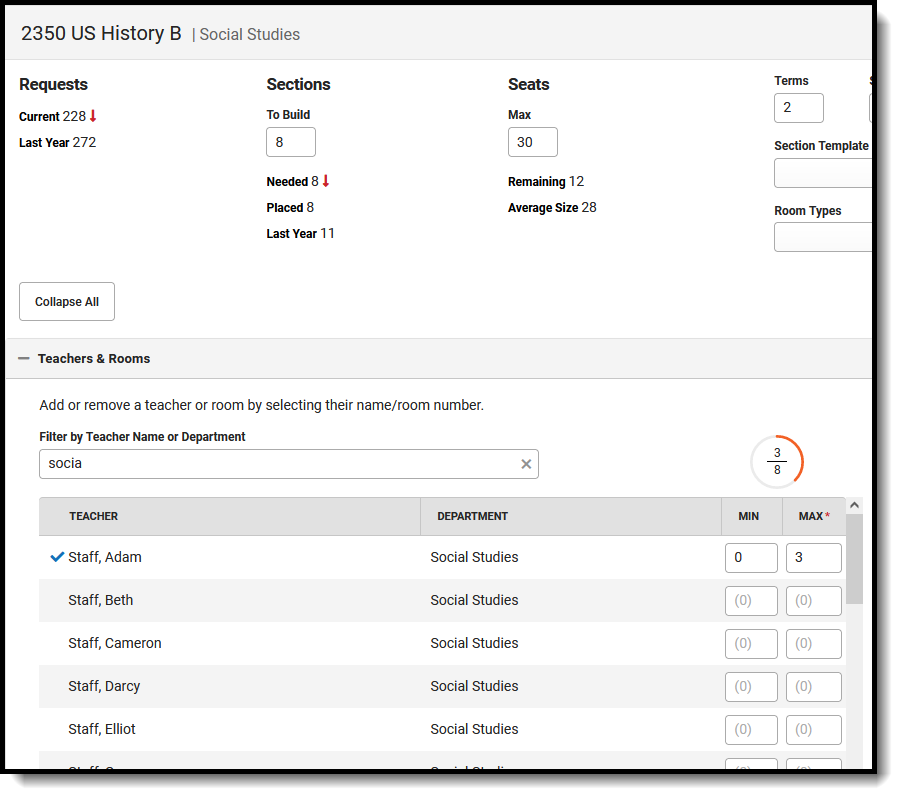
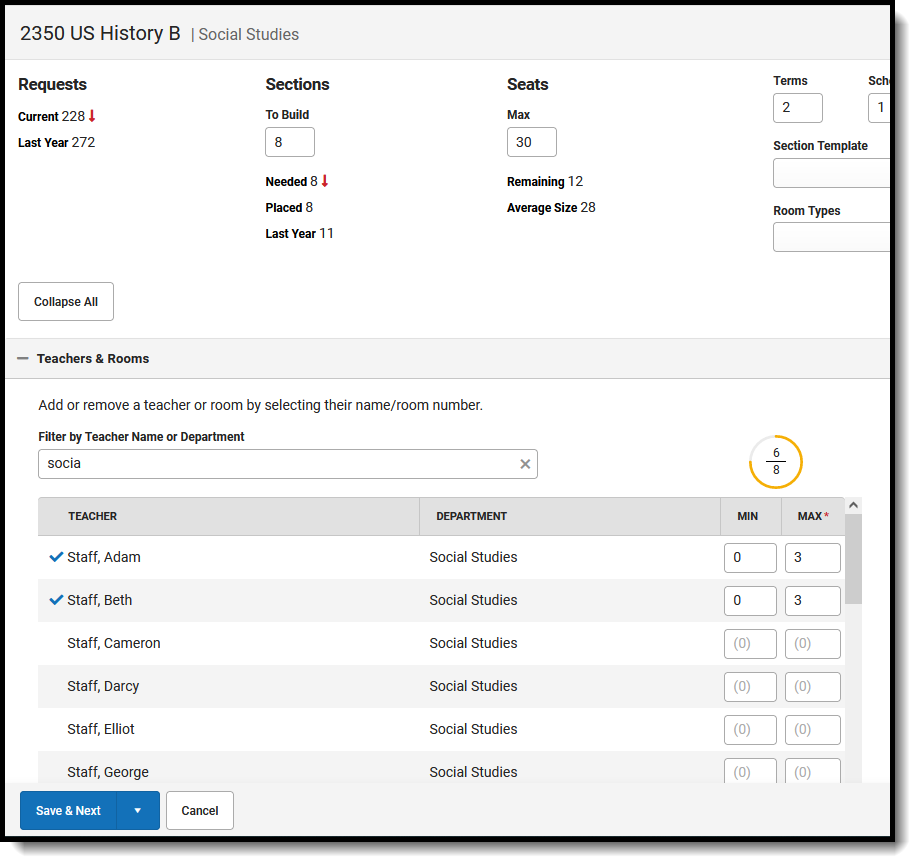
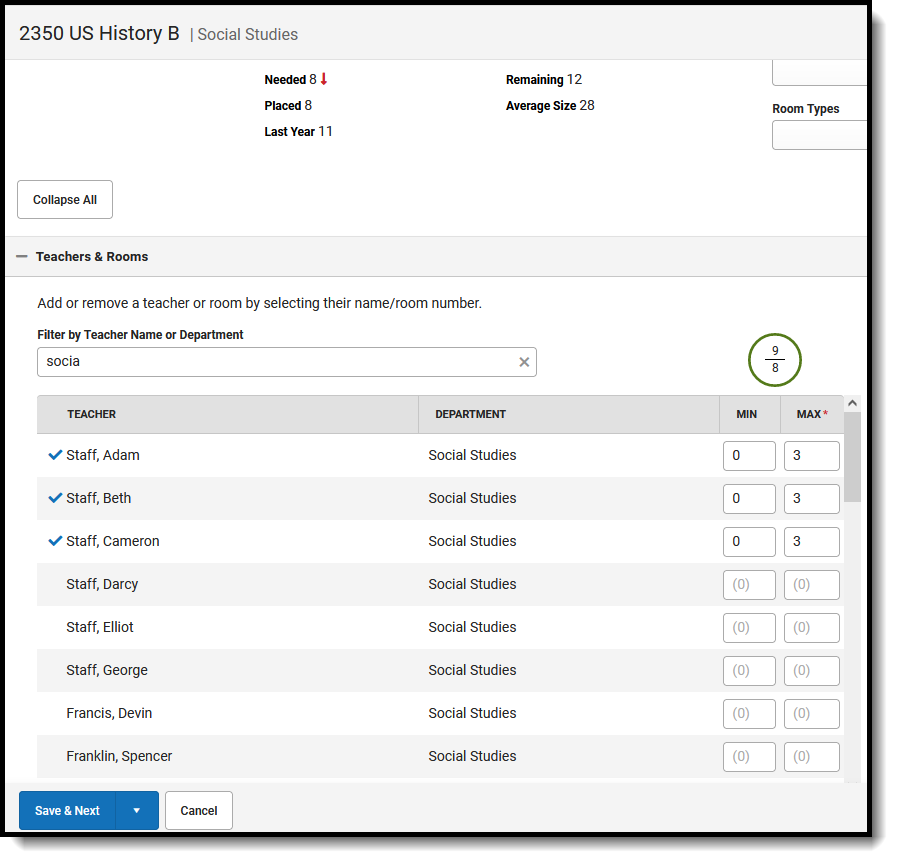
The Progress Dial represents the total maximum sections assigned to the teacher over the total number of sections to build and updates upon saving. The following images show different values of the Progress Dial.
For the US History class, eight sections are needed to meet the number of student requests. Each assigned teacher has a maximum section value of 3 (this is default value that can be changed if needed). That means at least three teachers are needed to have a complete (green) Progress Dial.
| No Assigned Teachers | One Assigned Teacher |
|---|---|
 |  |
| Two Assigned Teachers | Three Assigned Teachers |
 |  |
Rooms
Rooms that are already assigned to the course always display at the top of the list, whether or not they are part of any filtering that is done for teachers.
Filter the list of rooms by Room (name or number) or Room Type (lab, gym, etc.). The filter fields are dynamic, meaning any text entered into them instantly filters the options to list matching results.
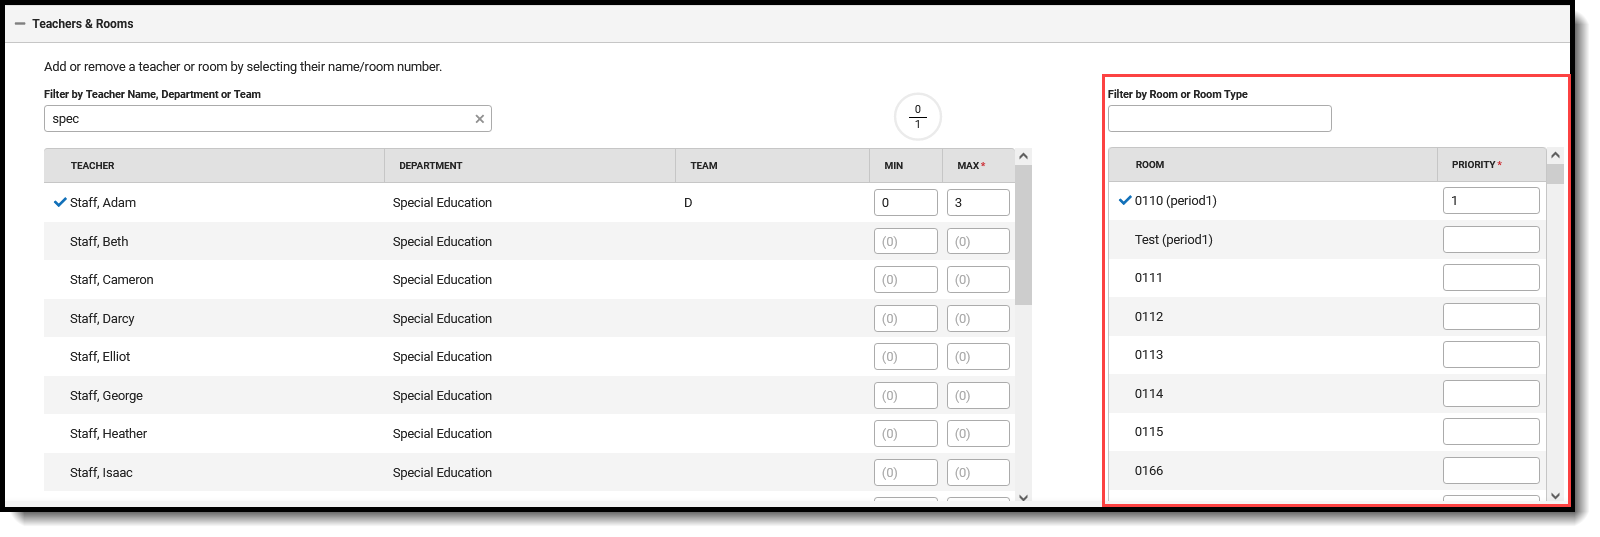 Assigning Rooms to Courses
When creating rooms, a Name is required entry, but a Room Type can also be added. Room Types are created in the Attribute/Dictionary and are more descriptive than just a room number or name. It could be LAB or GYM or POOL, for example. When a school has multiple labs or multiple gyms, the Room Type would be LAB and the Room Number might be LAB A.
Room Priority is used to place a section into the room with a Priority of 1. This is automatically entered when the FIRST room number is selected. When more than one room is selected for a particular course, or there are several rooms in which the teacher can teach that course, select all appropriate rooms and add a priority. Priority is also automatically assigned; a value of 1 indicates that is the preferred room and was selected first.
Rules
Course rules can be assigned to courses to assist with the planning and placement of courses across multiple years. When a rule is assigned to a course, its complementary rule is applied to the course’s pair. For example, when Algebra I has a rule that is must be taken BEFORE Geometry, a rule is added to Geometry that it must be taken AFTER Algebra I.
To aid with Academic Planning, there are different types of rules that can be added to courses - Scheduling Rules and Planning Rules:
- Scheduling Rules tie different courses together in a variety of ways which affect the flexibility of the Scheduling Board. The rule only takes affect when a student requests both courses during the same scheduling year.
- Planning Rules define relationships between courses across years. Planning rules are NOT used in the Scheduling process.
In the Course Planner, only Scheduling Rules can be added to courses. To add Planning Rules to a course, use the Course Rules tool.
Use rules only when absolutely necessary to achieve the education goals of the district.
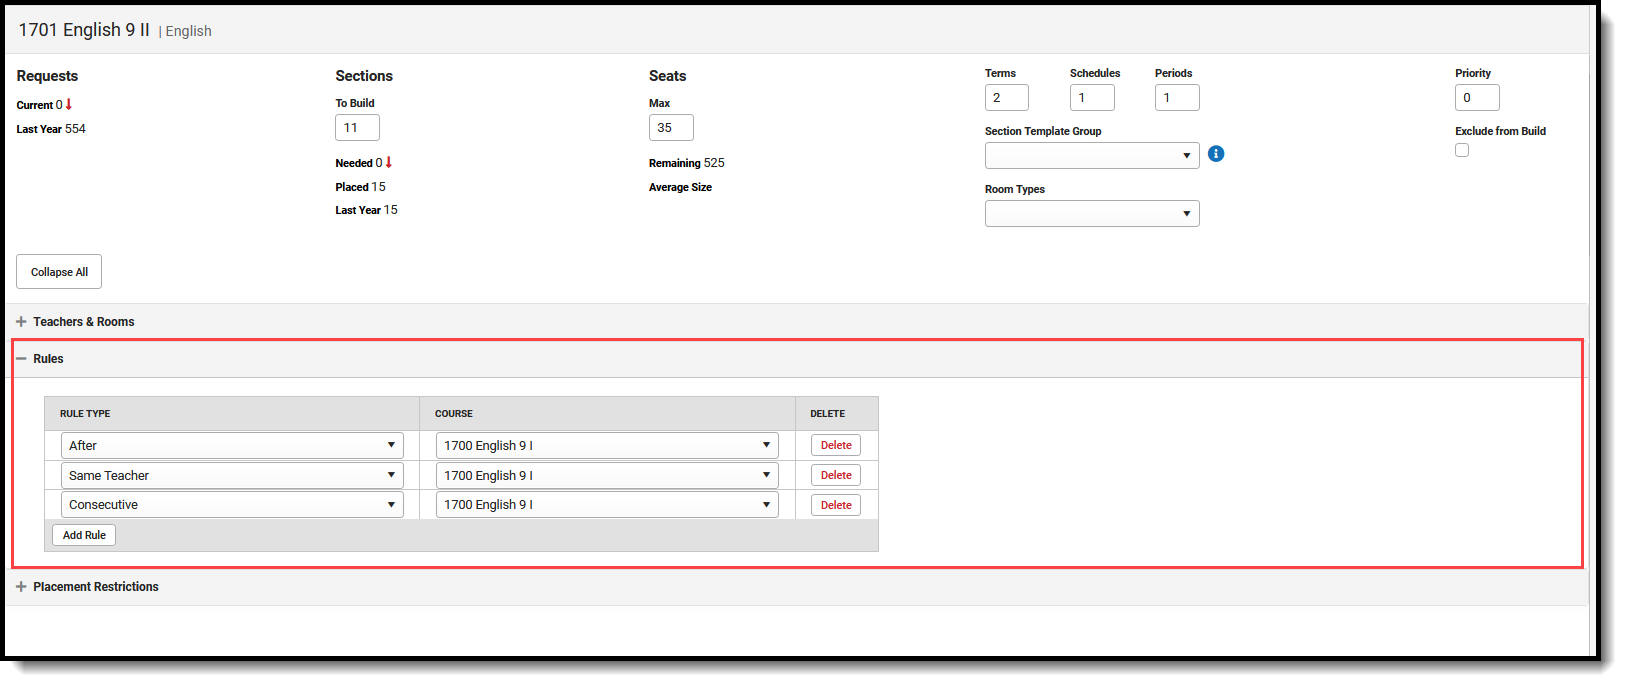 Course Planner Rules
See the Scheduling Rule Descriptions and Examples for detailed explanation of the available rules.
A course cannot have a rule tied to itself. Meaning, the Course field does not include an option to select the course that is being viewed.
Placement Restrictions
The Placement Restrictions section creates a constraint on that period and term. This restriction can be for a selected period, a term or a schedule, or a combination of each. The restriction indicates a section is not placed in that period, schedule, or term.
Use the Filter by Term field to change the schedule grid to only display the entered Term number. Use the Filter by Period Schedule to only display that particular period schedule. Or, use them together to only display Term 3 and the Daily Period Schedule. These filter selections remain when moving to the next course.
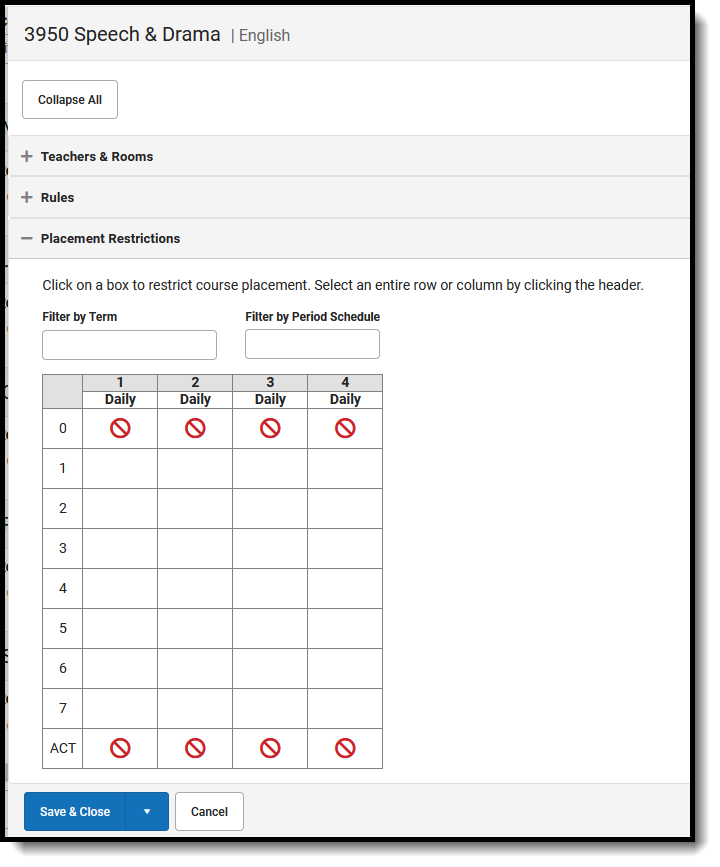 Placement Restrictions
When a restriction is added, the No Symbol (  ) is added to the period. Restrictions can be added for a period across all terms by clicking the period number row; to a period schedule by clicking that schedule name; for an entire term by clicking the term number; for a single period.
Restrictions are added for any period schedule or term that is not displayed due to filtering by term or schedule. When saved, a validation message displays to alert the user that changes were made to hidden terms/period schedules.
A label displays on the main Course Planner view when a placement restriction exists.
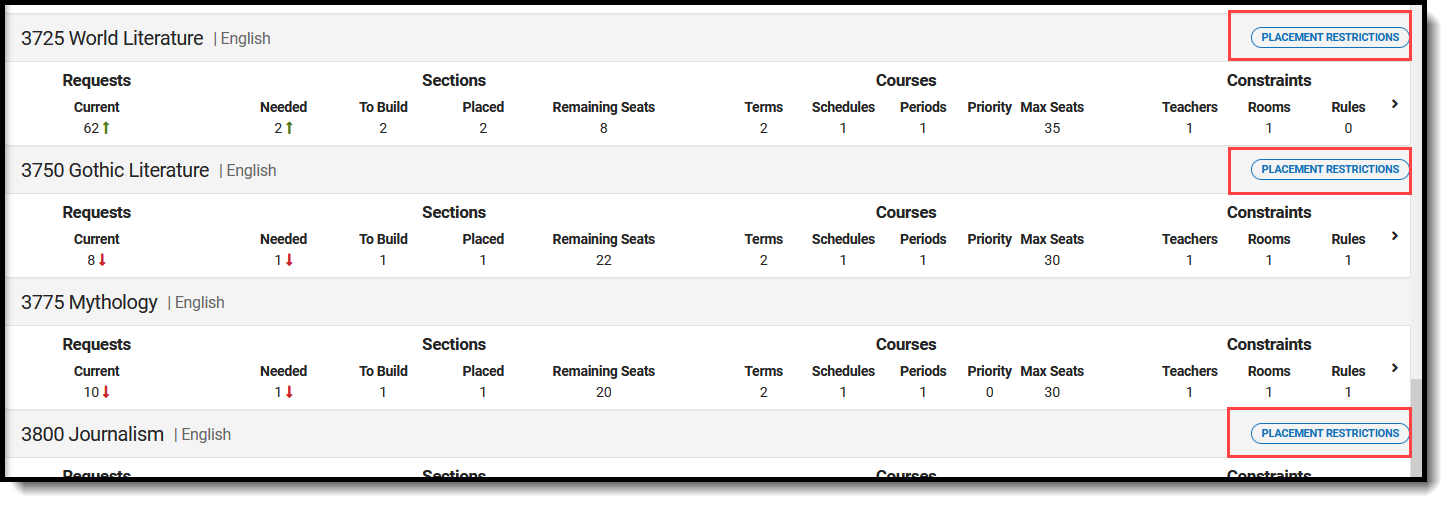 Placement Restriction Label
Modify Course Plan Information
Change Sections, Seats, etc.
All of the information displayed in the Main Course Planner view can be modified in the side panel, EXCEPT the number of students who have requested the course.
- Open the side panel by clicking in the row or clicking the chevron on the far right side of the row for the appropriate course.
- Enter the appropriate values for the selected course for the following fields by typing in the field or selecting an option from the dropdown list:
- Sections (To Build)
- Seats (Max)
- Terms
- Schedules
- Periods
- Section Template
- Room Types
- Priority
- Mark the Exclude from Build checkbox to have the build logic in the Schedule Board ignore this course.
- If this is the only update that needs to be made, click Save & Next, Save & Stay or Save & Close button. Otherwise, continue making adjustments for this course.
When returning to the main view, the changes are reflected in the Sections and Courses tallies.
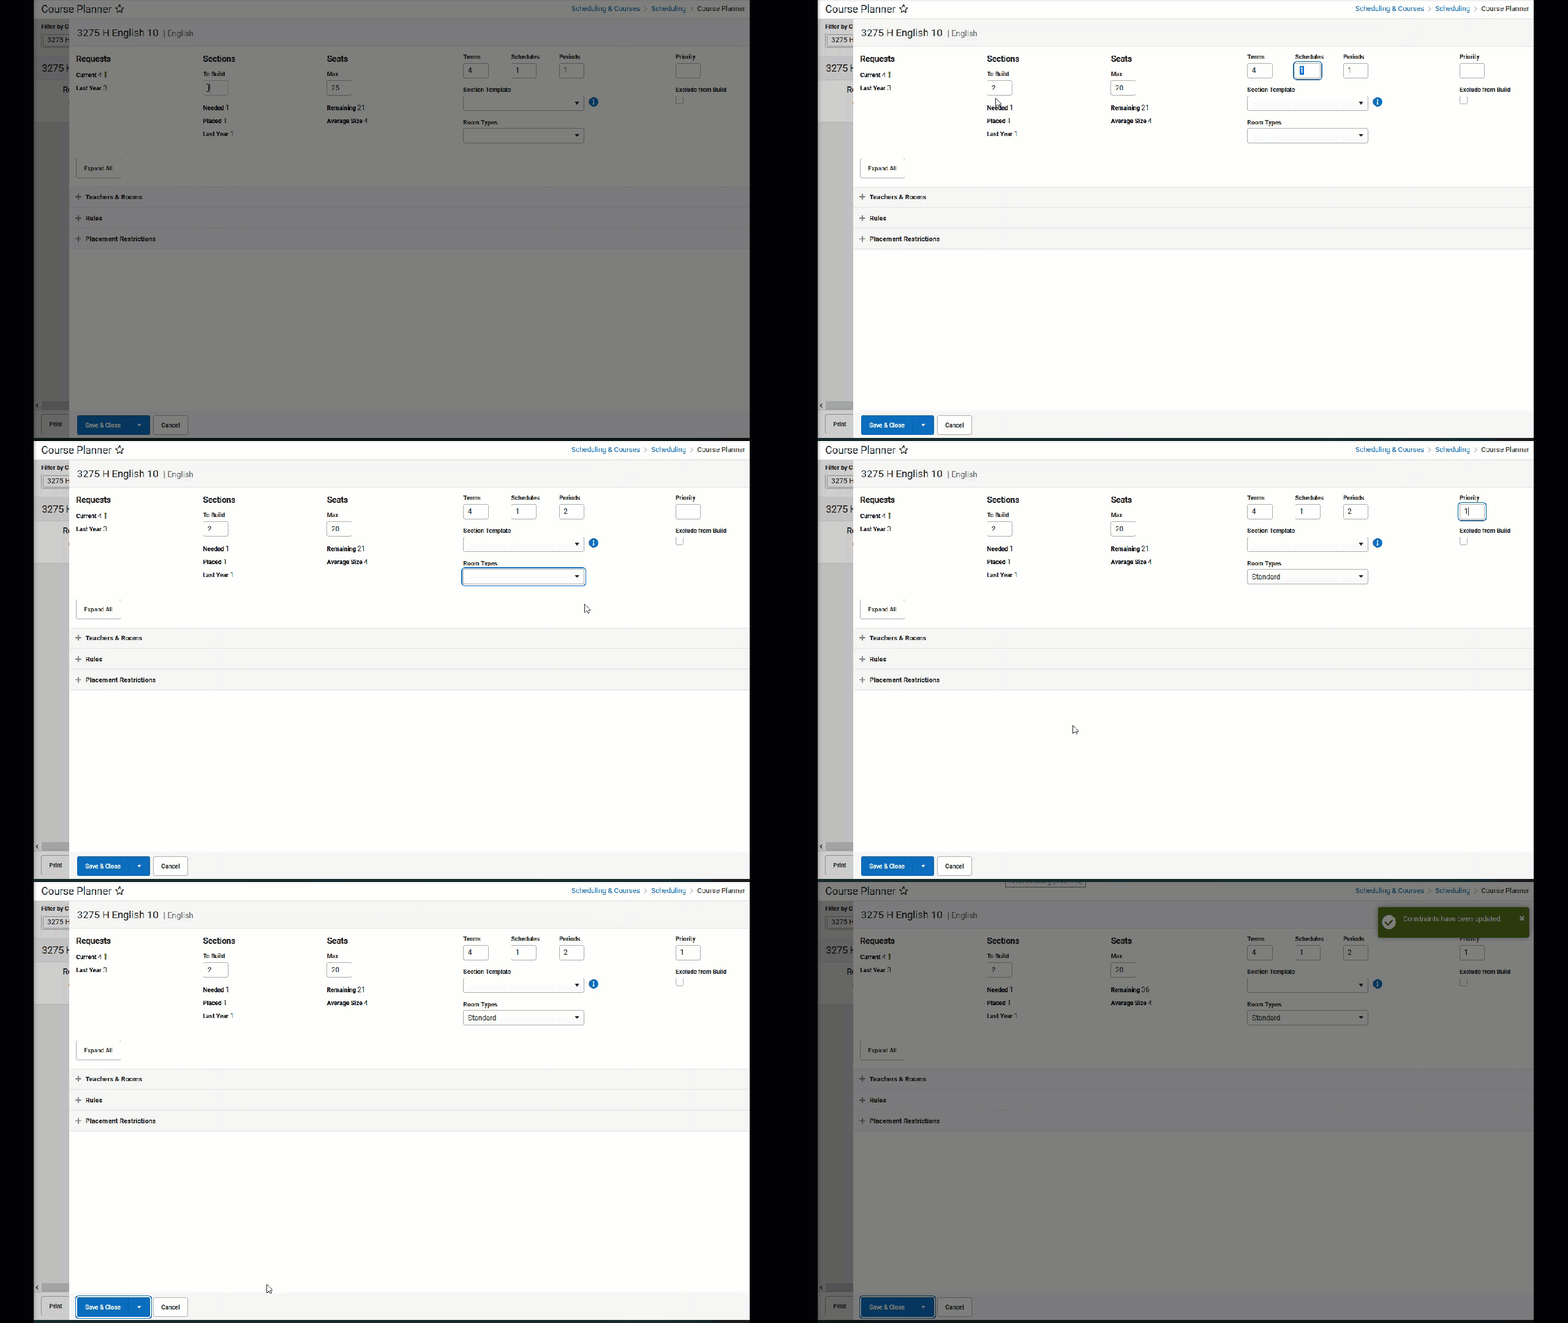 Adjust Course Information
Assign Teachers to Courses
- Expand the Teacher & Rooms card.
- Filter the Teachers and Rooms, if desired.
- Click anywhere in the row for the teacher to be assigned to the course. A blue checkmark displays next to a teacher when it has been assigned, and a green alert message displays in the upper right corner.
- If needed, modify the Max value. This is the maximum number of sections of the course the staff person can teach.
- If this is the only update that needs to be made, click Save & Next, Save & Stay or Save & Close. Otherwise, continue making adjustments for this course.
When returning to the main view, the number of teachers is updated to reflect the number of teachers added to the course.
To remove teachers from a course, click the blue checkmark next to their name.
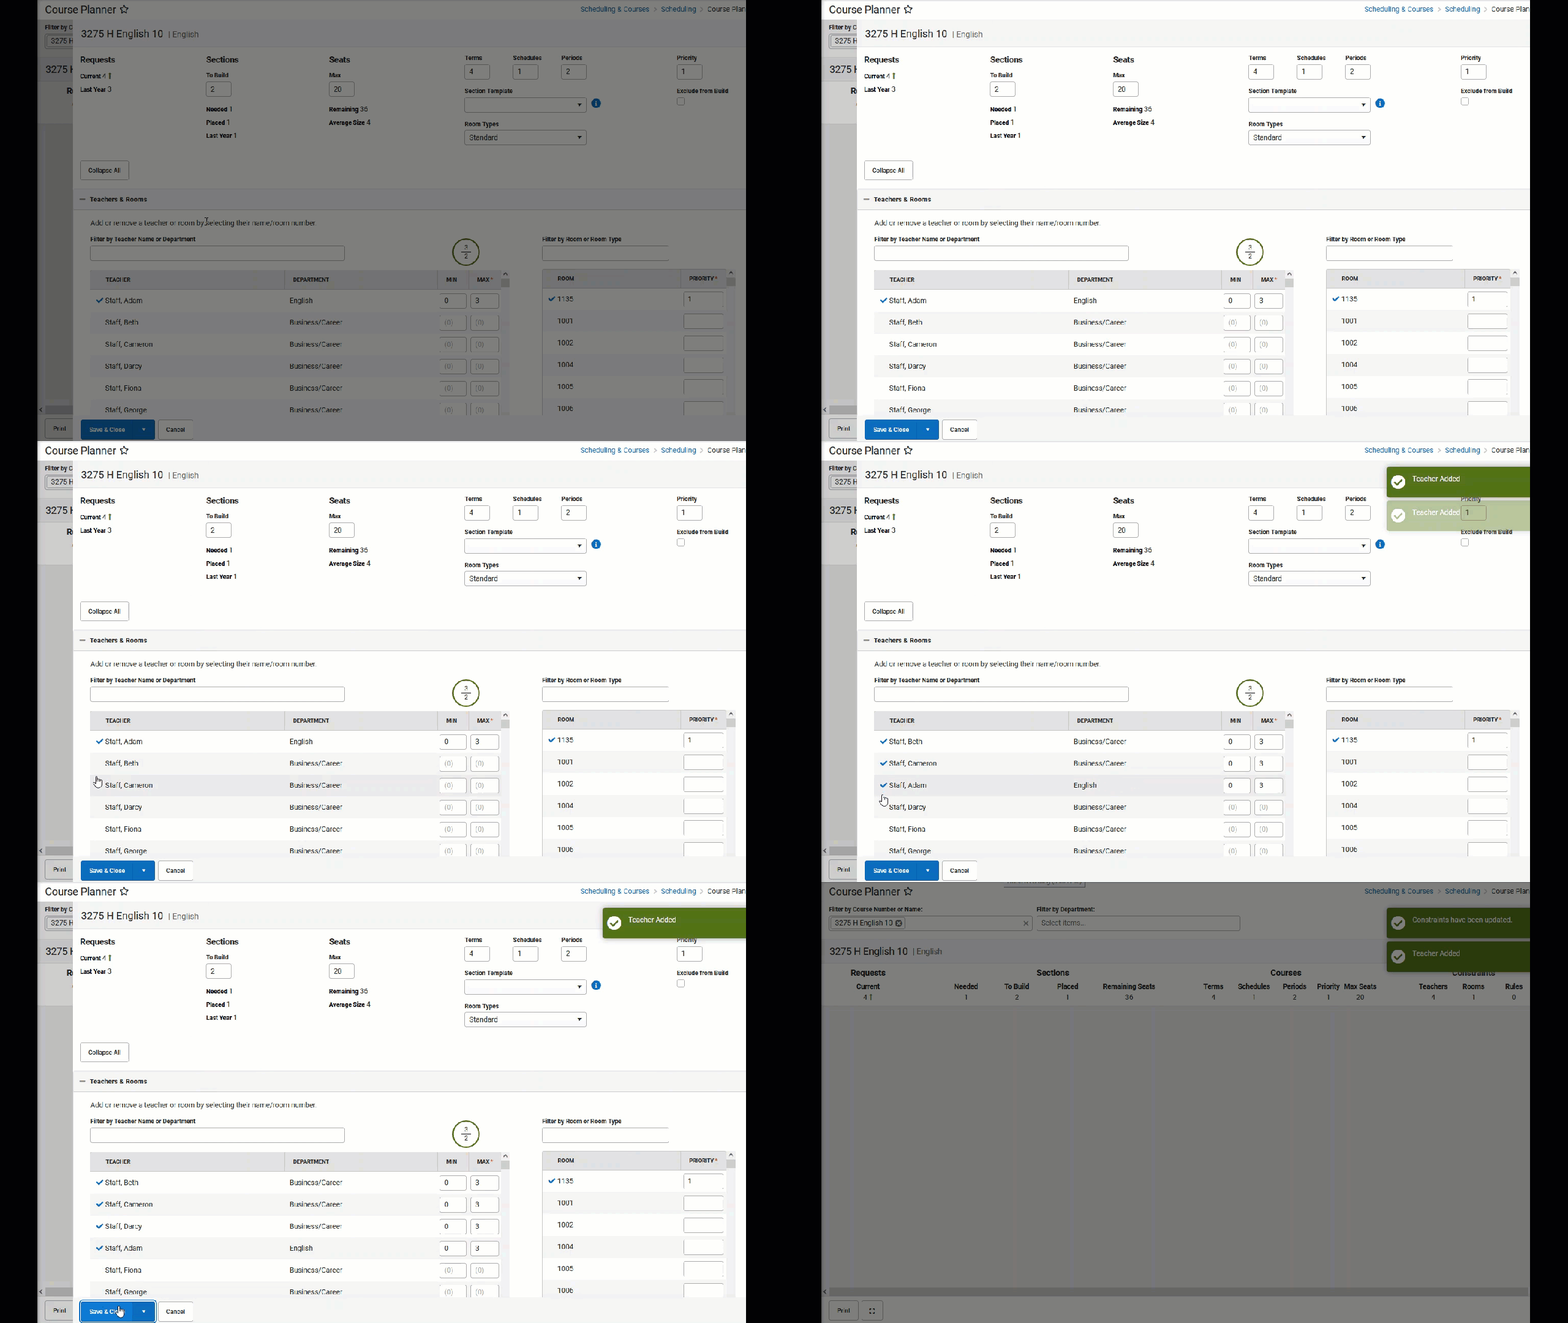 Assign Teachers to Courses
Assign Rooms to Courses
- Filter the list of rooms to those appropriate for the selected course.
- Select the desired rooms for the teacher's courses by clicking in that room row. A blue checkmark displays next to selected rooms.
- If this is the only update that needs to be made, click Save & Next, Save & Stay or Save & Close. Otherwise, continue making adjustments for this course.
When returning to the main view, the number of rooms is updated to reflect the number of rooms added to the course.
To remove rooms from a course, click the blue checkmark next to its name.
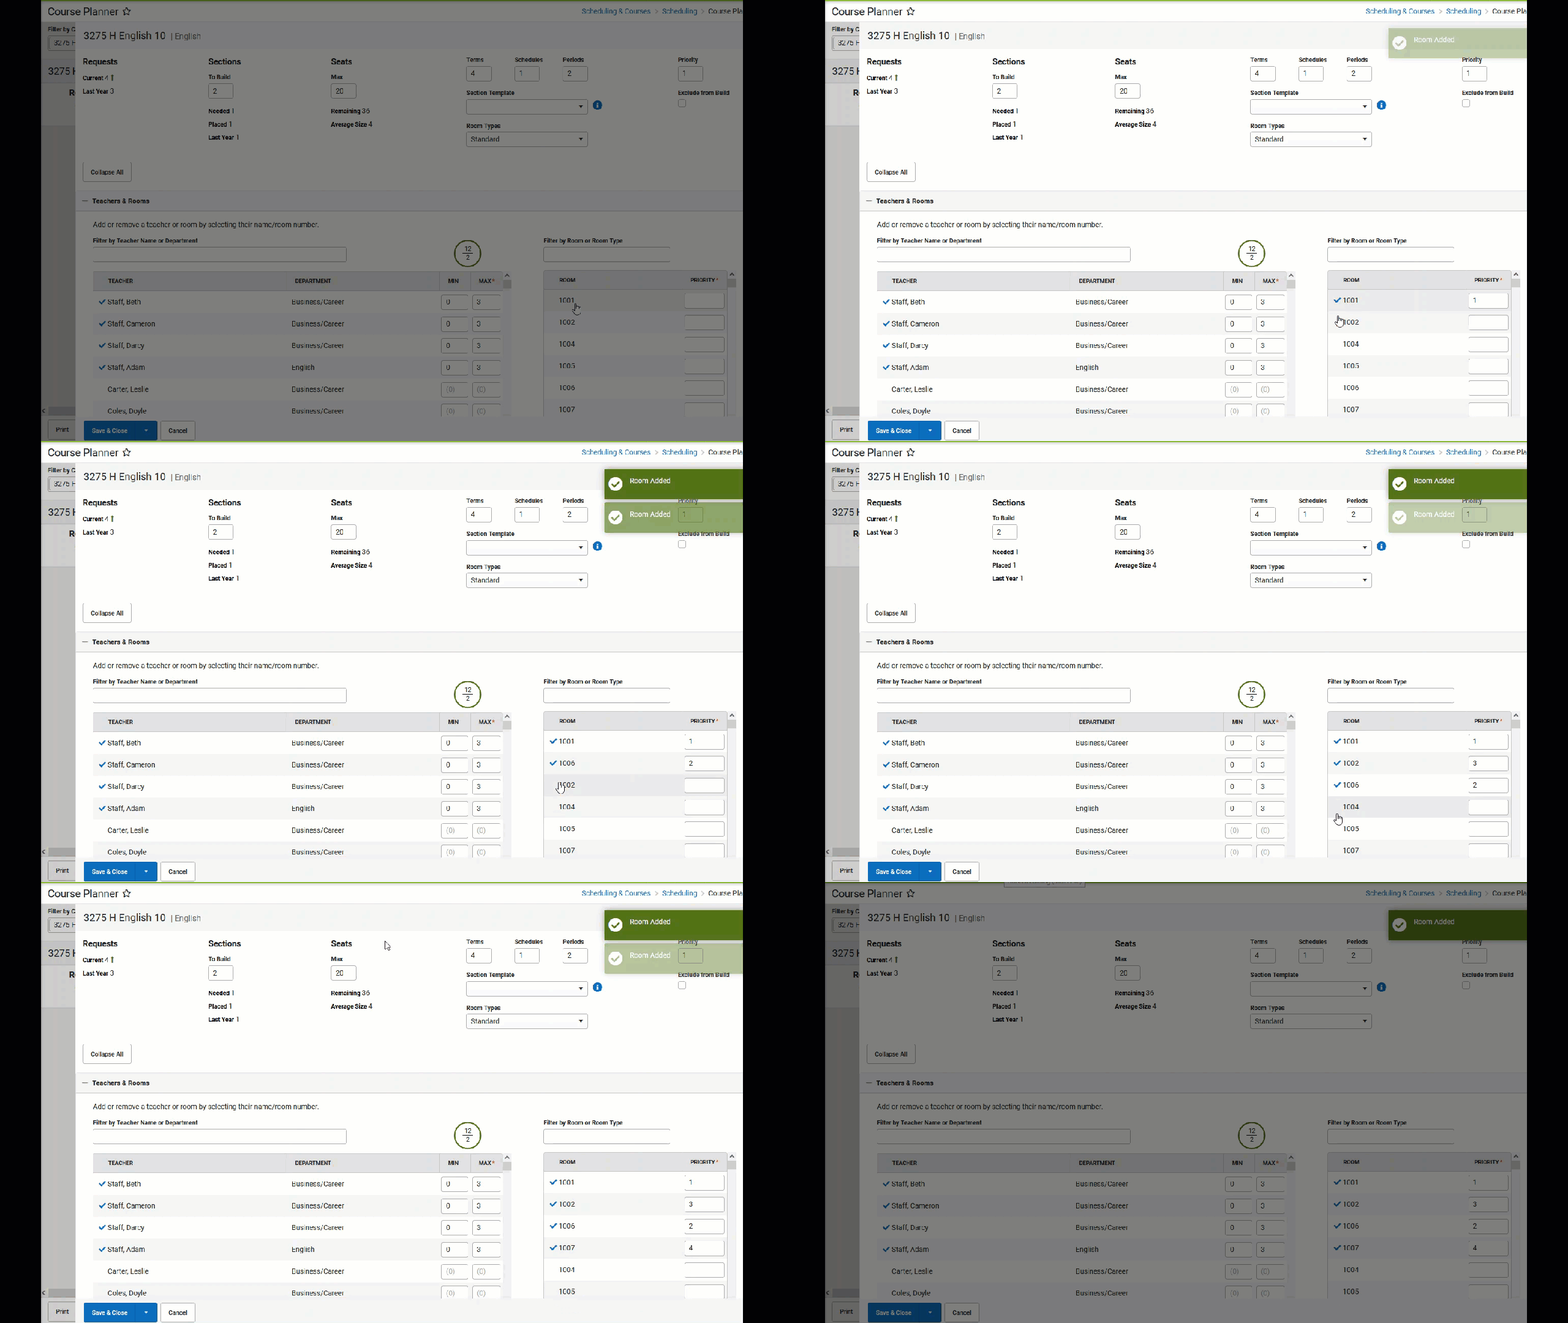 Assign Rooms to Courses
Assign Rules to Courses
- Click Add Rule. A blank Rule Type field and Course field display.
- Select the Rule Type from the dropdown.
- Locate the correct Course to which to assign the rule.
- If this is the only update that needs to be made, click Save & Next, Save & Stay or Save & Close. Otherwise, continue making adjustments for this course.
When returning to the main view, the number of rules assigned to the course updates to reflect the number of rules added.
Both the Rule Type and the Course fields must be populated in order to save the record.
To remove a rule, click Delete.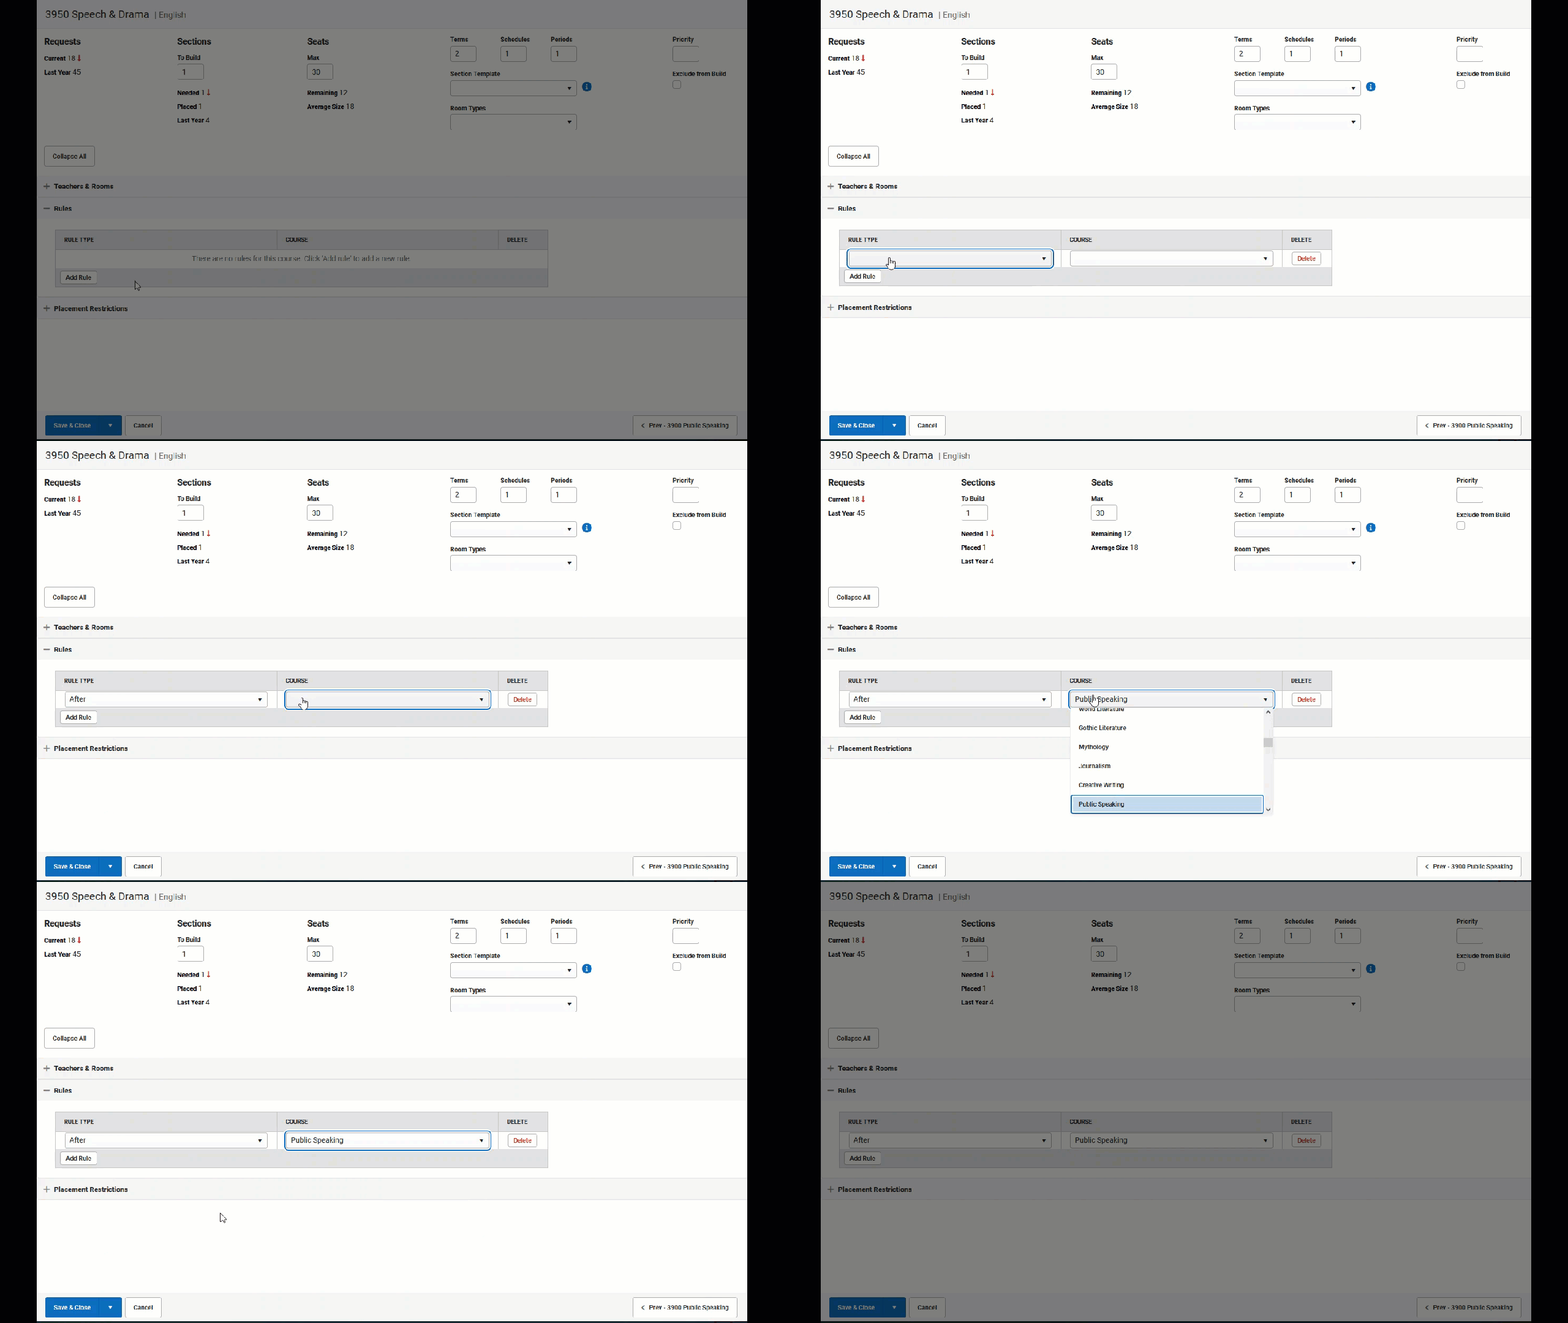 Add Rules
Add Placement Restrictions
Click to add a placement restriction in the desired term(s) and periods). To remove a restriction, click in that space again.
When this is the only update that needs to be made, click Save & Next, Save & Stay or Save & Close. Otherwise, continue making adjustments for this course.
When returning to the main view, the Placement Restriction label displays. Details of that restriction are not displayed.
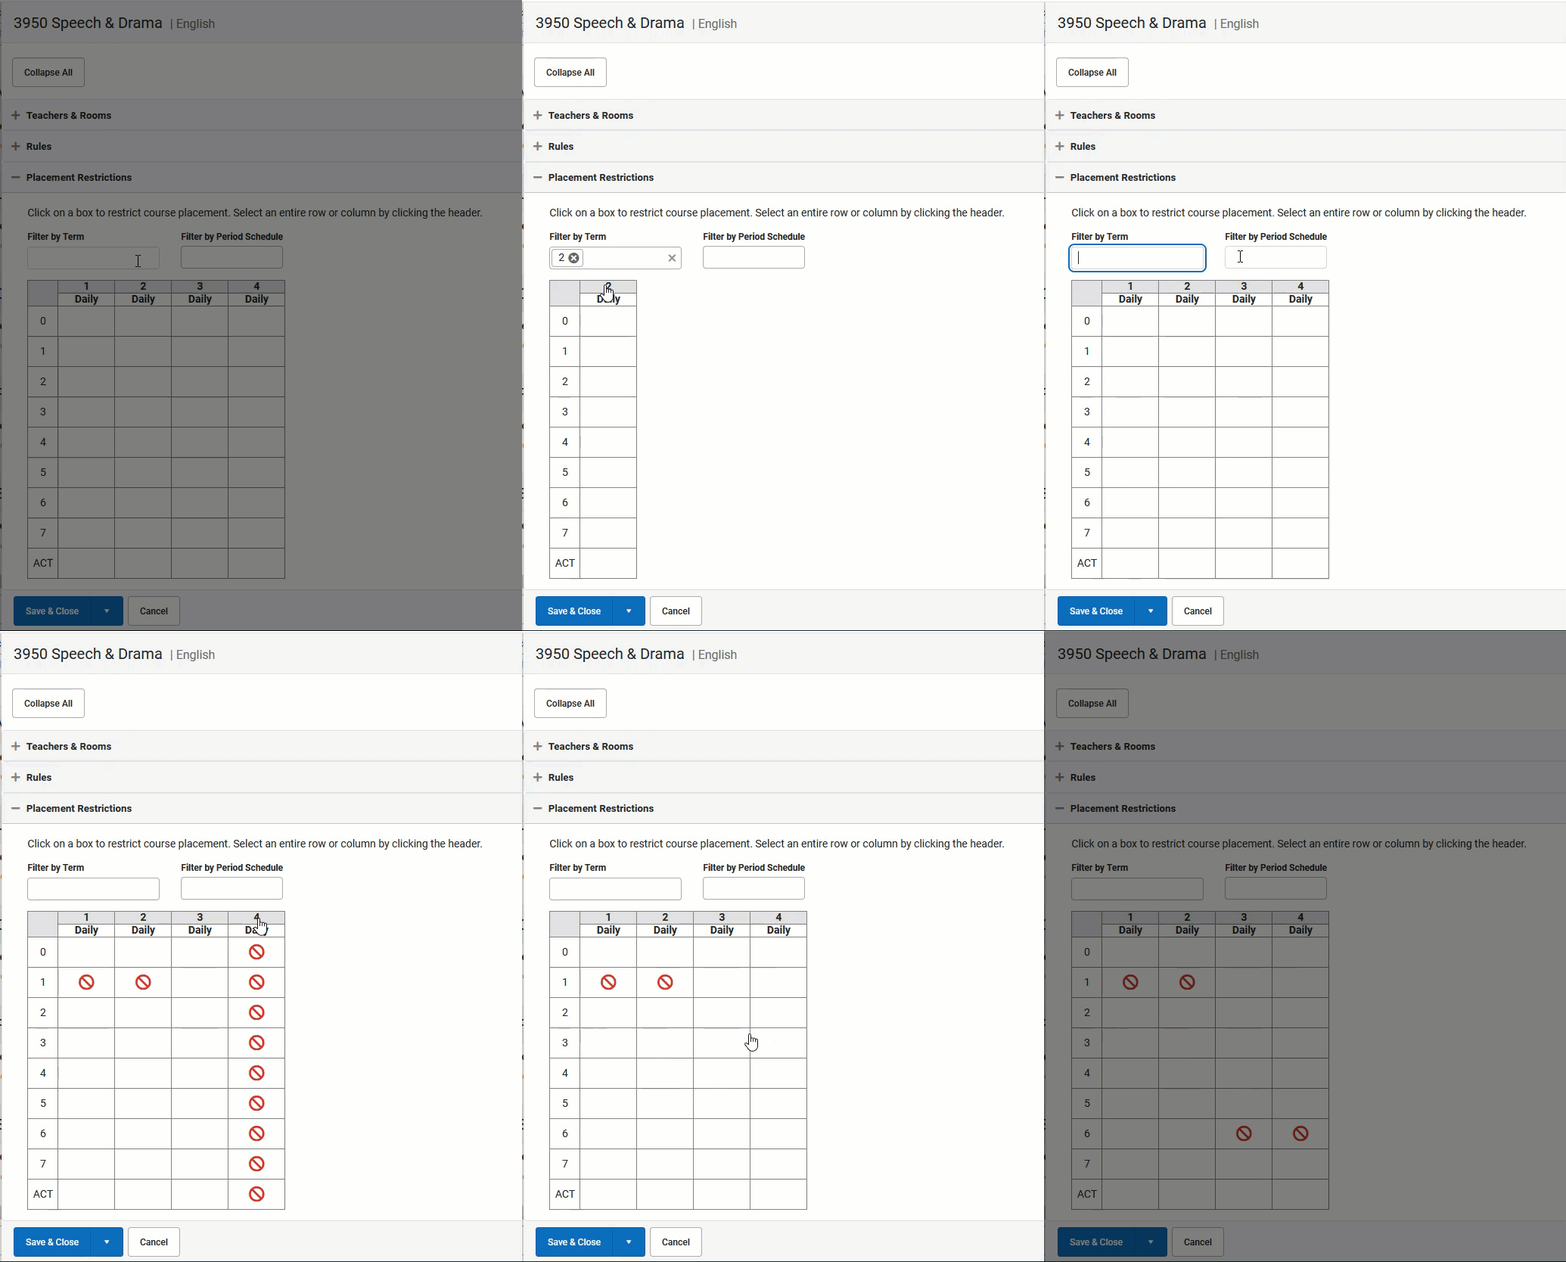 Add Placement Restrictions
Previous and Next Course
When finished modifying the course with teachers, rooms and placement restrictions, use the Previous and Next buttons in the bottom right to add teachers, rooms and placement restrictions to other courses without leaving the Side Panel view. Changes do need to be saved before viewing another course.
 Previous and Next Courses
Next Steps
- Review the Scheduling Center and/or Checklist for Scheduling for remaining scheduling tasks.
- Use the Scheduling Board to build the courses and load the student requests.
- Generate scheduling reports to review the placement of courses.
- When all scheduling items have been completed, mark the Scheduling Board Trial active.
