The Schedule Wizard is being removed from the product as of the Campus.2435 Release (August 2024).
Use the following tools for scheduling and planning purposes:
Tool Search: Schedule Wizard
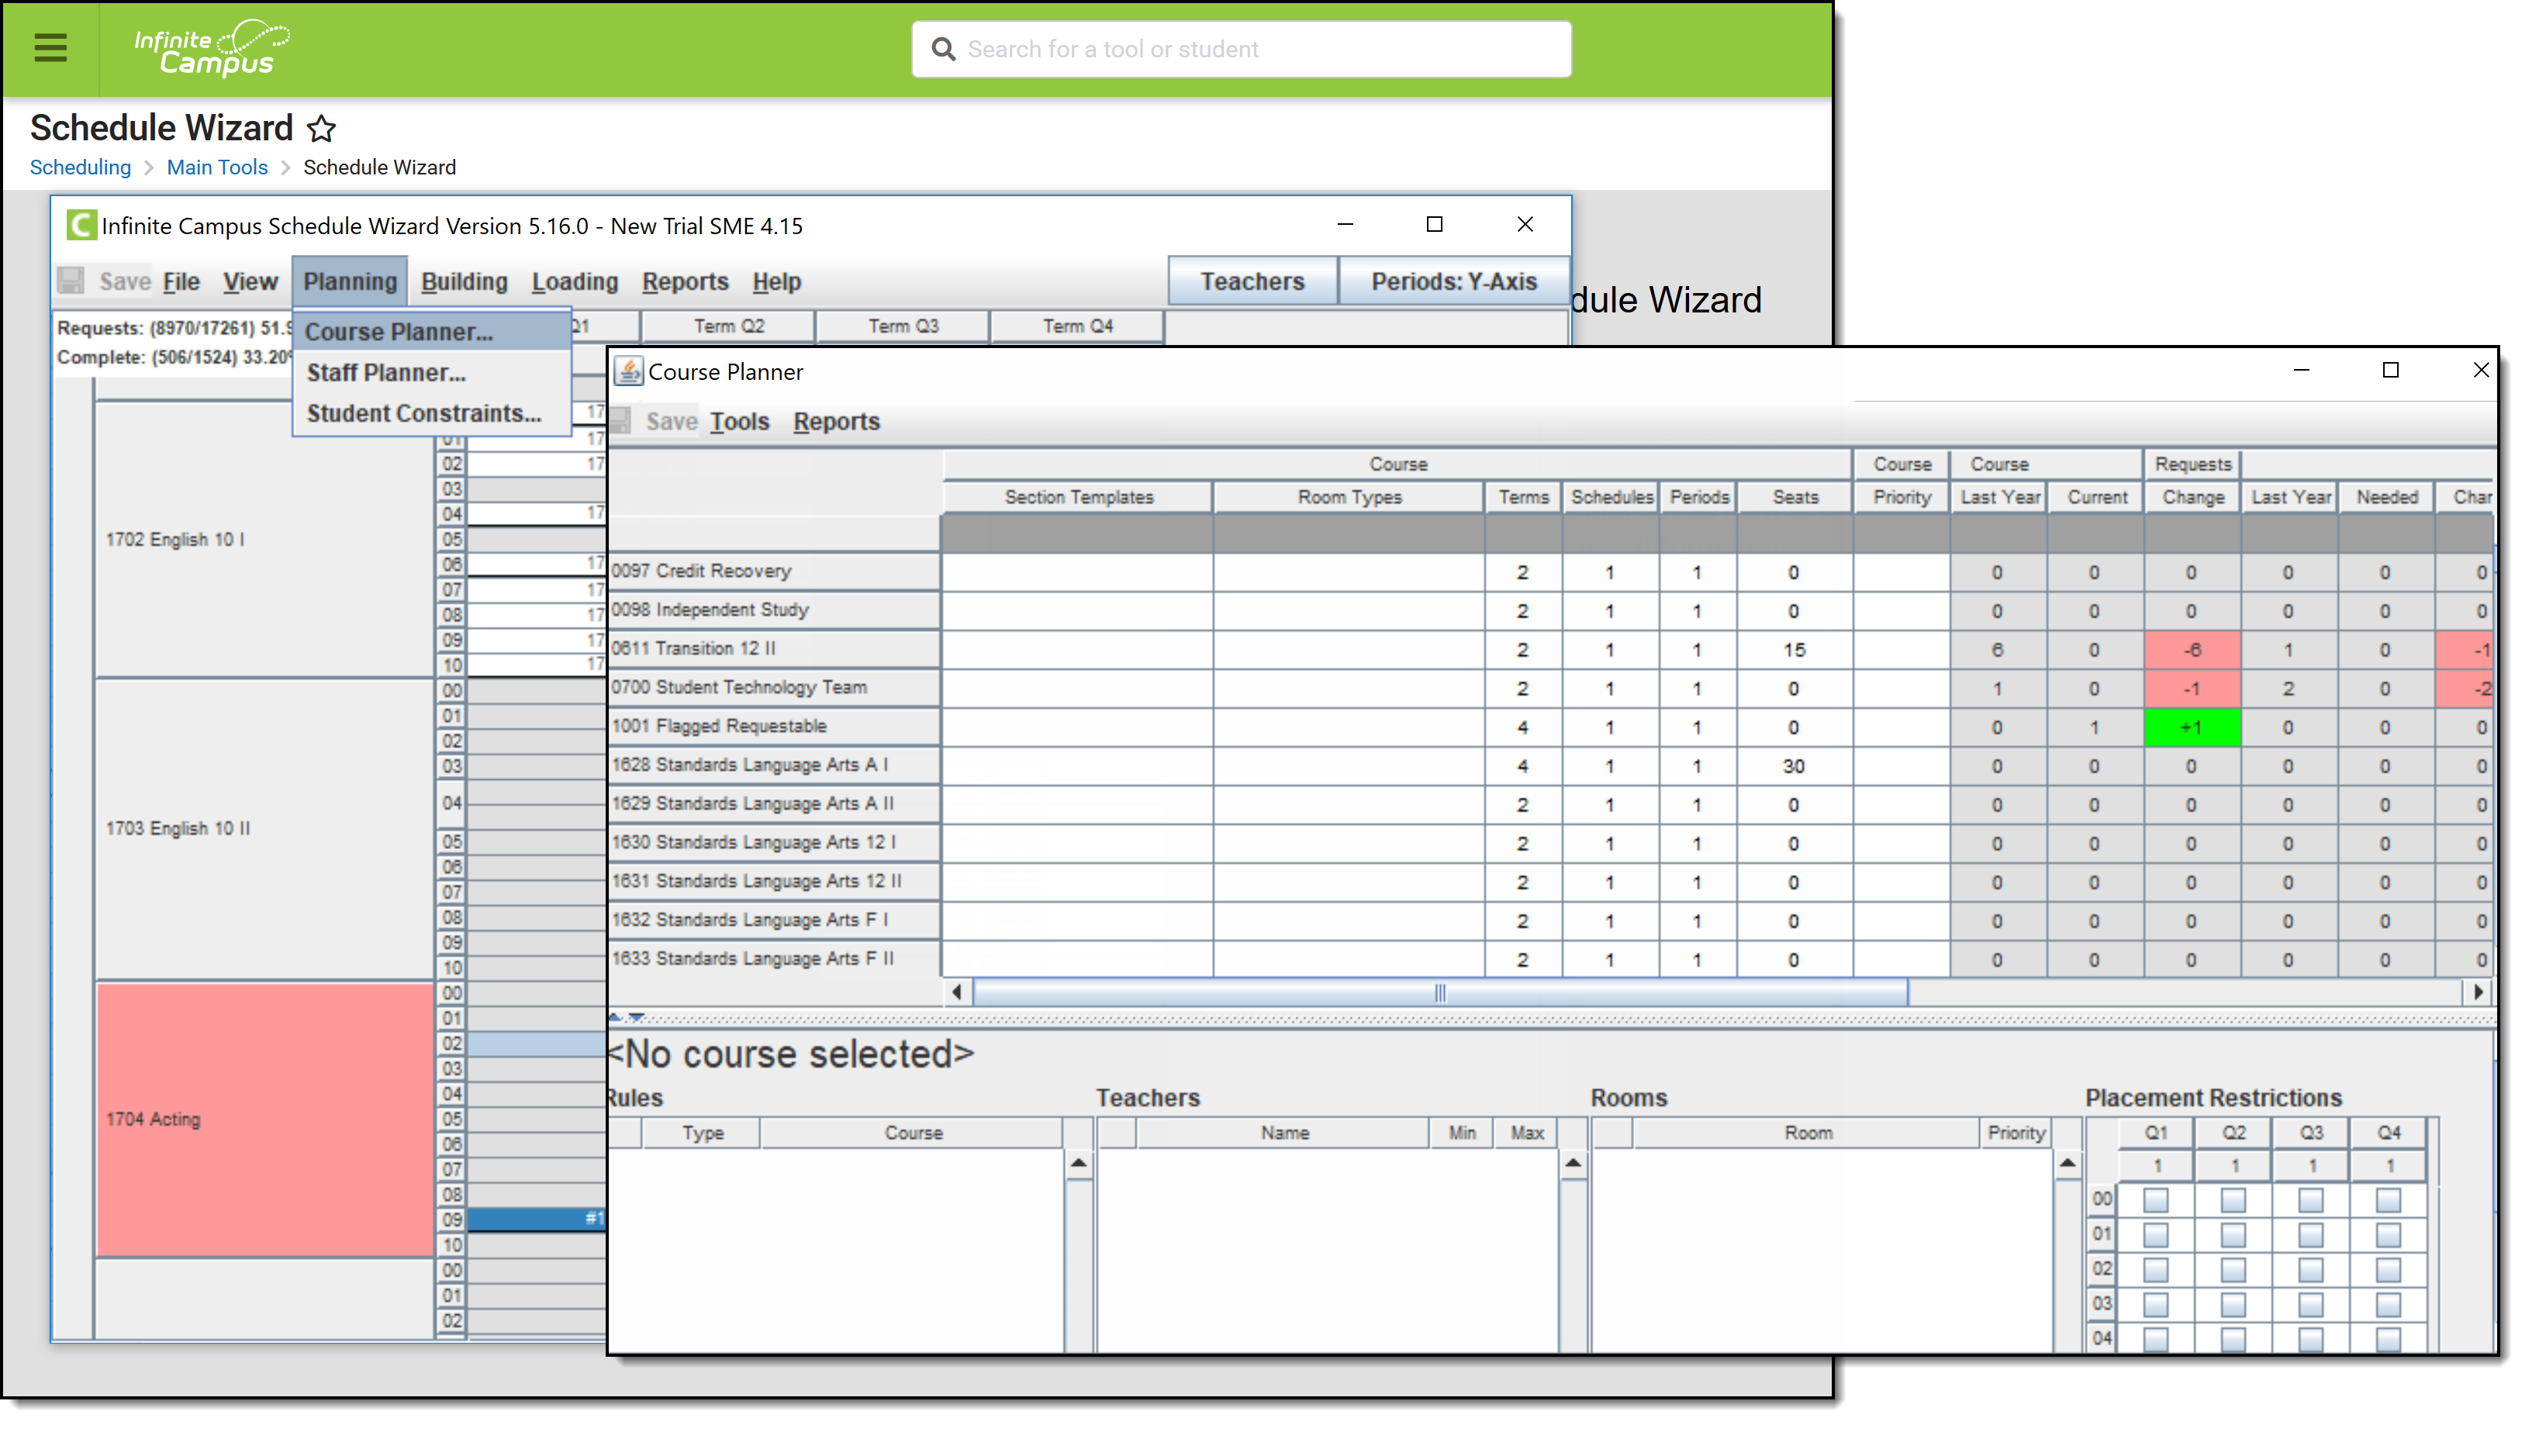
The Course Planner displays request tallies, computes number of sections needed, and compares students requests and sections to last year's calendar to see how these changes may affect section staffing needs. Any scheduling related course item can be modified in the Course Planner, including course constraints, room placement and teacher assignment.
A new stand-alone Course Planner tool was released in the Campus.2315 Release Pack (April 2023) and can be used interchangeably with this Course Planner.
The Course Planner can be used throughout the scheduling process, but is best used after calendars for the next school year are created and enrollments have been rolled forward and student requests are entered.
Course Planner Layout
The Course Planner lists the names of courses (and departments, if selected) on the left hand side in alphabetical order. Then, the following information is listed for each course:
- Course data, entered on the Courses editor
- Section templates assigned to the Course
- Assigned Room Types
- Course Requests, entered during the Course Registration process and viewable in the Walk-In Scheduler
- Section information
- Course Constraint information
Any area on the Course Planner that is not grayed out is editable.
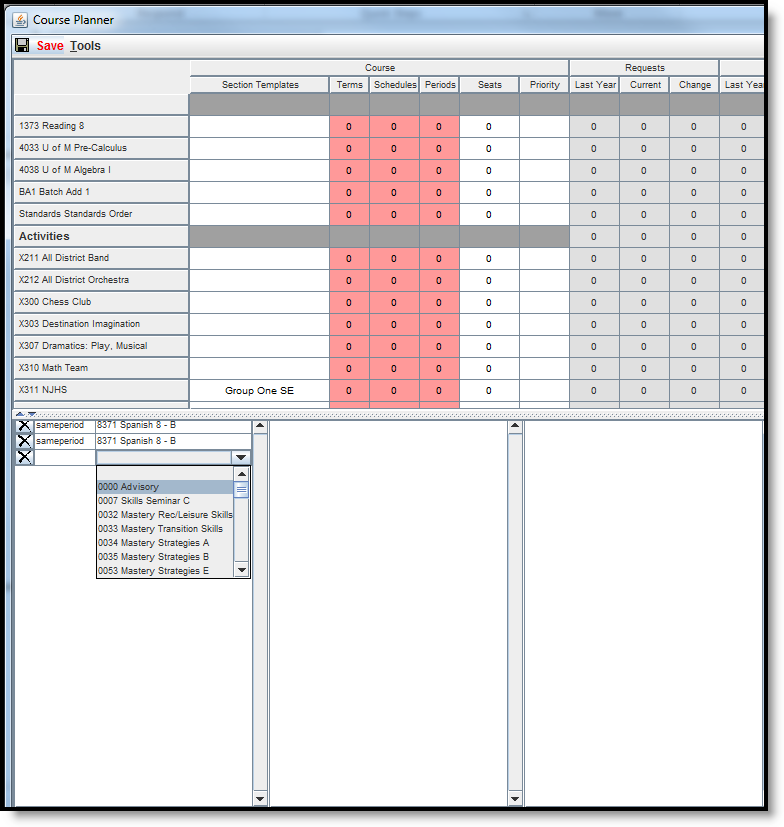
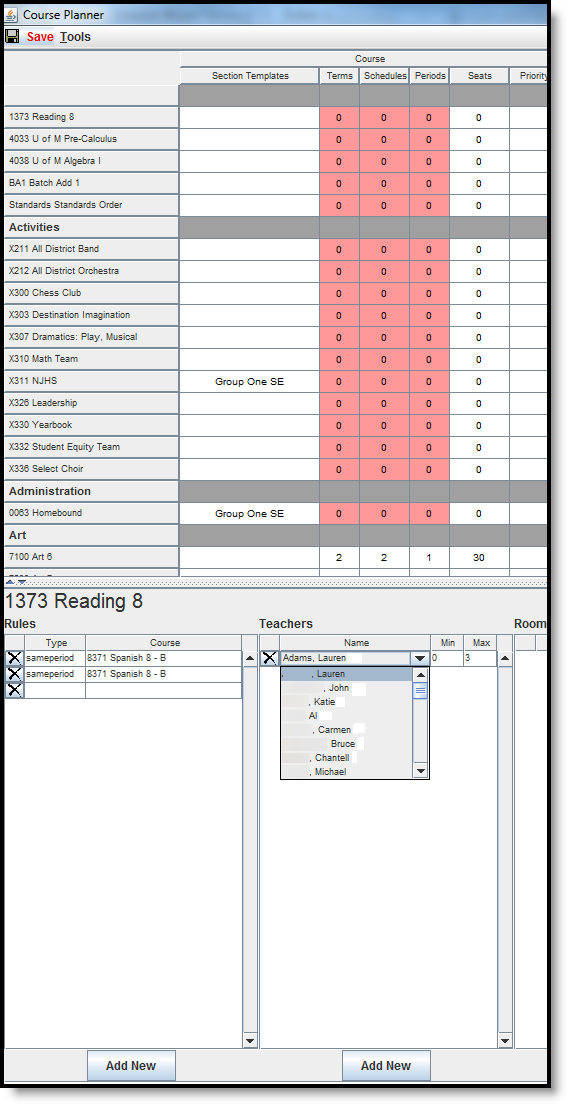
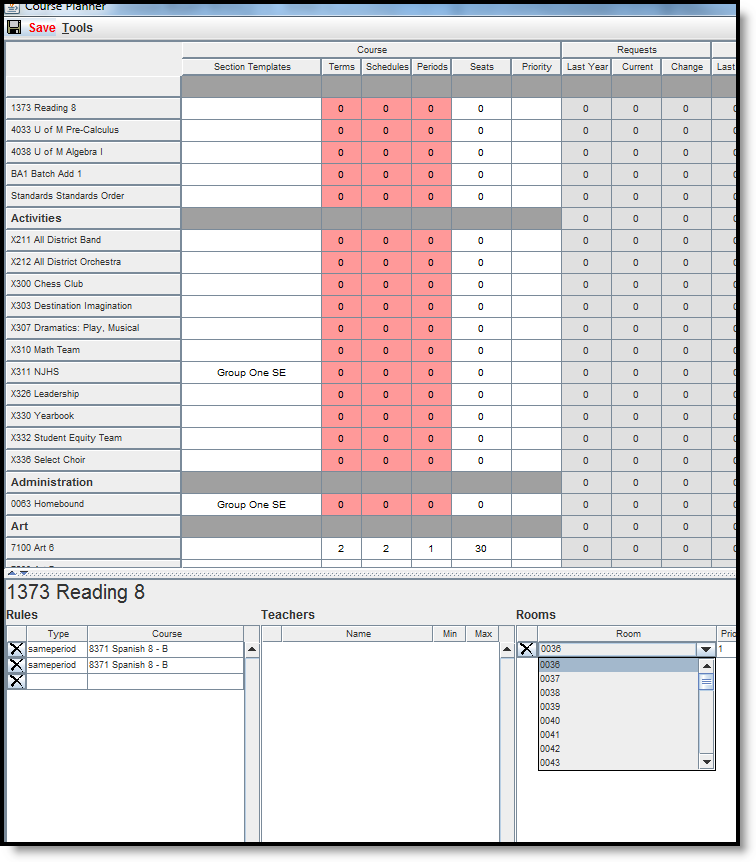
At the bottom of the Course Planner, scheduling rules can be added, teachers can be added to course sections and rooms can be scheduled for each course section.
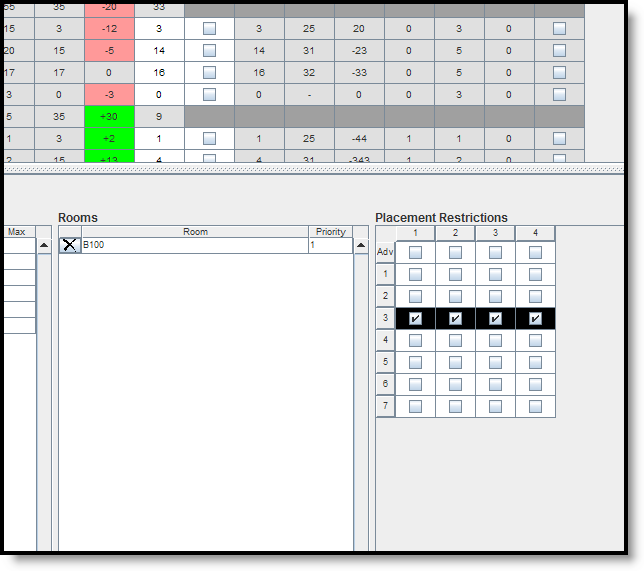
In addition, placement restrictions can be selected. This limits where the course section is placed based on staff availability.
Course Details
The following defines the items listed for each column available for Courses on the Course Planner.
Item | Description |
|---|---|
| Section Templates | Indicates to which section template group the course is assigned. If this field is populated, the Terms, Schedules and Periods fields cannot be modified. If sections have already been placed, assigning a Section Template does not affect those sections. Any sections not already placed when building courses are affected. |
| Room Types | Describes the type of room (gymnasium, class room, auditorium, etc.) for the room name. District users are required to populate the options in the Attribute Dictionary that are available for selection. See the Room Types for more information. |
Terms | Total number of terms a section of the course meets. |
Schedules | Number of the total period schedules in which the course section meets. |
Periods | Total number of periods a section of the course meets. |
Seats | Total number of student seats for each course section. This field is limited to three characters. |
Priority | Value for the priority this course takes in the Schedule Wizard loading process. If a value is entered in the Terms, Schedules, Periods, Seats or Sections to Build fields is not a numeric value, the value in this field changes to a zero. |
Requests
The following defines the items listed for each column available for Requests on the Course Planner. This area lets the scheduling staff see how many new course sections they may need, potentially causing new teachers to be hired.
Item | Description |
|---|---|
Last Year | Total number of student requests (Required and Elected) for the course for the active school year. If scheduling is being done for the 2019-2020 school year, Last Year is the 2018-19 school year. |
Current | Total number of requests (Required and Elected) for the course in the upcoming school year. If scheduling is being done for the 2019-2020 school year, Current is the requests for the 2019-20 school year. |
Change | Difference between the active year's request total and the upcoming school year. If scheduling is being done for the 2019-2020 school year, Change is what is needed for the 2019-20 school year. |
Sections
The following defines the items listed for each column available for Sections on the Course Planner.
Item | Description |
|---|---|
Last Year | Number of sections built in the past school year for the course. For schools with multiple calendars in the previous year, the calendars must be numbered (System Administration > Calendar > Calendar > Calendar > Number) in order to properly report the Last Year value. See the Calendar Details article for more information. |
Needed | Number of sections needed in the upcoming school year for the course. |
Change | Difference between last year's section number and the upcoming year's section number. |
To Build | Total number of sections that will be built for the course. If an existing value in this field is increased AFTER currently built sections have been locked, the new sections do not override the existing sections. |
No Auto | If selected, the builder does not build the course. Sections of courses marked as No Auto need to be built manually. |
Placed | Total number of sections placed. |
Avg Size | Average size of each section (student count). |
Remaining | Once everything is built and loaded, this total is the remaining number of seats available. |
Constraints
The following defines the items listed for each column available for Sections on the Course Planner.
Item | Description |
|---|---|
Rules | Number of rules associated with the course. |
Teachers | Teachers assigned to the course. |
Rooms | Rooms assigned for the course. |
Placement | Selection indicates a restriction exists for the placement of course sections. |
Course Planner Tools
The Course Planner contains tools to mass edit course restrictions. When a calendar has multiple schedule structures that have a varying number of course periods, the Course Planner removes any placement restrictions and displays the period schedules appropriately for each schedule structure.
Mass Set Course Values
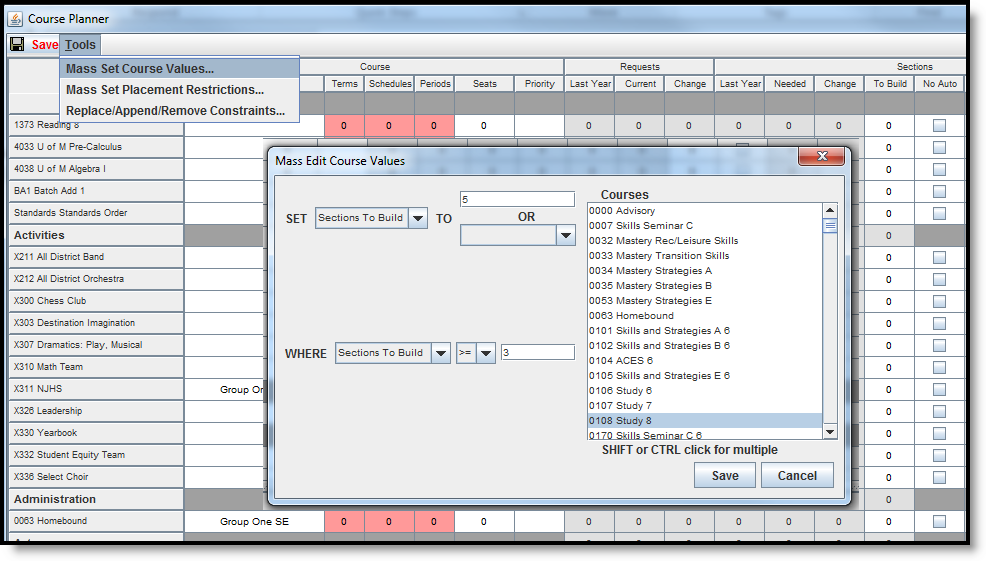
The Mass Edit Course Values allows the setting of course information (e.g., terms, schedules and periods) for more than one course at a time. This tool is viewed like a query, where the user can select which items to set, enter the value of the change for the courses and select existing information to be overwritten.
Options for Mass Edit Course Values
The following tables define the options available for mass editing course values.
Item | Options |
|---|---|
SET | Terms |
TO | Terms |
WHERE | Terms |
OPERATOR | = (equals) |
Use the Mass Edit Course Values Tool
- Select the option from the SET dropdown list for the courses that need to be modified.
- Enter the Value in the blank field or select the TO option in the dropdown list.
- Select the option from the WHERE dropdown list indicating what item should be changed.
- Select the Operator from the dropdown list.
- Select the Courses that should be modified.
- Click the Save button on the tool. This updates the courses selected and highlight them in green.
Mass Set Placement Restrictions
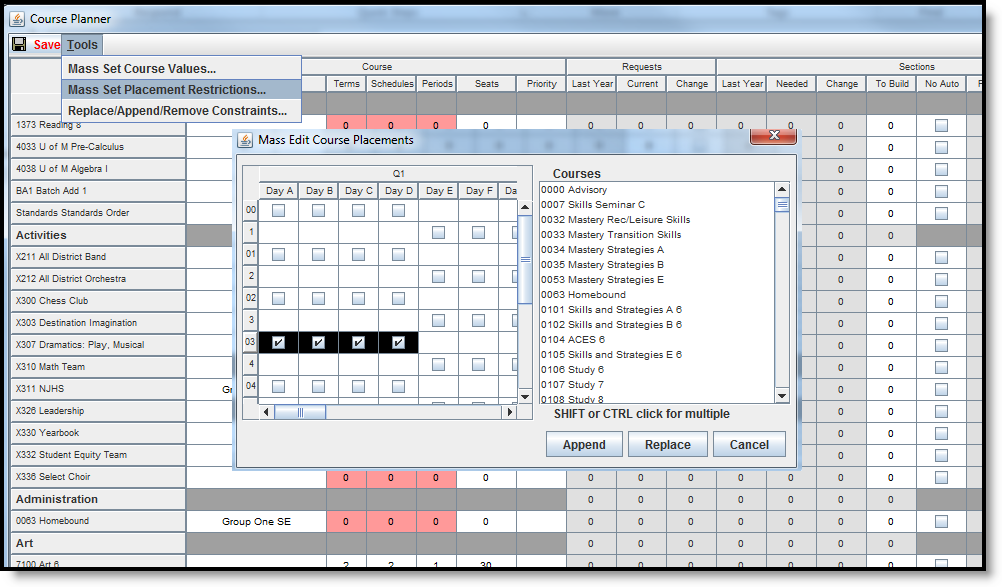
The Mass Edit Placement Restrictions allows the selection of periods and terms where the selected courses should not be placed or built.
Placement restrictions can be appended (added to) or replaced (overwritten). If adding additional restrictions to existing restrictions, click the Append button. If adding new or changing existing restrictions, use the Replace button.
Existing restrictions do not display on this mass edit tool. Restrictions only display when the course is selected in the Course Planner.
Use the Mass Edit Course Placements tool
- Select the Courses that should be modified.
- Place a checkmark in the appropriate period and term combination where the course should not be placed.
- Click the Append or Replace button as appropriate. Restrictions are updated.
Replace/Append/Remove Constraints
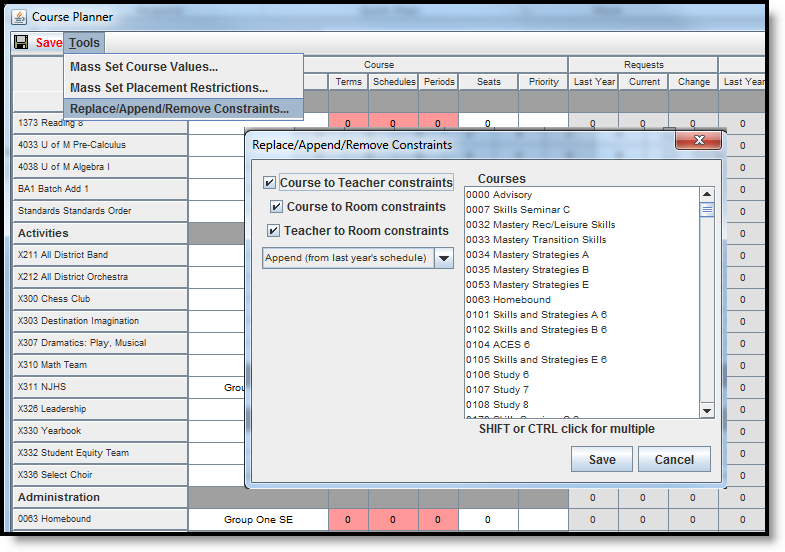
The Replace/Append/Remove Constraints tool is designed for use by districts that have never used constraints before in the scheduling process or have limited use of constraints. Information is built based on the previous year's course information. The district can use that same setup, replace the existing constraints, append the existing constraints or remove the constraints.
For example, if a teacher taught a class in a certain room last year, the tool looks at that course and assume that setup is an authorized constraint and build the teacher to room to course constraint.
For any existing placement restriction, room assignment or teacher assignment, the Replace/Append/Remove Constraints tool can modify the existing information or the recently modified information. These items can be changes from last year's schedule, replaced from last year's schedule or deleted, allowing the user to plan course constraints from the beginning.
Course to Teacher constraints, Course to Room constraints and Teacher to Room Constraints are selected by default. If only a specific option should be modified, remove the checkbox from the unnecessary items.
The dropdown list selection determines what should happen to the constraints:
- Replace updates the existing constraint.
- Append changes the existing constraint.
- Remove completely removes the existing constraint.
Use the Replace/Append/Remove Constraints Tool
- Select the desired constraints to remove.
- Select the Action to perform from the dropdown list.
- Select the Courses for which to remove the constraints.
- Click the Save icon. Constraints for the selected courses are removed.
Add Course Planner Information
The Course Planner displays all constraints, rules, teacher assignments and placement restrictions in one place. Any rules, rooms or teachers already assigned to the courses display here.
Before adding this information, a course must be selected in the Course Planner. Do this by placing the cursor in any cell of the applicable course.
Save any changes made by clicking the Save icon at the top of the Course Planner. When changes have been made, this icon displays in red text.
If any Rules, Teachers, Rooms or Placement Restrictions need to be removed, select the item for removal and click the X next to the item. A warning message displays, asking the user if this is the desired behavior. Click the Delete button to continue with the removal.
Rules
See the Course Rules article for descriptions of each rule.
- Place the cursor in one of the course fields to display course editors at the bottom of the page.
- Click the Add New button at the bottom of the Rules editor. A blank row displays.
- Click in the Course field. This acts as a dropdown list.
- Select the course for the rule.
- Click in the Type field. This acts as a dropdown list.
- Select the desired Rule to apply to the course selected above and to place a restriction on the selected course in the dropdown list.
If a scheduling rule needs to be removed from a course, it removes it from both the selected course and the course to which the rule applies.
Using a combination of rules or multiple rules limits the placement of sections on the Whiteboard and limit the fulfillment of student requests. Only add rules when absolutely necessary.
Teachers
Assigned teachers display on the Section tab and are added to sections outside of the Wizard on the Staff History tab.
Assigned teachers display on the Section tab and are added to sections outside of the Wizard on the Staff History tab.
- Click the Add New button at the bottom of the Teachers editor. A blank row displays.
- Click in the Name field. This acts as a dropdown list.
- Select the teacher to assign to this course.
- Modify the Minimum and Maximum sections that can be taught by that teacher.
Rooms
- Click the Add New button at the bottom of the Rooms editor. A blank row displays.
- Click in the Room field. This acts as a dropdown list.
- Select the room to assign to this course.
When selecting a room for a placed Section, the logic in the build process of the Schedule Wizard follows this order:
- Selects the Room from Staff Planner, if Rooms are designated in both Course Planner and Staff Planner and the Room for the Section to Build appears in both Planners.
- Selects the Room from Course Planner, if Rooms are designated in both Course Planner and Staff Planner and the Room for the Section to Build appears only in the Course Planner.
- Selects the Room from Course Planner, if Rooms are designated in only the Course Planner.
- Selects the Room from Staff Planner, if Rooms are designated in only the Staff Planner.
- If Rooms are not designated in either Planner, a room is not automatically assigned for the section.
Placement Restrictions
Place a checkmark in the appropriate period and term combination. These checkboxes indicate where the sections of the course will not be placed on the Wizard when course information is loaded. This restriction is different than the Placement Restrictions assigned to staff when using the Staff Planner. Course Placement Restrictions determine when a course will not meet. For example, if band has to meet in Period 7 for the entire school year, checkmarks should be placed in all periods and terms except Period 7. Or, to eliminate the placement of courses over the lunch period, select that period for each term.
Automatic placement restrictions occur when the Before and After scheduling rule is in place and a certain percentage of the requesting students have requests for both courses. For example, German 1 has a rule of before German 2; German 2 has a rule of After German 1.
German 1 has 10 requests, but only 5 of those students also have a request for German 2; the placement constraint will not be added for German 1 because not more than 50% of those students have requests for the other course. If 6 of the 10 students who have a German 1 request also have a German 2 request, the placement constraint is added.
Course Planner Reports
To generate the current layout of courses for the selected trial, use the Save Course Planner Display to save the layout to the location of your choosing, in CSV or HTML. When one of these options is selected, follow the instructions for saving a report to your computer or other shared location. Selecting the Current View saves the course layout as it is currently displayed.
Next Steps
- Review the Checklist for Scheduling and Other Scheduling Tools documentation.
- Use the Staff Planner to enter requirements for each staff based on their licensure, desired room information and courses each staff person can teach.
- Build the Schedule using the Building Tools.
- Load course requests using the Loading Tools.
- Generate Reports to review the placement of courses.
- If all scheduling items have been completed and any additional changes will be made in the Campus application, mark the Trial active.
