Tool Search: Announcement Setup
State Edition Announcements allow personnel at the state level to create announcements and select which districts see the announcement. These announcements can be published to statewide users (those who have statewide tool rights), to state-linked districts or to both and are viewable on the Campus Home Page.
Announcements can also be created by District Edition users. See the Announcements for District Edition Users documentation for more information.
 State Edition Announcements
See the Announcement Setup Tool Rights article for information on available tool rights.
Announcements List
 Announcements List - State Edition
To sort columns: Select the blue link corresponding to name of a column to sort announcements in the Announcements List. By default, announcements sort by Start Date.
To edit an announcement: Select an announcement from the list to display the Announcement Editor
Information displayed in the Announcements List includes:
- Announcement name
- Published location (State and/or District)
- Sticky (display at top of recipient's Message Center)
- Start/End Date for message to display
Create State Edition Announcements
 Announcement Setup - Announcement Detail (State Edition)
- Click the New icon. An Announcement Detail editor displays.
- Enter the Start Date indicating when the message will first display in the selected districts.
- Enter the End Date indicating the last day for the message to display in the selected districts.
- Mark the appropriate checkboxes for where the message should be viewable,
- Publish to Statewide Users: (all DIS-connected districts and schools in the State Announcements section of the Message Center)
 Message Center - State Announcement
 - Publish to District(s): (all schools in the selected district(s) in the District Announcements section of the Message Center)
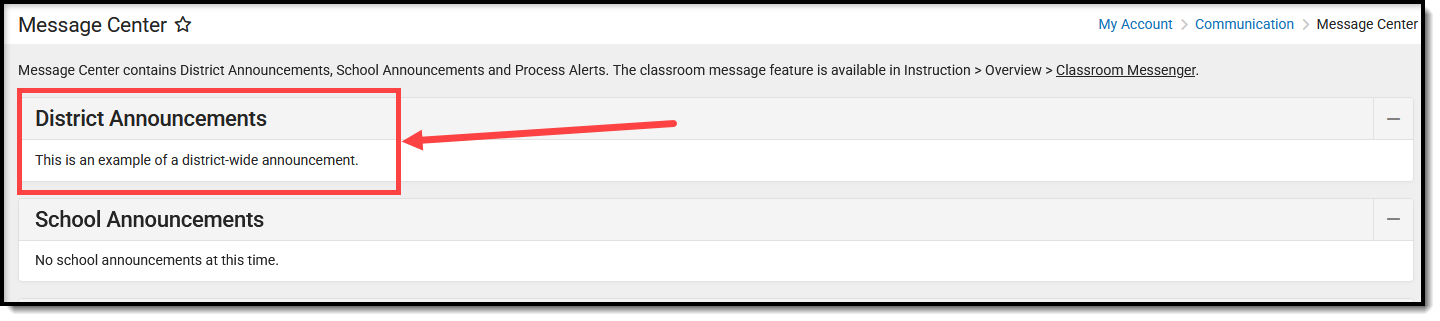 Message Center - District Announcement
 - Sticky: (display at top of recipient's Message Center - must also select a Publish option)
- Publish to Statewide Users: (all DIS-connected districts and schools in the State Announcements section of the Message Center)
- Determine how districts will be chosen - by Ad hoc Filter or by District Selection.
- If districts are selected by ad hoc filter, select the Ad hoc Filter radio button and choose an existing Ad hoc Filter.
- If districts are chosen by selection, select the District Selection editor and move the desired districts to the Selected Districts column using the arrow keys.
- Enter the body of the message in the Text area. Use the tools provided to format the text or to add items if desired (e.g. image, table, link).
- Review the content of the message, the selected districts, and the start and end dates.
- Make any necessary changes.
- Click the Save icon. The new announcement displays in the Announcement List and is viewable on the Campus Home Page as of the entered start date to those districts matching the criteria of the announcement.


Delete an Announcement
- Select the Announcement to delete from the Announcement List.
- Click the Delete icon. The announcement will be deleted from the Announcement List and the Campus Home Page for the selected districts of that announcement. Deleted announcements cannot be retrieved.
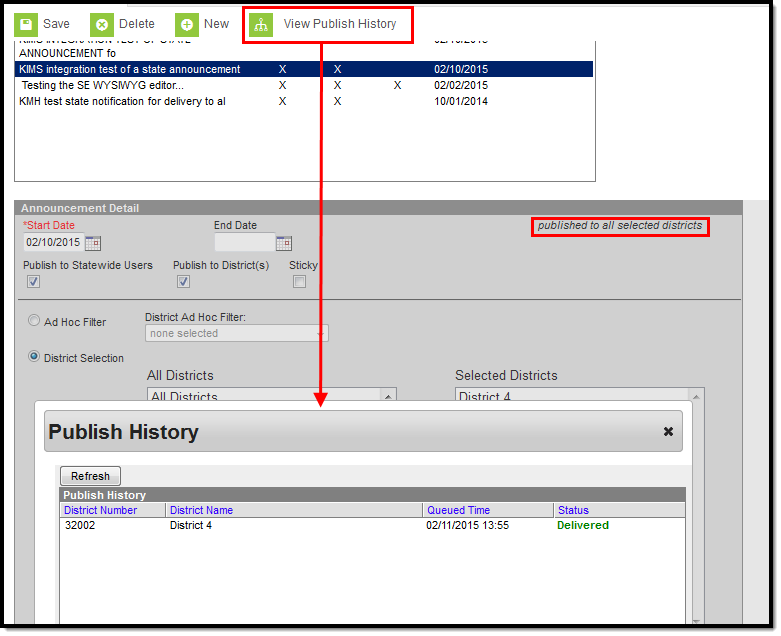
View Publish History
Click the View Publish History button to see which districts received the announcement. This displays a Publish History pop-up window that lists the districts chosen to receive the message and a Status, indicating if the districts have received it. This column will read either Delivered (announcement is viewable) or Pending (announcement is in the process of being delivered).
Read Tool Rights to View Notice Publish History are required in order to see this icon.
 View Publish History
