Tool Search: Household Food Service Deposit
This functionality is only available in districts that have purchased Campus Point-of-Sale as an add-on functionality.
The Household Food Service Deposit screen allows a district to enter new deposits, void existing deposits and review account balances for any patron in a household. In general, this tool is used to manage deposits made to student accounts.
All members of the household will be shown in the Household Member Deposits List editor. However, only the members who have Food Service accounts will appear in black text and have a Deposit Detail editor to track their deposits. Members of the household who do not have an account are shown in gray text.
When a new deposit is to be added to a household, the funds may be dispersed in a variety of manners:
- Funds may be distributed based on the setup of deposit percentages saved for the household.
- Funds may be equally distributed among patrons.
- Funds may be unequally distributed among patrons.
- All funds from the deposit may be distributed to one patron.
To view the details of an existing deposit, click on the deposit in the Deposits Detail editor. The details cannot be edited, as they are read-only.
The Do not accept check area of the Check editor displays a checkmark for household members who should not be allowed to pay with a check. Please see the Create an NSF Block article for more information.
 Household Food Service Deposit Field Descriptions

Household Member Deposits List Editor
|
Column Header |
Definitions |
|---|---|
|
Name |
Name of household member. |
|
NSF |
An "X" in the NSF (No Sufficient Funds) column indicates the district has had to collect money from this patron. This is a visual flag to warn staff members not to accept checks from this person. |
|
Birthdate |
The birth date of the household member. |
|
Elig(ibility) |
The discounted meal status (free or reduced) of the individual. If the student does not qualify for free or reduced meal purchases, this column will be blank. If a student's eligibility should NOT be viewed by cashiers processing meal purchases the Eligibility setting of the POS Preferences should be disabled. |
|
Grd (Grade) |
Grade level of the household member. |
|
# (Number) |
Total number of deposits given for that household member. |
|
Amount |
Dollar amount of the deposit. |
|
Net |
The net total of deposits. If a deposit has been voided, this total will reflect that adjustment. |
Deposits Detail Editor
|
Column Header |
Definitions |
|---|---|
|
Date |
Date on/for which the transaction was posted. |
|
Description |
Comments on the transaction, as entered by the user. If the deposit has been made by a parent/student through use of the online payments, this field will indicate the payment method (e.g., Visa, Checking Account, Savings Account"). |
|
Type |
The type of deposit: Cash, Check or CC (Credit Card). |
|
Credit |
The amount of the deposit credited to the patron. |
|
Net |
The net total of deposits. If a deposit has been voided, this total will reflect that adjustment. |
Add a Deposit for One Household Member
To specify a deposit for only one individual within the household:
- Select the Click to add a new deposit link on a patron's Deposits Detail editor, OR
- Click the New Deposit icon from the action bar and select the name of the individual patron from the Member field.
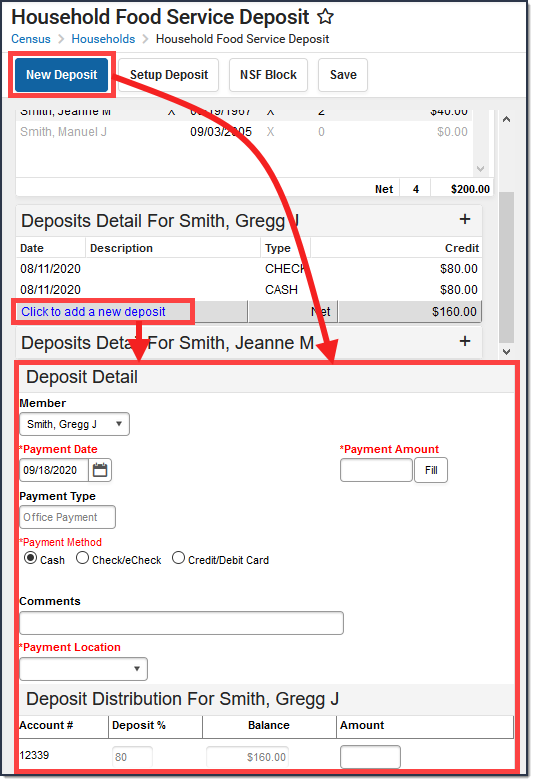 Deposit Detail Editor
Deposit Detail Editor Field Descriptions

|
Fields/Items |
Definition |
|---|---|
|
Member |
The name of the household member to whom the deposit should be applied. "All" is the default selection, allowing the funds to be dispersed among the members of the household. |
|
Payment Date |
Date for which the deposit should be recorded. |
|
Payment Amount |
Total value of the deposit. |
|
Fill (Clear) |
This button allows the funds entered in the Payment Amount field to be dispersed among the members of the household listed at the bottom of this editor. If deposit percentages have been assigned, the Fill button will automatically split this amount as indicated in the Deposit % column. If no deposit percentages exist, the funds will be dispersed equally among all members of the account. After this button has been used and the funds have been distributed, the name of this button will change to "Clear" and will allow the user to clear the distribution. |
|
Payment Type |
This field will auto-populate with the value "Office Payment" when the deposit is made through this tool. If the deposit has been made by a parent/student using the My Cart tool in Campus Parent or Campus Student, this field indicates that the payment was made "Online." |
|
Payment Method |
Payment method used for the deposit: Cash, Check/eCheck or Credit/Debit Card. When "Check/eCheck" is selected, the Check Number field will appear. If "Credit/Debit Card" is selected, the Reference Number field will appear. |
|
Comments |
User-entered details on the deposit that will display in the Description column of the Deposits Detail editor of each member's individual account information. |
|
Payment Location |
Location at which the deposit was entered. |
A Deposit Distribution editor will appear for each account attached to the household:
|
Column/Field |
Definition |
|---|---|
|
Account # |
The number of the household member's food service account. |
|
Deposit % |
The percentage of each household deposit that should be distributed to the account. If a number does not appear in this column, household deposit percentages have not been established (through the Setup Deposit icon in the action bar). |
|
Balance |
The current balance of the account. |
|
Amount |
This is the amount of the total deposit listed in the Payment Amount field that will be applied to this account.
|
Make a Deposit for All Household Members
Entering a Payment Amount and clicking the Fill button will auto-divide the amount among the accounts. If deposit percentages are established, the Payment Amount will be divided accordingly. If deposit percentages are not set up, the Payment Amount is dispersed equally among accounts.
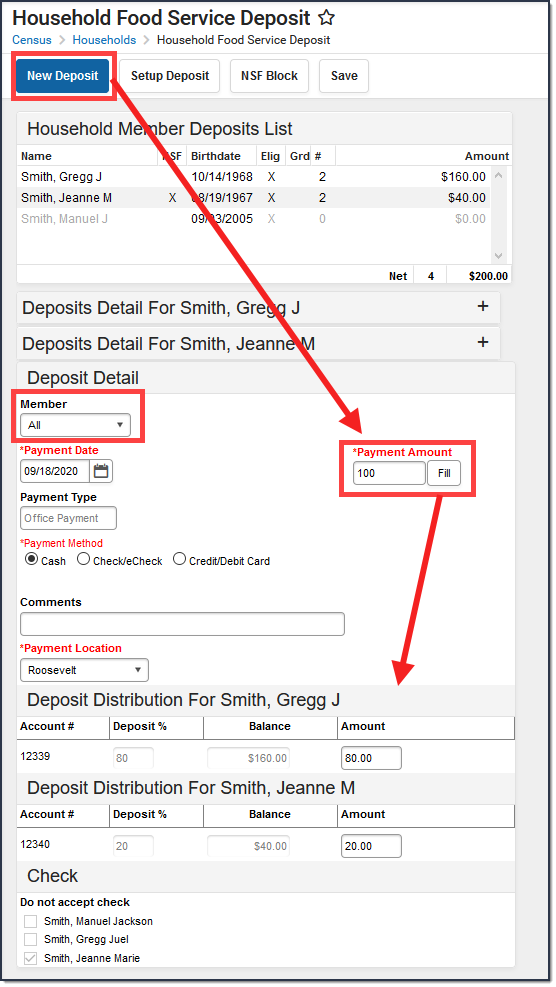
- Select the New Deposit icon from the action bar. The Deposit Detail editor will appear.
- Select "All" from the Member field. If the deposit should only be attributed to one member, select his/her name from this field instead.
- Enter or select a Payment Date.
- Enter a Payment Amount.
- Select a Payment Type.
Payment Method Description Cash Select Cash.
Check/eCheck The Check # field displays when you select this option. Enter the Check #.
Credit/Debit Card If your district does NOT use Online Payments or a Desktop Card Reader, enter the Reference #.
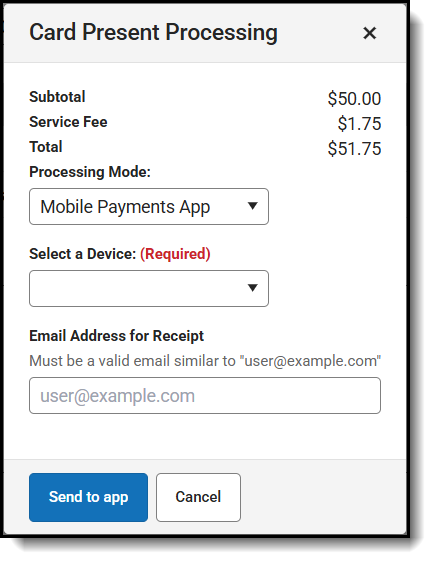
Credit/Debit Card (Mobile Payments App) - Click the Process button. The Card Present Processing window displays.
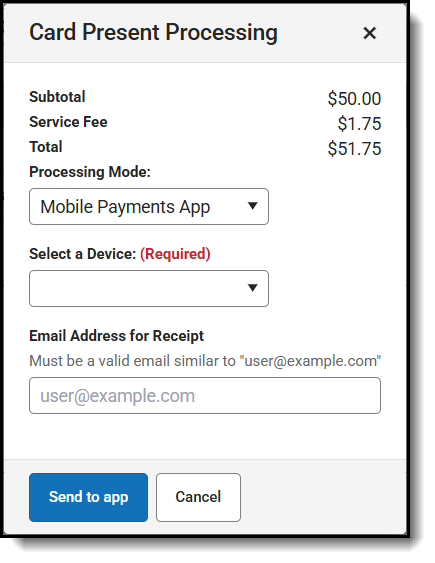
-
Select Mobile Payments App in the Processing Mode field.
-
Select one of the mobile devices configured for Campus Payments from the Select a Device field. For details on setting up the mobile app to take payments, see Mobile Payments Setup for Office Payments.
-
Enter an Email Address if the cardholder would like a receipt.
-
Click Send to app. It will then appear as a Pending Transaction on that mobile device. You may need to tap Refresh for the transaction to appear.
-
Tap Submit Payment.
-
Use the card reader to either tap, swipe, or read the chip in the card. When payment is complete, a confirmation message displays on the app. In Campus, a card present receipt display.
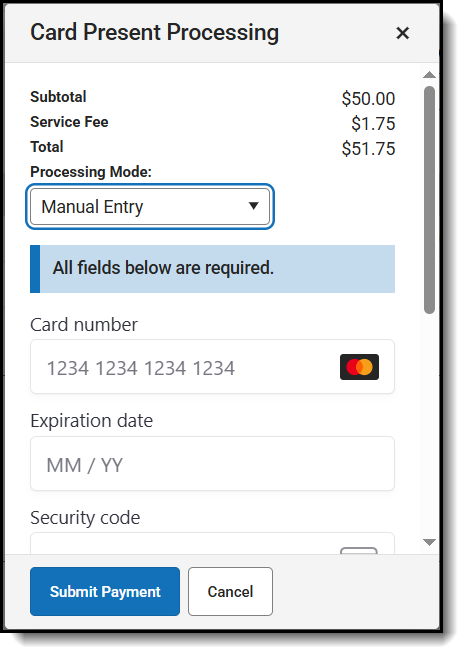
Credit/Debit Card (Manual Entry) - Click the Process button. The Card Present Processing window displays.
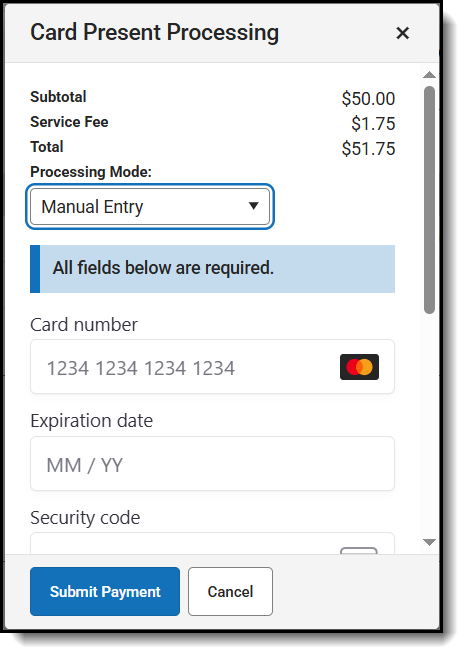
- Select Manual Entry in the Processing Mode dropdown list.
- Fill out the following fields.
- Card Number
- Card Expiration
- Security Code
- Full Name
- Country or region
- Address
- Email Address for Receipt
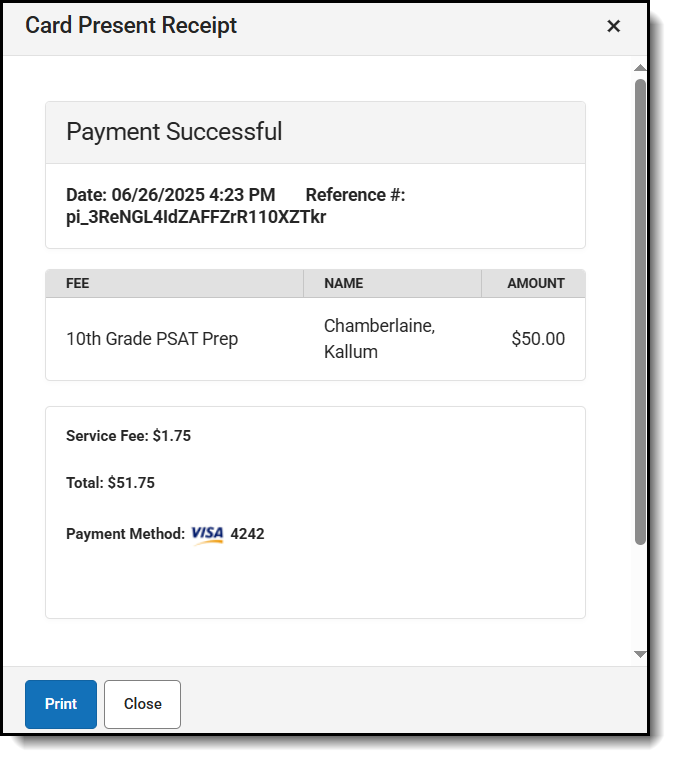
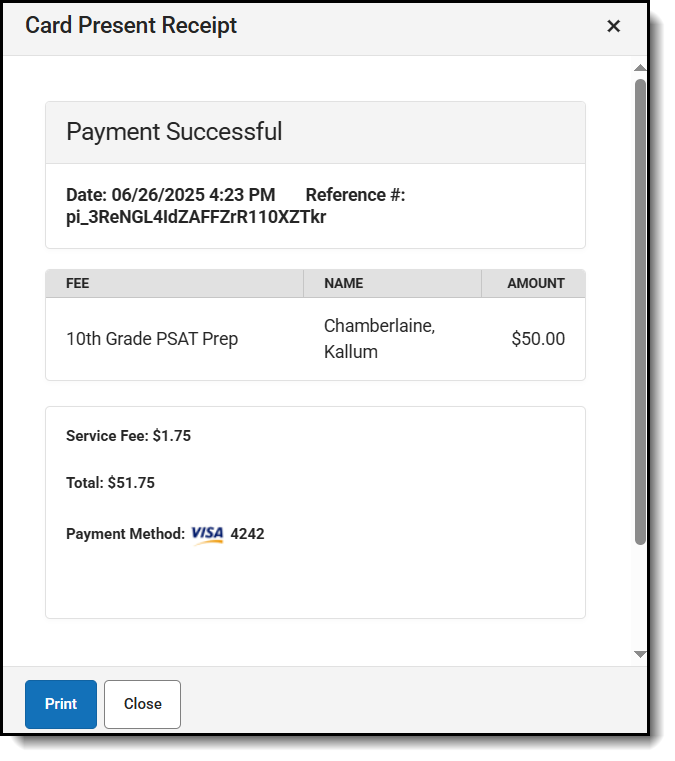
- Click the Submit Payment button. If the transaction is successful, the receipt displays and you can print the receipt from your browser. A receipt is emailed if an email address was entered in the Email field. This email is not included in the Sent Message Log.
-
Click the Close button. The payment displays below the fee(s) with the type and date of the payment, the amount paid in the Credit column and Balances and Totals updated accordingly.
- Enter additional details in the Comments field. This text will be displayed in the Description column of the Deposits Detail editor.
- Select a Payment Location to indicate where the deposit was entered.
- Verify the Amount. If necessary, this field can be manually edited.
- Click the Fill button to disperse the Payment Amount among the accounts. The dispersal amount will automatically appear in the Amount field of each member's account Deposit Distribution editor.
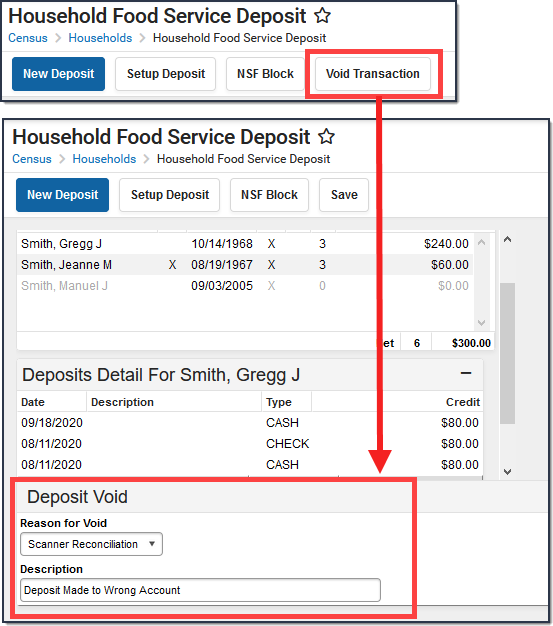
Void a Household Food Service Deposit Transaction
- Expand the Deposits Detail editor of the proper patron within the household.
- Select the deposit transaction to void.
- Click the VoidTransaction icon in the action bar. The Deposit Void editor will appear.
- Select a Reason for voiding the deposit.
- If desired, enter a Description for the void. Text entered in this area will show up in the Description column of the Deposits Detail editor.
- Click Save to void the transaction.
- Click Yes on the pop-up window to finalize the void.
Upon reopening the Deposits Detail editor for the patron, the Date of the reversed transaction will appear in bright red text, indicating that it was voided. The Date of the original transaction will appear in dark red text.
 Voiding a Transaction
- Click the Process button. The Card Present Processing window displays.