Point of Sale 1.0 has been deprecated as of 7/1/2023. Please see the Cashier Cheat Sheet.
This section contains several common actions a cashier may need to perform. For example, selecting multiple quantities, clearing mistaken entries, and voiding transactions.
This article includes the following topics:
Selecting Multiple Quantities
To select more than one quantity of a purchasable item for one patron:
- Use the number pad to enter the quantity, which is displayed in the Input box in the bottom left corner.
- Select the item being purchased.
- Verify quantity and item in the Item Description area.

Selecting Multiple Quantities
Charging Multiple Meals to One Patron Account
When a patron wants to pay for another person’s meal; e.g., another student, parent, guardian, each meal must be processed separately. The paying patron will have two consecutive transactions debited to their account.
Process the patron who is paying for the meal.
Student designated meals should be processed before any Guest/Adult designated meals. When multiple student meals are served to one patron, after the first meal, the subsequent meals are processed as Non-reimbursable.
- Charge the paying patron's account a second time for the non-paying patron.
Result
The paying patron’s account is charged a second time for the non-paying patron.
The following notice may display to verify the second transaction is charged to the same account.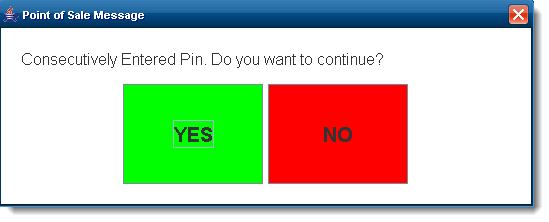

Clearing Mistaken Item Entries
Cashiers can void mistaken purchasable item entries BEFORE the transaction is processed.
![]()
Clearing Entries
- Clear Entry. Clears most recent entry.
- Clear All. Clears all entries.
If the Input field displays an amount that cannot be cleared, see the Troubleshooting article.
Voiding Transactions
With the assistance of a head cashier or other administrator who has been assigned a Manager PIN, cashiers may void transactions at the POS terminal after they have been processed.
Voiding transactions through the POS terminal must take place BEFORE the terminal is shut down. If a mistake is found after the terminal has been shut down, it must be voided on the patron’s account Journal tab within the Campus application.
Voiding a Transaction for Patron within Last 5 Patrons
- Select Options.
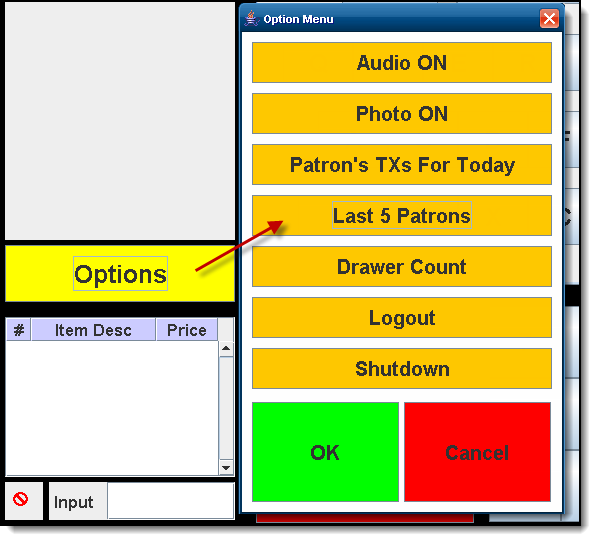
- Select Last 5 Patrons.
Result
The Historical TX window displays. - Select the patron's incorrect transaction.
- Select Void TX.
Enter Manager PIN.
A cashier PIN will NOT work.
- Select Submit.
- Select OK.
- Process the correct transaction, as necessary.

Voiding a Transaction for Patron NOT within Last 5 Patrons
- Search for patron.
- Select patron name and click Select.
- Select Options.
- Select Patron’s TX For Today.
- Select patron’s incorrect transaction.
- Select Void TX.
Enter Manager PIN.
A cashier PIN will NOT work.
- Select Submit.
- Select OK.
- Process correct transaction normally OR select Process and verify YES.
Depositing Check/Cash into a Patron's Account
Cashiers can deposit money (via cash or check) into a patron's account using the quick deposit button.

Quick Deposit Button
When selected, the Deposit editor appears, allowing the cashier to enter the amount of cash being deposited or information about the check being deposited.

Depositing Cash into a Patron's Account
To deposit cash into the patron's account:
- Select the Cash button. Orange cash amount buttons will become active on the right-hand side of the screen, allowing the cashier to quickly select a cash amount. The cashier may also enter the cash amount using the number pad.
- Verify the total cash amount in the Amount Tender field is correct.This field indicates how much cash will be deposited into the patron's account.
- Select the Submit button to process the deposit and add the amount to the patron's account balance.
Cashiers may also deposit checks into a patron's account by selecting the Check button.

Depositing a Check into a Patron's Account
To deposit a check into a patron's account:
- Select the Check button. The Check Number field will appear.
- Enter the Check Number by using the keypad.
- Enter the Amount Tender by either selecting the Orange amount buttons on the right-hand side of the screen or entering the check amount using the keypad.
- Verify the Check Number and Amount Tender is correct and select the Submit button to deposit the check amount into the patron's account in real time.

Patron Balance After Deposited Check
The example above, a twenty dollar check was deposited into the patron's account and immediately added to the patron's balance.
Lock the Terminal Screen Without a Drawer Count
To lock the terminal screen without a drawer count, complete one of the following options.
Option 1 - With a Keyboard
Click the windows key + L which automatically locks the terminal.

When you are ready to serve patrons again, click Ctrl + Alt + Delete. The Windows login screen appears. Enter the password for the user account and you can continue to serve patrons.

Option 2 - Without a Keyboard
If you do not have an external keyboard, minimize the point of sale window and click Start > Shutdown > Standby.
When ready to serve patrons again, follow on of the following steps to reach the Windows login screen for the particular machine you are using.
- IBM - Click on the Point of Sale screen.
- ELO - Click (do not hold down) the power button.
- POSX - Click the power button.
In each case, enter the password for the user account and you can continue to serve patrons.
