The School Store tools allow staff to set up stores for every school in the district, create products and categorize them, and establish product types and align them to fund accounts for district or school level payments.
School Store Setup
The following topics cover how to enable School Store in Campus, create product types and align them to fund accounts, and establish settings for each school that will be having a School Store.
Enable Images for School Store
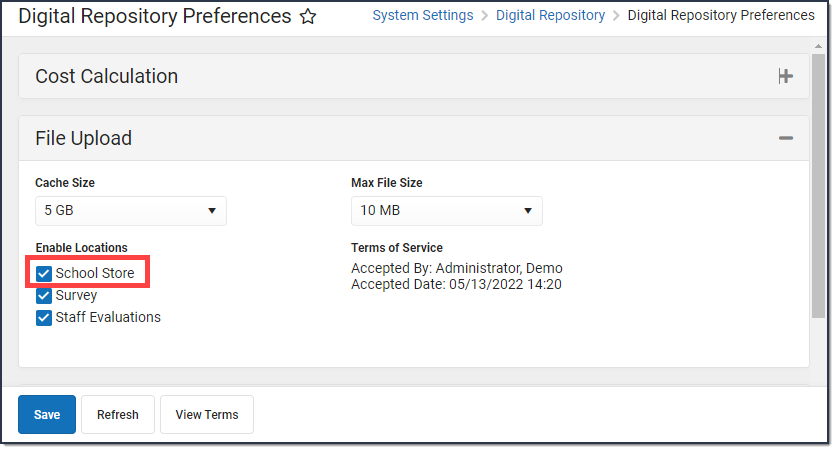
Pictures can be added in school store. This has to be enabled in Preferences under Digital Repository.
Documentation
The Infinite Campus School Store gives members of your school easy online access to purchase goods and services. Each school in your district can have their own store, which display in Campus Parent and Campus Student.
Step 1. Enable School Store in the Digital Repository
Tool Search: Digital Repository
Before you can set up the School Store, you must enable the School Store in the Digital Repository.
Step 2. Set up Product Types
Tool Search: Product Types
Product Types are assigned to Products and to Fund Accounts. When a product is purchased, funds are deposited into the bank associated with the Fund Account to which you assigned the Product Type.
Step 3. Set up Fund Accounts
Tool Search: Fund Accounts
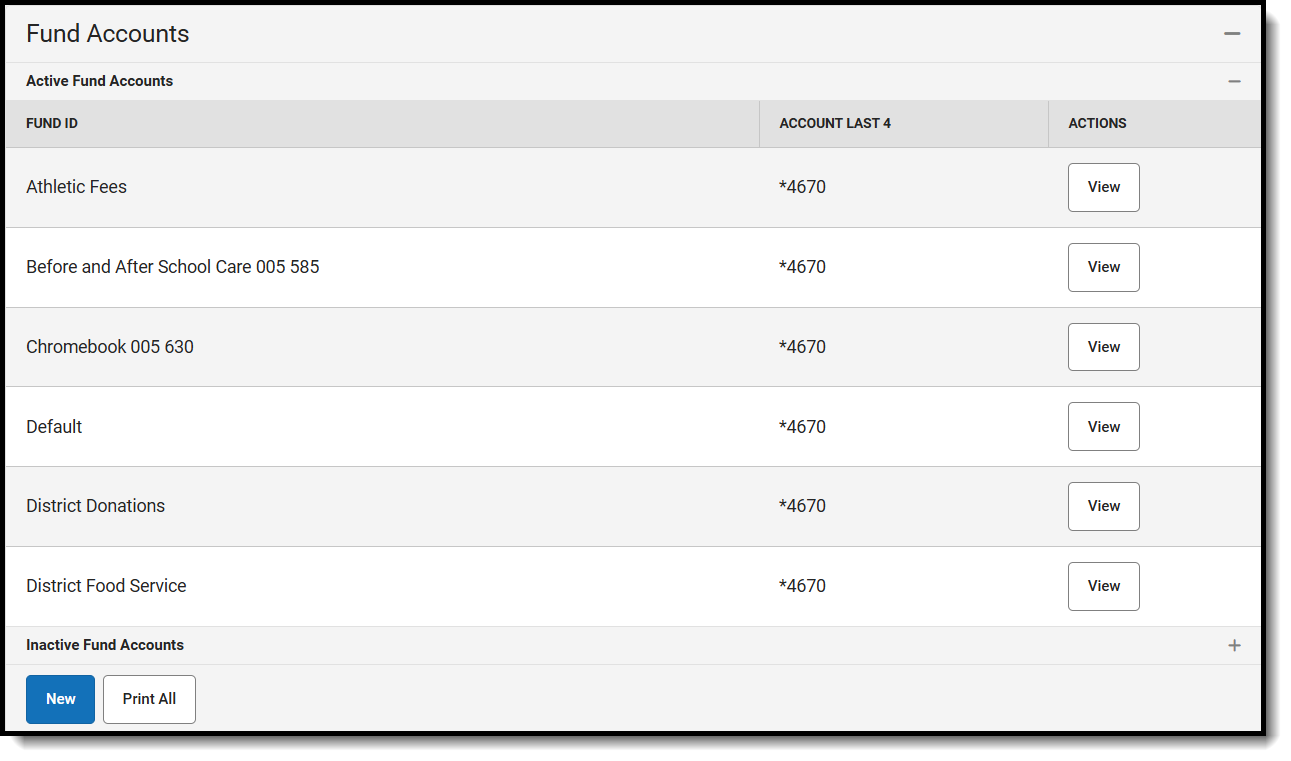
Fund Accounts identify which bank accounts are used for items purchased in the School Store. Fund Accounts are managed in Payments Setup.
Step 4. Create a Store for Each School
Tool Search: School Store Settings
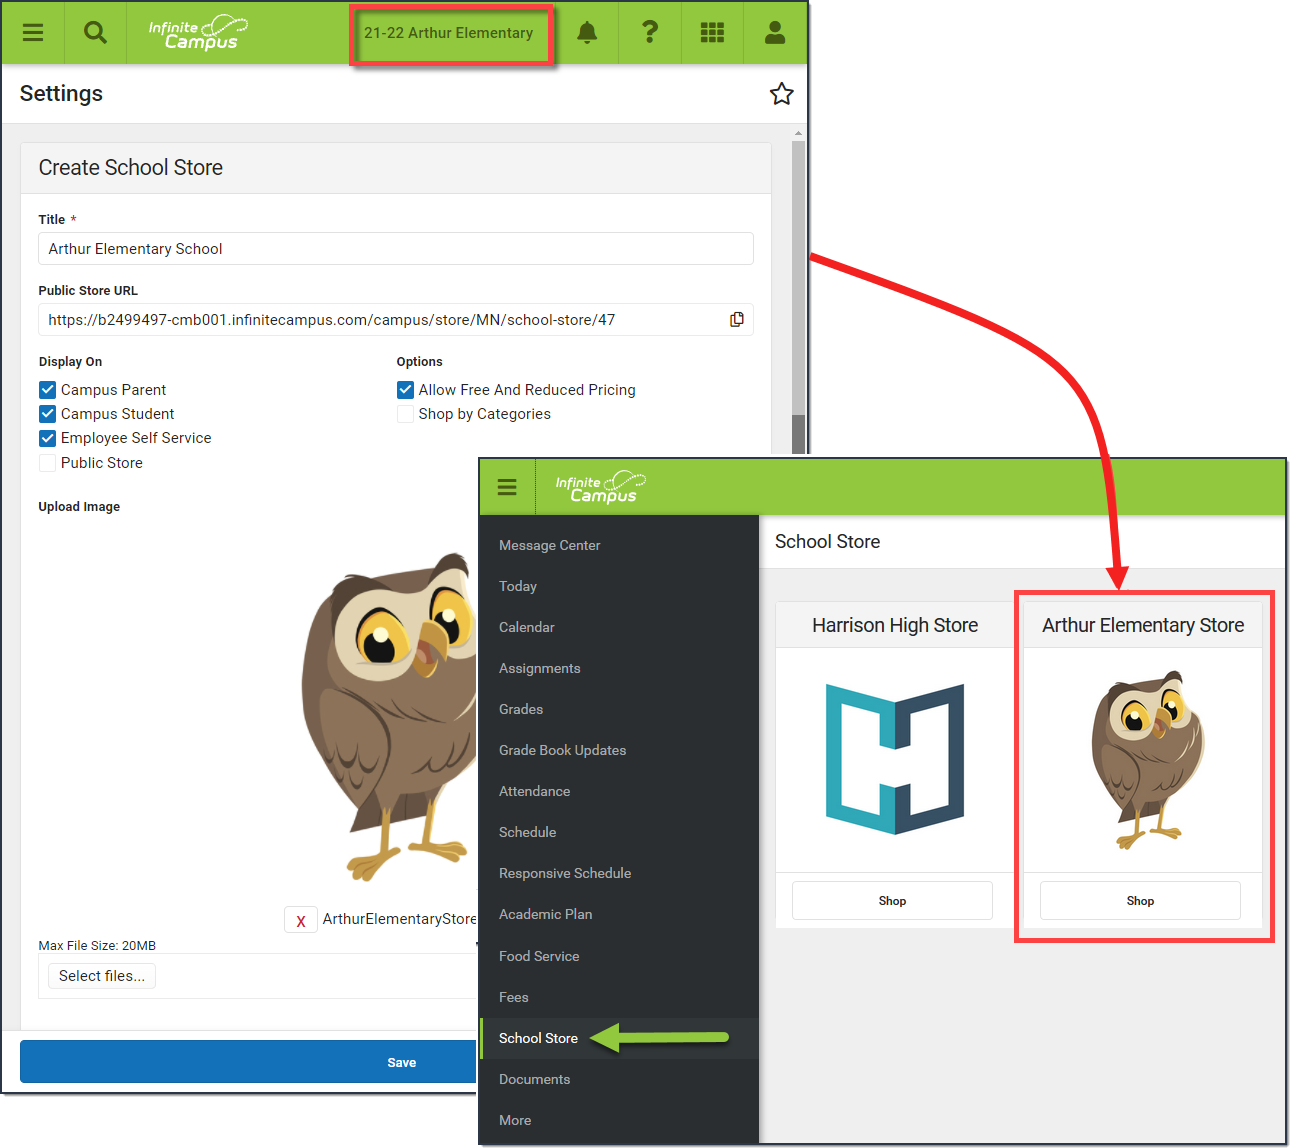
The Settings tool allows you to choose where you want the School Store to display and set options for each school's store, including Public Store options. Repeat this procedure for each school that will have a school store.
Step 5. Set up Categories
Tool Search: School Store Categories
Categories are how similar products are grouped together in the store. When a portal user selects a category, only the products assigned to that category display. Inactive categories and active categories with NO active products do not appear in the School Store.
Step 6. Set up Products
Tool Search: General Product
After Categories are set up, Products can be created using General Product.
Product Types
Product Types are assigned to Products and Fund Accounts. When a product is purchased, funds are deposited into the bank associated with the Fund Account to which you assigned the Product Type. Read the step regarding Product Types in the documentation (Step 3), or watch the video.
Documentation
The Infinite Campus School Store gives members of your school easy online access to purchase goods and services. Each school in your district can have their own store, which display in Campus Parent and Campus Student.
Step 1. Enable School Store in the Digital Repository
Tool Search: Digital Repository
Before you can set up the School Store, you must enable the School Store in the Digital Repository.
Step 2. Set up Product Types
Tool Search: Product Types
Product Types are assigned to Products and to Fund Accounts. When a product is purchased, funds are deposited into the bank associated with the Fund Account to which you assigned the Product Type.
Step 3. Set up Fund Accounts
Tool Search: Fund Accounts
Fund Accounts identify which bank accounts are used for items purchased in the School Store. Fund Accounts are managed in Payments Setup.
Step 4. Create a Store for Each School
Tool Search: School Store Settings
The Settings tool allows you to choose where you want the School Store to display and set options for each school's store, including Public Store options. Repeat this procedure for each school that will have a school store.
Step 5. Set up Categories
Tool Search: School Store Categories
Categories are how similar products are grouped together in the store. When a portal user selects a category, only the products assigned to that category display. Inactive categories and active categories with NO active products do not appear in the School Store.
Step 6. Set up Products
Tool Search: General Product
After Categories are set up, Products can be created using General Product.
Video
The Product Types tool within the School Store module allows you to group similar products, and assign them to Fund Accounts in the Online Payments tool.
Fund Accounts
Fund Accounts identify which bank accounts are used for items purchased in the School Store.
Documentation
Tool Search: Payments Setup
Fund Accounts identify which bank account is used for each fee, School Store product, and transaction.
Once a Fund Account is made inactive, it cannot be made active again.
When a Bank Account is inactivated, Campus inactivates all Fund Accounts associated with the Bank Account.
A Fund Account cannot be deleted if transactions were made using that Fund Account.
One Bank Account can be used for multiple Fund Accounts. This feature allows your district to segregate payment categories such as Food Service or Fee/Fee Types within the same Bank Account.
The following characters cannot be used in the Fund ID: > < * “ % + = ^ [ ]
When you change a Fund ID name and/or Bank Account ID, Campus creates an inactive copy of the original Fund Account and names it by appending "Archived" to the original name; e.g,"FundName_Archived." Campus reporting uses "FundName_Archived" for past transactions and uses the new Fund ID name for new transactions.
Fund Account Types
Type
Description
Default
You can set up a default Fund Account for the District and at each school. The default Fund Account is used when a fee or payable service is paid and a Fund Account is not set up for the fee or payable service. Campus first looks for the Fee's Fund Account then Campus looks for the school's Default Fund Account. If the school does not have a Default Fund Account, Campus uses the District's Default Fund Account.
Food Service
All food service transactions are deposited into this bank account. If your district uses Household Food Service accounts, only set up one Food Service Fund account. This allows Campus to identify the correct Fund Account when there are multiple enrollments associated with an account.
Tuition
All tuition transactions are deposited into this bank account.
Service Fees
All service fees are deposited into this bank account.
Transaction Fees
All transaction fees are deposited into this bank account.
Fee Types
This option allows you to indicate which fees and services are deposited into the selected bank account. A list of Fee Types display below the Fee Types checkbox when it is marked. Fee Types are created and modified in the Fee Type dictionary in the Core Attribute Dictionary. Fee Types are assigned to Fees and Fund Accounts.
Once a Fee Type is selected for a Fund Account, you cannot select the same Fee Type for a second Fund Account at the same school.
Optional Fees associated with a student's enrollment in a future calendar do not display in Campus Parent or Campus Student.
School Store Product Types
This option allows you to indicate which Fund Accounts are used for items purchased in the School Store.
Dependent Care
All dependent care transactions are deposited into this bank account.
Add a Fund Account
When setting up a school's Fund Account, verify the correct school is selected in the School dropdown list in the Campus toolbar before you begin.
For District Fund Accounts, select All Schools in the School dropdown list.
Click the New button.
Result The Fund Account panel displays and the Active checkbox is automatically selected.
Select the Bank Account ID.
Enter a unique FUND ID to identify the Fund Account. (50 characters max)
The following characters are not permitted: > < * “ % + = ^ [ ]
FUND IDs must be unique. You cannot use the same FUND ID at different schools.
Enter a unique Fund Description.
The field only allows 120 characters and cannot include trailing spaces.
Campus automatically uses the Fund ID as the Fund Description, but you can change the Fund Description to suit your district's needs. This field is informational only and can optionally display in the Payments Reporter.
Select one of the following checkboxes:
Default
Food Service
Tuition
Service Fees
Transaction Fees
Fee Type- Also select the Fees you want to include.
School Store Product Types - Also select the Product Types you want to include.
Dependent Care
Click the Save button.
Edit a Fund Account
You can change any field on the Fund Account except for the Default checkbox.
Expand the Active Fund Accounts area by clicking the Active Accounts header.
Click View for the Fund Account you want to edit. The Fund Accounts will panel display.
Make the necessary changes then click Save.
Inactivate a Fund Account
Caution This action cannot be undone. Once a Fund Account is inactive, it cannot be made active again.
Expand the Fund Accounts area by clicking the Active Fund Accounts header.
Select the Fund Account you want to inactivate. The Fund Accounts panel displays.
Clear the Active checkbox.
Click the Save button.
Print the Payment Fund Account Report
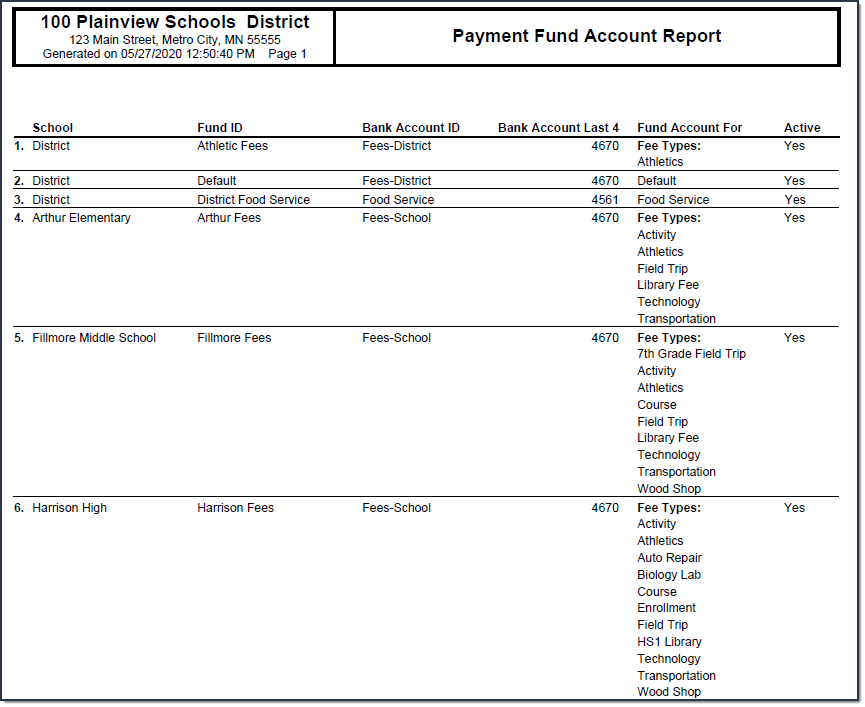
The Payment Fund Account Report provides comprehensive information about all of the Fund Accounts you have set up in the district or all of the Fund Accounts set up for a specific school. When All Schools is selected in the Campus toolbar, information for all schools in the district reports. Otherwise, the report is limited to the Fund Accounts set up for the specific school selected in the toolbar.
To print the PDF report, click the Print All button.
Video
The payments for specific fees and/or services can be assigned to particular fund accounts using the Fund Accounts tool.
KxTcBsyp
School Store Settings
Settings need to be made for each school that will be having its own School Store.
Documentation
Tool Search: Settings
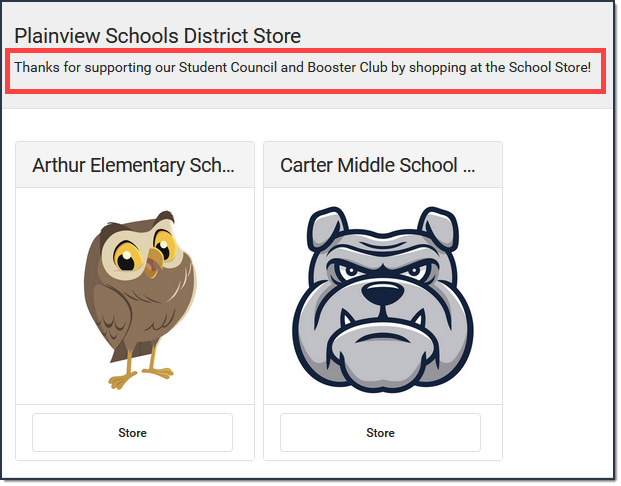
The Settings tool allows you to choose where you want the School Store to display and set up different options for every store. From here you can also set up Public Store options. The Public Store is a website where anyone can shop for goods or services from your district.
Create a store for each school by selecting the school in the Campus toolbar. Use the field descriptions provided here to complete the screen then click Save. Repeat this procedure for each school that is going to have a school store.
Field Descriptions (School Store)
Field
Description
Store Display Name
The name of the store.
Public Store URL
The URL that is used to visit the Public Store. The URL is cannot be modified.
Copy URL - Copies the Public Store URL.
Generate QR Code - Creates a QR Code that can be shared with parents and students to access the Public Store.
Download QR Code - Downloads a .png file of the QR Code that can be posted and shared.
Enable Store for
You can display the store in Campus Parent, Campus Student, Employee Self Service, or the Public Store. If you do not want the store to display, do NOT mark the checkbox.
Allow Free and Reduced Pricing
When this checkbox is marked, students that have an active eligibility record (FRAM > Eligibility) can be given a reduced price for items in the store.
The reduced price is set up on the product. If you do not set up a reduced price, the student is charged the regular selling price.
Shop By Categories
This option allows you to set up the School Store for users to shop by category or by products.
When this checkbox is marked, the first page in the store displays the Categories. Users can select a Category to see the products they can purchase.
When this checkbox is not marked, the first page in the School Store displays all of the products in the store. Users still have the option to view and group the products by category from the products page.
Add Parent Portal Description
Adds the text to the top of the Parent Portal School Store.
Add Student Portal Description
Adds the text to the top of the Student Portal School Store.
Store Logo Upload
A picture that represents the school store in Campus Student and Campus Parent.
The image must use one of the following extensions: .jpg, .jpeg, .png, or .gif.
Create a Public Store
Create a Public Store by selecting All Schools in the Campus toolbar. Use the field descriptions provided here to complete the screen then click Save.
Tip: See the Public Store Overview for more information about setting up a Public Store. There are multiple steps that you must complete before products can be purchased on the Public Store.
Example Public Store Settings
Field Descriptions (Public Store)
Field
Description
Enable Public Store
Once the Enable Public Store box is checked, people can use the Public Store URL found on this Settings page to shop at your Public Store.
Store Display Name
The name of the store as it appears in Campus Student and Campus Parent.
Public Store URL
The URL that is used to visit the Public Store. The URL is cannot be modified.
Copy URL - Copies the Public Store URL.
Generate QR Code - Creates a QR Code that can be shared with parents and students to access the Public Store.
Download QR Code - Downloads a .png file of the QR Code that can be posted and shared.
Require User Account To Purchase
Public Store customers can create a user account before they make purchases on the Public Store. If you mark this checkbox, customers will be required to create a user account before making a purchase.
When someone creates an account, their name and email address are saved in Campus in the Demographics tool and Campus assigns the Public Store Homepage to their user account. Public Store customers can review their payment methods and purchase history after they log in.
Description
The text you enter in this field displays below the Title on the Public Store.
Store Logo Upload
A picture that represents the Public Store. This image displays at top of the page.
The image must use one of the following extensions: .jpg, .jpeg, .png, or .gif.
Video
Settings for each school store and the public store are managed in School Store Settings.
School Store Inventory
This section shows how to create the products the School Store is going to sell. First, categories are set up, and then the products are created and grouped into a category.
Categories
Categories are created as a way to group and organize products. Read the step about Categories in the documentation, or view the video.
Documentation
Tool Search: Categories
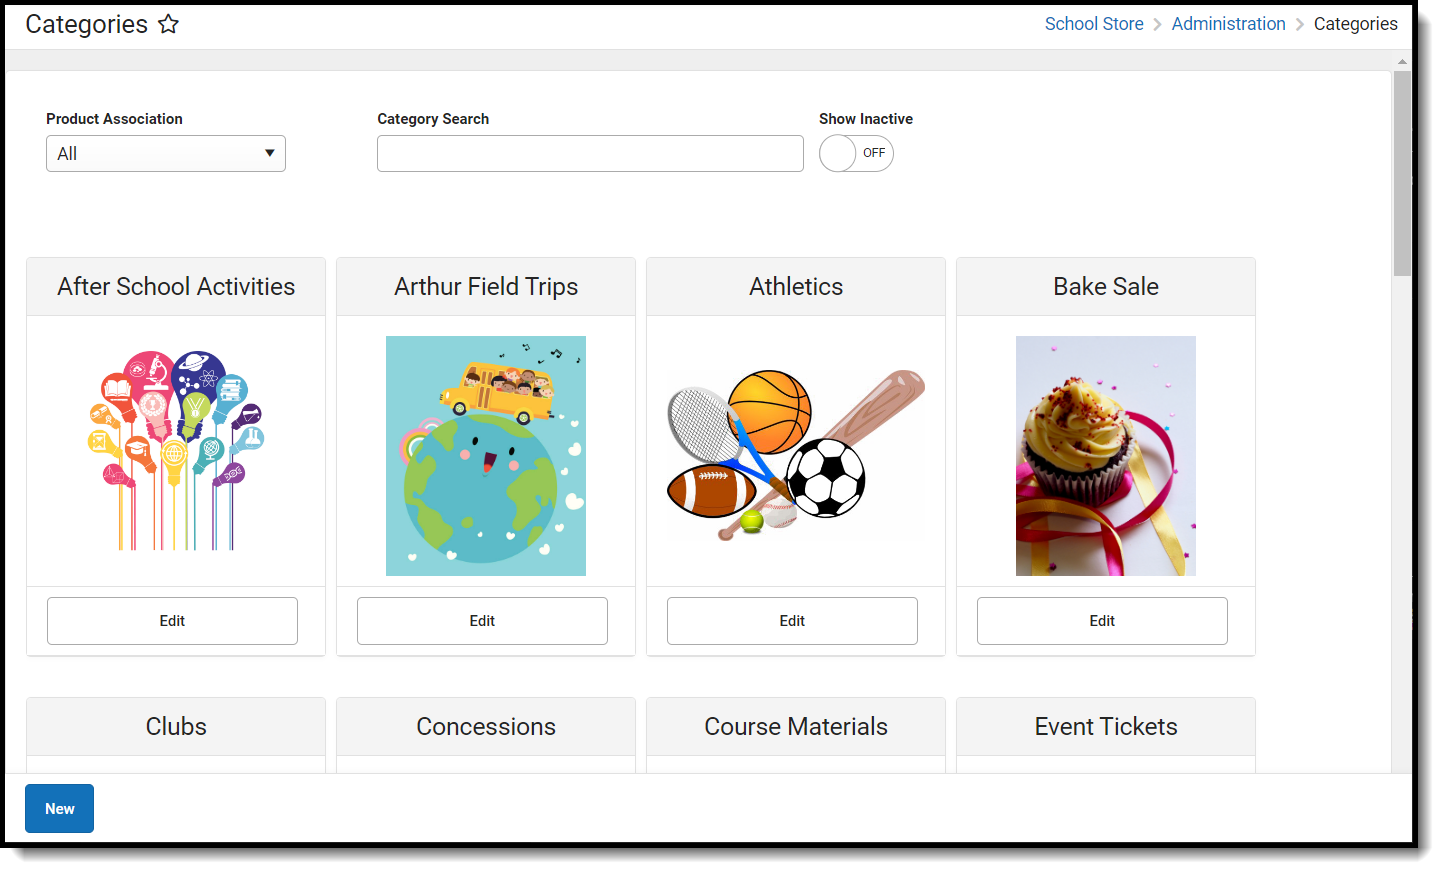
Categories are how similar products are grouped in the store. When a portal user selects a category, only the products assigned to that category display. Inactive categories and active categories with NO active products do not appear in the School Store.
If you select All Schools in the Campus toolbar, the Categories for every school can be seen.
If you set the Show Inactive toggle to ON, inactive Categories also display. Otherwise, when the toggle is set to OFF, only active Categories display. Inactive Categories can be deleted if there are no Products assigned.
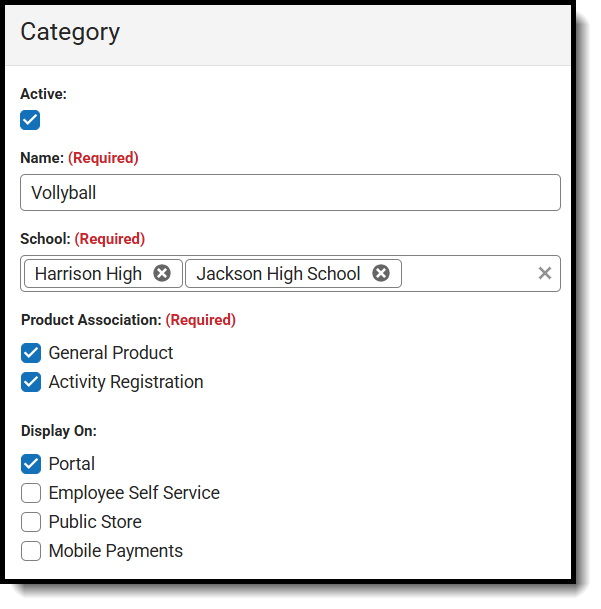
Click New in the action bar. The Category panel displays. The Active checkbox and the Display OnPortal checkbox are automatically selected.
Enter a Name for the category.
Select the Schools where the category will be available.
This field only displays schools you have tool rights to.
Mark the appropriate Product Association checkboxes:
General Product - Mark this checkbox if the category will include products for purchase in the School Store.
Activity Registration - Mark this checkbox if the category will include activities for which students can register.When this checkbox is marked, Campus makes the category available for selection in the Activity Builder.If this checkbox is not marked, the category will not be available in the Activity Builder.
When using Activity Registration, review information related to Restrict to Associated School Enrollments. When this checkbox is marked within the Activity Builder, the Recipient dropdown list will only display students who have an enrollment in the active school year at the school to which the activity is attached. This includes primary, secondary, and enrollments with a future end date.
Mark the appropriate Display On checkboxes:
Portal Tip: This checkbox is automatically selected on new Categories. Clear this checkbox if you do not want this Category to display in Campus Parent or Campus Student.
Employee Self Service
Public Store
Mobile Payments
The options Employee Self Service, Public Store, and Mobile Payments must have General Product selected (under Product Association).
Use the Select Files option to upload an image for the category.
The image must use one of the following extensions: .jpg, .jpeg, .png, or .gif.
Click Save.
The Category is ready for you to add Products.
After Categories are set up:
if someone else wants to edit the School field on the Category, they must have tool rights to all of the assigned schools. Otherwise, they cannot make changes to the School field.
if you decide to inactivate a Category and active products are tied to the Category, Campus also inactivates the products and the products will not display in the School Store until they are manually made active again.
the Product Category is a required field on the Orders Report. If you remove a school from a Category, you will not be able to use the Orders Report for purchases made for that combination of Category and School.
Video
Categories group products, services, and activities in the school store and activity registration.
Products and Inventory
Now that categories are established, the products that are going to be sold are created next. There are three parts to a product: 1) the product name 2) the product items, and 3) the availability.
Documentation
Tool Search: General Product
After Categories are set up, Products can be created using the Product progress tracker. The Product progress tracker includes the following three parts:
1 - Product
2 - Product Items
3 - Availability
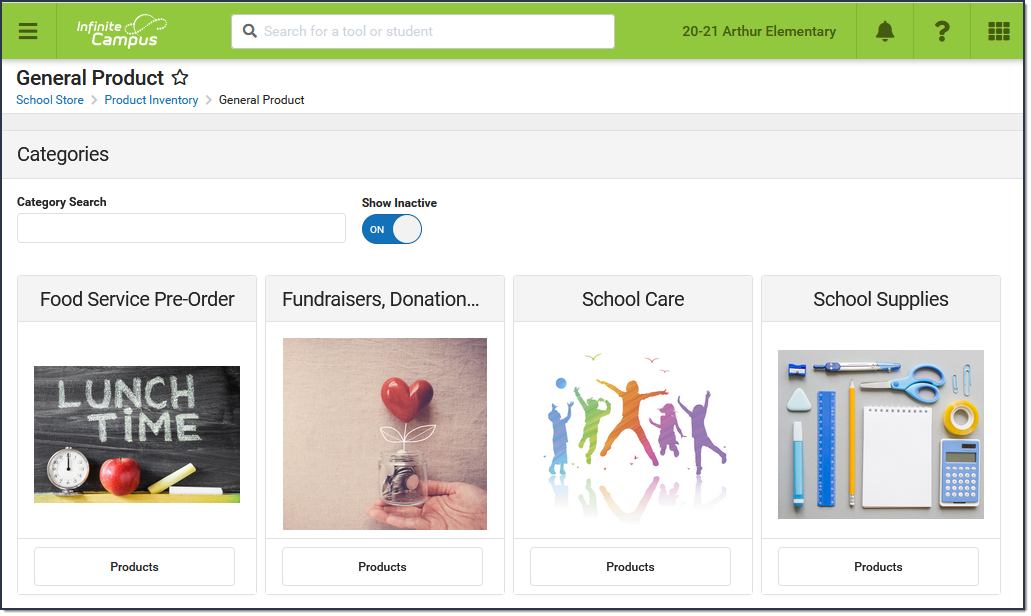
To get started, select All Schools or a specific school in the Campus toolbar, then click the Products button on a Category. If you set the Show Inactive toggle to ON, inactive Categories also display. Otherwise, when the toggle is set to OFF, only active Categories display.
If you create a Product and decide you do not want it, you can delete the Product if it has never been purchased.
The name that displays in the School Store, Public Store, Employee Self Service, and/or Campus Mobile Payments.
Categories
The Categories under which you want the Product to appear. You can select multiple Categories.
When you select a Category in School Store, Public Store, Employee Self Service, and/or Campus Mobile Payments, the assigned Products display.
The Products and Items associated with the Category are available for selection when setting up the Event Layout in School Store > Administration > Events.
The Product Category is a required field on the Orders Report. If you remove a school from a Category, you will not be able to use the Orders Report for purchases made for that combination of Category and School.
Product Type
The Product Type to which you want to assign the Product. When this product is purchased, funds are deposited into the bank associated with the Product Type's Fund Account.
Purchase Limits
Purchase Limits restrict the number of products or product items that can be bought for an individual recipient.
If you choose Product, the purchase limit is set in Part 3 - Availability.
If you choose Product Item, the purchase limit is set in Part 2 - Product Items.
If you choose not to use this feature, Campus automatically limits the number of products that may be purchased to 10 products per recipient.
Purchase Limits can only be used in Parent Portal, Student Portal, and Employee Self Service.
Description
Detailed information about the product. This Description appears below the picture of the product.
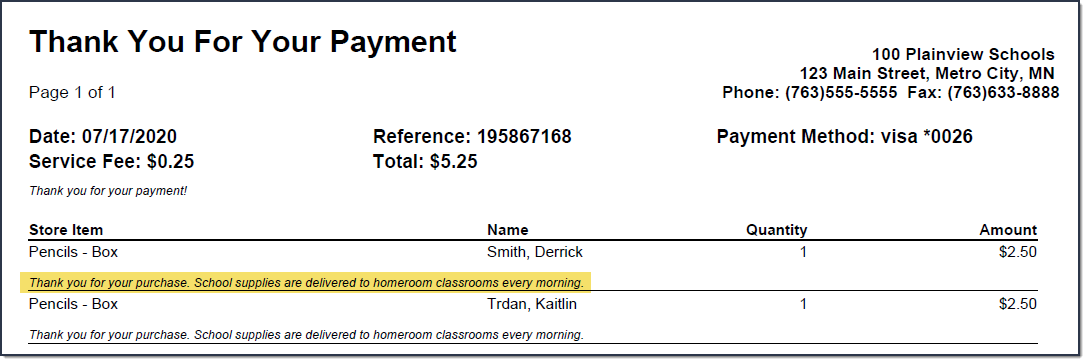
Receipt Comments
This field allows for comments or special instructions to be added to a customer's receipt when the product is purchased. Comments appear below the purchased item.
Variable Rate
Mark this checkbox if you do not want to set a specific price for the item. When this checkbox is marked, the customer can enter any amount they want when they check out. This option is useful for things like donations.
Partial Refund
Mark this checkbox if you want to allow partial refunds for this item.
Inventory Tracking
When this checkbox is marked, Campus calculates the amount of inventory you have available after a purchase is made.
An additional column called Inventory on Hand displays on the Step 2 Attributes screen and allows you to manage the items in your store. If the number in this column is zero, Campus displays the message Out of Stock when the users try to add the item to their cart.
Do NOT mark this option if
you are allowing users to preorder this product, or
you do not want to limit the quantity of items that can be sold.
If you use the Payments Reporter to issue refunds for products purchased in the School Store and this checkbox is marked, Campus allows you to choose whether you want to return the item to Inventory on Hand.
Customer Comments
When this checkbox is marked, customers can add information to their purchase before they check out. Comments appear on the Pick List report.
You may enter text in the customer comment field to automatically display a message.
Customer Comments are not available in the Campus Mobile Payments app.
Description
Detailed information about the product. This Description appears below the picture of the product.
Image Upload
This option allows you to add a picture of the product.
The image must use one of the following extensions: .jpg, .jpeg, .png, or .gif.
As a best practice, the file should not exceed 3MB. The image that displays in the store is a square, so a 1:1 aspect ratio is also recommended.
The uploaded images do not display in the Campus Mobile Payments app.
Image Description
After you select an image, an Image Description field appears. Use this field to enter a short text description of the image to be read aloud by screen readers, helping users with visual impairments understand what the image shows.
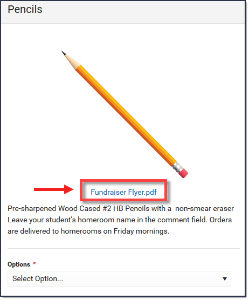
File Upload
This option allows you to add a PDF file to the product. For example, pencils are going to be sold at a fundraiser, so a flyer about the fundraiser can be uploaded to the Pencils product.
A link to the PDF file displays between the image and the description.
The uploaded files do not display in the Campus Mobile Payments app.
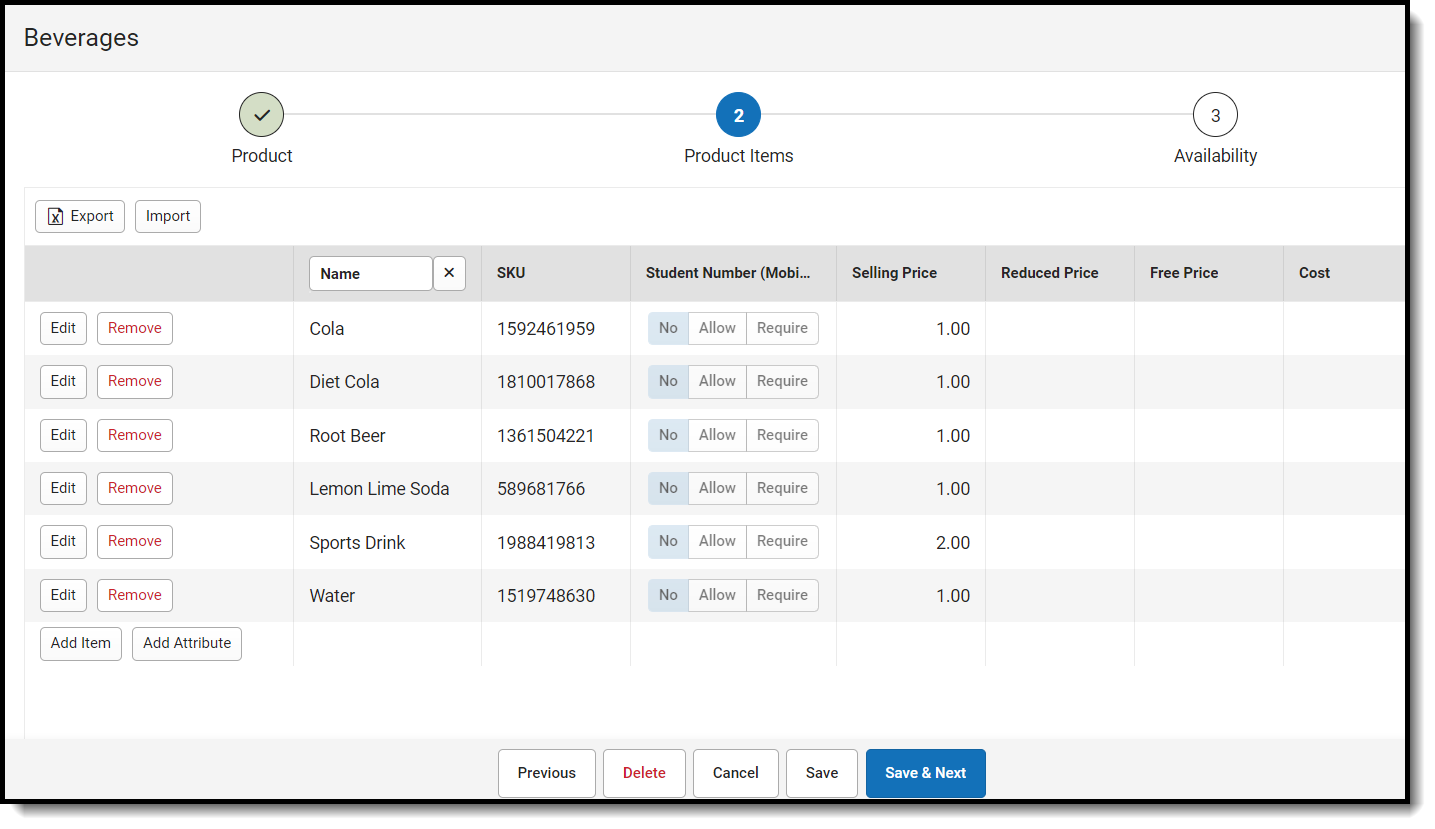
2 - Product Items
You can drag and drop rows to easily reorder lines in the table. To add multiple attributes (lines and rows) to the table, you must first click the Add Attribute button.
Field
Description
Export
The Export button allows you to download an Excel version of the Product Items table.
Import
The Import button allows you to upload an Excel or CSV file to populate the Product Items table.
To begin, use the Export button to download a template of the Product Items table.
You can have up to three custom attribute columns for tracking additional product information.
At least one custom attribute column is required to add more than one product item.
If your import file includes more than three custom attribute columns, only the first three columns are used and additional columns are ignored.
Depending on the options selected in Part 1 - Product, not all fields may display when exporting.
Do NOT change any of the following default column headers. Changing the name of a default column makes it a custom attribute column.
SKU
Student Number (Mobile)
Inventory on Hand
Selling Price
Reduced Price
Free Price
Cost
Purchase Limit
When you import the file, the Student Number (Mobile) column automatically populates with No if there isn't a value in the file.
When you import the file, the Selling Price column automatically populates with 0.00 and Inventory on Hand populates with 0 if there aren't values in the columns. The other fields will be filled with a blank if there are no values for them.
If you are using an Excel document and one of your attributes represents time, you must use quotes around the time. For example, if the time is 5:30pm it must be "5:30pm" or '5:30pm' in the excel document.
Add Item
The Add Item button allows you to add another row to the table if you are using custom attributes.
Add Attribute
The Add Attribute button allows you to add custom attributes to the table. You can add up to three custom attribute columns for tracking additional product information.
Student Number (Mobile)
This column displays if Mobile Payments is marked within the Category under Display On.
The Student Number (Mobile) field is used to track information about purchases for students. For example, if selling prom tickets, you may want to enter the student number at the time of purchase to track the students who are attending.
When a row is added in Step 2 Product Items, the Student Number (Mobile) column displays three options:
No -is the default option. When an item is purchased using the Campus Mobile Payments app, the Student Number will not display.
Allow - gives you the option to enter a student number during the purchase of an item; it is not required.
Require - requires the student number to be entered during the purchase of an item.
The Student Number (Mobile) column appears in the Campus Mobile Payments app only.
SKU
You can enter your own SKU or one from a vendor. If you leave this field blank, Campus assigns a unique, system generated number.
Infinite Campus recommends using unique SKUs for each product.
Inventory on Hand
This column only displays if Inventory Tracking is selected in Step 1 Product.
This is the total amount of inventory on hand. You can manually update this number at any time.
If the number in this column is zero, Campus displays the message Out of Stock when the user tries to add the item to their cart.
Selling Price
The price customers pay and see in the store. The price can be $0.00.
Items that cost $0 cannot be purchased through the Public Store.
Reduced Price
The price students with a Reduced eligibility status whose guardians have given permission to share it with the School Store and Activity Registration pay and see in the School Store. The price can be $0.00.
Free Price
The price students with a Free eligibility status whose guardians have given permission to share it with the School Store and Activity Registration pay and see in the School Store. The price can be $0.00.
Cost
The price the district paid to purchase the product from the vendor. This field is optional.
Purchase Limit
This column only displays if you chose Purchase Item in the Product Limits dropdown list (Part 1 of the Product Progress Tracker). Enter the maximum number of this particular item the user is allowed to purchase for a recipient.
3 - Availability
Field
Description
Active
When this checkbox is marked, the product is available on the Start Date in the store(s) marked in the Available On section.
Restrict to Associated School Enrollments
When this checkbox is marked, the Recipient dropdown list in the School Store will only display students who have an enrollment in the active school year at the school to which the product is attached. This includes primary, secondary, and enrollments with a future end date.
Example
If you have a Product attached to the High School only and this checkbox is marked, parents will only be able to select their student(s) with primary and secondary High School enrollments in the active school year as well as enrollments with a future end date. Please note that if the same Product is associated with multiple schools; e.g., a middle school and a high school, parents can select both middle and high school students in both stores.
This option is only available when the product is only available on the Portal. If the Employee Self Service, Public Store, or Mobile Payments checkboxes are also selected, this field is disabled.
Include Future Enrollment
When Restrict to Associated School Enrollments has been selected, allows future enrolled students to purchase the item. If selected, the Days Before Enrollment field will appear. This allows users to set the number of days before the enrollment start date the product will be available for purchase. The maximum number of days is 365.
Available On
Portal
Employee Self Service
Public Store
Mobile Payments
Start Date
The first day and time on which the product may be purchased. This field is required.
Campus verifies the Product Type and Category are active on the same day or prior.
End Date
The last day and time on which the product may be purchased. After this date and time, the product is inactive and is not available in the store.
Purchase Limit
This field only displays if you chose Product in the Product Limits dropdown list (Part 1 of the Product Progress Tracker). Enter the maximum number the user is allowed to purchase for a recipient from that product group. For example, if the Product Limit is set to 3 for School Supplies, this means you can purchase any3 items from the School Supplies product group.
Purchase Limits can only be used in Parent Portal, Student Portal, and Employee Self Service.
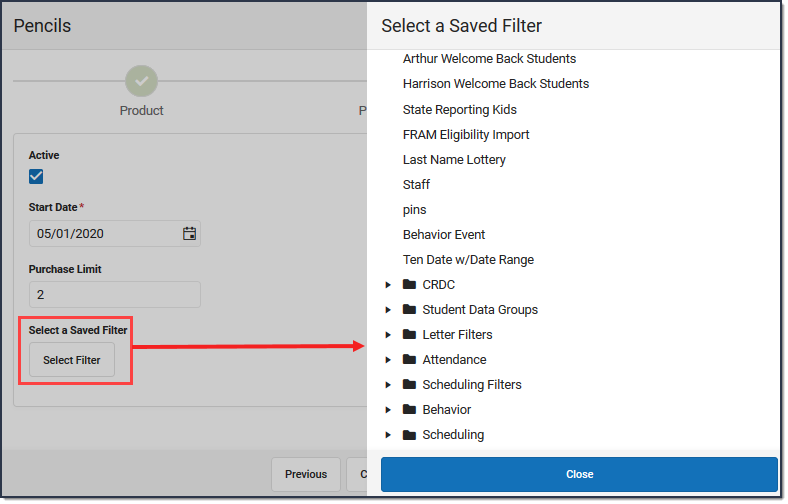
Select a Saved Filter
This option allows you to select an Ad Hoc filter to limit purchasing to the people included in the filter. Only people who are included in the Ad Hoc filter and have an active enrollment in the active calendar year can be selected as a Recipient.
Select a Saved Filter is only available when Portal is selected from the Available On section. If the Employee Self Service, Public Store, or Mobile Payments checkboxes are also selected, Ad Hoc filters cannot be applied.
Refunds
Use the Payments Reporter to issue refunds for products purchased in the School Store.
If the Inventory Tracking checkbox is marked on the product, Campus automatically updates the Inventory on Hand to include the refunded item.
Users can choose whether to return the item to inventory or reimburse the customer.
Video
The General Product tool allows you to set up products and services for the School Store and associate them to categories.
tNHUalSd
School Store Use
See how a parent, guardian, or student views the School Store in Campus Parent or Campus Student.
My Account
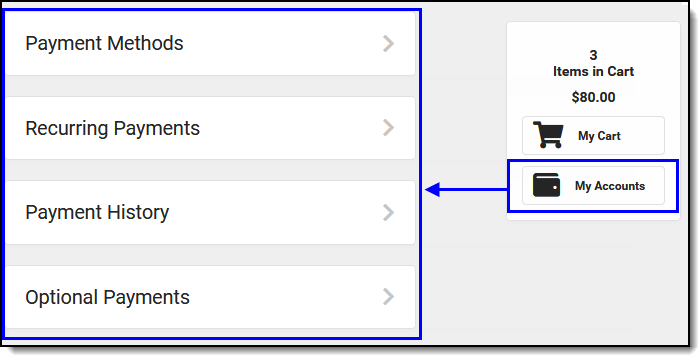
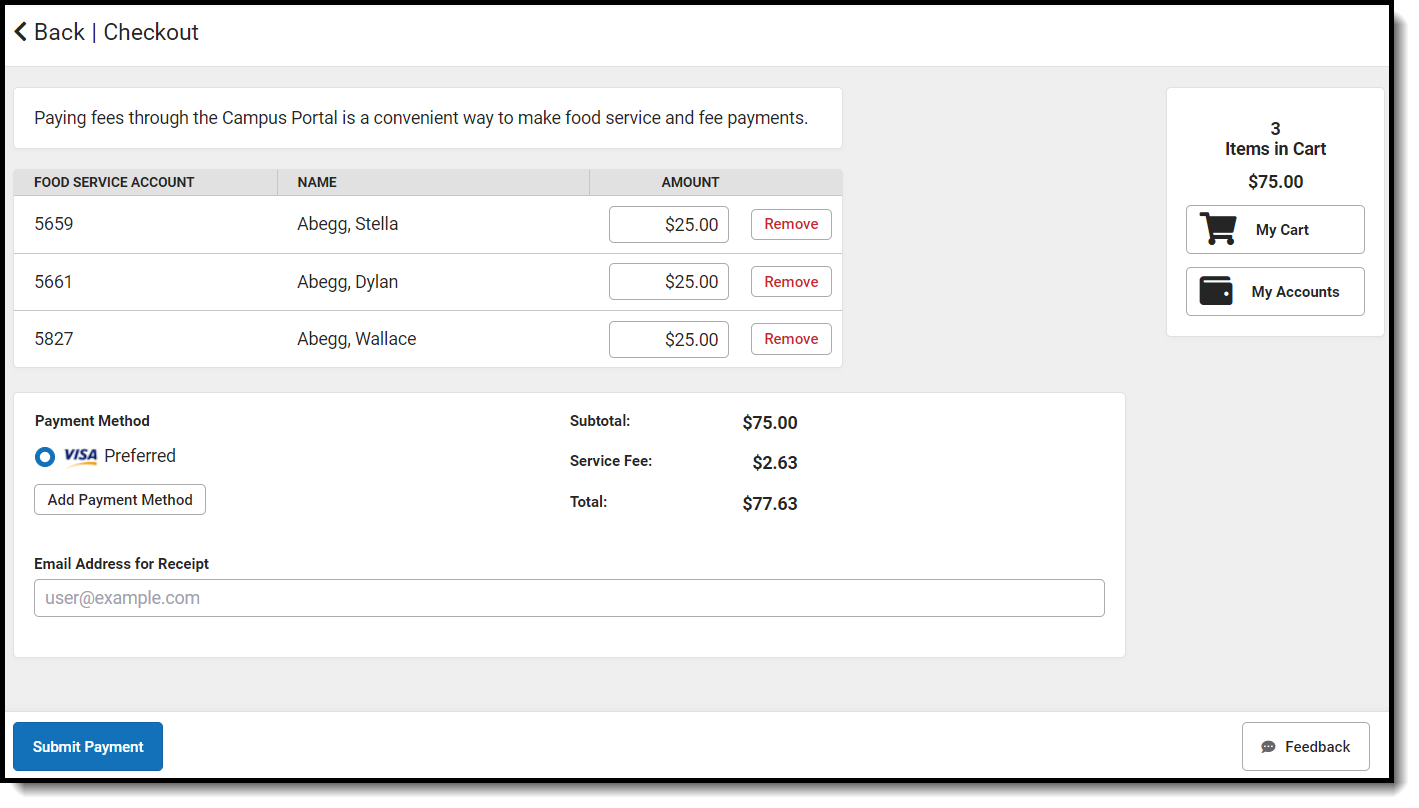
The My Account tool is used to set up payment methods and recurring payments, add items to My Cart, and view payment history.
Documentation
The My Accounts is the tool where you can manage payment methods, select optional payments to pay, set up recurring payments, and view your payment history.
Access to My Cart may be removed for an individual.
Documentation
Tool Search: Payments
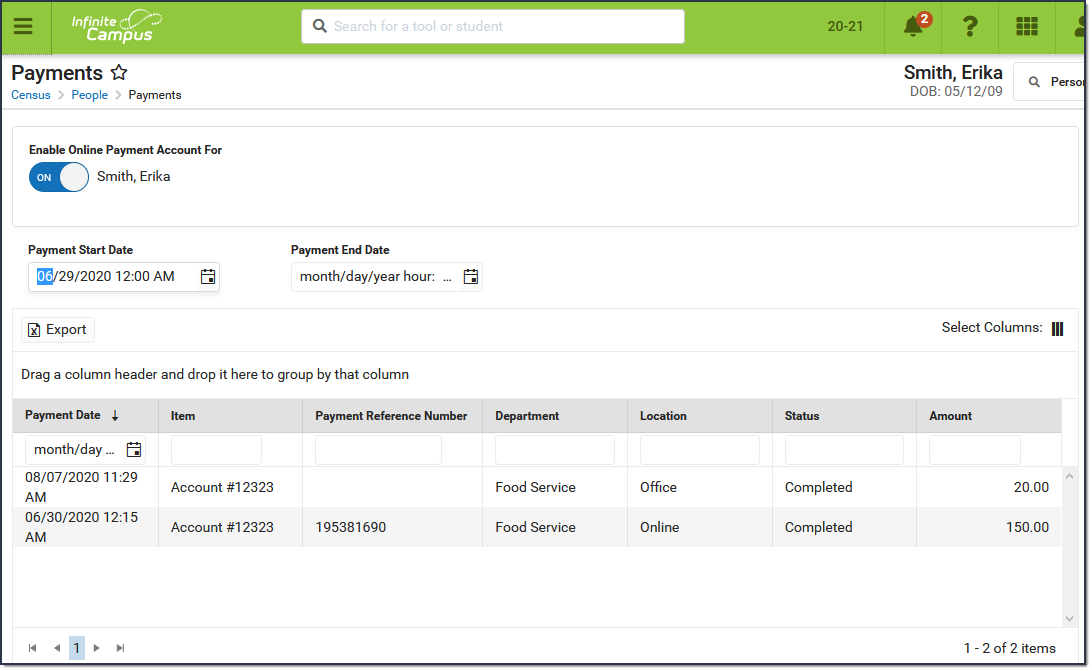
The Payments tool provides a summary of online payments, Food Service deposits, School Store purchases, and office payments made for an individual person. The Payments tool is also where you can enable or disable a person's access to online payments.
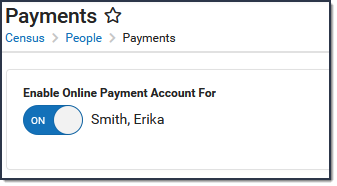
Enable or Disable Access to Online Payments
When this toggle is ON, the person can use My Cart to make payments.
When this toggle is OFF, the person can NOT use My Cart to make payments. When you set this toggle to OFF, recurring paymentsset up by this person are automatically stopped.
By default, users may make payments for any Fee regardless of the calendar in which the Fee was assigned. This also means that payments can be made for students who do not have an active enrollment.
Review Payments
The Payments tool allows you to review details about transactions that were completed through the online payment process, a food service terminal, or in the office.
You can sort the results by clicking a column heading. Each click changes the data in ascending or descending order.
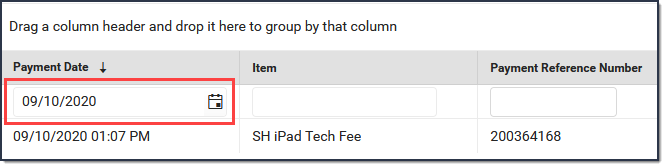
You can add filters to narrow the report's results. For example, you can find payments that were made on a specific date.
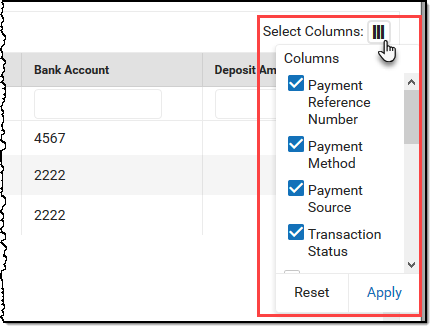
The column selector allows you to choose which columns to hide or display. Click thebutton and mark the checkbox next to the columns you want to display. Clear the checkbox next to columns you want to hide.
If you are viewing a parent/guardian's Payments page, payments made for their students do not display. Only the following types of transactions display for parent/guardians.
Transactions for food service accounts.
Payments for fees assigned to the parent/guardian.
Payments for activities where the parent/guardian is the recipient.
Purchases made in the School Store where the parent/guardian is the recipient.
Video
Payments made for fees, school store items, activities, and food service accounts can be viewed on the Payments page.
My Cart Access - Household
Access to My Cart may be removed for an entire household.
Documentation
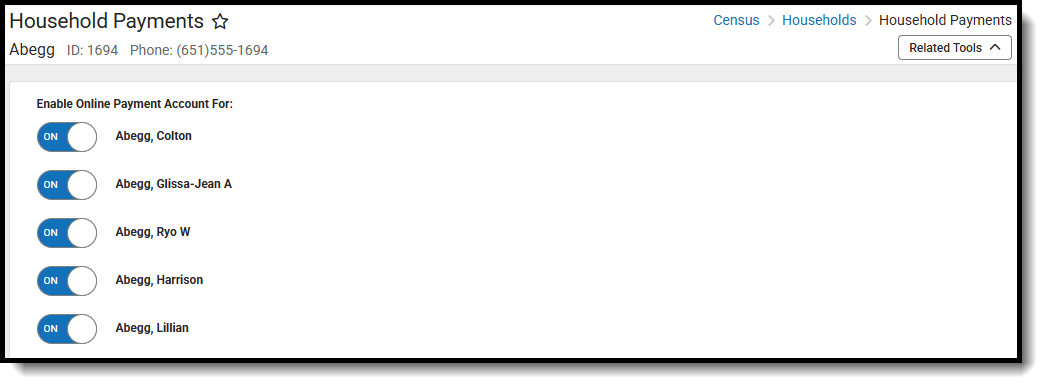
Tool Search: Household Payments
The Household Payments tool allows you to enable household members' access to online payments. When this toggle is turned on, the person sees the Payments area on the portal.
If you disable Online Payments, recurring payments set up by that person are automatically stopped.
Office staff can manage payments and inventory by using the following reports: Payments Reporter, Pick List, Sales, and Inventory on Hand.
Payments Reporter
Office staff can use the Payments Reporter to view the payments made, perform refunds, export the report's results, and change the view of the report.
Documentation
Tool Search: Payments Reporter
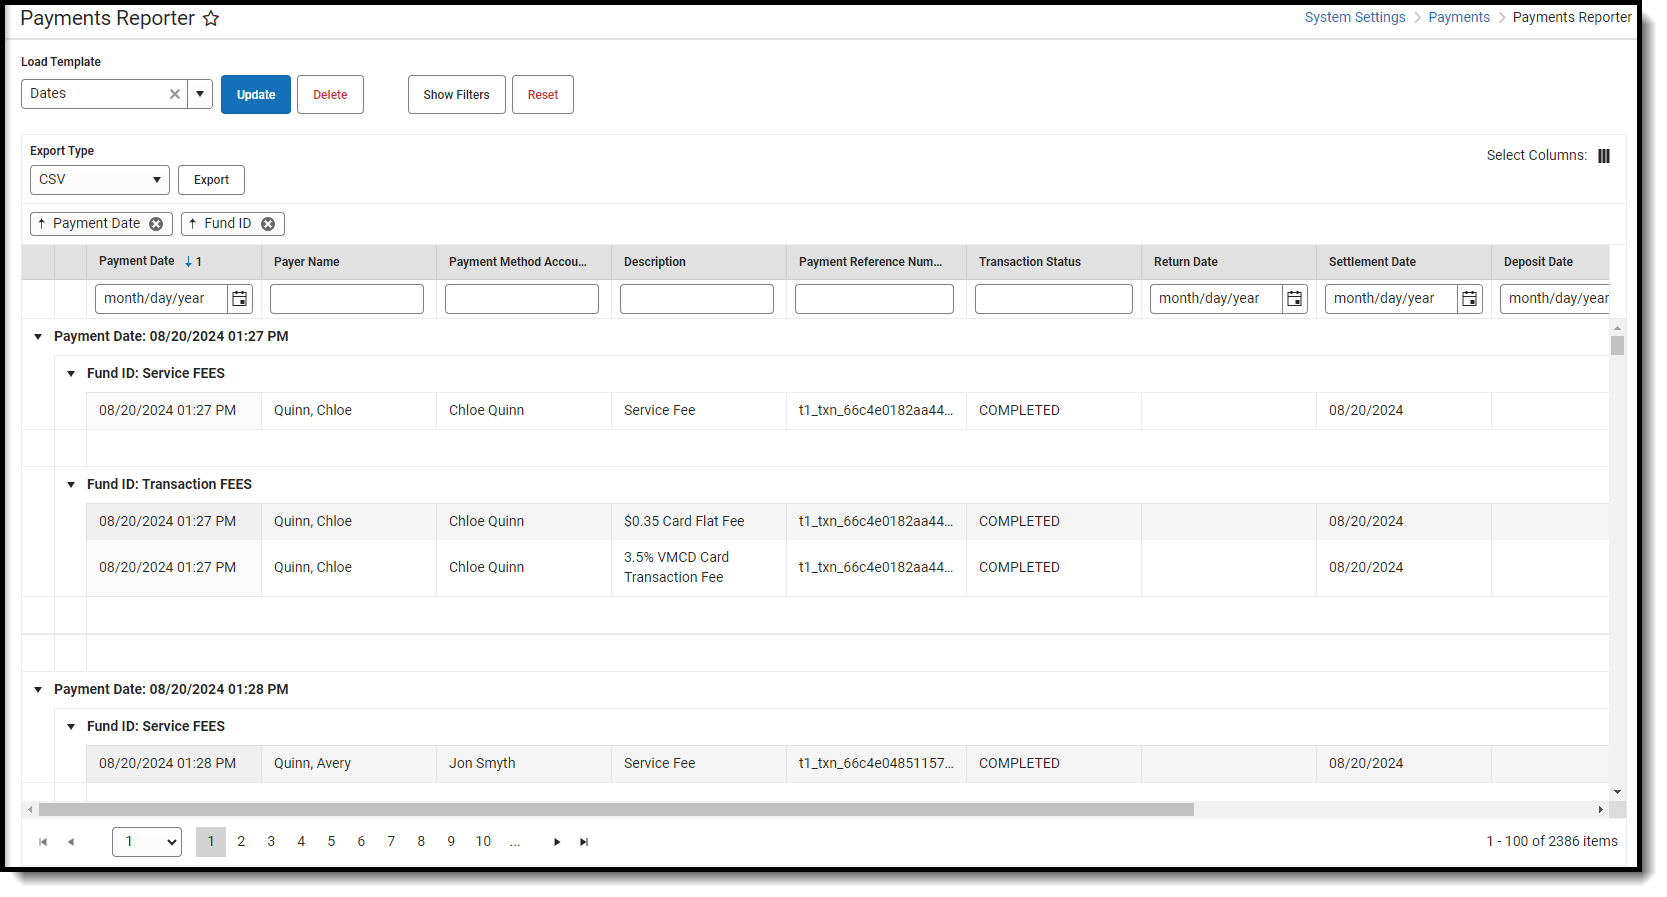
The Payments Reporter details all transactions that were completed through the online payment process. With this tool, you can check the status of a specific payment, issue refunds, and revoke transactions.
Campus automatically voids all returned transactions. The original transaction appears with the Returned status and the correcting transaction appears with the Return Void status. Transactions may be returned if the account is not valid or has insufficient funds.
Transaction fees are never refunded.
Payments with the Transaction Status Resolved can only be refunded if the transaction was resolved by Campus Support. If you need to refund a payment that you manually resolved, contact Campus Support for assistance.
When a payer makes a purchase for $0.00, Campus assigns a reference number but a Payment Method does not appear in the report. In addition, Service Fees are not applied when the total is $0.00.
A Deposit Date does not display either unless the zero dollar purchase was purchased with other items for which the payer was charged and the transaction is processed.
If an E-check fails, it can occur up to 10 business days after settling. If there is a failure, the amount of the E-check is automatically returned.
Refunds (full or partial) for echecks are not allowed until there is a Settlement Date.
Refunds for echecks are processed 12 days after the transaction's Payment Date. This ensures funds have cleared before the refund is processed.
All refunds that are requested between 5:45 p.m. and 6:00 p.m. Eastern Time will not process until 12:00 a.m. the following day. For example, a refund requested at 5:45 p.m. on September 1st will be processed at 12:00 a.m. on September 2nd. This rule applies to all payment types except for echecks which cannot be processed until 12 days after their transaction's Payment Date.
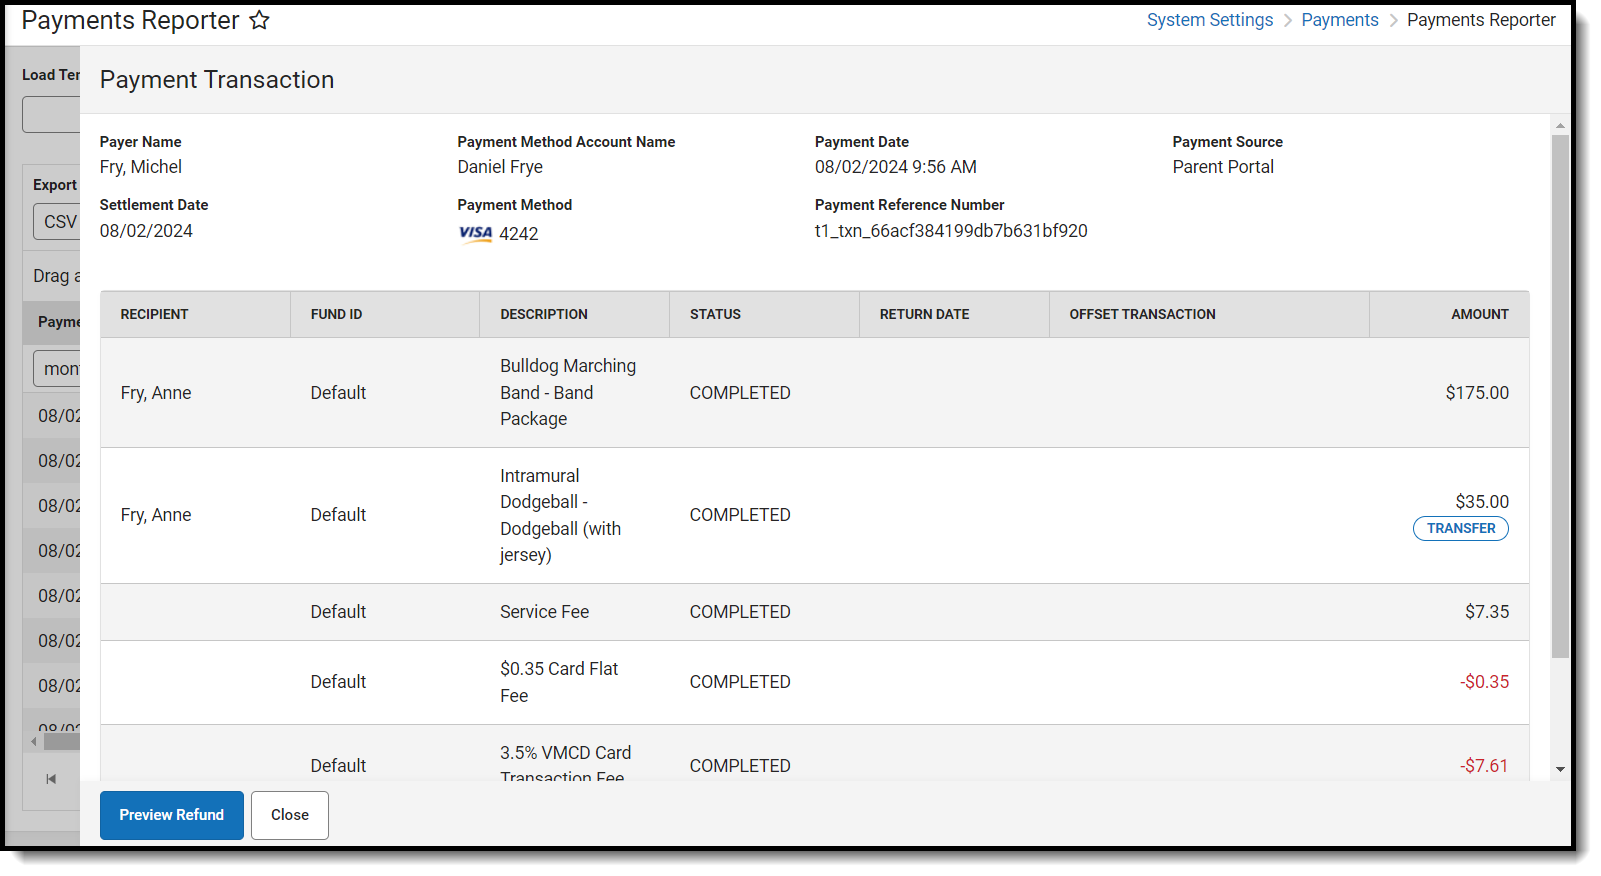
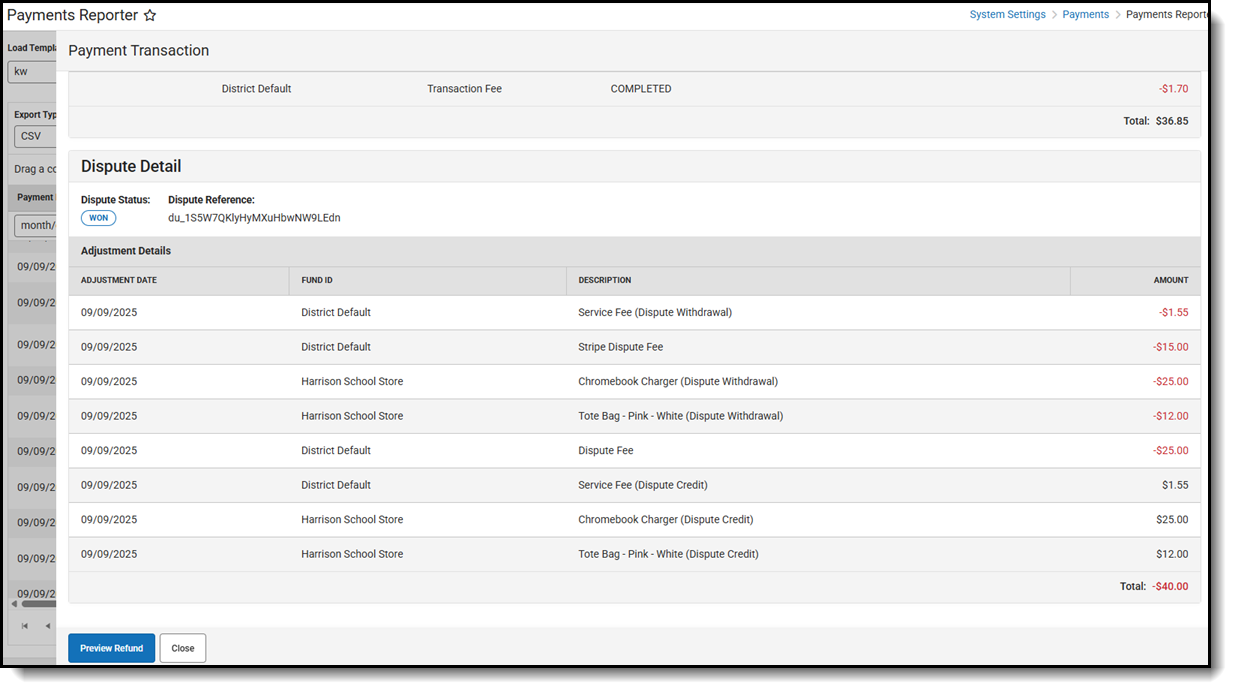
If a transaction is disputed, a chargeback or dispute fee is assessed. These can be searched for in the Description column as ‘Chargeback’ or “Dispute.’ When clicked, the Payment Transaction history will appear showing all the fees associated with that transaction.
About the Deposit Process
Following a payment, the funds are typically deposited into your bank account within three to four business days. This timeframe includes the settlement of the payment, the request for the deposit, and the bank's processing duration. Please note that this period may vary slightly depending on the timing of the payment and Stripe’s processing schedule.
The deposit process runs daily before 5:45 PM Eastern Time (ET). The deposit job must complete by 6:00 PM Eastern Time (ET); otherwise, the payment platform moves the request date forward one day to ensure the deposit job has enough time to complete.
The deposit process does not run on weekends (Saturday, Sunday) or holidays.
Step
Description
1
Campus determines your district's account balance. When your district is processing payments, any returns/refunds you process are subtracted from your account balance when they occur. At the end of each business day, Campus calculates the balance and then requests a deposit. If your district's account balance is negative, Campus issues a negative deposit.
2
After determining the balance, Campus combines transactions with the following statuses into a deposit.
Completed
Resolved
Returned
Partial returned
Returnvoid
Transactions with a settled date
Transaction Fees
There is a brief delay (up to 1 hour) between the time the deposit request is made and when the deposit is processed by the payment platform.
3
If the deposit is...
Then...
Successful
You will see a deposit in your district's bank account. Keep in mind, you may see different deposit dates for one payment reference number since the deposit payment separates transaction line items.
Not Successful
The deposit is canceled and recalculated the following day.
Tips for Searching
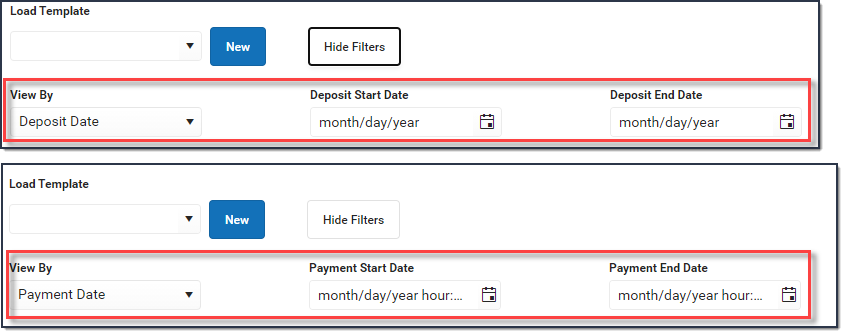
You can search for transactions according to their Payment Date or Deposit Date. Click the Show Filters button, then select the option you want to use in the View By field and enter the appropriate start and end dates.
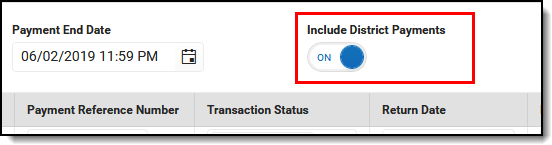
To include district payments such as Service Fees in your search, click the Show Filters button then toggle Include District Payments to ON. If you want to see payments made to your school only, set the toggle to OFF.
This toggle is only available if your system administrator has assigned the appropriate tool rights.
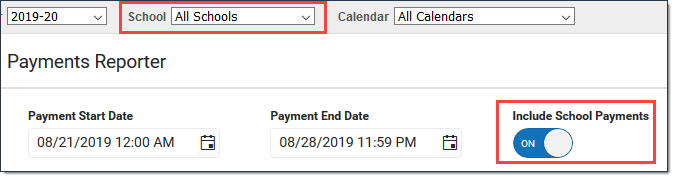
If you select All Schools in the School dropdown list, only payments made to the district display. However, you can set the Include School Payments toggle to On to include payments from all schools in the district.
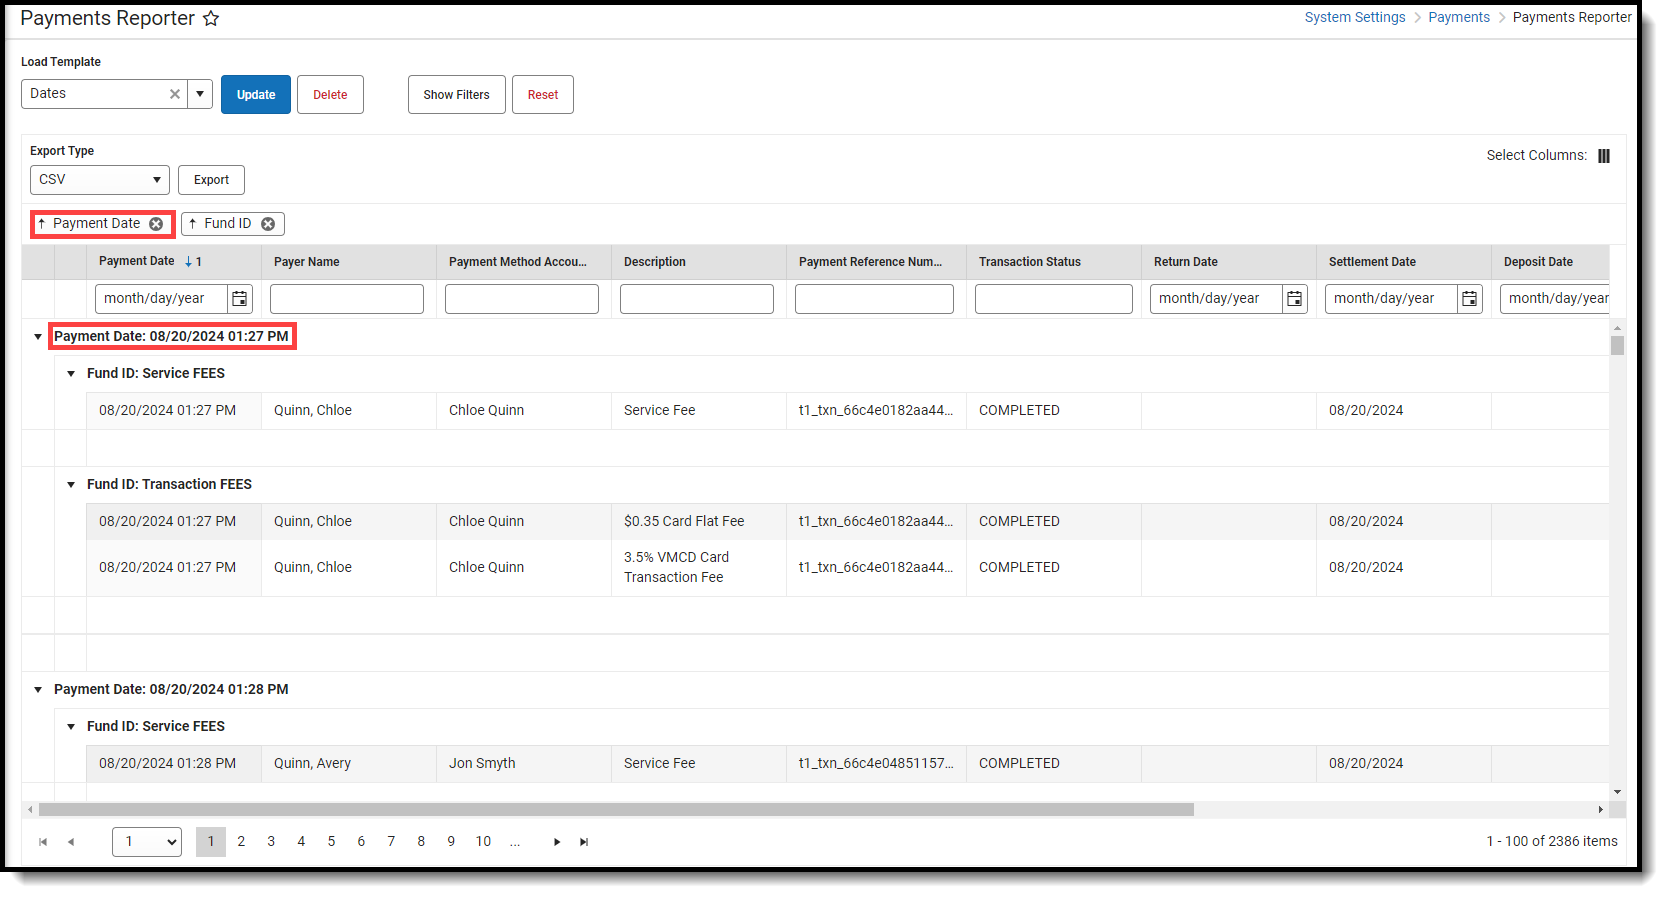
Search results are grouped by Fund ID.
Select an individual line to see the entire transaction in the Payment Transaction panel.
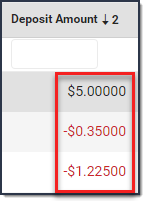
Sort results by Deposit Date and Deposit Amount when trying to perform a bank reconciliation.
You can sort the results by clicking a column heading. Each click changes the data in ascending or descending order.
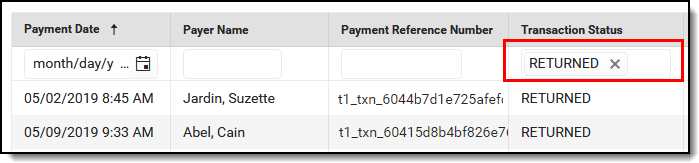
You can add filters to narrow the report's results. For example, you can find payments that were made on a specific date or Transaction Status.
Transaction Status Descriptions
Transaction Status
Description
Completed
A fully completed transaction.
Canceled
If a transaction displays this status, you can manually resolve the transaction or contact Campus Support.
Exception
The payment was processed by the payment vendor but not on Campus.
If a transaction displays this status, you can manually resolve the transaction or contact Campus Support.
Returned
and
Return Void
Campus automatically voids all returned transactions from the payment vendor. The original transaction appears with the Returned status and the correcting transaction appears with the Return Void status. Transactions may be returned if the account is not valid or has insufficient funds. Transactions also appear in these states if the district manually Refunds a Payment.
There could be a two to five-day delay in which Campus may have completed the transaction and the payment vendor may need to return it.
Revoked
Note: Revoked can no longer be used as a status, but any transactions previously marked as Revoked will retain that status.
Transactions can be manually revoked by the district if an interruption occurs between the district and the payment vendor where the payment was never processed.
This status displays transactions manually revoked by the district within the date range entered on the editor.
Pending
If a transaction displays this status, you can manually resolve the transaction or contact Campus Support.
Processing
If a transaction displays this status, our payment processor is waiting for confirmation from the bank that the transaction has cleared. Once the confirmation is received, the deposit date could be in the past. For example, a fee or refund might show a deposit request date of 4/3 but will stay in pending status until 4/10 then once in completed status the deposit date would be 4/4.
Negative deposits can take 5-7 business days before they have a Deposit State of Completed in Campus.
View Details for a Single Transaction
A transaction with the label Fee Surplus indicates an online payment was voided using the Fees tool. The payment amount is deposited into the surplus for that student. When you see this label, the payment can NOT be refunded in Payments Reporter.
To view details for a single transaction, click the transaction you want to view. The Payment Transaction panel displays details for the transaction.
Since lines on the Payments Reporter are grouped by Fund ID, this is a good method for viewing the entire transaction.
View Disputed Transaction Details in Payment Transaction Panel
When a user clicks on a transaction with a dispute, the information related to that dispute will display within the Dispute Detail.
For Stripe, disputes have been supported since version .2531, and for Payrix since version .2539. Any disputes before these updates will show fees in the Transaction Details section, while disputes after the updates appear in the Dispute Details section.
This option is only available if your system administrator has assigned the appropriate tool rights.
The Transaction Fee cannot be refunded.
The Service Fee can only be returned if your District has enabled Service Fee refunds in the Payment setup.
If you do NOT refund Service Fees, the Service Fee stays in a Completed status.
Refunds for echecks are not allowed until there is a Settlement Date.
Click the transaction you want to refund.
Result: The Payment Transaction panel displays.
Click the Preview Refund button.
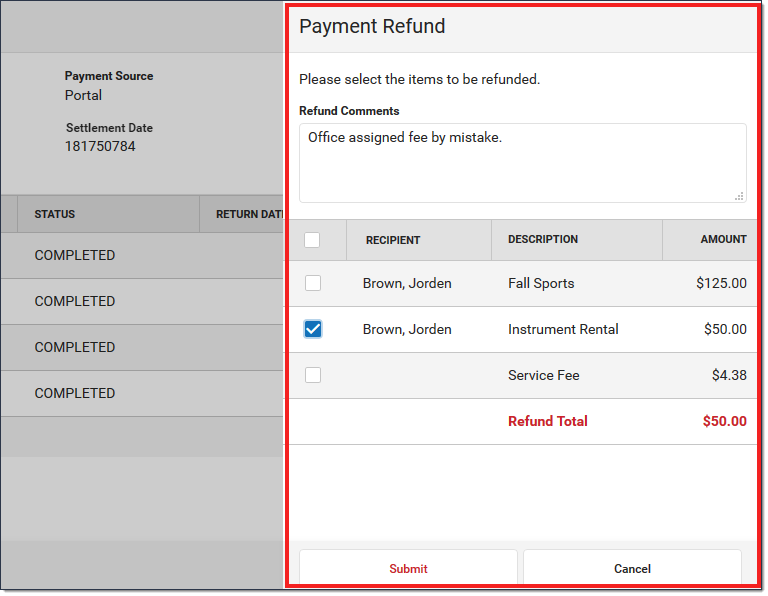
Result: The Payment Refund panel displays.
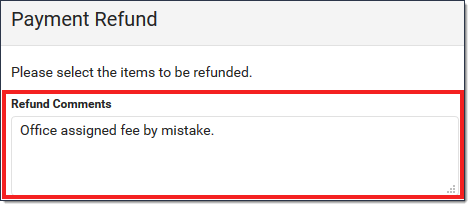
Enter the reason for the refund in the Refund Comments field. (optional) This comment will display on the offset transaction's details.
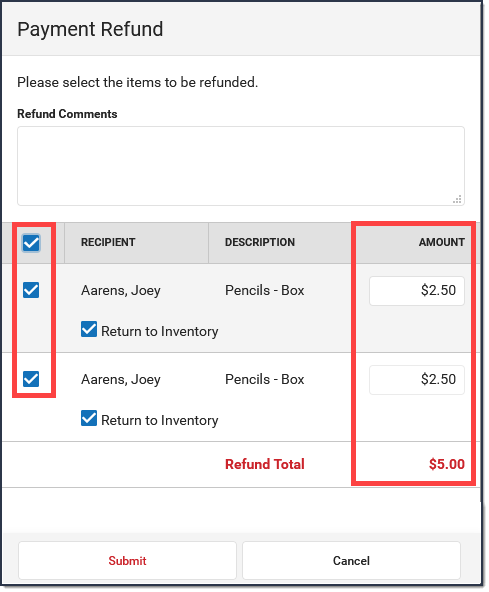
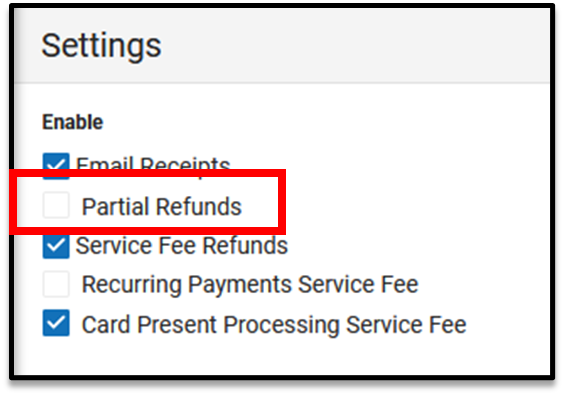
Complete one of the following options. Options that display depend on whether your district allows partial refunds.
If Partial Refunds...
Then...
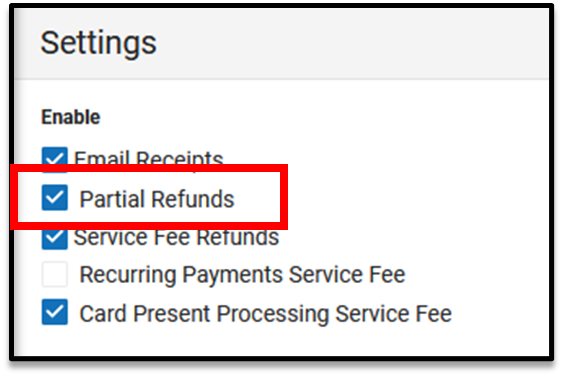
is enabled in Payments Setup (district settings)
Mark all of the checkboxes.
Verify the Amount you want to refund.
If your district uses inventory tracking, verify the Return to Inventory checkbox is marked next to the item(s) you want to return (optional)
Click Submit.
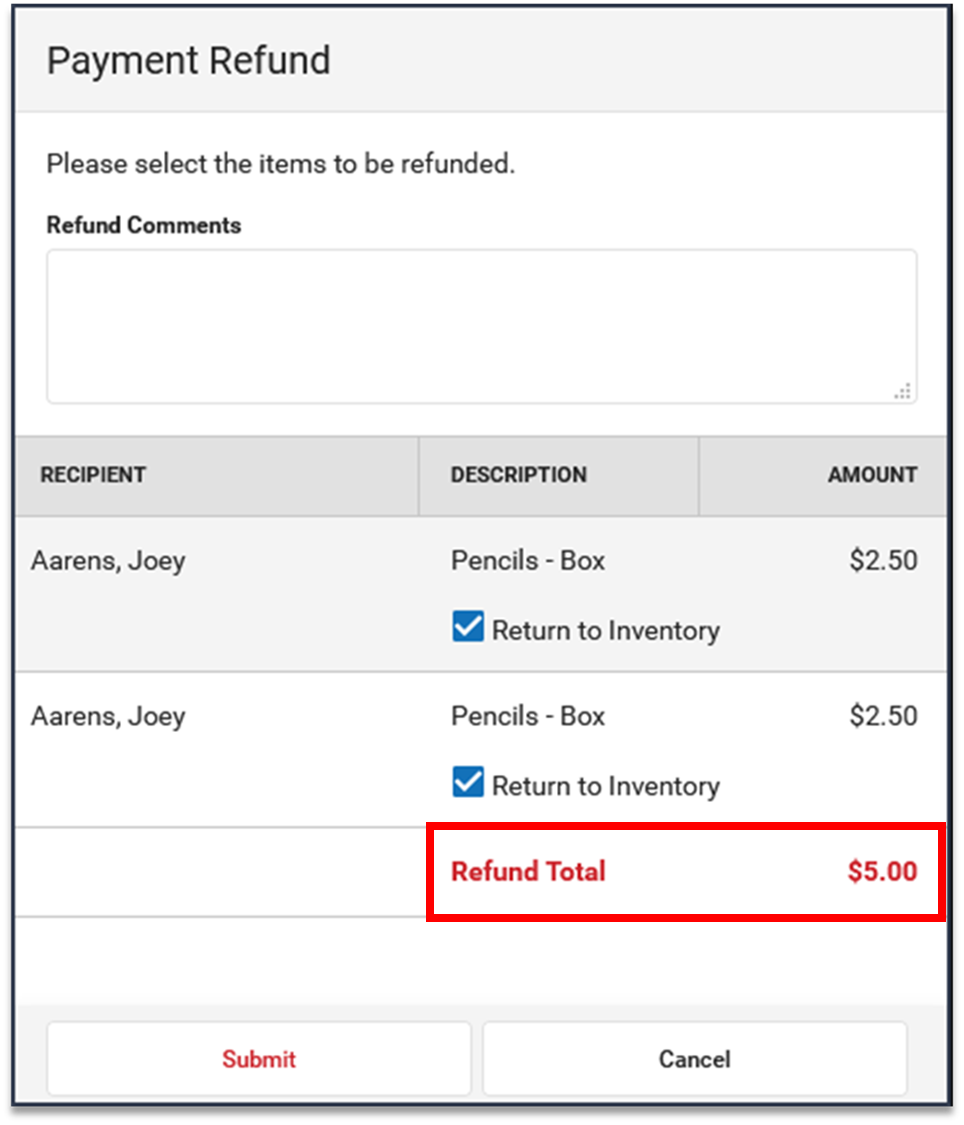
is not enabled in Payments Setup (district settings)
The entire amount is refunded; you cannot give partial refunds.
If your district uses inventory tracking, verify the Return to Inventory checkbox is marked next to the item(s) you want to return (optional)
Click Submit
Result: A confirmation message displays.
Click OK.
Result
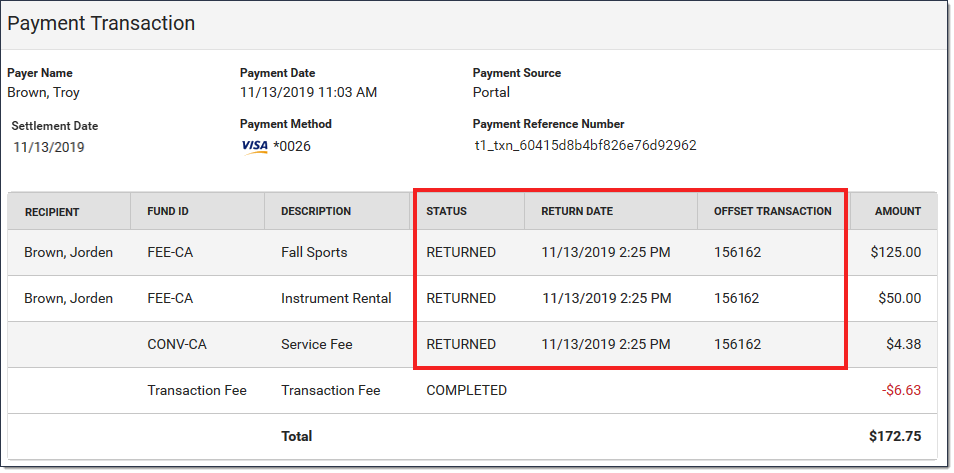
The Payments Reporter screen displays. Campus updates the original Transaction Status to RETURNED and adds an offset entry with the Status RETURNEDVOID on the refunded lines.
Campus also updates the original payment transaction's details. After a refund is made, the details include a Return Date and the Offset Transaction Reference Number.
Refunds may incur an additional Transaction Fee based on your district's contract with the payment vendor.
Issue a Partial Refund
Tips
This option is only available if:
Your system administrator has assigned the appropriate tool rights.
Your district has enabled partial refunds in the Payment setup.
The Transaction Fee cannot be refunded.
Refunds may incur an additional Transaction Fee based on your district's contract with the payment vendor.
The Service Fee can only be returned if your District has enabled Service Fee refunds.
If an item is already partially returned, you cannot make additional refunds on the same item.
Partial refunds appear in the Payments Reporter with a status of Partial Return and an offset transaction number.
Refunds for echecks are not allowed until there is a Settlement Date.
If split fees is enabled, districts may opt to refund only the service fee related to the specific product being returned, rather than the entire service fee if a full refund option is enabled.
Click the transaction you want to refund.
Result The Payment Transaction panel displays.
Click the Preview Refund button.
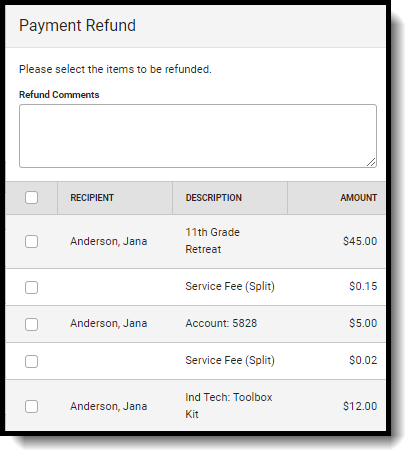
Result The Payment Refund panel displays. Only items eligible for a refund displayed on the screen.
Enter the reason for the refund in the Refund Comments field. (optional) This comment will display on the offset transaction's details.
Mark the checkbox(es) next to the item(s) you want to return.
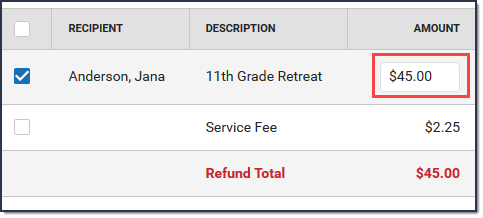
Verify the Amount(s) you to refund.
You can change the amount to be less than the amount that was paid.
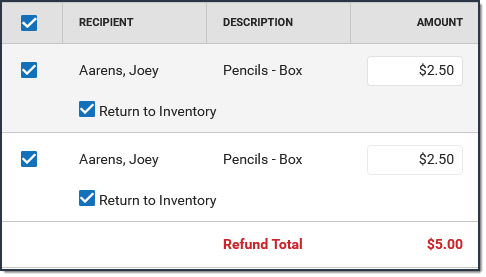
Verify the Return to Inventory checkbox is marked next to the item(s) you want to return to inventory. (optional)
This checkbox only displays if you use inventory tracking and is automatically selected. If you do not want to return an item to inventory, make sure the checkbox is cleared.
Click Submit.
Result: A confirmation message displays.
Click OK.
Results
The Payments Reporter screen displays. Campus updates the Transaction Status to RETURNED and adds an offset entry with the Status RETURNEDVOID on the refunded lines.
Campus also updates the payment transaction's details. After a refund is made, the details include a Return Date and the Offset Transaction Reference Number.
Refunds may incur an additional Transaction Fee based on your district's contract with the payment vendor.
Select Columns to Display
The column selector allows you to choose which columns to hide or display. Click the Select Columns button and mark the checkbox next to the columns you want to display. Clear the checkbox next to the columns you want to hide.
Group Report by Specific Columns (Grouping Options)
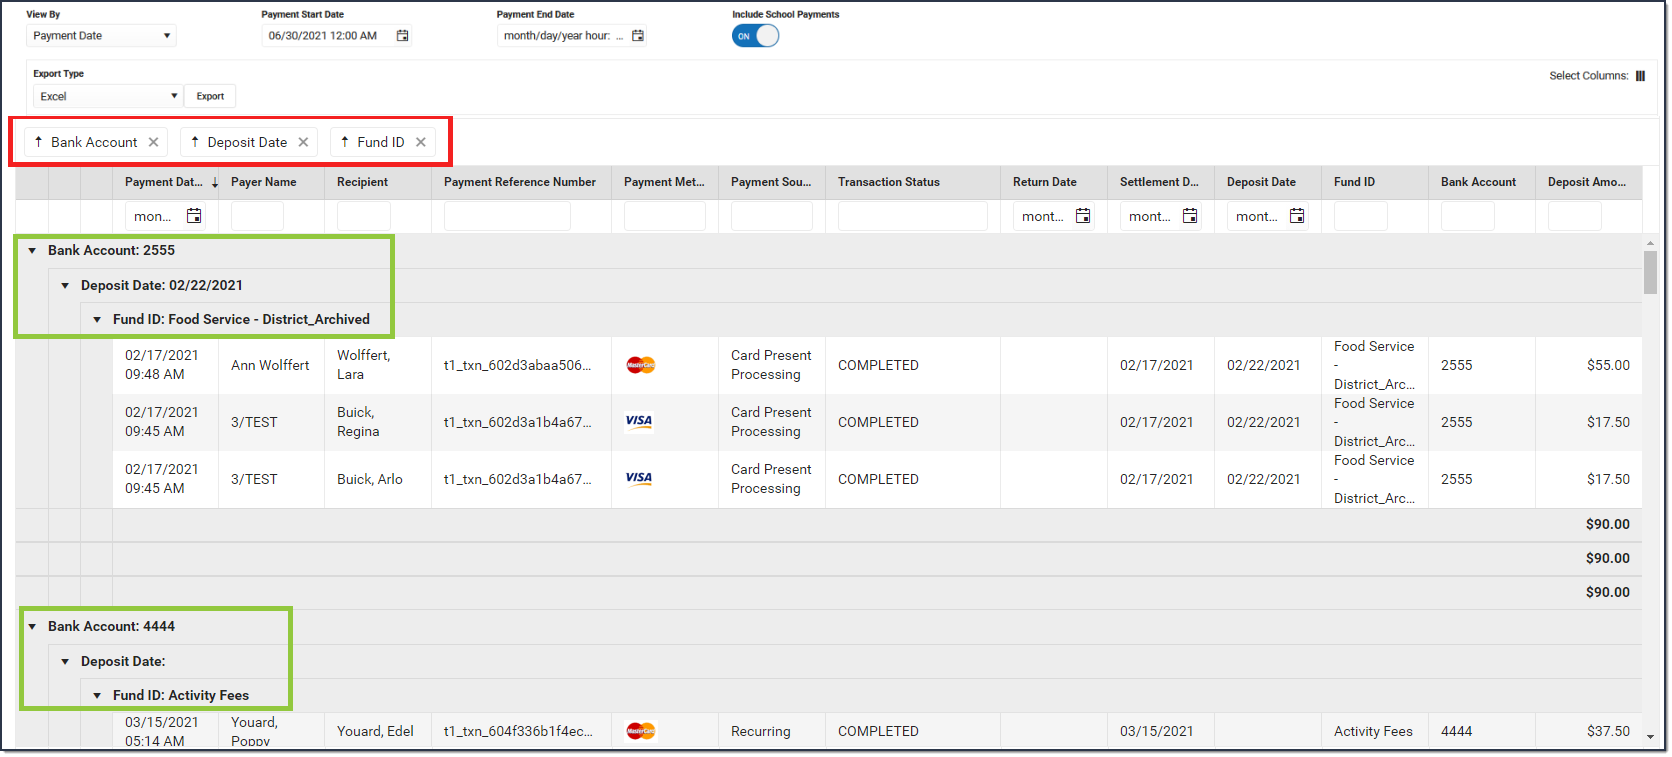
The report displays differently based on the grouping options you select. Select the column(s) you want to group together and drag the column(s) to the area above the table. You can select multiple columns and further group the report results.
Note: Avoid exporting the grouped Payments Reporter to PDF. As grouping levels increase, additional columns are added to the report, which can push content beyond the page width and cause overlapping columns.
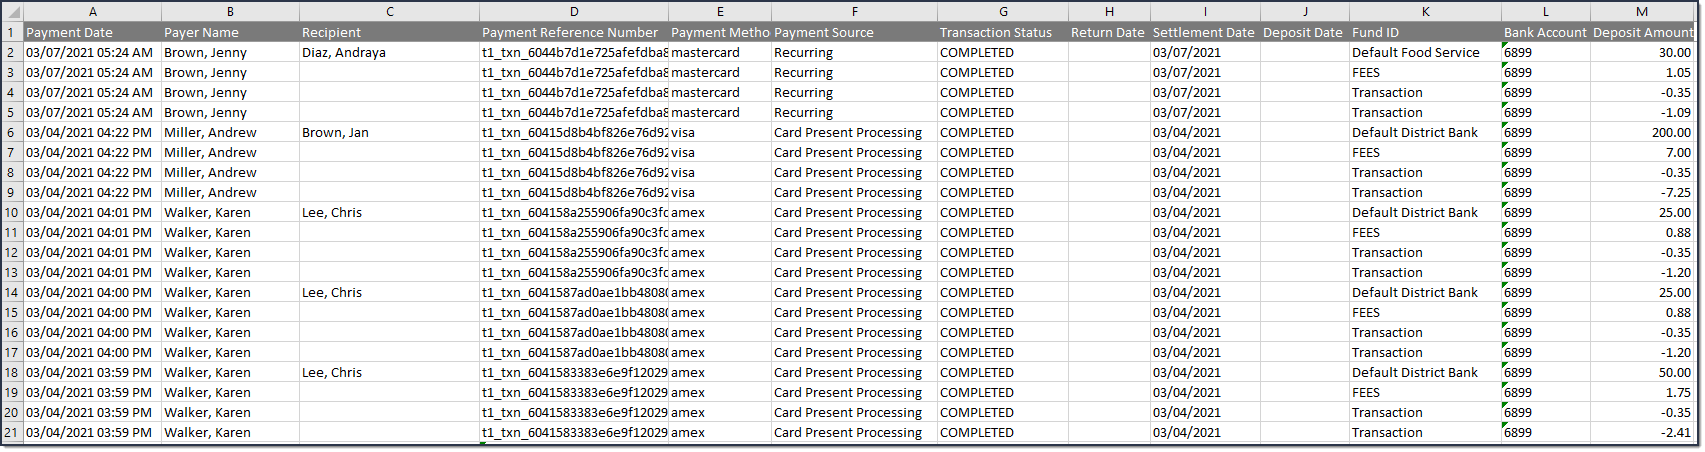
Payments Reporter Column Descriptions
The following columns are available on the Payments Reporter. These columns are available via the column selector and can be grouped, filtered, and saved as templates.
TIP
You can sort the Payments Report by clicking a column heading. Each click changes the data in ascending or descending order. When grouping specific columns, be sure to also sort the column headings to ensure you are viewing the report results in an organized manner.
Column
Description
Payment Date
The date on which the payment was made.
Payer Name
The name of the person who made the payment. This column will only show a name if the payer is a logged-in Infinite Campus user.
Payment Method Account Name
If a name is entered in a payment method, it will be displayed in this field.
Recipient
The person receiving items purchased in the School Store or the student who was registered for an activity.
If an item was purchased and paid through the Campus Mobile Payments app, the student's name appears IF the student number was entered at the time of the purchase.
Description
A description of the fee.
If the 'Split Transaction and Service Fees' checkbox has been enabled within the Payments Setup Settings, any transaction or service fee involving a split will be designated with '(Split)' in its description.
Payment Reference Number
This number is automatically generated by the payments platform and is a unique identifier for a specific transaction.
Payment Method
Indicates what was used to make the payment; e.g., type of credit card or eCheck. If eCheck is used, it will indicate if it was from checking or savings.
Card Entry Type
Shows whether a credit/debit card payment was typed in manually, swiped, or processed through the Campus Mobile Payments app using a chip insert or tap (EMV). If the payment method was not a credit or debit card, this column will appear blank.
Payment Source
Identifies where the transaction occurred.
Portal
Parent Portal
Student Portal
Employee Self Service
Card Present Processing
Public Store
Recurring
Refund
Reversal
Failed Transaction
Campus Payments App
Activity Roster
Fees
Food Service
POS Terminal
Transaction Status
The current state of the transaction. See the Transaction Status topic for more information.
Completed
Exception
Canceled
Pending
Returned
Return Void
Revoked
Dispute Status
Displays the status for any payment currently or previously involved in a dispute.
Closed - The dispute has been closed and could have been won or lost.
Inquiry - An inquiry has been opened by the cardholder. The district must take action to prevent it from going into a full dispute.
In Review - The dispute is under review. Nothing can be submitted or done in this status.
Lost - The district has lost the dispute.
Open - The transaction is currently in dispute.
Won - The district has won the dispute.
If you have any questions regarding a Dispute Status, please contact Support.
Return Date
After a refund is made, the details include this Return Date and the Offset Transaction Reference Number.
Settlement Date
The date on which the payment is finalized and eligible to be deposited.
Deposit Date
The date when the payment platform deposits the money into the bank accounts.
Deposit Request Date
The date when Campus requested payments to be disbursed to the bank accounts.
Deposit Request Reference
The ID the payment platform sends to Campus when Campus requests a disbursement.
Fund ID
The unique identifier for the Fund Account. Fund ID is unique and the same Fund ID cannot be used at different schools.
Fund Description
A description of the Fund Account.
Bank Account
The bank account associated with the Fund ID.
Deposit Amount
The specific amount of money that constitutes the deposit.
Tip: Turn the Show Full Value toggle to ON to see the Deposit Amount go to 5 decimal places.
Create and Manage Templates
Templates allow you to save a custom view of the Payments Reporter and use it again later. You can choose specific columns to display, group them in a useful way, filter data in each column, and save your selections as a template. You can create multiple templates as well as update or delete templates at any time.
Create a New Template
If there are existing templates, click the Reset button before you begin.
Use the Select Columns tool to choose the column(s) you want to display then drag the column(s) you want to group together to the area above the table.
Click the Show Filters button and enter any filter data you want to use. (Optional)
Further narrow down report results by using the filters in each column. (Optional)
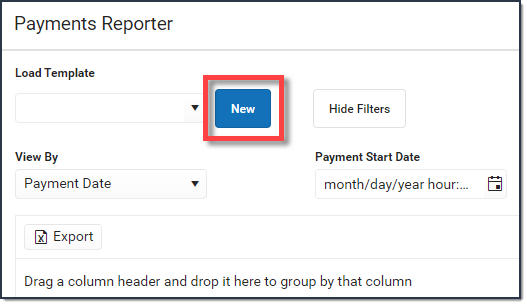
Click the New button (next to the Load Template dropdown list).
Result: The Create Template panel displays.
Enter the Template Name then click Save.
Result: The new template displays in the Load Template dropdown list.
Delete a Template
To delete a template, select the template you want to delete in the Load Template dropdown list then click the Delete button.
Update a Template
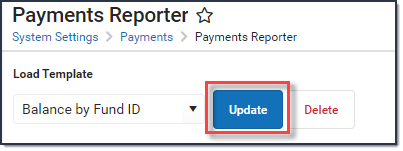
To update a template, select the template you want to update in the Load Template dropdown list. Make any necessary changes then click the Update button to save your changes.
Identify Deposit Balance by Fund ID
The report displays differently based on the grouping options you select. Select the column(s) you want to group together and drag the column(s) to the area above the table. To identify the balance by Fund ID, group columns in the following order:
Bank Account
Deposit Date
Fund ID
Export the Report
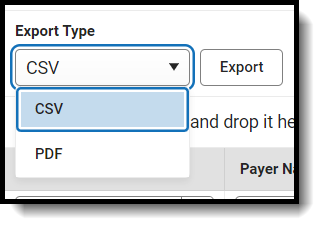
You can export the report to CSV or PDF format. To export the report, select the format you want from the Export Type dropdown list then click the Export button.
If you do not limit the report results using the Payment Start Date and/or the Payment End Date, the export will be limited to the last 60 days.
Video
Pick List
The Pick List tool displays the items that were purchased and for whom. Items that have been picked up can be checked off using the Pick List.
Documentation
Tool Search: Pick List
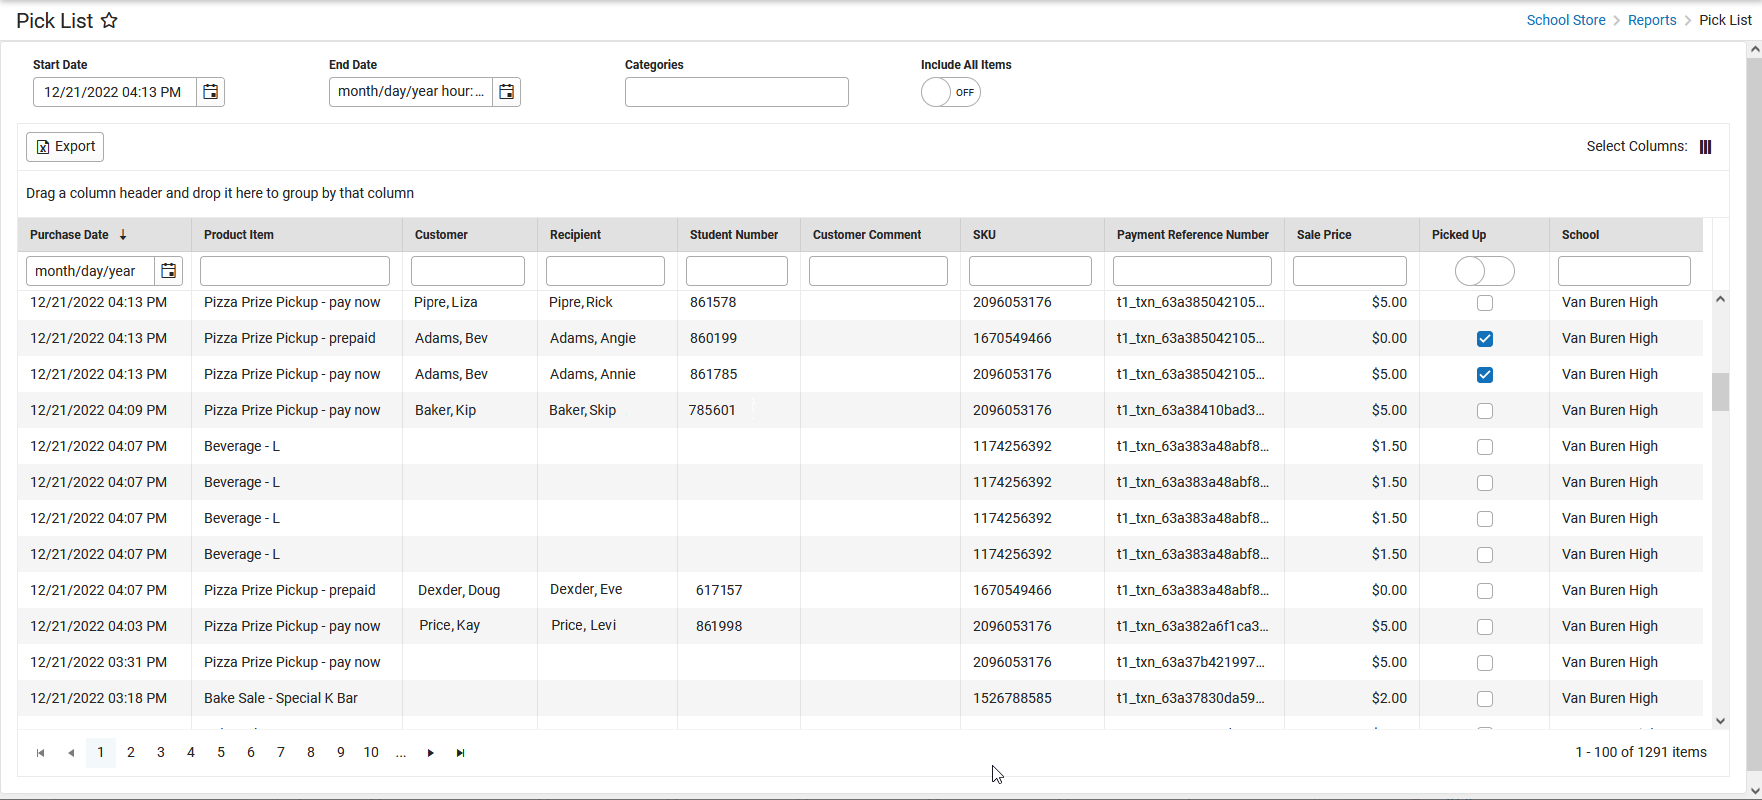
The Pick List report provides a comprehensive list of purchased items. Use the Start Date and End Date fields to narrow report results.
When an item is picked up, mark the checkbox in the Picked Up column. The next time you open the report, Campus will automatically hide this item.
To quickly mark all items as picked up, slide the toggle in the Picked Up column. Turning the toggle off clears the Picked Up checkboxes.
To display items that need to be picked up AND items that were already picked up, slide the Include All Items toggle to ON.
Display additional columns by clicking the Select Columns icon. Choose from:
Email (email address provided by customer).
Source (ESS, Parent Portal, Student Portal, Public Store or Campus Payments App).
Event Name (purchases recorded at an event using Campus Mobile Payments).
If a purchase is returned using the Payments Reporter, the returned item does NOT appear in the Pick List report.
The Sale Price column is only available if your administrator has given you tool rights to see payment amounts.
The Pick List report provides a comprehensive list of purchased items that tracks whether items have been picked up.
Sales
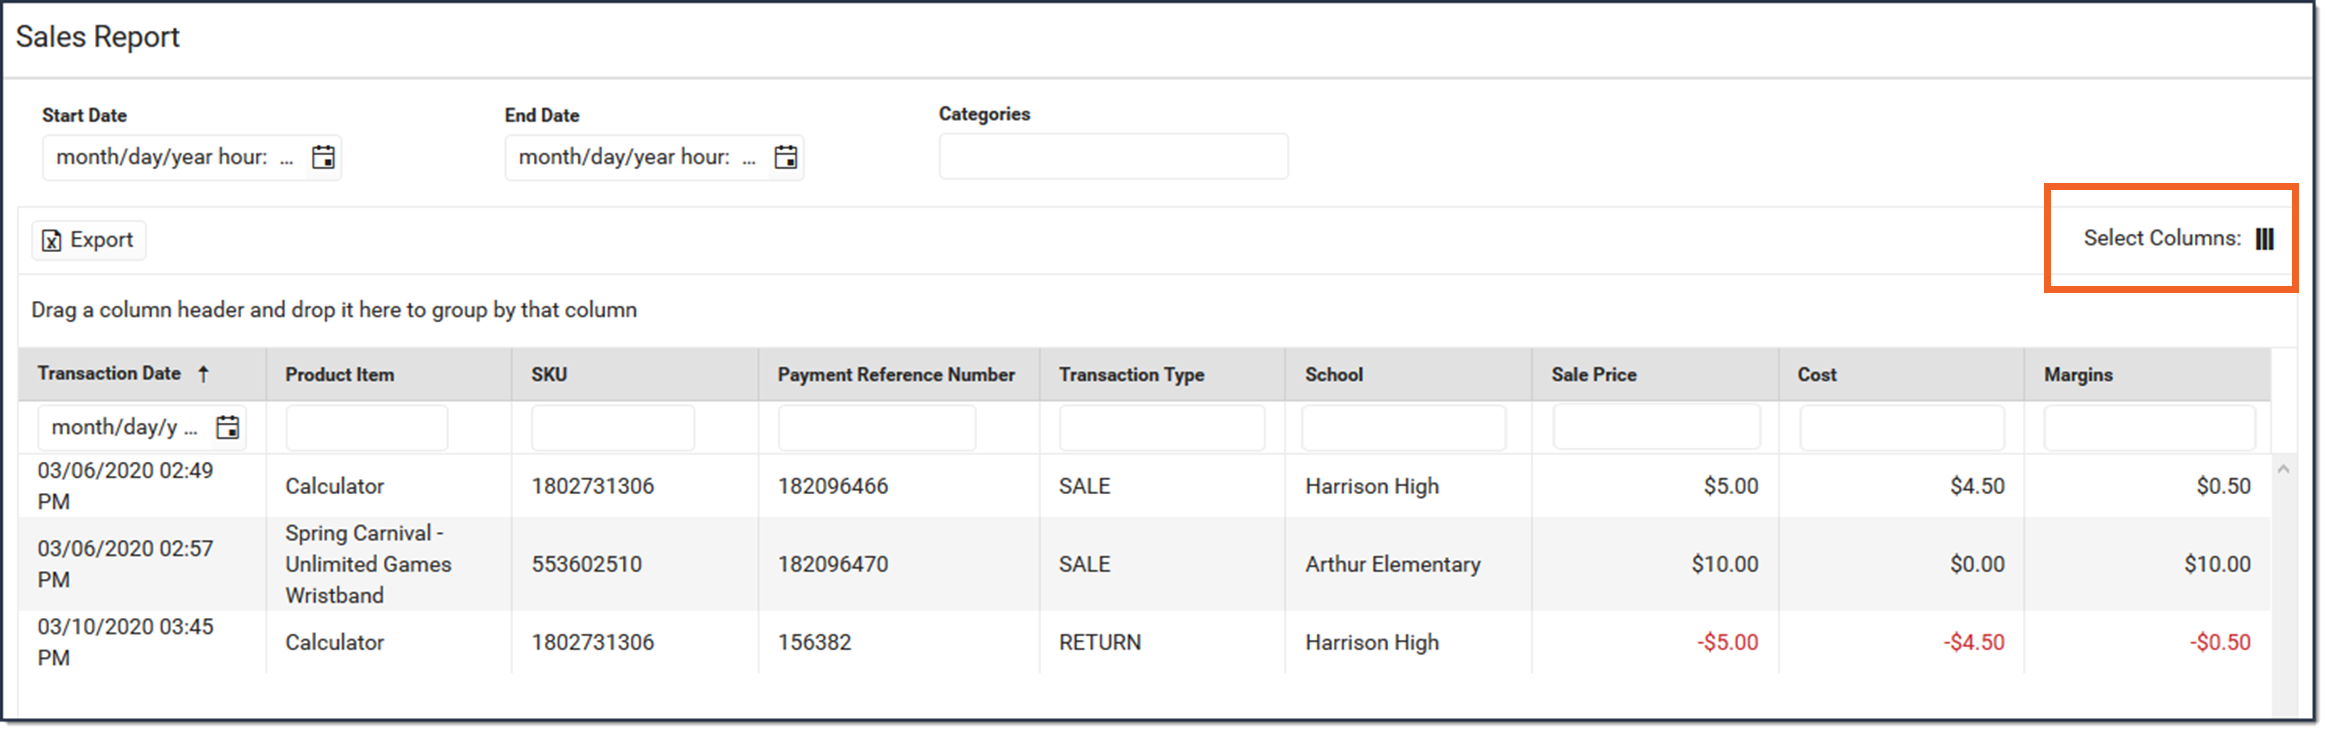
The Sales report shows how many of each item has been sold and provides the margins for each item.
Documentation
Tool Search: Sales
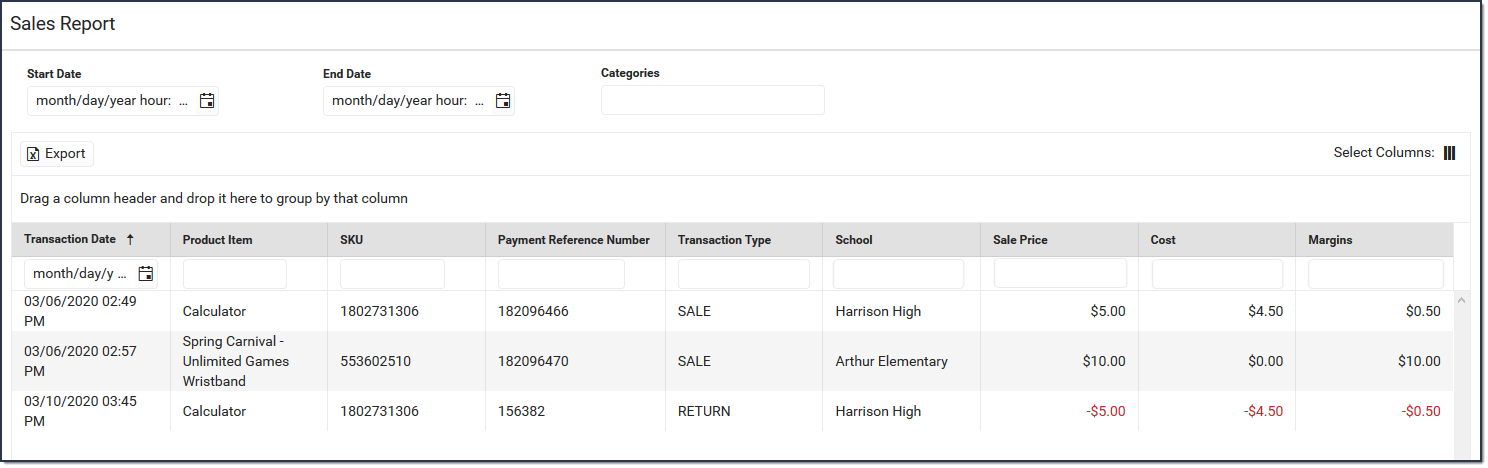
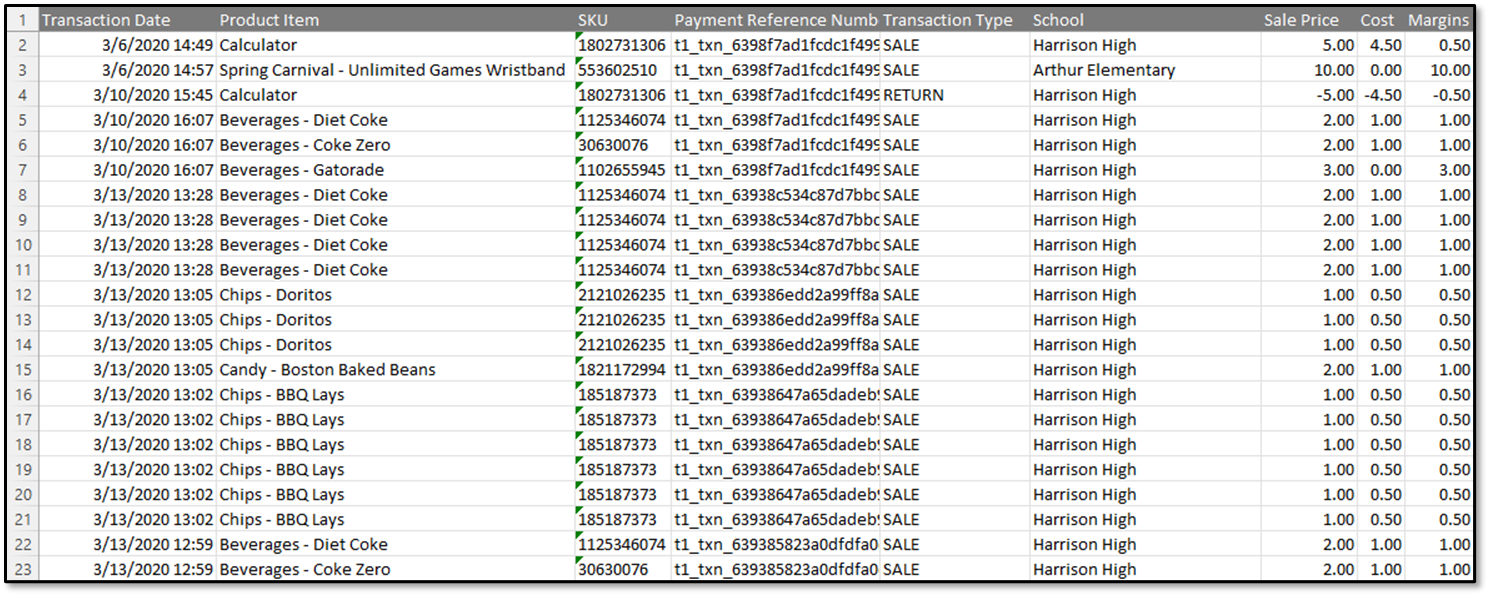
The Sales Report provides a comprehensive record of sales activity across all of your district's stores. You can limit report results to a specific school by selecting the school in the Campus toolbar. Report results can also be limited to specific start and end dates.
The Sales report can be exported to a Microsoft Excel file.
Additional Columns
When you launch the Sales report tool, the default columns appear. These columns can be hidden, or you can display additional columns.
Click the Select Columns icon. The list of available columns displays.
Hide columns by unmarking the checkboxes.
Display additional columns by marking the checkboxes. The additional columns are Device Name and Event Name. Information for these two fields will display if purchases and payments were recorded using the Campus Mobile Payments app.
Click Apply to save the changes. The columns that were selected are displayed.
When you close the report and reopen it, the default columns reappear. Any columns selected previously are not saved.
Video
The School Store Sales report provides a list of sales activity for all school stores within the district.
Inventory on Hand
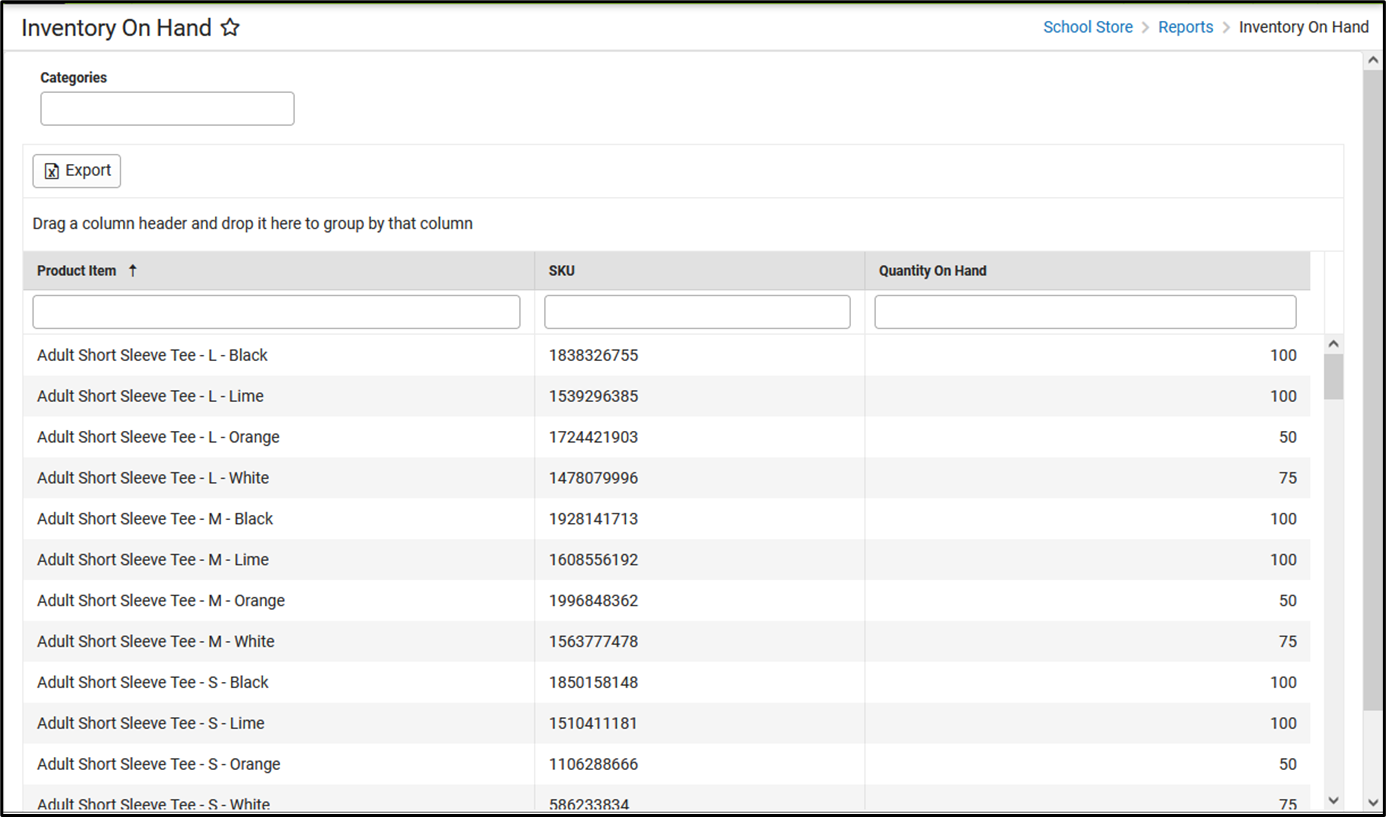
The Inventory on Hand report is used to see how many of each item are available and whether a product needs to be repurchased and stocked.
Documentation
Tool Search: Inventory on Hand
The Inventory On Hand Report provides a complete list of items you have available for sale at this point in time. The report includes the Product Name, SKU, and Quantity on Hand.
This report includes only products with the Inventory Tracking option selected.
To create the report, use the Field Descriptions found in this article to select the report options then click the Generate button.
Example Orders Report Editor
Report Editor Field Descriptions
Field
Descriptions
Setup
Report Type
Detail is the only option available at this time.
Purchase Start Date
The first date on which you want to report. The report returns purchases made on this date through the entered End Date. This is a required field.
Purchase End Date
The last date on which you want to report. The report returns purchases made on the Start Date through the End Date entered here.
Product Category
The category defined in the School Store Administration. This is a required field. Schools using this category automatically display in the Schools section of the editor.
If you have removed a school from a Category, you will not be able to use the Orders Report for purchases made for that combination of Category and School.
Product Item(s)
The item defined in the School Store Inventory. Only items assigned to the selected Category display. This is a required field.
Schools
Select
All checkboxes are selected by default. Clear the checkbox next to the school(s) you want to exclude from the report.
School Ordered From
The school from which the purchase was made. This is not necessarily the school where a student is enrolled.
Room Type
Select one of the following options. This option does NOT filter the data. It only indicates which room data displays on the report.
Homeroom
Period with Lunch Minutes
If you select the Period with Lunch Minutes option, the report will includethe room the student is in during the selected period. The period reports as of the day you print the report. If the student's location will change based on the day, the report must be printed ON the serving day to get the correct period information.
Period
Select the Period to include in the report. This option is only available if you selected Period in the Room Type field.
Report Options
Include
POS Flags - When this checkbox is marked, an additional column called POS Flag is included in the report. This column displays the User Warning and the Flag name that appear on the Point of Sale terminal. If the User Warning is not entered, the column reports the Flag name and null; e.g., "User Warning on Student Record (POS display flag);null." This option only displays if you have tool rights to the Display POS Flag tool rights under the School Store Order report.
Format Options
Group By
This option allows you to to arrange the data in the report by one of the following options. Orders within each option are grouped by student name.
School
School/Room Number
School/Item
Customer
Format
Option
Description
CSV
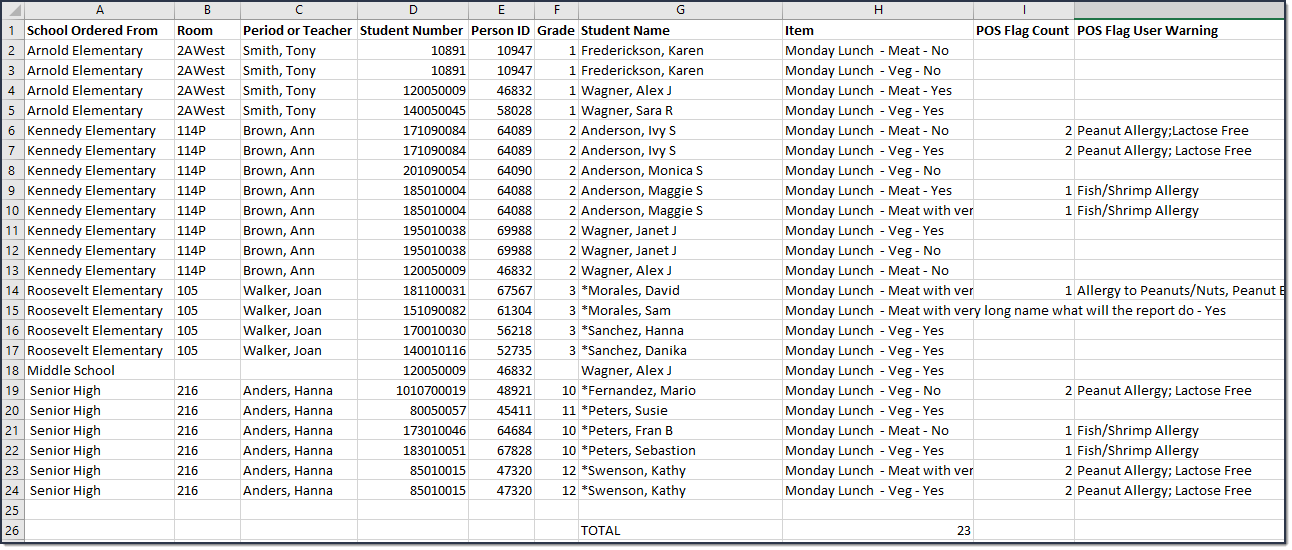
The CSV format and includes the information found in the Report Layout section.
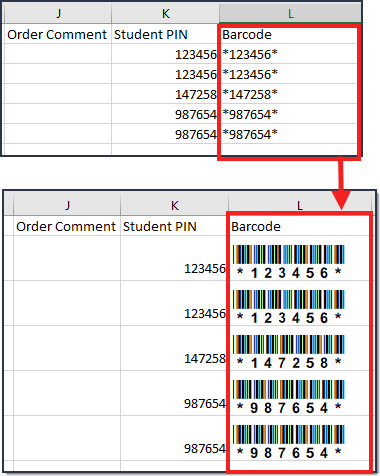
After the you generate the Detail report, you can create a barcode list that can be read with a 1D or 2D barcode scanner.
Labels-Large
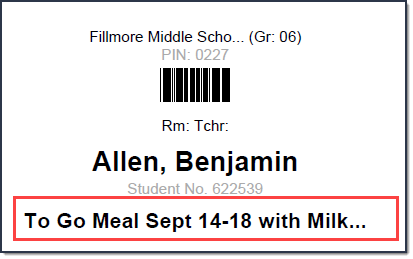
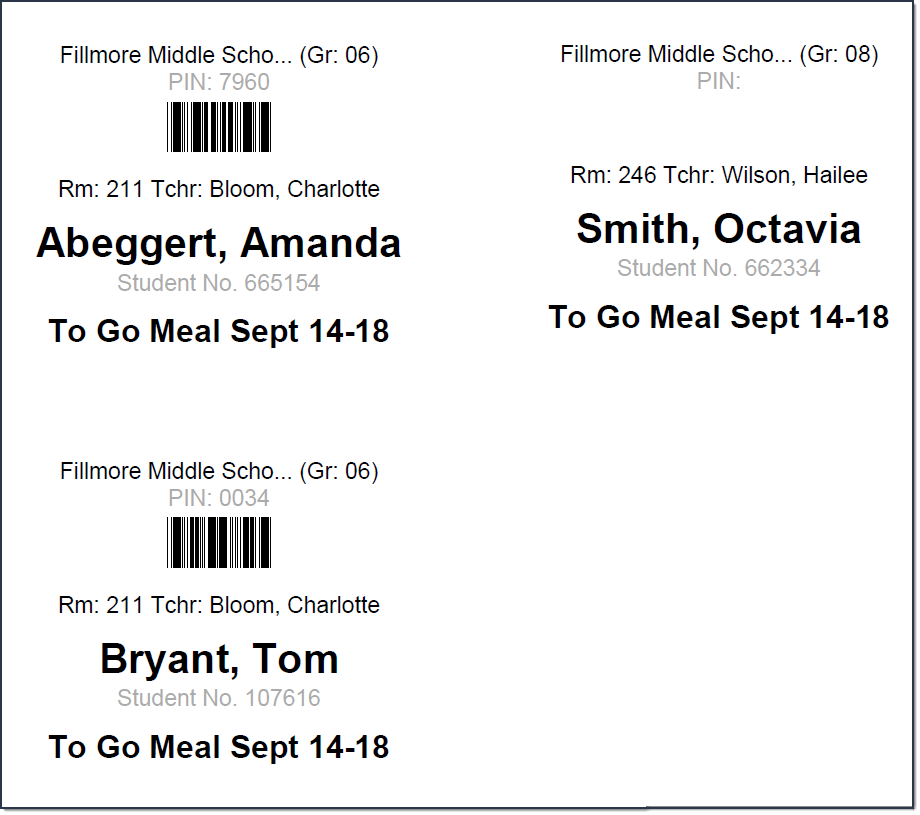
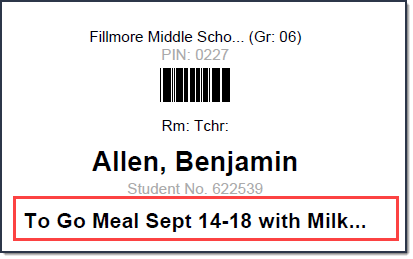
The Labels - Large report displays in PDF format. You can use this format to create labels for boxed/bagged food. This report is designed to be printed on Avery 8395 Adhesive Name Badges. Eight labels print on each page.
Tip For the order to print on a label without being cut short, limit the Product Name and attributes in the School Store to 31 characters. If this information is too long to fit on one line, the information is truncated and followed by an ellipsis.
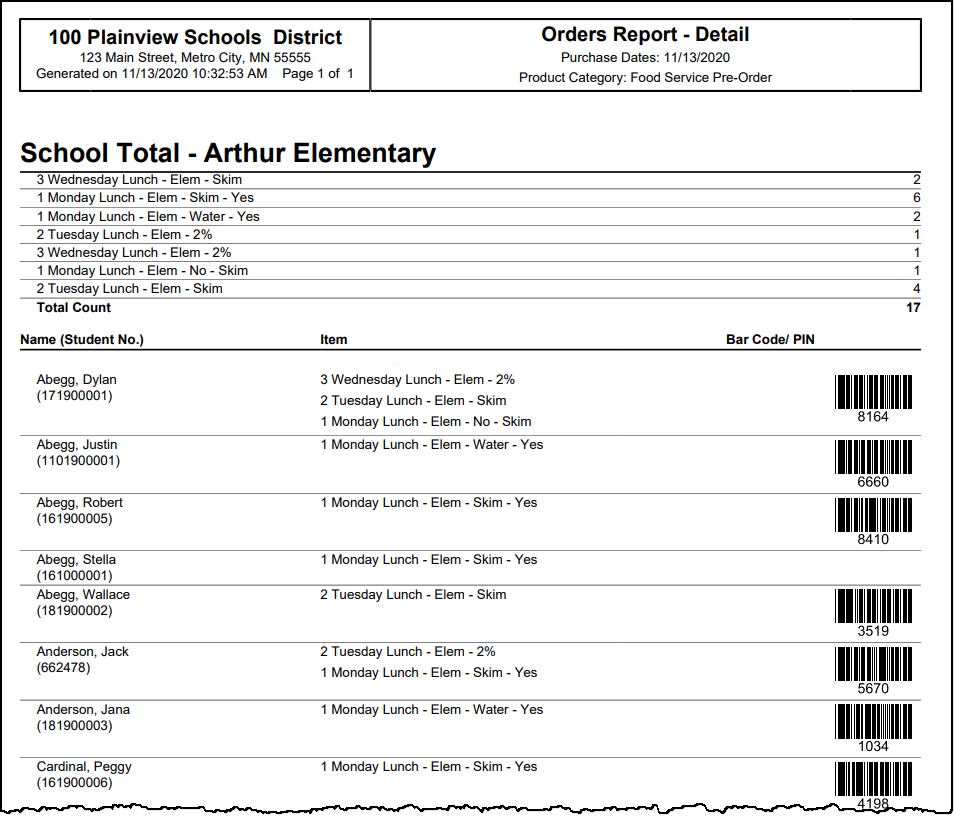
PDF
The PDF version of the report includes order information grouped according to your selection in the Group By field. If your district uses Point of Sale, the PDF report also includes the student's PIN and barcode if there is an account PIN on the student's record.
Example Detail Report
Example CSV Report
Example Labels - Large Report
Note The Barcode is blank if the student does not have a PIN or if Point of Sale is not enabled. In the following example, the student on the right does not have a PIN.
Example Labels
Example PDF Report
Example PDF Report
Report Layout
Column
Description
School Ordered From
The school from which the pre-order was placed.
If the purchase
was made at an event,
the purchase was recorded using the Campus Mobile Payments app,
AND a student number was entered for the item purchased,
then the school assigned to the event displays in the report.
Room
The student's homeroom number.
Period or Teacher
The student's homeroom teacher or the period with lunch minutes.
Student Number
The unique student number assigned and maintained by the school district.
Person ID
The Campus assigned person ID for the student.
Grade
The grade in which the student is currently enrolled.
Student Name
The student's full name.
Item
The specific meal or Ala carte item that was purchased. For the order to print on a label without being cut short, limit the Product Name and attributes in the School Store to 31 characters. If this information is too long to fit on one line, the information is truncated and followed by an ellipsis.
POS Flag Count
The report only includes this column if the POS Flag checkbox is selected on the report editor. This column displays the total number of POS flags active on the day the report is printed.
POS Flag User Warning
The report only includes this column if the POS Flag checkbox is selected on the report editor. This column displays the User Warnings; e.g., "No tree nuts; severe dairy allergy", that are marked as a POS Flag and are also active on the day the report is printed. Multiple user warnings are combined into one string and separated by a semi-colon (;). If there is not a User Warning, the column does not report.
Order Comment
Any information the customer added to their purchase before they checked out.
Customer Name
The name of the person who made the purchase. If the payment was recorded using the Campus Mobile Payments app, this is the name from the credit card when it was swiped.
Student PIN
The student's Point of Sale Account PIN. If Point of Sale is not enabled, this column is blank.
Barcode
Currently, the CSV file displays the student's Point of Sale Account PIN in this column. You can use this column to create a scannable barcode list in the CSV file. If Point of Sale is not enabled, the Barcode is blank.
Purchase Start Date
The date selected on the report editor. The report returns purchases made on this date through the Purchase End Date entered on the report editor.
Purchase End Date
The date selected on the report editor. The last date on which purchases were made. The report returns purchases made on the Purchase Start Date through the Purchase End Date.
Product Category
The Product Category selected on the report editor. The Category is defined in the School Store Inventory.
Total
Item - The total number of meals and ala carte items.
Create a Barcode List
After the you generate the CSV Detail report, you can create a barcode list that can be read with a 1D or 2D barcode scanner. To create the barcode list, select the Barcode column and change the font to the standard Code 39 font. If you do not have this font installed, you will first need to download and install the font from a trusted source. You must also keep the * (asterisk) before and after the PIN number and make sure the barcode is not bold.
Example Barcodes
Video
The Orders Report in Campus School Store can be used to create a report or file extract of orders placed for particular items.



 Example of Fund Accounts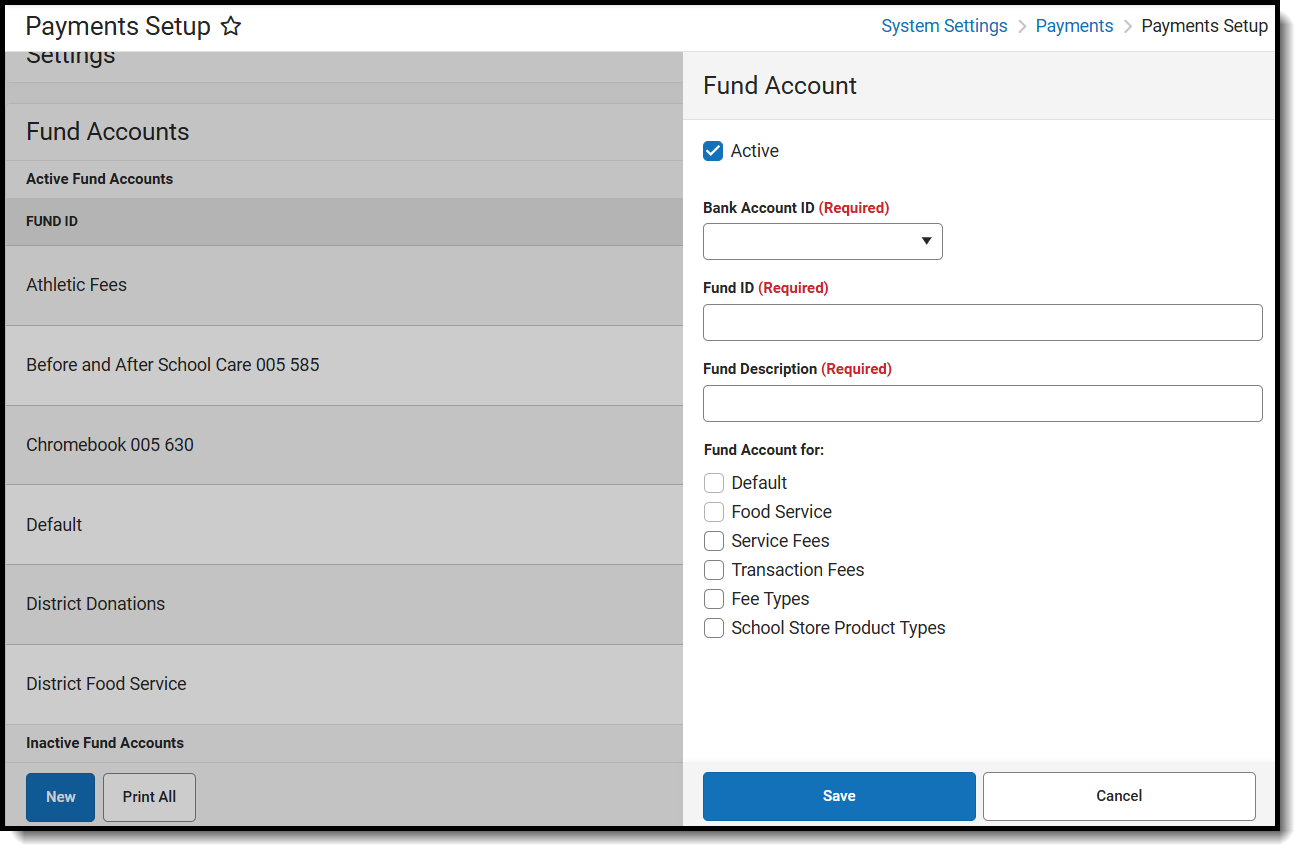


 Example Public Store Settings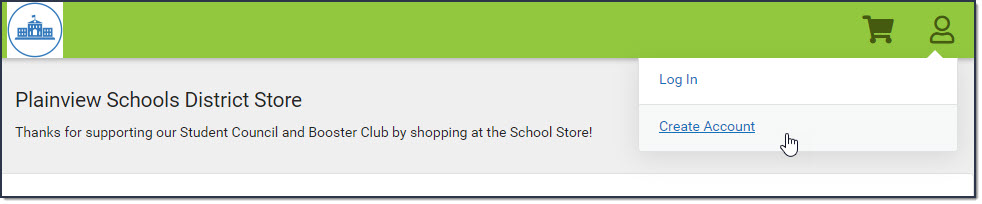


 The Student Number (Mobile) field is used to track information about purchases for students. For example, if selling prom tickets, you may want to enter the student number at the time of purchase to track the students who are attending.
When a row is added in Step 2 Product Items, the Student Number (Mobile) column displays three options:
The Student Number (Mobile) field is used to track information about purchases for students. For example, if selling prom tickets, you may want to enter the student number at the time of purchase to track the students who are attending.
When a row is added in Step 2 Product Items, the Student Number (Mobile) column displays three options:

 button and mark the checkbox next to the columns you want to display. Clear the checkbox next to columns you want to hide.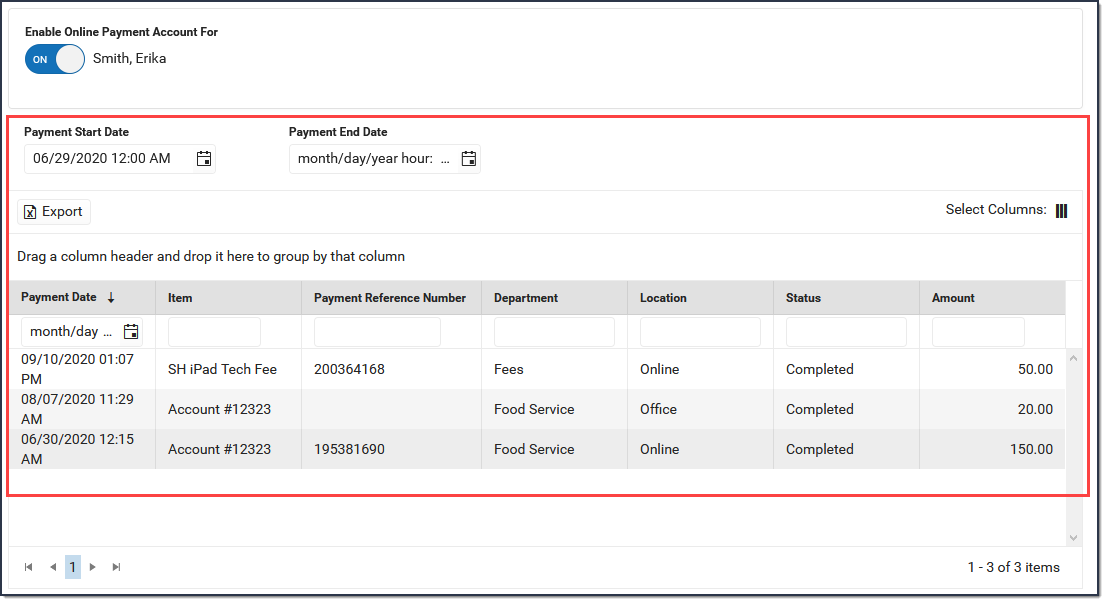


 Result: The Create Template panel displays.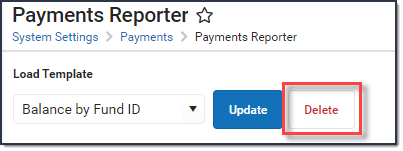
 The Orders Report does NOT include