Classic View: System Administration > Payments > Payment Setup
Campus is changing payment vendors. This article provides the steps you need to migrate your bank accounts from the current payment vendor to the new one.
You will need the full bank account number for each bank account you are migrating. If you cannot edit a bank account in the migration tool, that means your district already created the bank account during the onboarding process.
What to Expect After Migrating to the New Payment Platform
For a few weeks, you may see updates to transactions processed through Vanco and updates for transactions processed through the new payment platform in the Payments Reporter. The Payment Reference Number for transactions from the new payment platform begins with p1_txn. To exclude Vanco transactions and only see transactions from the new payment platform, use p1_txn in the Payment Reference Number column to filter results in the Payments Reporter.
Step 1: Getting Started
Classic View: System Administration > Payments > Payment Setup > Bank Accounts
Before you begin, select All Schools and print a list of all bank accounts currently set up in Campus.
- Use this list to verify the bank name, routing number, and the last four digits of the bank accounts set up in Campus.
- All active bank accounts on the report will be migrated. If there is a bank that you do not want to migrate to the new payment platform, inactivate the bank account.
Correcting Bank Account Conflicts
If a bank account is missing or something is wrong with a bank account, this indicates there is conflicting information between the old payment platform and Campus. The conflict must be corrected before you can migrate your bank accounts. Complete the following steps to correct the conflict.
- Create the correct bank in Campus: System Administration > Payments Setup > Bank Accounts > NEW.
- Select the correct bank in the Vendor Bank Account dropdown list.
- Edit all Fund Accounts that are assigned to the wrong bank and reassign them to the new bank account.
- Inactivate the incorrect bank account.
Step 2: Update Vendor Information
Classic View: System Administration > Payments > Payment Setup > Vendor Information
- Go to Vendor Information and click Edit.
Result
The Vendor Information Panel displays.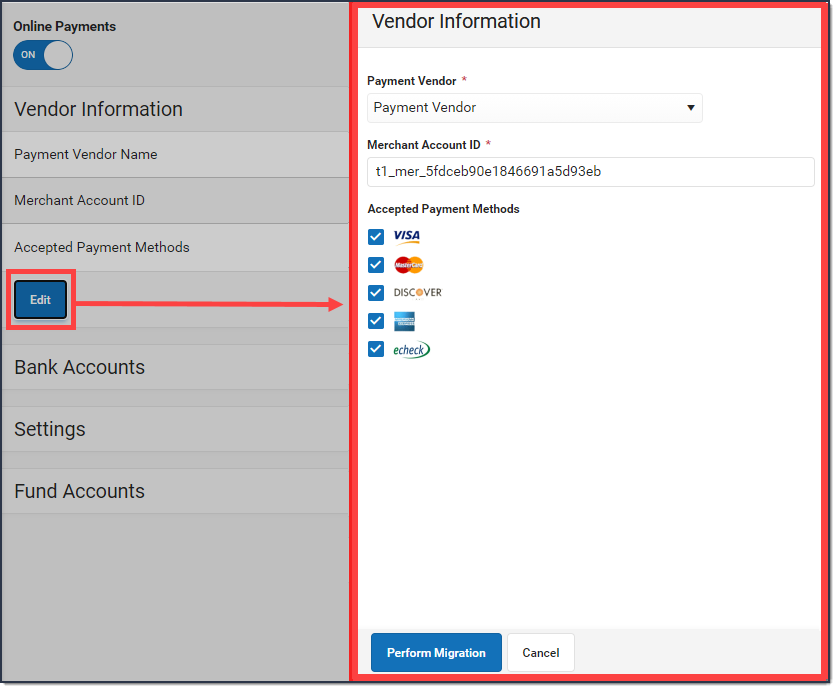
- Select Infinite Campus Payments in the Payment Vendor field.
- Enter your new Merchant Account ID that you copied from your support case. Make sure there are no spaces before or after the ID.
- Click Perform Migration.
Result
The panel Preview Migrating Banks displays. Continue to Step 3: Migrate Banks.

Step 3: Migrate Banks
Classic View: System Administration > Payments > Payment Setup > Vendor Information
All active bank accounts display on the Preview Migrating Banks panel. You may notice a different number of bank accounts compared to your bank account list because Campus is only validating bank accounts and not bank account IDs.
If you see a bank account that you do not want to migrate, please cancel and inactivate the bank account before you complete the migration process. If you can't edit a bank account, this means your district already created this bank account during the onboarding process with the new payment vendor. The names of the banks that are already set up with the current payment vendor appear along with their routing number and the last four digits of the account number.
Once the bank account migration process is complete, it cannot be undone.
 Example Preview Migrating Banks Screen
- Enter the complete bank account number in the Bank Account Number field.If you can't edit a bank account, this means your district already created this bank account during the onboarding process.
- Correct any Invalid Account errors by using the process from Step 1: Getting Started. You must correct all errors and enter all Bank Account Numbers before you can continue.
- Click Complete Migration.
Result
A confirmation message displays. - Click OK.
Result
Campus migrates your banks to the new payment platform. During the migration, Campus creates two Fund Accounts: FEE and Transaction Fee. The new Fund Accounts are assigned to the same bank account that is assigned to the district's Default Fund Account. Verify the bank account assigned to these Fund Accounts and change the bank account if necessary. Be sure to select "All Schools" before editing these Fund Accounts.Campus validates bank accounts after the first deposit is made to it. If a bank account is invalid, a message appears in the Process Alerts (provided you have rights to the bank accounts and All Schools) and it will be labeled accordingly.
