Tool Search: Batch Program Assignment Wizard
The Batch Program Assignment Wizard adds, deletes, or modifies assignment of the selected flag, graduation program, academic program, program or program with sessions on the selected students’ Flags, Programs (General), or Programs (Academic Planning) tools. It also manages course assignments, tracks graduation and academic progress, locks or unlocks plans, posts diplomas, and updates Course Requests.
See the Academic and Graduation Programs (State Edition) article for information specific to State Edition users that manage those programs at the State level and push them down to the District level.
 Batch Program Assignment Wizard
See the Batch Program Assignment Wizard Tool Rights article for information about rights needed to use this tool.
General Information
- Select a school and calendar from the Context Switcher before selecting a program type to batch assign. Depending on the selected program type, users may see programs that can be assigned district-wide, programs that apply only to their school, and inactive programs (red text).
- A student can have multiple assignments of any program type other than graduation. Students are allowed only one graduation program assignment. If the student already has a graduation program assigned to them, it is overwritten when a new assignment is made.
- Some programs are created with requirements or conditions students must meet in order to be assigned to them. For example, students assigned to a graduation program must have the appropriate cohort start and end year if that information is associated with the selected graduation program.
Batch Assignment By Type
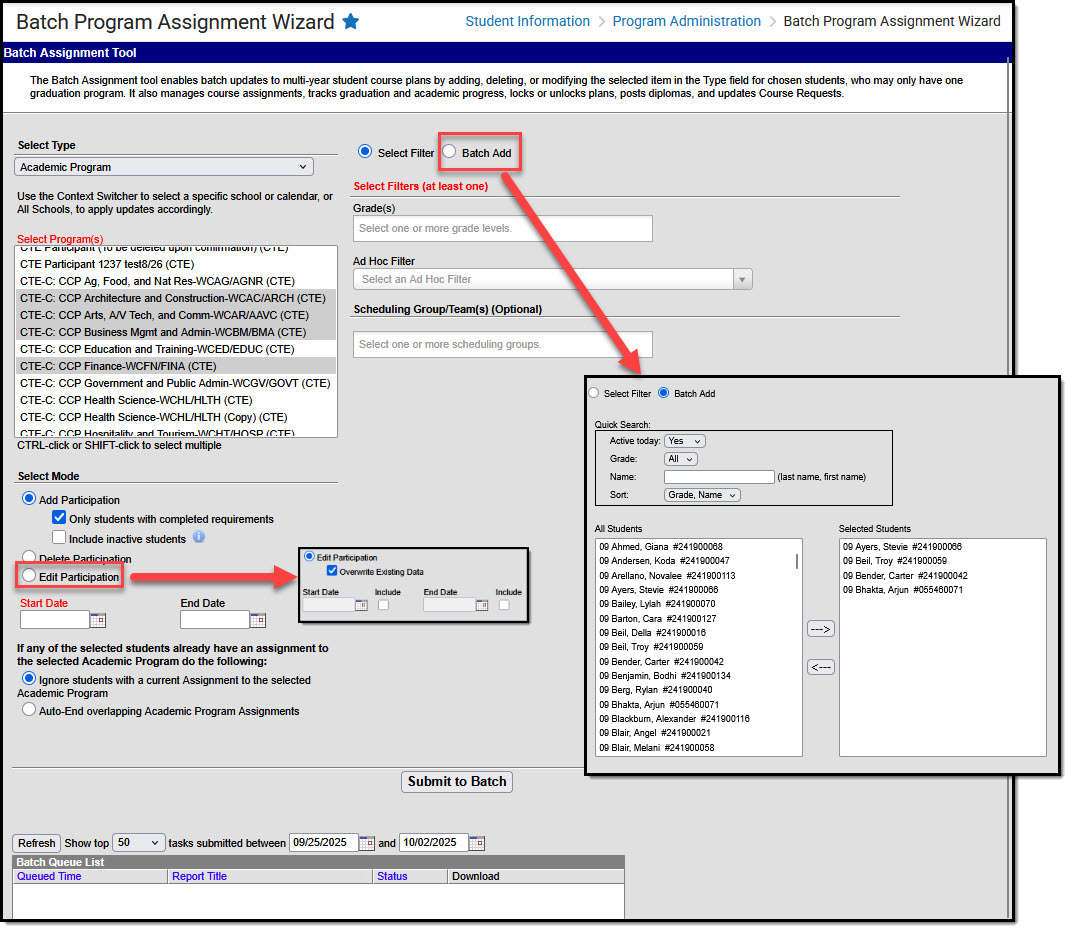
Academic Program
Academic Programs define a course of study. The Progress tool displays a selected student's progress toward meeting requirements for completing the program(s) to which they are assigned, such as course requirements, assessments, and certificates. Not every state uses Academic Programs, and those that do may use them differently.
 Batch Program Assignment Wizard - Academic Program
- From the Context Switcher, select either one school or All Schools.
- Select Type: Academic Program
- Select Programs: select one or more programs to update
- Choose Students to update (Select Filter OR Batch Add)
- Select Filter: Select at least one filter type. (Example: Selecting Grade(s)=09 and Ad Hoc Filter=Honor Roll Students would return only 9th grade students included in the Honor Roll Students filter).
- Batch Add: use quick search or manual select options to locate and select students to which the update will apply.
- Select Mode (choose one)
- Add Participation
- Only students with completed requirements: select to align program to students who aren't currently assigned to it but have already completed the program's requirements
- Include inactive students: appears when "Only students with completed requirements" is selected, allows inclusion of students who completed requirements but are not actively enrolled
- Delete Participation: remove participation records for selected program
- Note for CTE Programs: CTE Program Participation Records are only deleted when the end date is NULL or occurs in the future.
- Edit Participation: choose to edit participation by entering a Start and/or End Date. If you wish to override or remove existing dates, select Override Existing Data, indicate which dates to include, and either enter dates or leave the fields blank as appropriate.
- Add Participation
- Start/End End Date: you must enter a date if the field is red (e.g. Start Date on Add Participation), otherwise enter dates or leave dates blank as appropriate
- Note for CTE Programs: CTE Program Participation Records are only deleted when the end date is NULL or occurs in the future.
- Select Ignore to skip students already assigned to the program(s) or select Auto-End to end date existing overlapping assignments.
- Submit to Batch. Select options for when the batch job should run (e.g. off-peak hours for large amounts of data), then select OK.
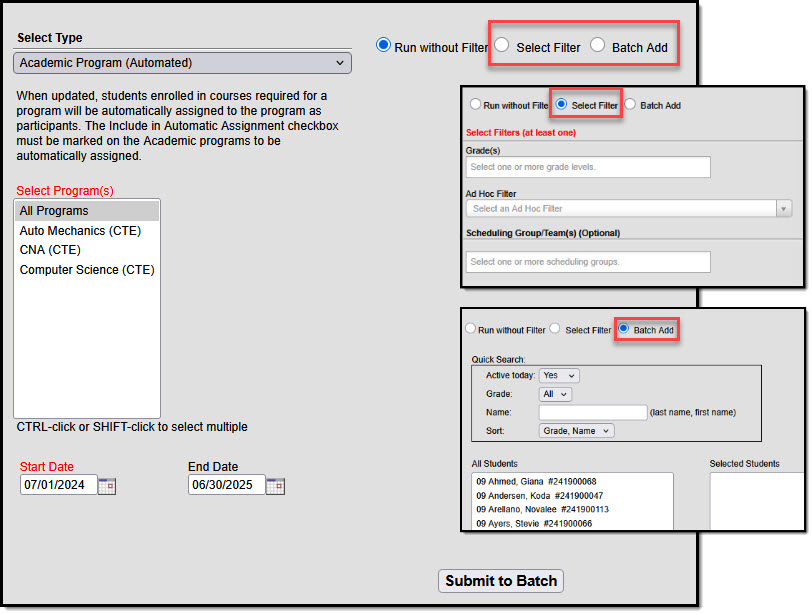
Academic Program (Automated)
Academic Programs that have been marked Include in Automatic Assignment appear in the list of programs that can be selected for automated assignment. Some schools follow this process at the beginning of every year, using first and last instructional day dates, expecting that students may be assigned to one or more new programs annually based on courses they take.
 Batch Program Assignment - Academic Program (Automated)
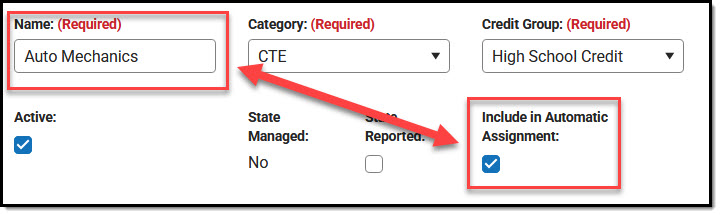 Program Marked for Automatic Assignment
- Select Type: Academic Program (Automated)
- Select Programs: select one or more programs to update
- Choose Students to update (Select Filter OR Batch Add)
- Run without Filter: This selection runs for all students, is resource-intensive, and should be run during off-peak hours.
- Select Filter: Select at least one filter type. (Example: Selecting Grade(s)=09 and Ad Hoc Filter=Honor Roll Students would return only 9th grade students included in the Honor Roll Students filter).
- Batch Add: use quick search or manual select options to locate and select students to which the update will apply.
- Enter a Start Date and, optionally, an End Date.
- Submit to Batch: Select options for when the batch job should run (e.g. off-peak hours for large amounts of data), then select OK.
- Students enrolled in courses required for a program will be assigned to the program as participants. Assignments are not duplicated.
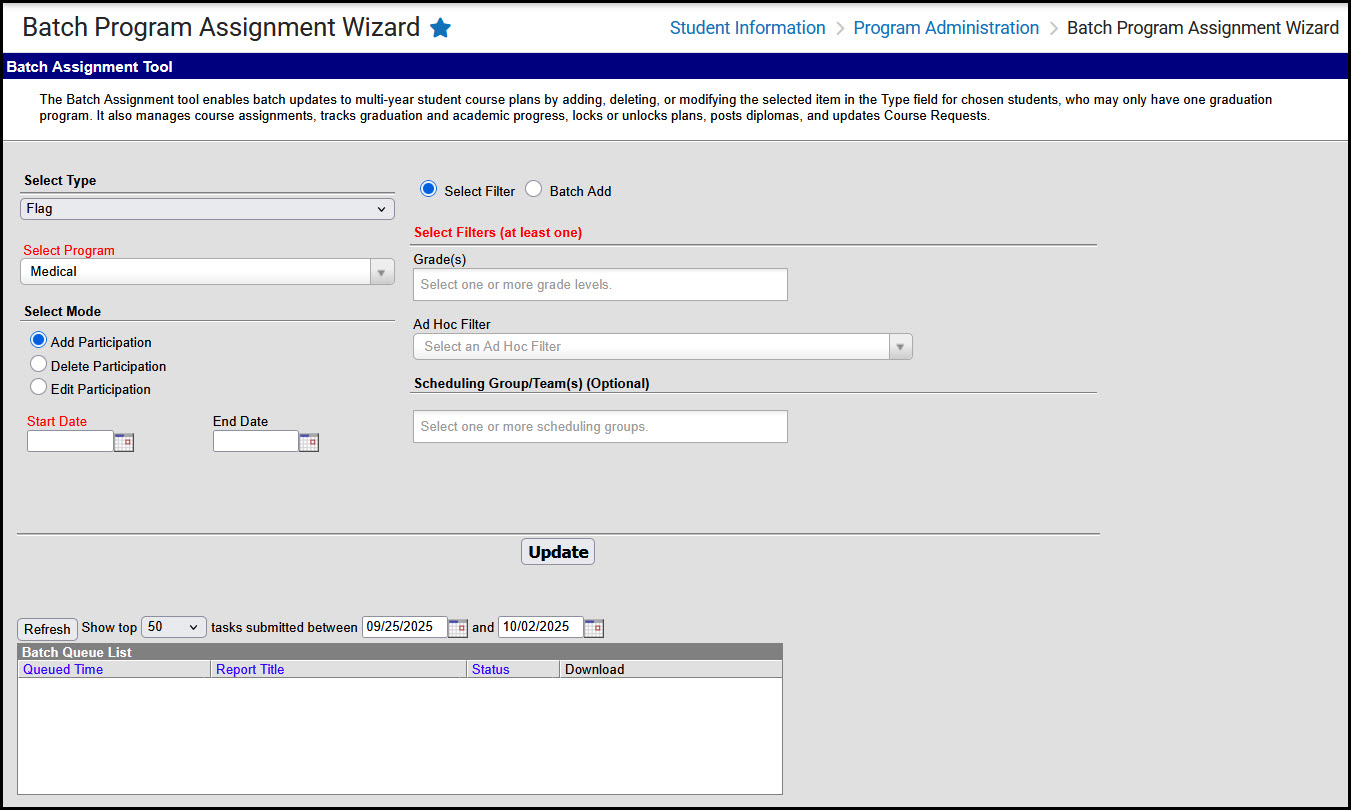
Flag
Flags are alerts that schools can create and assign to students to indicate things such as participation in a program, or if a student has a contact or medical alert. Start and End Dates set the date range during which the flag's icon, if it has one, appears next to the student's name in Campus.
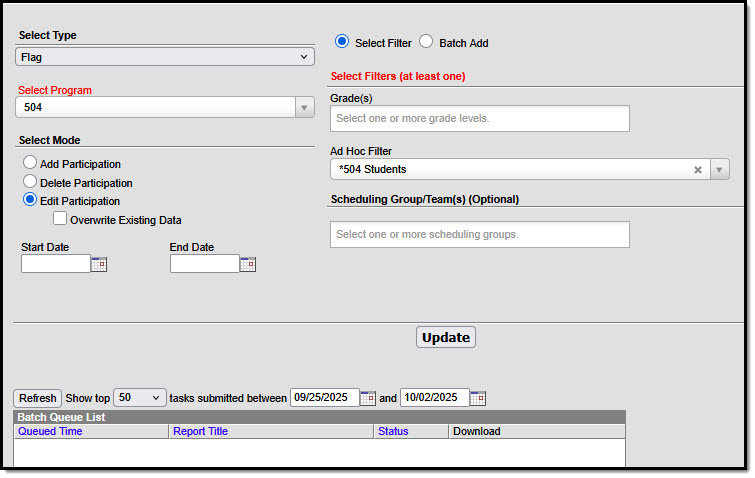 Batch Program Assignment - Flag
- Select Type: Flag
- Select Program: choose one program from the list
- Choose Students to update (Select Filter OR Batch Add)
- Select Filter: Select at least one filter type. (Example: Selecting Grade(s)=09 and Ad Hoc Filter=Honor Roll Students would return only 9th grade students included in the Honor Roll Students filter).
- Batch Add: use quick search or manual select options to locate and select students to which the update will apply.
- Select Mode (choose one):
- Add Participation: add flag to selected students that do not already have one
- Delete Participation: remove flag from selected students
- Edit Participation: choose to edit participation by entering a Start and/or End Date. If you wish to override or remove existing dates, select Override Existing Data, indicate which dates to include, and either enter dates or leave the fields blank as appropriate.
- Select Update to apply selections, then select OK to close the confirmation message that appears.
Graduation
Graduation Programs define all the academic requirements necessary for a student to graduate, such as courses to be taken and GPA to be earned.
- A student may only be assigned to one graduation program at a time.
- Changing the student's graduation program doesn't change recorded data regarding things such as classes taken and grades earned.
- The student's Progress toward meeting graduation standards could change based on the requirements defined for whatever graduation program they're currently assigned to.
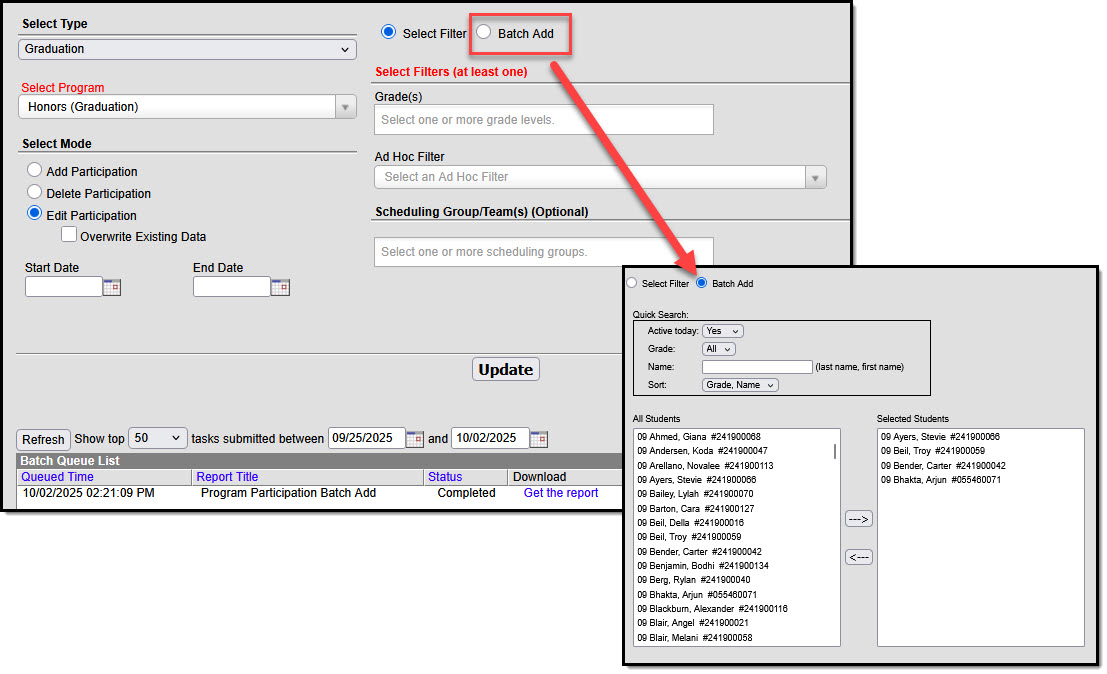 Batch Program Assignment - Graduation
- Select Type: Graduation
- Select Program students will be assigned to
- Choose Students to update (Select Filter OR Batch Add)
- Select Filter: Select at least one filter type. (Example: Selecting Grade(s)=09 and Ad Hoc Filter=Honor Roll Students would return only 9th grade students included in the Honor Roll Students filter).
- Batch Add: use quick search or manual select options to locate and select students to which the update will apply.
- Select Mode (choose one):
- Add Participation: add program for selected students
- Delete Participation: remove program for selected students
- Edit Participation: choose to edit participation by entering a Start and/or End Date. If you wish to override or remove existing dates, select Override Existing Data, indicate which dates to include, and either enter dates or leave the fields blank as appropriate.
- Select Update to apply selections, then select OK to close the confirmation message that appears.
Program
Programs can be used to indicate student participation in whatever a district defines as a program. Examples include after school clubs, intramural sports, or community education. When you select a program a summary of program information appears just beneath the Update button.
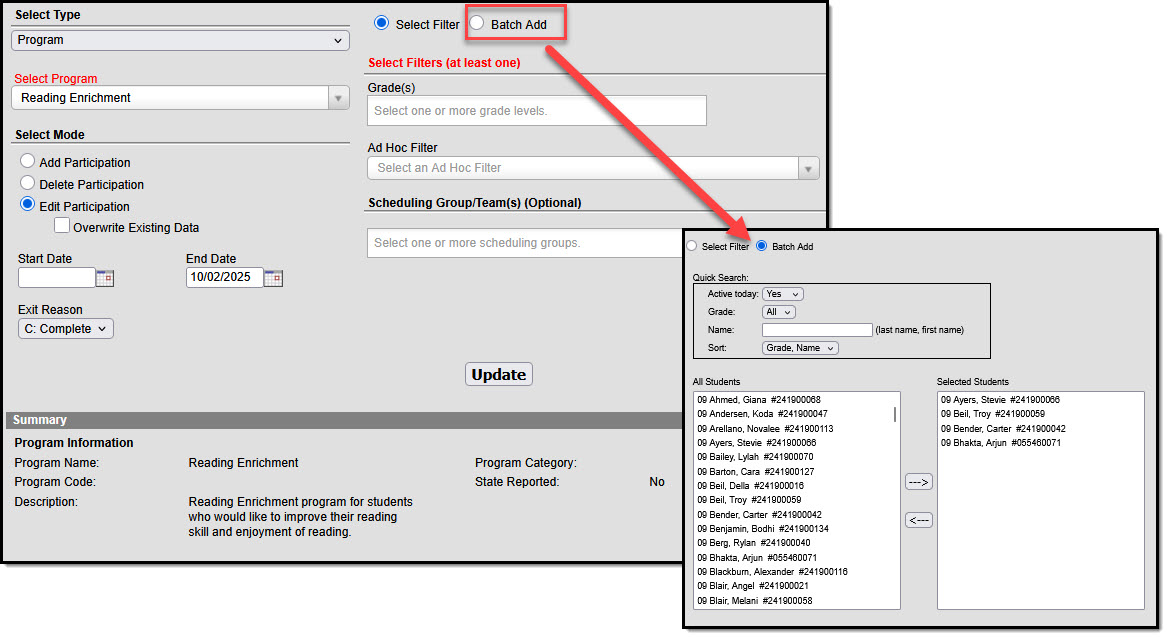 Batch Program Assignment - Program
- Select Type: Program
- Select Program students will be assigned to
- Choose Students to update (Select Filter OR Batch Add)
- Select Filter: Select at least one filter type. (Example: Selecting Grade(s)=09 and Ad Hoc Filter=Honor Roll Students would return only 9th grade students included in the Honor Roll Students filter).
- Batch Add: use quick search or manual select options to locate and select students to which the update will apply.
- Select Mode (choose one):
- Add Participation: add program for selected students
- Delete Participation: remove program for selected students
- Edit Participation: choose to edit participation by entering a Start and/or End Date. If you wish to override or remove existing dates, select Override Existing Data, indicate which dates to include, and either enter dates or leave the fields blank as appropriate.
- Exit Reason: select an exit reason if students are leaving the program and you need to indicate why.
- Select Update to apply selections, then select OK to close the confirmation message that appears.
Program Session
Program Sessions track the date, time, and location that an instance of a program is taking place. This option only displays programs for which sessions or instances of a program that can be tied to specific dates, times, and locations have been created.
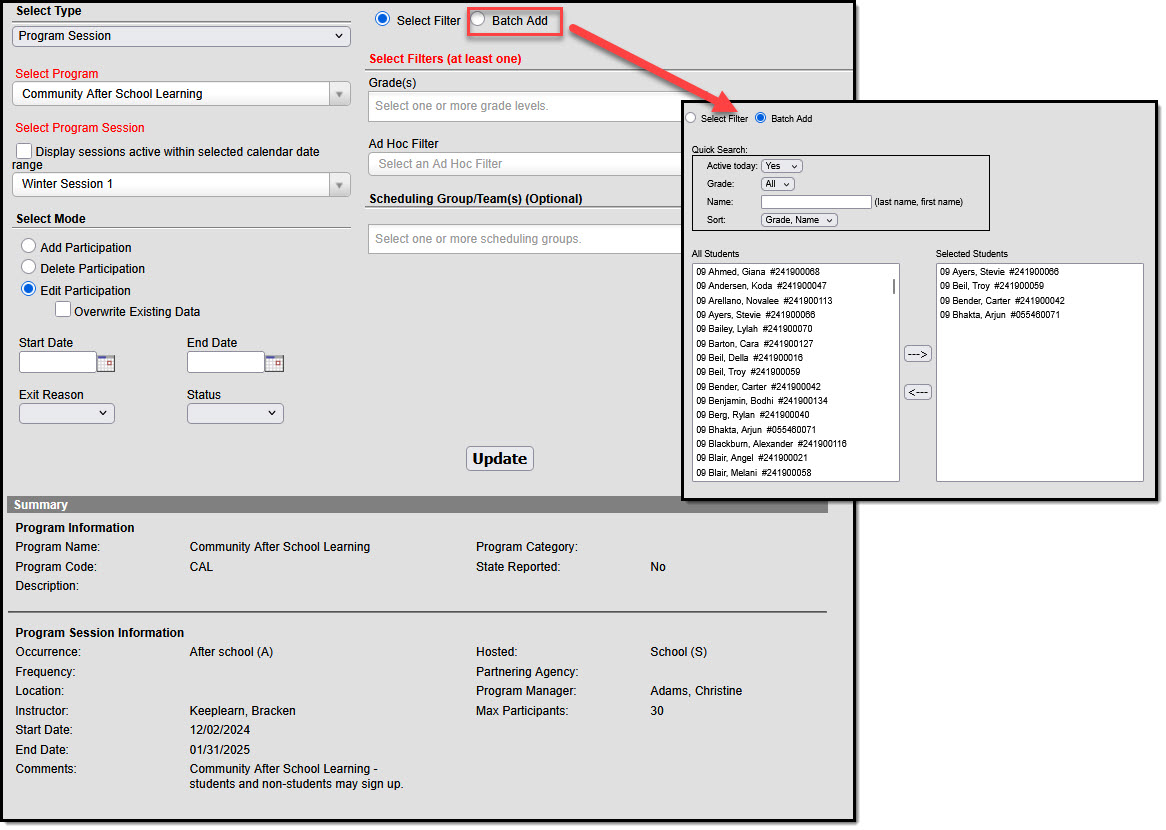 Batch Program Assignment - Program Session
- Select Type: Program Session
- Select Program students will be assigned to
- Select Program Session: Select "display sessions active within selected calendar date range" to limit selection options to sessions active within the calendar selected in the Context Switcher. Choose a session from the droplist.
- Choose Students to update (Select Filter OR Batch Add)
- Select Filter: Select at least one filter type. (Example: Selecting Grade(s)=09 and Ad Hoc Filter=Honor Roll Students would return only 9th grade students included in the Honor Roll Students filter).
- Batch Add: use quick search or manual select options to locate and select students to which the update will apply.
- Do not exceed Max Participants indicated in Program Session Inrformation
- Select Mode (choose one):
- Add Participation: add program for selected students
- Delete Participation: remove program for selected students
- Edit Participation: choose to edit participation by entering a Start and/or End Date. If you wish to override or remove existing dates, select Override Existing Data, indicate which dates to include, and either enter dates or leave the fields blank as appropriate.
- Exit Reason: select an exit reason if students are leaving the program and you need to indicate why.
- Status: indicate a status to be applied, if appropriate
- Select Update to apply selections, then select OK to close the confirmation message that appears.
Program Session Dates: When assigning program sessions, the entered start and end dates must be within the selected program session start and end dates.
Max Participants: When enrollment in a program session meets the entered Max Participant number, a pop-up message displays. Additional students can still be added to the program session, but be aware the enrollment has exceeded the entered value.
