This article describes the steps to take in order to properly move Ed-Fi to the next school year. It also contains general recommendations for processes to complete at the end of the school year and beginning of the school year.
Configure Ed-Fi for the Next School Year
This section describes the process necessary for configuring Campus to report Ed-Fi data for the next school year.
Step 1. Update to Release Pack Campus.2327.1 or Later
In order to have the schema and logic in place for AzEDS 9.0. it is critical you update Campus to at least Release Pack Campus.2327.1 (July 2023) or higher. Failure to do this may result in an inability to properly report data for the next school year.
Step 2. Create a New Ed-Fi Configuration for the Next School Year
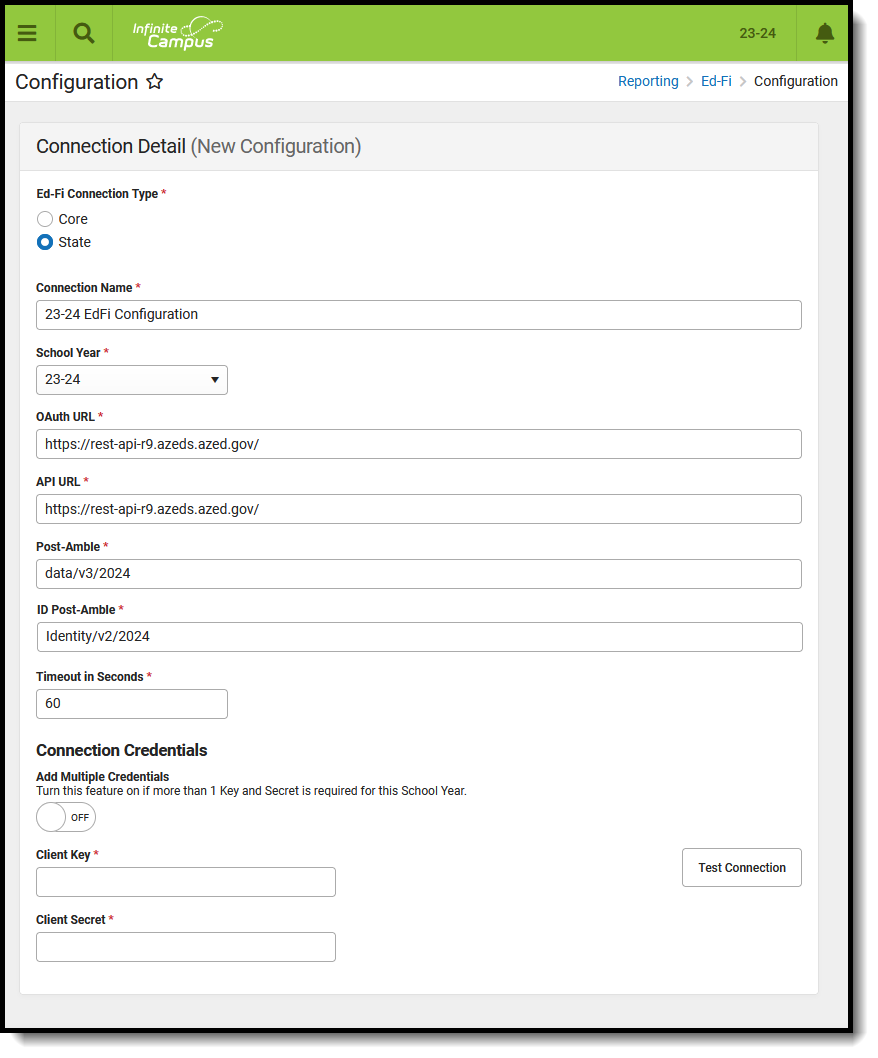
Create a new Ed-Fi configuration for the next school year. The image below shows the proper field entries for the Connection Configuration.
- Click the New button. The Connection Detail editor displays.
- Select the Connection Type of State.
- Enter a Connection Name of 23-24 EdFi Configuration or something similar.
- Select the School Year of 2023-24. This requires the 2023-24 School Year to be created.
- Enter the following values:
Field Value O-Auth URL https://rest-api-r9.azeds.azed.gov/ API URL https://rest-api-r9.azeds.azed.gov/ Post-Amble data/v3/2024
ID Post-Amble Identity/v2/2024 Client Key This is the same Client Key as the previous year's Ed-Fi configuration unless instructed differently by the Arizona Department of Education (ADE). Client Secret This is the same Client Secret as the previous year's Ed-Fi configuration unless instructed differently by the Arizona Department of Education (ADE). Timeout in Seconds This field defaults to a value of 60 seconds and determines (in seconds) the amount of time allowed to pass before the connection between Campus and Ed-Fi is considered timed out and Ed-Fi events are not processed. These Ed-Fi events are then reprocessed the next time a quartz job runs. Multiple Credentials Turn this feature on when more than one Key and Secret is required for the school year.
Sites that have multiple districts need to populate the District Number field in order for data to report correctly. The District Number field must be 9 characters in length. It is crucial that trailing zeroes are added to the number to make it 9 characters long. Any leading zeros are removed. For example, when the district number is 070280000, the leading zero is removed and the entered value is 702800000.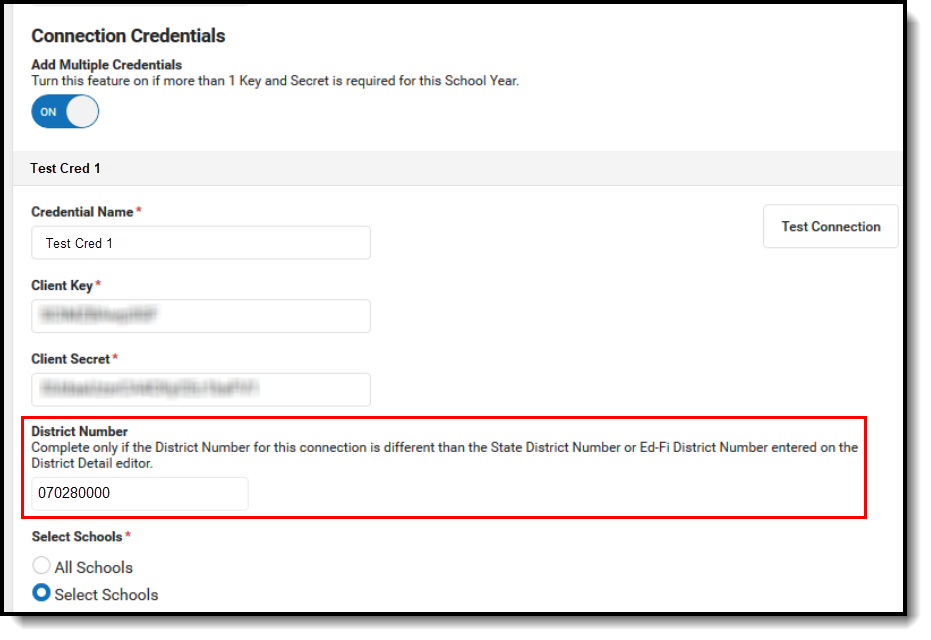 Connection Credentials
 - Click the Save button.
- Click the Test Connection button to ensure configuration values were correct and a connection to Ed-Fi was made. A message of "Connection is Valid" displays when it is successful.

 Connection Detail Configuration
Step 3. Go through the Ed-Fi Setup Checklist to Ensure Items are Complete
To ensure data is set up properly throughout Campus, review and/or update data based on the list below.
Once complete, proceed to Step 4.
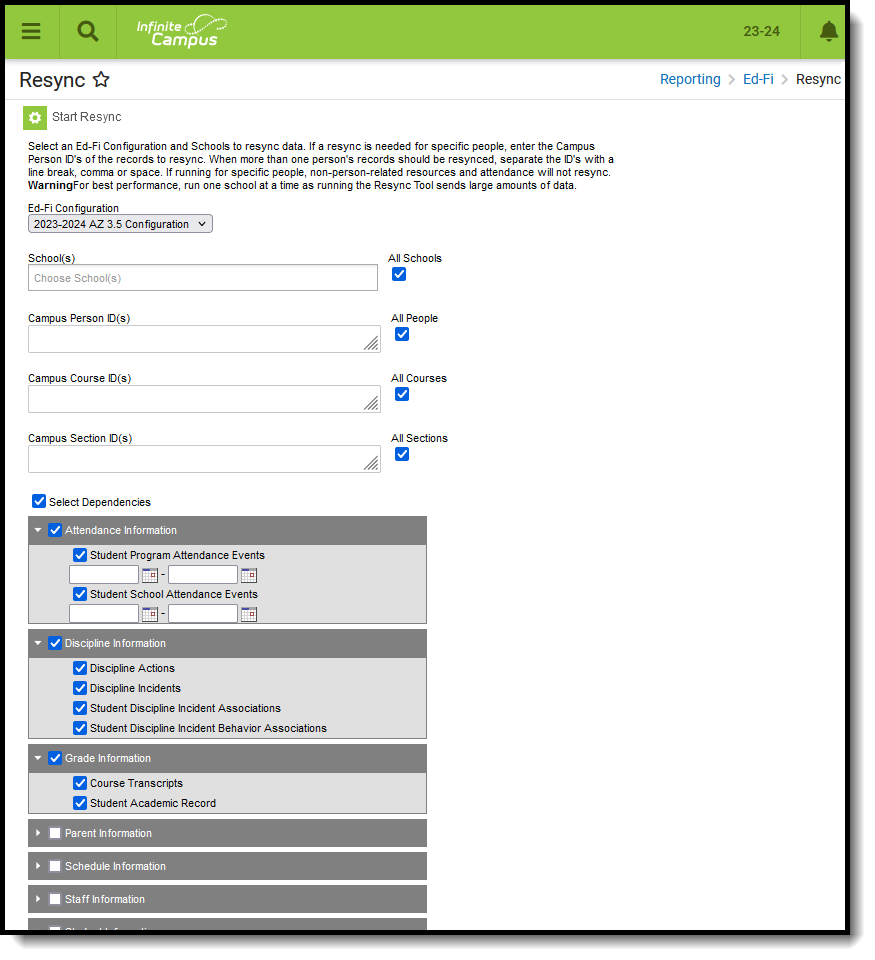
Step 4. Perform an Ed-Fi Resync for the Next Scope Year
Now that the next school year's Ed-Fi configuration is in place and data has been properly reviewed, use the Resync tool to resync Ed-Fi data.
- Verify the 2023-24 is selected in the toolbar.
- Select the 2023-24 Configuration option from the Ed-Fi Configuration dropdown.
- All schools, all Person IDs, all Course IDs and all Course Section IDs need to be resynced for the next year. Mark the All Schools, All People, All Courses and All Sections checkbox.
- Mark the Select Dependencies checkbox to ensure related data is sent properly and complete. Review the Recommended Resync Order for guidance on when to sync each resource. The options marked in the Ed-Fi Resource Preferences tool determine which options are available for selection here.
- Mark the checkbox next to each data set that should be resynced and enter the appropriate dates and mark the desired resources.
- Select the Start Resync button. Data begins resyncing between Campus and AzEDS.
This action generates a large volume of items in the event queue, so it may be helpful to plan the resync for an off-peak time period and resync in groups of calendars rather than all calendars.
 Ed-Fi Resync
Process for Districts With 915 Approval
For those who have been granted 915 approval, the Ed-Fi configuration for the previous school year needs to be added back and data resynced.
Repeat Step 2 and Step 4, changing the 2023-24 configuration and school year to 2022-23 configuration and school year. Once the resync is complete on the previous year, that configuration can be deleted.
Ed-Fi Configuration Values By Year
| Year | O-Auth URL | API URL | Post-Amble | ID Post-Amble |
|---|---|---|---|---|
| 2023-24 | https://rest-api-r9.azeds.azed.gov/ | https://rest-api-r8.azeds.azed.gov/ | data/v3/2024 | identity/v2/2024 |
| 2022-23 | https://rest-api-r8.azeds.azed.gov/ | https://rest-api-r8.azeds.azed.gov/ | data/v3/2023 | identity/v2/2023 |
| 2021-22 | https://rest-api-r7.azeds.azed.gov/ | https://rest-api-r7.azeds.azed.gov/ | data/v3/2022 | identity/v2/2022 |
| 2020-21 | https://rest-api-r6.azeds.azed.gov/ | https://rest-api-r6.azeds.azed.gov/ | data/v3/2021 | identity/v2/2021 |
| 2019-20 | https://rest-api-r5.azeds.azed.gov/ | https://rest-api-r5.azeds.azed.gov/ | data/v3/2020 | identity/v2 |
| 2018-19 | https://rest-api-r4.azeds.azed.gov | https://rest-api-r4.azeds.azed.gov | /api/v2.0/2019/ | /api/identity/v1 |
| 2017-18 | https://rest-api-r3.azeds.azed.gov | https://rest-api-r3.azeds.azed.gov | /api/v2.0/2018/ | /api/v2.0/ |
| 2016-17 | https://rest-api.azeds.azed.gov | https://rest-api.azeds.azed.gov | /api/v1.0/2017/ | /api/v1.0/ |
