The Course Build Constraints tool is being removed from the product as of the Campus.2435 Release (August 2024).
Use the following tools for scheduling and planning purposes:
Tool Search: Build Constraints
The Build Constraints tool lists the teachers allowed to teach the selected course, the rooms where the course is allowed to be taught and the periods where the course cannot be taught. This view is used as a summary of the information for the course and is used in the scheduling process.
 Course Build Constraints
Modifying these constraints is done in the Scheduling Build Constraints. Information on using the Scheduling Build Constraints Wizard is included below. Click the Mass Edit Constraints icon to begin. To return to Course Build Constraints tool, use the Back icon..
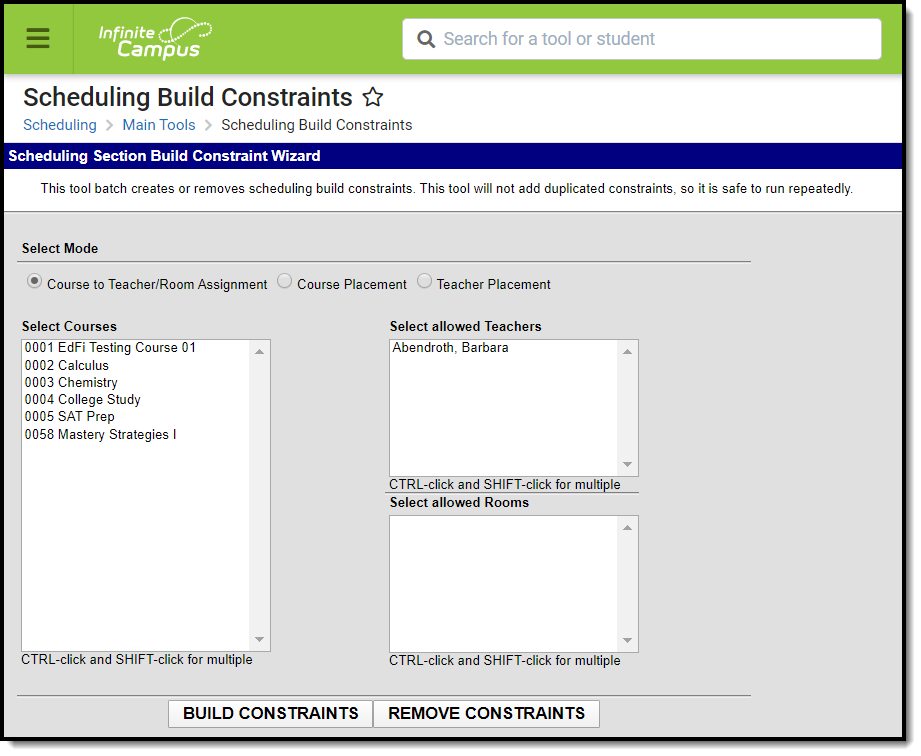
Scheduling Build Constraints
Scheduling Build Constraints adds or removes constraints placed on the selected course, teacher, room or period. These constraints are used in the Scheduling Board when building the Master Schedule for the next school year.
A constraint indicates when a course cannot be taught (period constraint), where it can be taught (room constraint) and which staff person can teach it (teacher constraint).
In the Schedule Wizard, these constraints can be built using the Course Planner Tool and the Staff Planner Tool.
 Request and Rosters
Constraints can be built or removed for the following:
- Course to Teacher and Room
- Course Placement
- Teacher Placement
- Room Placement
This wizard does not duplicate any existing constraints that are available, so it can be used multiple times.
Constraints are visible on the Course Build Constraints tool.
Teachers need to be assigned to course sections OR teachers need to be available (no other conflicting course assignments, etc.) in order to assign teachers to courses.
Course to Teacher to Room Constraints
Course to Teacher to Room Constraints build or remove constraints for the selected teachers to teach the selected course in the selected room. Note that the list of Rooms is sorted by rooms assigned a Room Type first, then those not assigned a room type. See the Rooms article for more information.
Create Course to Teacher and Room Constraints
- Select the Course to Teacher/Room Assignment Mode. A list of courses appears on the left side and a list of Teachers and Rooms appears on the right side.
- Select the Courses (use the CTRL and SHIFT keys to select multiple courses) for which to create constraints.
- Select the Teachers who are allowed to teach the selected courses.
- Select the Rooms where the course section can be scheduled.
- Click the Build Constraints button. A message indicating the constraints that were built appears.
- Click OK to acknowledge this message.
Verify the constraints were added correctly by viewing the Build Constraints tool on the course.
Remove Course to Teacher to Room Constraints
- Select the Course to Teacher/Room Assignment Mode. A list of courses appears on the left side and a list of Teachers and Rooms appears on the right side.
- Select the Courses (use the CTRL and SHIFT keys to select multiple courses) for which to remove the existing constraints.
- Select the Teachers who currently are assigned to teach the course.
- Select the Rooms where the course section can be scheduled.
- Click the Remove Constraints button. A message indicating the constraints that were removed appears.
- Click OK to acknowledge this message
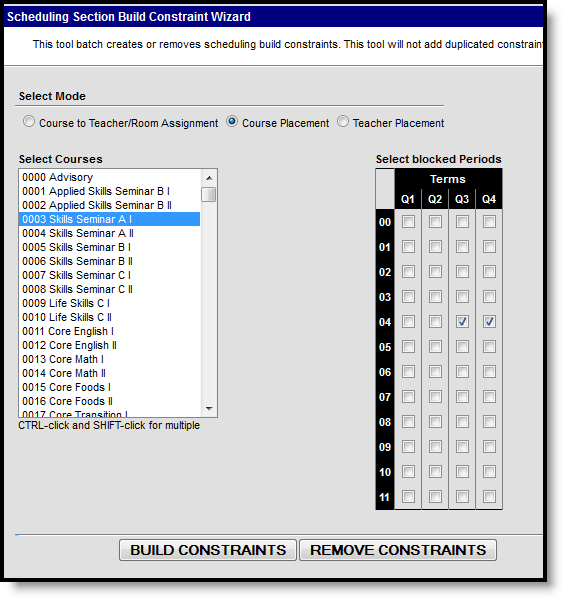
Course Placement Constraints
Course Placement Constraints block the selected course from being placed into the selected period. When using the Schedule Wizard, these constraints are applied to the Course Planner and Building Tools.
Create Course Placement Constraints
- Select the Course Placement Mode. A list of courses appears on the left side and a period grid appears on the right.
- Select the Courses (use the CTRL and SHIFT keys to select multiple courses) for which to create constraints.
- Place checkboxes where the course should NOT be placed in the period grid.
- Click the Build Constraints button. A message indicating the constraints that were built appears.
- Click OK to acknowledge this message.
 Request and Rosters - Course Placement Constraints
Remove Course Placement Constraints
- Select the Course Placement Mode. A list of courses appears on the left side and a period grid appears on the right .
- Select the Courses (use the CTRL and SHIFT keys to select multiple courses) for which to remove constraints.
- Place checkboxes where the course could NOT be placed in the period grid.
- Click the Remove Constraints button. A message indicating the constraints that were removed appears.
- Click OK to acknowledge this message.
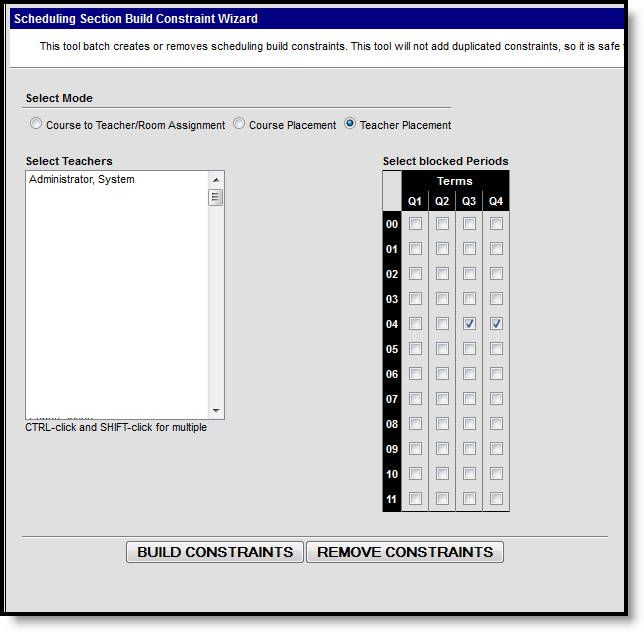
Teacher Placement Constraints
The Teacher Placement Constraint is used to set teacher prep periods.
Create Teacher Placement Constraints
- Select the Teacher Placement Mode. A list of teachers appears on the left side and a period grid appears on the right .
- Select the Teachers (use the CTRL and SHIFT keys to select multiple teachers) for which to create constraints.
- Place checkboxes where the teacher should NOT be teaching a course.
- Click the Build Constraints button. A message indicating the constraints that were built appears.
- Click OK to acknowledge this message.
 Request and Rosters - Teacher Placement Constraints
Remove Teacher Placement Constraints
- Select the Teacher Placement Mode. A list of teachers appears on the left side and a period grid appears on the right .
- Select the Teachers (use the CTRL and SHIFT keys to select multiple teachers) for which to remove constraints.
- Place checkboxes where the teacher should NOT be teaching a course.
- Click the Remove Constraints button. A message indicating the constraints that were removed appears.
- Click OK to acknowledge this message.
