Human Resources will no longer be available after June 30th, 2025. For more information, visit the Human Resources and Staff Evaluation Deprecation FAQ.
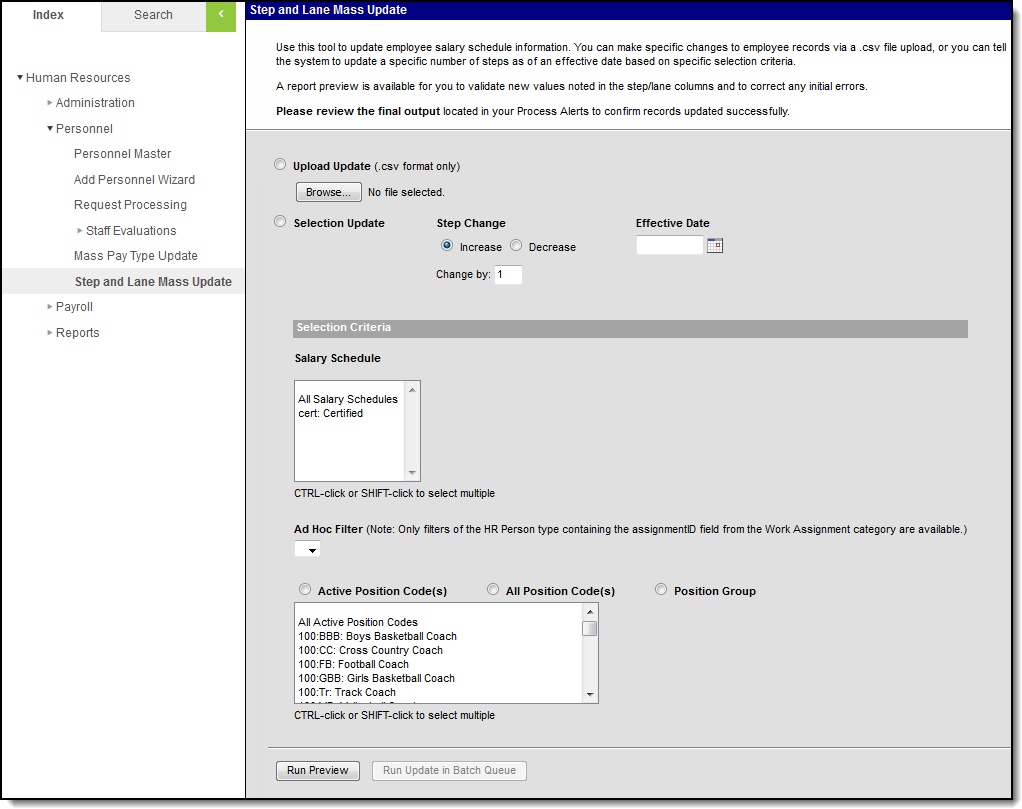
Tool Search: Step and Lane Mass Update
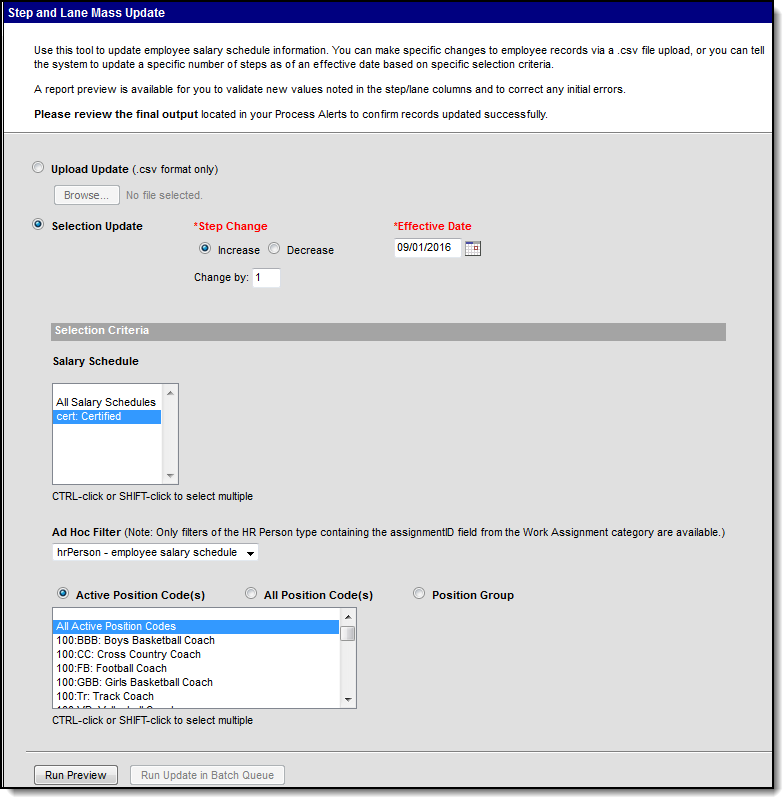
Use the Step and Lane Mass Update tool to update employee salary schedule information. You can make specific changes to employee records by uploading a CSV file or you can tell the system to update a specific number of steps as of an effective date based on specific selection criteria.
A report preview is available for you to validate new values and to correct any errors.
If your district also uses the Payroll module, synchronization errors can happen and prevent records from updating in the Payroll module even though updates are successful in the Human Resources module. When the update process complete, be sure to review the notification in the Process Alerts for this type of error.
This process creates a new wage record for each Work Assignment with the new step and lane except in the following scenarios.
- The position has ended. Only active Work Assignments are updated.
- The Effective Date is the same as an existing wage record's start date.
- If the existing and new Salary Schedules are the same, the process UPDATES the existing wage record.
- If the existing and new Salary Schedules are different, the existing wage record is NOT updated.
If an existing wage record is starting after the Effective Date.
If the existing and new Salary Schedules are the same, a new wage record is created and a warning about the future record appears.
The new wage record includes an end date that is prior to the start date of the future-dated record.If the existing and new Salary Schedules are different; no changes are made.
- If the Step/Lane and Salary Schedule combination is invalid; no changes are made.
- If the Step/Lane and Salary Schedule combination matches the existing record; no changes are made.
Step and Lane Mass Update Tool
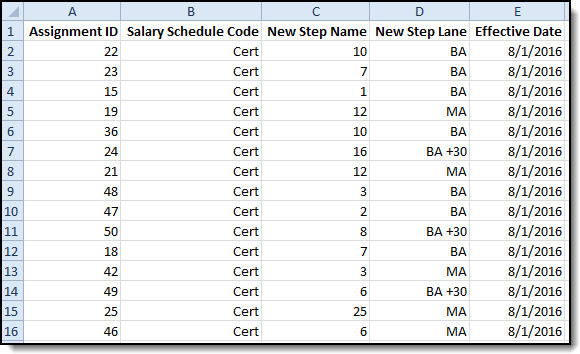
Update Employee Salary Schedule Information with a CSV File
You can make changes to employee records en masse by uploading a CSV file.
Create an Upload File
To update employee salary schedule information with a CSV file, the CSV columns must be submitted in the following order:
- Assignment ID (The Assignment ID is not visible in Campus. You must use Ad hoc reporting to retrieve that information.)
- Salary Schedule Code
- New Step Name
- New Lane Name
- Effective Date (mm/dd/yyyy)
Use the Filter Designer and Data Export to retrieve Assignment IDs and current salary schedule information. The following table provides the Ad hoc field names found in HR Person > HR > Work Assignments > Salary that you may find helpful when you create your upload file.
| Name | Ad hoc Field |
|---|---|
| Assignment ID | hrWorkAssignment.assignmentID |
| Salary Schedule Code | NA hrWorkAssignmentSalary.salaryScheduleName will provide the full Salary Schedule name. However, the CSV upload file requires the Salary Schedule Code. The code can be found on the Salary Schedule Detail editor. |
| Step Name | hrWorkAssignmentSalary.stepName |
| Lane Name | hrWorkAssignmentSalary.laneName |
| Start Date | hrWorkAssignmentSalary.startDate |
Example Upload File
Upload Update
- Create an Upload File.
- Select the Upload Update radio button.
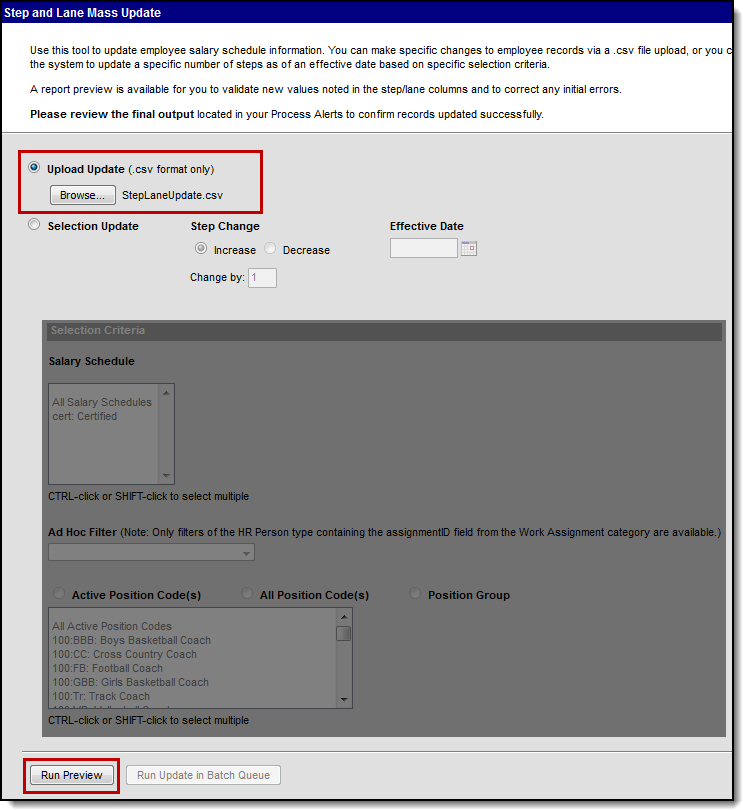
- Click the Browse button to select and upload the CSV file.
- Click the Run Preview button.
Result
A report preview is made available for you to validate the changes and correct any errors prior to running the update. Repeat steps 1-4 if you need to make changes to the file. - Click the Run Update in Batch Queue button.
Result
The Batch Queue Reporting Options display.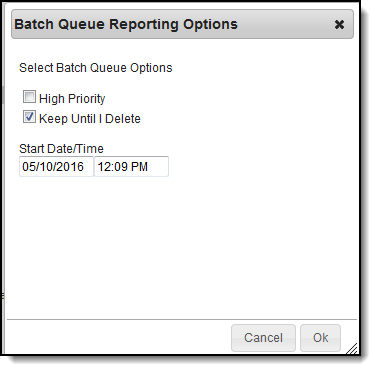
Select from the following Batch Queue Options.
Field / Option
Description
High Priority
Mark this checkbox if running this update is considered a high priority. Updates designated as "high priority" by this checkbox will take precedence over other processes in the Batch Queue that are not designated as such.
Keep Until I Delete
Mark this checkbox if the results should continue to appear on the Add Reports to Batch Queue and Admin Queue tools until manually deleted by a user. If this checkbox is not marked, the completed update report will be cleared from the Add Reports to Batch Queue and Admin Queue tools based on the frequency for the Batch Queue Maintenance task set within the Task Scheduler.
Start Date/Time
Indicate the date and time when you want to start the update process. These fields auto-populate with the current date and time. Click in either field to enter a new date. A calendar displays when choosing a new date. Time must be entered in HHMM format, in either standard time format (i.e., 2:15 pm) or in military time (i.e., 14:15).
Click OK.
Result
A confirmation message displays. Your request is put in the queue and you will receive a notification in the Process Alerts when the report completes.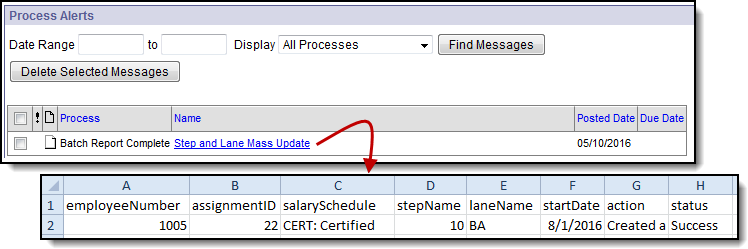


Use Selection Criteria to Update Steps
This tool can automatically increment steps for you. You specify the number of steps to increase or decrease, the date on which the change becomes effective, and choose at least one of the following criteria: Salary Schedule(s), and Ad hoc Filter, and/or Position Code(s)
Example Selection Update and Selection Criteria Options
Complete the following steps to make changes using the selection criteria.
- Mark the Selection Update radio button.
Result
The Step Change and Effective Date fields become red which indicates they are required fields. - In the Step Change field, indicate whether you want to Increase or Decrease the steps and indicate how many steps to increase/decrease in the Change by field.
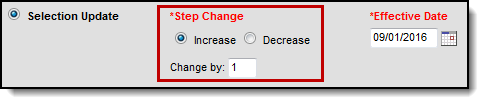
- Enter the date on which the change becomes effective in the Effective Date field.
Choose at least one option in the following Selection Criteria. You may make selections for all options, but you must select at least one of the following Selection Criteria.
Option Description Salary Schedule This field displays active salary schedules with the Complete Status. You can select All Salary Schedules , or select specific schedules. Ad hoc Filter Select an Ad hoc filter to limit the update to employees included in the filter. Only filters of the HR Person type containing the assignmentID field from the Work Assignment category are available.
Active Position Code(s)
All Position Code(s)
Position GroupThese fields give you the option to select only active Position Codes or all Position Codes. The option to select specific Position Groups is also available. - Click the Run Preview button.
Result
A report preview is made available for you to validate the changes and correct any errors prior to running the update. Repeat steps 1-4 if you need to make changes to the file. Select from the following Batch Queue Options.
Field / Option
Description
High Priority
Mark this checkbox if running this update is considered a high priority. Updates designated as "high priority" by this checkbox will take precedence over other processes in the Batch Queue that are not designated as such.
Keep Until I Delete
Mark this checkbox if the results should continue to appear on the Add Reports to Batch Queue and Admin Queue tools until manually deleted by a user. If this checkbox is not marked, the completed update report will be cleared from the Add Reports to Batch Queue and Admin Queue tools based on the frequency for the Batch Queue Maintenance task set within the Task Scheduler.
Start Date/Time
Indicate the date and time when you want to start the update process. These fields auto-populate with the current date and time. Click in either field to enter a new date. A calendar displays when choosing a new date. Time must be entered in HHMM format, in either standard time format (i.e., 2:15 pm) or in military time (i.e., 14:15).
Click OK.
Result
A confirmation message displays. Your request is put in the queue and you will receive a notification in the Process Alerts when the report completes.If your district also uses the Payroll module, synchronization errors can happen and prevent records from updating in the Payroll module even though updates are successful in the Human Resources module. When the update process complete, be sure to review the notification in the Process Alerts for this type of error.

