Point of Sale 1.0 has been deprecated as of 7/1/2023. Please see the Cashier Cheat Sheet.
Search for Patrons
| Quick Steps | Example |
|---|---|
|
|

Charge a Patron's Account
| Quick Steps | Example |
|---|---|
|
|

Cash payment
- Select the patron's purchasable items from the menu.
- Verify the items display in the white Item Description box in the screen's lower left corner.
- Tap Cash ($).
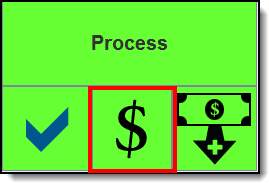
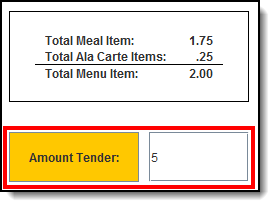
Result The Cash Tend window displays. - Enter the Amount Tender(ed).
- Tap Submit.
- If the cash was for the exact amount, the transaction is complete.
- If there is change due, tap Return to give cash to the patron OR tap Deposit to deposit the change into the patron's account.


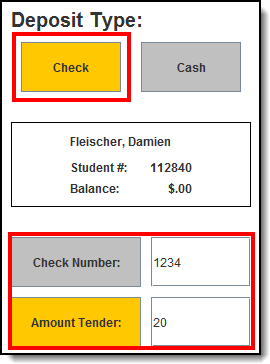
Check Payment
- Select the patron's purchasable items from the menu.
- Verify the items display in the white Item Description box in the screen's lower left corner.
- Tap Check (✔).
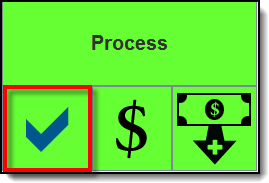
Result The Check Tend window displays. - Enter the Check number.
- Enter the Amount Tender(ed).
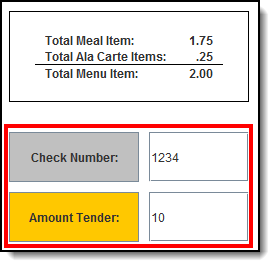
- Tap Submit.
- If the check was for the exact amount, the transaction is complete.
- If there is change due, tap Deposit.


Do NOT return money on check payments. Always deposit additional money left over after a transaction into the patron's account. Returning money to a patron on a check payment will affect end of day drawer counts.
Combination Payment
Patrons can pay for a transaction with cash OR check AND money from their account.
- Select the Cash ($) OR Check (✔) button. Result - The Cash Tend or Check Tend window displays.
Complete one of the following options.
Payment Type
Then…
Cash
Enter the exact Amount Tendered.

Check
Enter the Check Number and the Amount Tendered.

- Tap Submit.
Result - A message displays stating how much was debited from the student's account.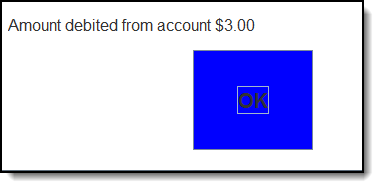
- Tap OK. Result - The transaction is complete.


Deposits
- Tap the Deposit button.
Result – The Deposit window displays. - Enter the amount of cash OR information about the check being deposited.
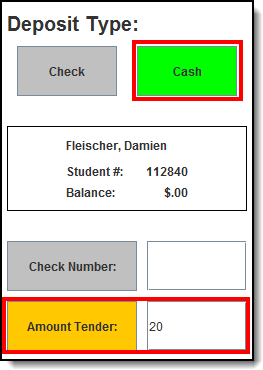
Tip: Orange QuickAdd buttons on the right-hand side of the screen allow you to quickly select an amount.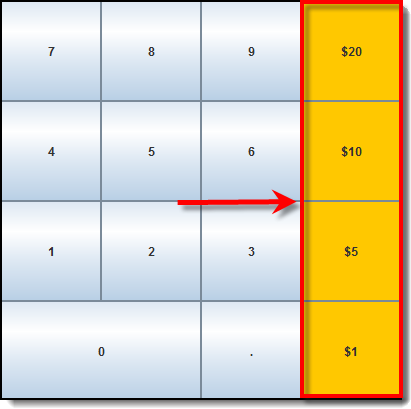
- Verify the total cash amount in the Amount Tender field is correct. This field indicates how much cash will be deposited into the patron's account.
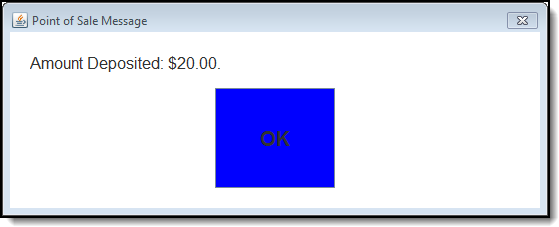
- Tap the Submit button to process the deposit and add the amount to the patron's account balance.
Result – A confirmation displays. - Tap OK. The deposit is complete.


Voids
With the assistance of a head cashier or other administrator who has been assigned a Manager PIN, cashiers may void transactions at the POS terminal after they have been processed.
Void a Transaction for Patron within Last 5 Patrons
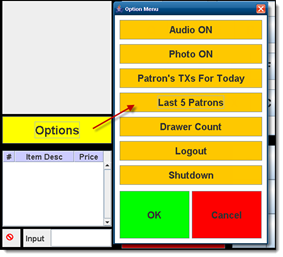
- Tap Options > Last 5 Patrons.
Result
The Historical TX window displays. - Select the patron's incorrect transaction then tap VOID TX.
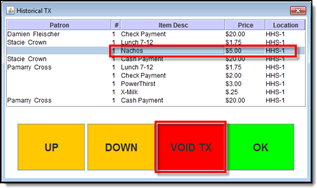
- Enter a Manager PIN and tap Submit. A cashier PIN will NOT work.

- Tap OK on the confirmation window. The void is complete.


Void a Transaction for Patron NOT within Last 5 Patrons
- Search for patron and tap Select.
- Tap Options > Patron’s TX For Today.
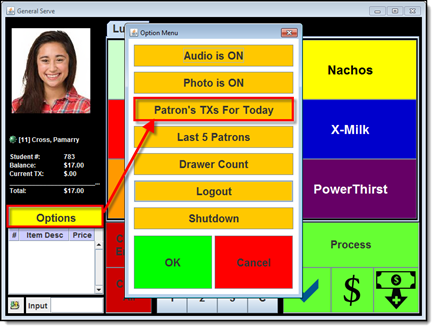
- Select the patron’s incorrect transaction and tap Void TX.
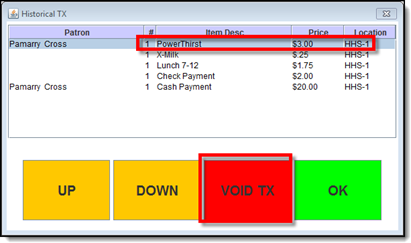
- Enter a Manager PIN and tap Submit. A cashier PIN will NOT work.

- Tap OK on the confirmation window. The void is complete.


Continuous Serve
Continuous Serve is used when all patrons are purchasing the same menu item. Select the menu items one time, before serving the first patron.
- Choose the item(s) ALL patrons are purchasing then tap Done.

Result – The screen changes to say "Ready to Serve Patrons.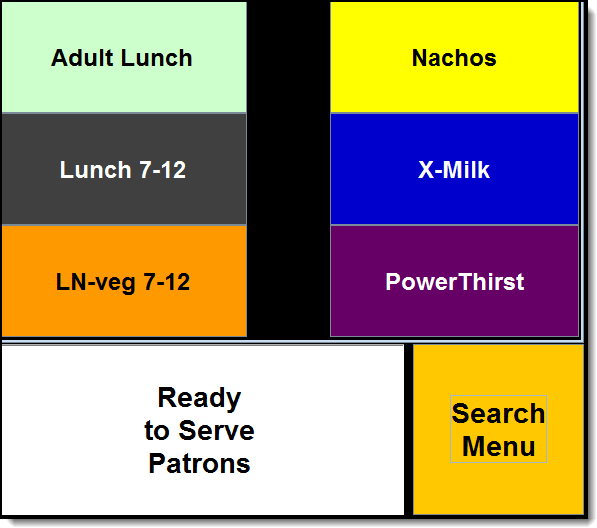
- Patrons enter their PINs as they go through the line. You do not need to select purchasable items each time. You can search for patrons, allow patrons to enter their PINs, or scan patron bar codes to select the patron for processing.
- At the end of the serving period, log out of the Continuous Serve application by tapping Options > Logout > Yes.


Drawer Count
The Drawer Count should be performed at the end of each serving period.
Start the Drawer Count
| Quick Steps | Example | ||||
|---|---|---|---|---|---|
|
|

Enter the Drawer Count
| Quick Steps | Example |
|---|---|
|
|

Terminal Screen Layout

Button/Field Area | Description |
|---|---|
Meal/Menu Tabs | Each tab contains the menu needed for a specific meal/serviceable time. |
Patron Picture | The picture of the patron being served. |
Grade & Name | Indicates the patron's name and current grade. |
Eligibility Indicator | Indicates the patron is eligible for Free or Reduced meals. The following describes each color: |
Allergy Alert | Indicates the patron's allergy(s). |
Student Number & Balance Info | Indicates the patron's Local Student Number and current account balance. |
Cashier Options Menu | Opens the Options Menu, containing options for assisting the cashier including control over audio, display of patron pictures, a list of a patron's transactions for the current date, the last 5 patrons served, drawer count, the ability to log out as cashier and the ability to shutdown the terminal. |
Item Description | Describes each item added to the patron's order. These are charged to the patron's account unless cleared via the Clear Entry or Clear All button. |
Active Server Connection Indicator | Indicates whether the terminal is properly connected to the server. A red circle with a line through it indicates the Point of Sale is not currently connected to the server. Green and gold arrows pointing up and down indicate the Point of Sale is currently connected to the server. |
Input Item Quantity | Indicates how many items are in the patron's current order (corresponding to the items listed in the Item Description box). |
Clear Item(s) / Entry | If the Clear Entry button is tapped, the most recent item added to the patron's order (corresponding to the items listed in the Item Description box) is removed and not charged to the patron's account. If the Clear All button is selected, all data entered during a patron's order (including items listed in the Item Description box) are removed. |
Item Multiplier | Allows the cashier to enter item quantities and perform other actions which require number entry. |
Clear Quantity | Clears the quantity entered via the Item Multiplier. |
Check Tendered | Opens the Check Tend editor, allowing patrons to pay for the meal order via check. This is an optional button made available by the Admin on the Point of Sale. |
Cash Tendered | Opens the Cash Tend editor, allowing patrons to pay for the meal order via cash. The Cash Tendered button is also used to open the cash drawer for a No Sale transaction or activity. This is an optional button made available by the Admin on the Point of Sale. |
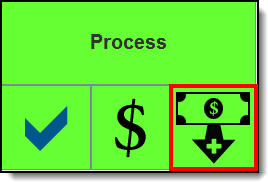
Quick Deposit Check/Cash | Opens the Deposit editor, allowing cashiers to deposit checks or cash to the patron's account in real time. Cashiers cannot deposit money into a patron's account until all items have been cleared from the patron's order (via the Clear Entry or Clear All buttons). This is an optional button made available by the Admin on the Point of Sale. |
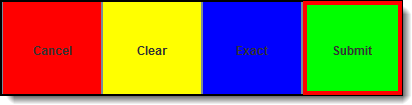
Process (Debit) from Account | Charges (debits) the patron's order to their account. |
Purchasable Items for Selected Meal/Menu Tab | Selectable items which are added to a patron's order when touched. These items will not be charged to the patron's account until the Process button is selected. |
