Tool Search: Ed-Fi
This article describes the steps you should take in order to properly move Ed-Fi to the 2023-2024 school year. This article also contains general recommendations for processes to complete at the end of the school year and beginning of the school year.
Configuring Ed-Fi for the 2023-2024 School Year
This section will describe the process necessary for configuring Campus to report Ed-Fi data for the 2023-2024 school year.
Step 1. Update to the most recent version of Campus
In order to have the schema and logic in place, it is critical you update to the most recent version of Campus before creating the 2023-24 configuration. Failure to do this will result in an inability to properly report data for the 2023-2024 school year.
Step 2. Create a New Ed-Fi Configuration for 2023-2024
You will need to create a new Ed-Fi configuration for the 2023-2024 school year.
Please remove state configurations that are older than three years.
 Ed-Fi Connection Detail
To do this:
- Navigate to the Ed-Fi Connection Configuration tool.
- Select the New button.
- Select the Connection Type, either Core or State.
- Enter a Connection Name.
- Select a School Year of 23-24.
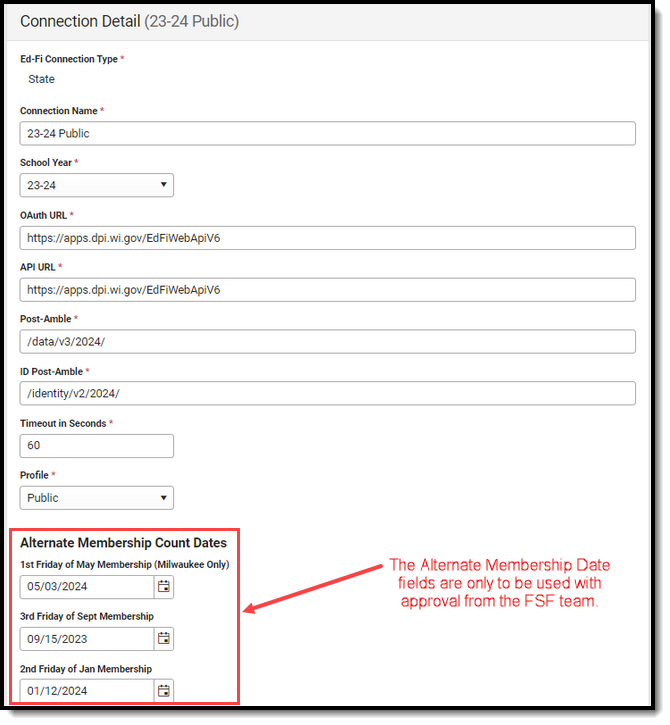
a. Enter the following values:
Field Value O-Auth URL https://apps.dpi.wi.gov/EdFiWebApiV6 API URL https://apps.dpi.wi.gov/EdFiWebApiV6 Post-Amble /data/v3/2024/ ID Post-Amble /identity/v2/2024/ Timeout in Seconds This field defaults to a value of 60 seconds and determines (in seconds) the amount of time allowed to pass before the connection between Campus and Ed-Fi is considered timed out and Ed-Fi events are not processed. These Ed-Fi events are then reprocessed the next time a quartz job runs. Profile An API Profile enables the creation of a data policy for a particular set of API Resources, generally in support of a specific usage scenario (such as for Nutrition or Special Education specialty applications). The policy is expressed as a set of rules for explicit inclusion or exclusion of properties, references, collections and/or collection items (based on Type or Ed-Fi Descriptor values) at all levels of a Resource.
The proper profile will be sent with the ed-fi data based on the item selected below.
- Send Choice profile if droplist is = Choice or Choice + Private Opt In
- Send Public profile if droplist is = Public
This will also determine the student population that gets sent:
- When Choice Only is selected, only students who have an enrollment where Choice = Yes report with a Choice profile.
- When Choice + Private Opt In is selected, all students will report with a Choice Profile.
- When Public is selected, all students report regardless of choice status.
1st Friday of May Membership (Milwaukee Only) For Milwaukee Only - Enter the appropriate date for the 1st Friday of May Membership. Note: This field is only to be used with approval from the FSF team.3rd Friday of Sept Membership Enter the appropriate date for the 3rd Friday of September Membership. Note: This field is only to be used with approval from the FSF team.2nd Friday of Jan Membership Enter the appropriate date for the 2nd Friday of January Membership. Note: This field is only to be used with approval from the FSF team.Client Key This will be the same Client Key as the 2022-2023 Ed-Fi configuration unless instructed differently by the Wisconsin Department of Education. Client Secret This will be the same Client Secret as the 2022-2023 Ed-Fi configuration unless instructed differently by the Wisconsin Department of Education. Multiple Credentials If multiple credentials have been entered for districts with multiple configurations in the same year, then one of the credentials must have the Identity Credential checkbox marked to identify which credential will be used by the Ed-Fi Locator tool to search for/assign Ed-Fi IDs. Only one credential can be marked as the Identity Credential. 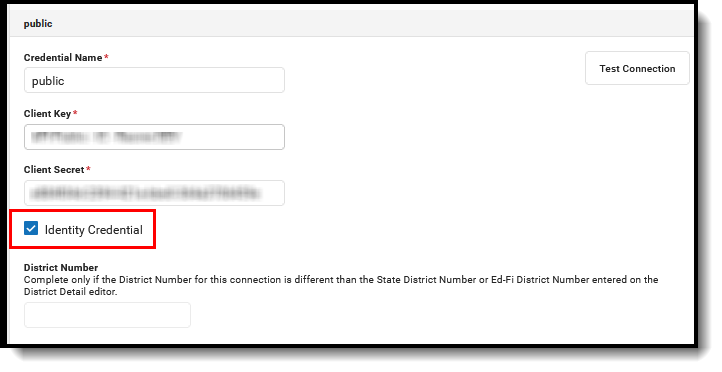
- Click the Save button.
- Move on to step 3.

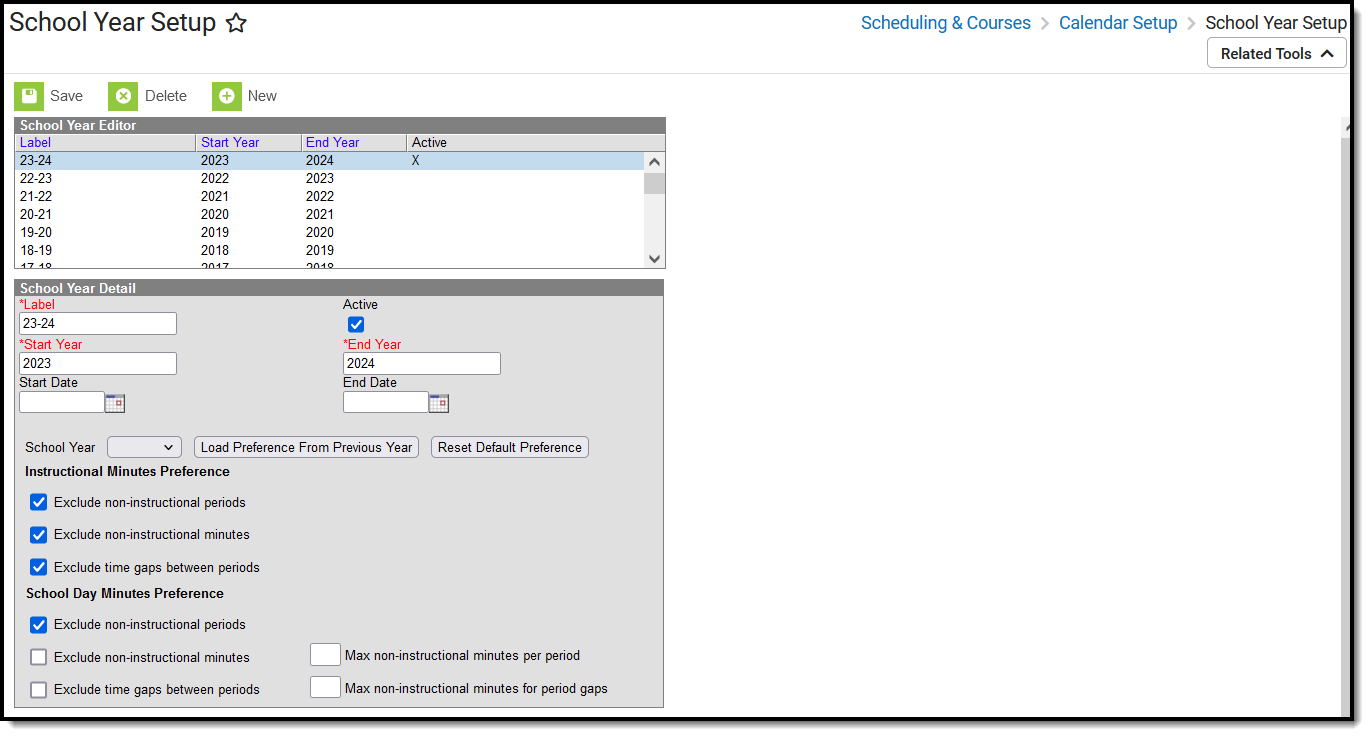
Step 3. Update the Active Year to 2023-2024
Next, you need to make 2023-2024 the active school year within the School Years tool. If you have already set 2023-2024 as the active school year, skip to Step 4.
 School Year Setup
To do this:
- Navigate to the School Years tool (Calendar Information> School Year).
Select the 2023-24 school year in the School Years Editor window.
- Mark the Active checkbox.
- Click the Save icon.
- Move on to Step 4.
Step 4. Go through the Ed-Fi Setup Checklist to Ensure Items are Complete
To ensure data is set up properly throughout Campus, review and/or update data based on the Ed-Fi Setup checklist.
Once complete, move on to Step 5.
Step 5. Assign Ed-Fi IDs
If multiple credentials have been entered for districts with multiple configurations in the same year, then one of the credentials must have the Identity Credential checkbox marked to identify which credential will be used by the Ed-Fi Locator tool. Only one credential can be marked as the Identity Credential.
 Locating the Person's Ed-Fi ID
To assign an Ed-Fi ID:
- To assign an Ed-Fi ID for a person, select the Get Ed-Fi ID button. The Ed-Fi Locator displays.
Note: The Get Ed-Fi ID button will be inactive if an Ed-Fi ID already exists for the individual. - Enter information for the required fields.
- If desired, enter information into the other search criteria fields in the Ed-Fi Locator. Entering additional identifying information is not required, but is highly encouraged.
- Click the Search button. Results appear on the right with the best results shown in sequential order. The Score column indicates the quality of the match between search criteria entered and the results within the Ed-Fi database.
- Once the correct person has been identified, click the Use This Person button to populate the Ed-Fi ID field within Campus.
- If you cannot locate the person within the Ed-Fi results, assign the person a new ID by selecting the Assign New Ed-Fi ID button.
- Once the person has either been assigned a new Ed-Fi ID or matched to an existing person via the Use This Person button, the Ed-Fi ID populates the Ed-Fi ID field. The Student State ID field is also auto-populated with the Ed-Fi ID. You should now save the Demographics record to ensure this data is preserved.
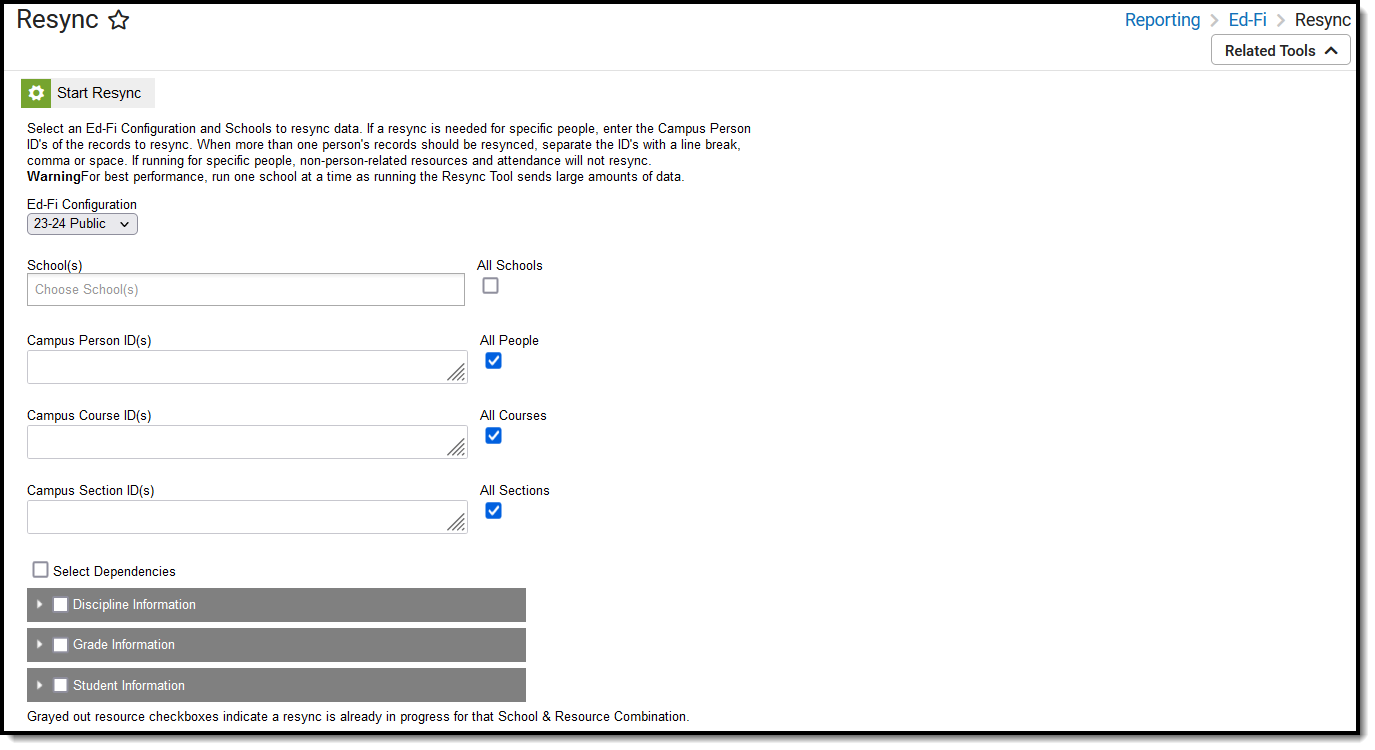
Step 6. Perform an Ed-Fi Resync for the 2023-2024 Scope Year
Now that the 2023-24 Ed-Fi configuration is in place, the Active Year is set, and data has been properly reviewed, an ordered resync should be completed as the first resync of the year. This is completed using the Resync tool.
 Resync
To do this:
- Navigate to the Resync tool.
Select a Configuration.
Select the Schools, People, Courses, and Sections to be resynced.
Mark the checkbox next to each data set should be resynced. Campus highly recommends marking the Select Dependencies checkbox to ensure related data is sent properly and complete.
Once data sets have been marked and you are ready to resync, select the Start Resync button. Data will begin resyncing between Campus and the Ed-Fi system.
Step 7. Update the Year on Ed-Fi Scheduled Tasks
Users need to update the year on Ed-Fi scheduled tasks. For additional information, please refer to the Wisconsin Ed-Fi Scheduled Tasks article.
Beginning of New School Year
For a general (not Ed-Fi specific) checklist of activities that should be performed within Campus at the beginning of a new school year, please see the Beginning of School Year Process article.
