Note: Terminal applications will close daily at 2:00 am to allow all terminals to receive necessary updates.
| What can I do? | What do I need to know? |
|---|---|
Install a POS Terminal
- Navigate to your Infinite Campus logon page and copy the URL for use in the Campus Login URL field on the POS Terminal Admin. The POS Terminal Admin will be available after you complete the terminal installation steps.
- Log onto Campus and navigate to Food Service > Administration > Terminals.
- Click the Install button.
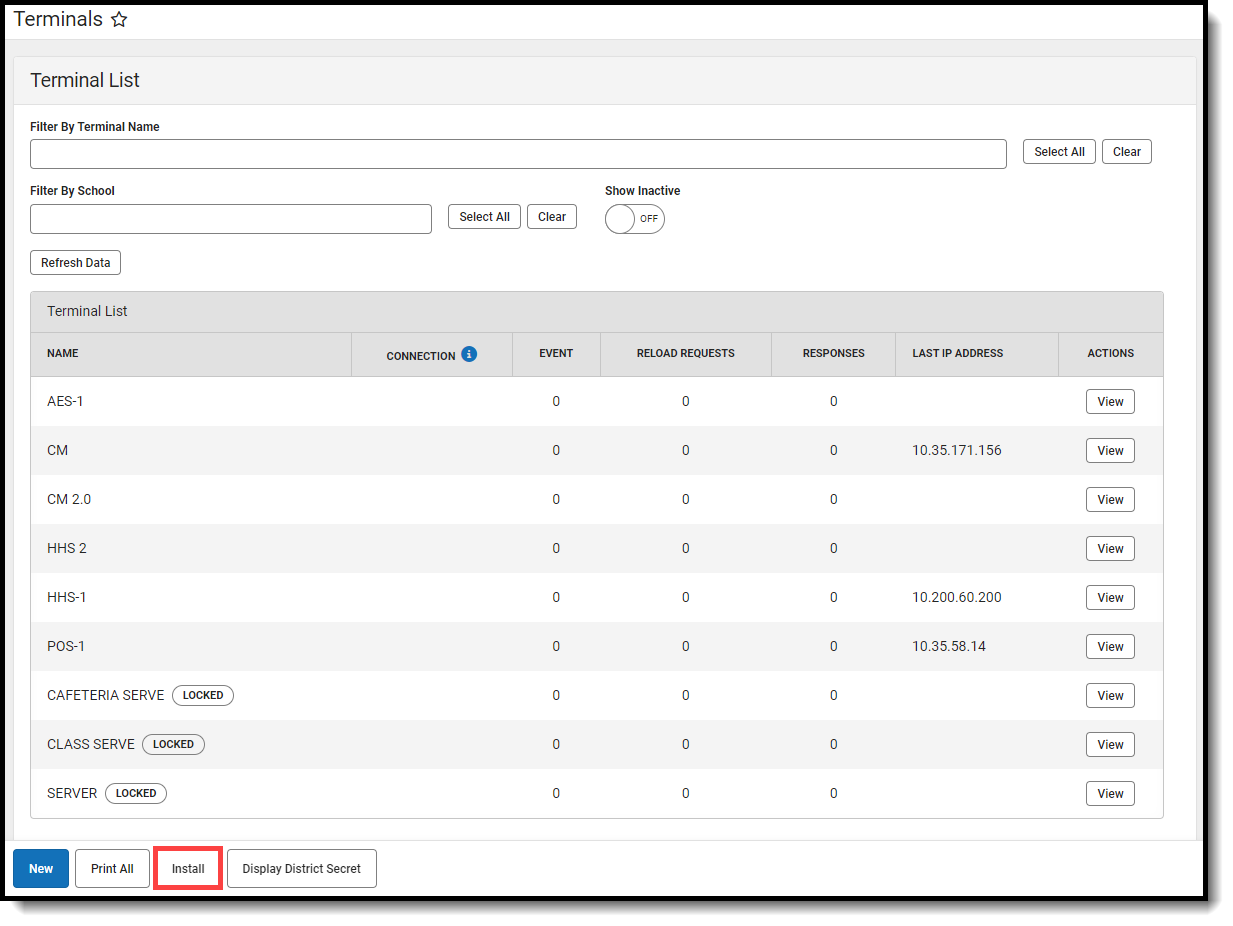 Result: Campus downloads the Campus Point of Sale Setup 2.x.x file to your terminal.
 - Open the Campus Point of Sale Setup 2.x.x.exe file.
Result: The POS Terminal Admin screen displays.
 Result: Campus downloads the Campus Point of Sale Setup 2.x.x file to your terminal.
If a Windows Defender Firewall message displays, click the Allow Access button.
You may need to allow POS to run with other firewall or anti-virus software.
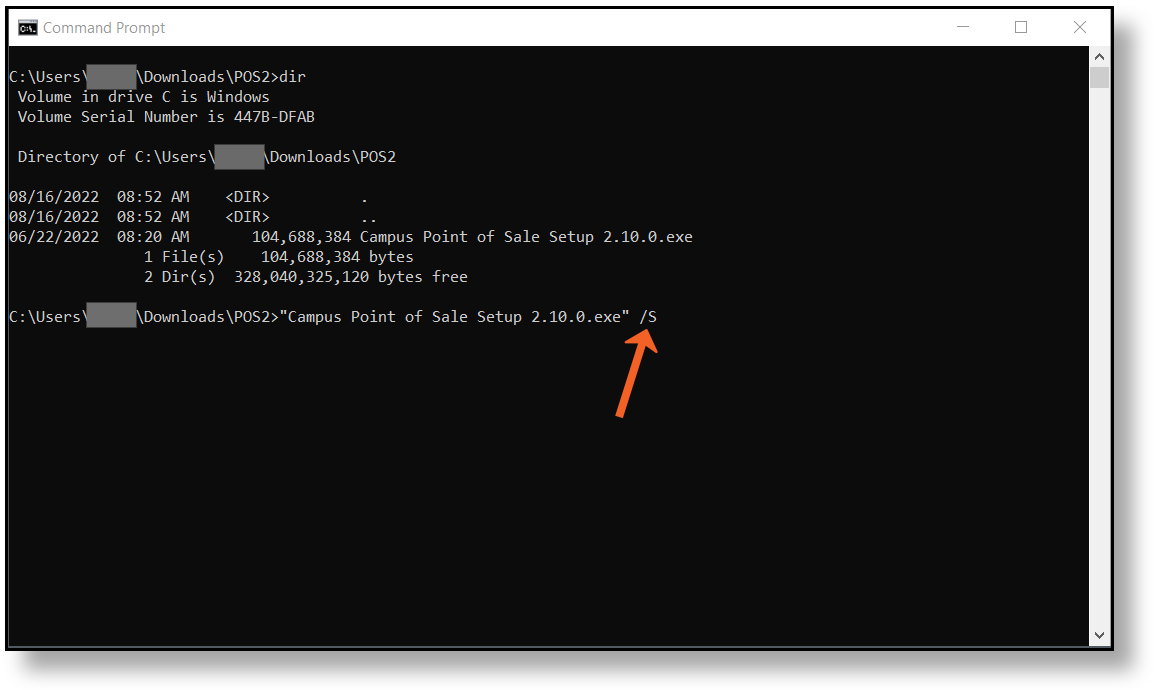
Silent Install
- Districts wanting to perform a silent install may add ""/S" to the .exe. file in Command Prompt. This will bypass all prompts, pop-ups and error messaging so they can mass install terminals.
- Terminal options need to be set for each terminal by opening the Point of Sale software.

Terminal Options

Use the field descriptions found below in the POS Terminal Admin Field Descriptions to set specific options and load data onto your terminal.
POS Terminal Admin Field Descriptions
| Option | Enabled | Disabled |
|---|---|---|
| Display | ||
| Totals | The Item amount, transaction total and remaining balance are visible on the cashier's screen.
|
Item amount, transaction total and remaining balance are hidden on the cashier's screen. Cash and check tender are not allowed. Deposit on account is allowed. |
| Patron Balance | Patron Balance and remaining balance are visible on the cashier's screen.
This option displays balance information for all students including Free and Reduced students. |
Patron Balance and remaining balance are hidden on the cashier's screen. Cashiers will not be able to see accounts going negative.
Item amount and transaction total are visible. |
| Eligibility | Displays the eligibility icon on the cashier's screen.
This option is often disabled for privacy purposes. |
The eligibility icon is hidden on the cashier's screen. |
| Actual Purchasable Cost |
The actual price the student will pay for items displays on the cashier's screen. For example, a reimbursable lunch for a free student displays as $0.
The transaction total and remaining balance displayed on the terminal will reflect sums from item prices displayed.
If a free or reduced student uses cash or check to pay for a transaction, whatever amount the student was overcharged will be deposited into their food service account.
This option is often disabled for privacy purposes. |
Prices on the terminal reflect the purchasable cost for all students. The full paid price displays for students with reimbursable lunches.
The transaction total and remaining balance will reflect sums from item prices that display on the terminal. |
| Patron PIN | The Patron PIN is visible on on the cashier's screen including the patron search screen.
This option is often disabled for privacy purposes. |
The Patron PIN is hidden on the cashier's screen. |
| Continuous Serve Messages | Reminders and restrictions set on accounts will display when the cashier is using Continuous mode. |
Patron messages are hidden on the cashier's screen while they are using Continuous mode. There are fewer interruptions for the cashier when you use this option.
|
| Balance Background Color | The Balance background displays in green, yellow or red, depending on the account balance and reminder amount set on the patron account. This applies to any patron that has a Free, Reduced, or Paid FRAM eligibility.
The Eligibility display option must be enabled for color-coded balance backgrounds to display.
|
The Balance background displays in medium grey. |
| Enable | ||
| Blind Cash Drawer Count |
The Deposit Amount on the Cash Drawer Count page will be hidden.
The Cash Drawer Count page will indicate whether the cashier's drawer is balanced. |
The Deposit amount will display on the Cash Drawer Count page.
When the cashier enters information on the Cash Drawer Count page and clicks Submit, POS 2.0 displays whether the drawer is balanced or unbalanced. |
| Serving Period |
The cashier must select the serving period when they log in.
Only services with the selected serving period assigned are visible. |
Cashier will go directly to terminal when they log in and all services will display. The Cash Drawer Count page will not display when the cashier logs off. |
| Meal Served Alert | If enabled on your terminal, a warning message appears if a patron has already been served a reimbursable meal at any terminal in the current serving period.
The warning message will not display if the reimbursable meal was entered via the Journal tool.
|
If disabled, the warning message does not appear if a patron has already been served a reimbursable meal at any terminal in the current serving period.
|
| Payments | ||
| Cash | Cash button displays on the terminal. | Cash button does not display on the terminal. |
| Cash Options |
Deposit Change: Allows cashier to deposit change from a cash transaction into a patron’s account. Return Change: Allows cashier to return change from a cash transaction into a patron’s account. Deposit on Account: Allows a patron to make a cash deposit to their food service account via the Point of Sale. |
Deposit Change: Cashier will not have the option to deposit change from a cash transaction into a patron’s account Return Change: Cashier will not have the option to return change from a cash transaction into a patron’s account Deposit on Account: Patrons will not be able to make a deposit to their food service account using cash via the terminal. |
| Check | Check button displays on the terminal. | Check button does not display on the terminal. |
| Check Options |
Deposit on Account: Allows a patron to make a check deposit to their food service account via the Point of Sale. Deposit Change: Allows cashier to deposit change from a check transaction into a patron’s account. Return Change: Do not use this for check transactions. |
Deposit Change: Cashier will not have the option to deposit change from a check transaction into a patron’s account
Return Change: Cashier will not have the option to return change from a check transaction into a patron’s account Deposit on Account: Patrons will not be able to make a deposit to their food service account using a check via the terminal. |
| Cash Drawer
Cash Drawer Options |
Cash and/or Check payments must be set to ON to enable the Cash Drawer. When the Cash Drawer toggle is ON, the cash drawer will open automatically in specific situations where the cashier needs access to the cash drawer. The default selection for the Cash Drawer is POS-X.
Campus supports cash drawers purchased through Campus. The following Cash Drawer Options are available.
|
This is the option for terminals without a cash drawer. If a drawer is attached, the drawer will not automatically open when processing cash transactions. |
Configurations
| Field | Description |
|---|---|
| Campus Login URL | In this field, paste the Campus application URL that you copied in step 1 of the Install a POS 2.0 Terminal instructions then click the Verify button. |
| District Secret | The District Secret authorizes the terminal to pull data from Campus. You can find and copy the District Secret from Display District Secret button in Food Service > Administration > Terminals.
 District Secret |
| Data Interchange URL | This is the URL used to communicate DIS messages between the POS terminal and the Campus application server. This field is read-only. |
| Point of Sale Application Name | The POS application is the set of purchasable items and service layouts set up for use on the terminal. In Campus, this is located in the Application Manager tool.
Application names with some special characters will cause a warning message. These include:
|
| Point of Sale Terminal Name | The terminal name the district has assigned to the POS. In Campus, this is located in the Terminals tool. |
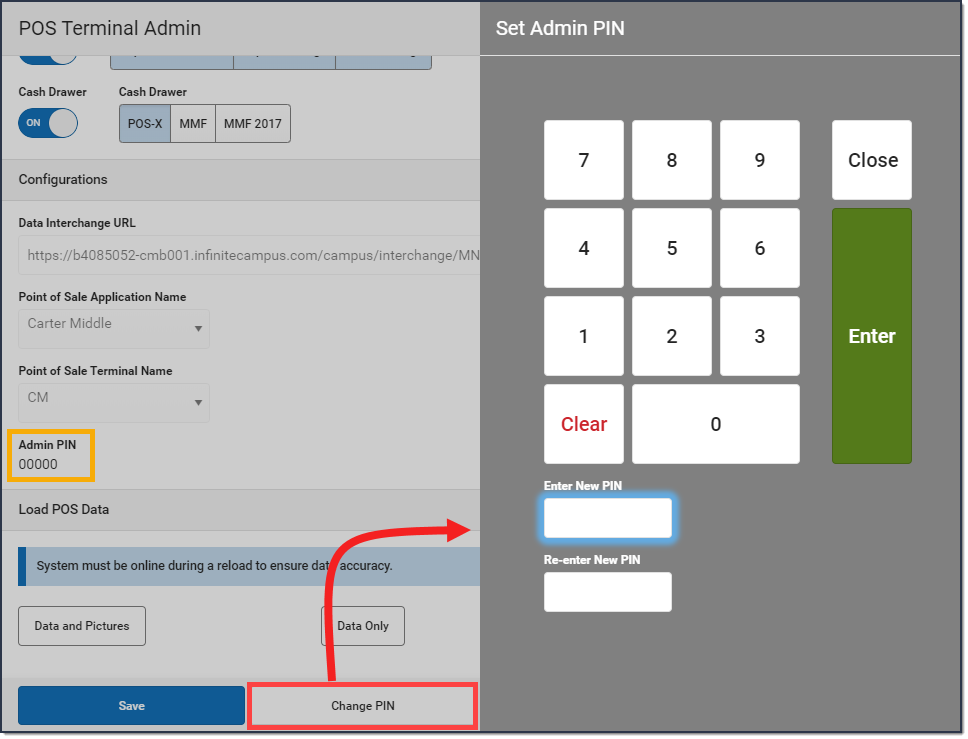
Admin PIN
Admin PIN |
This is the PIN necessary for the POS Admin to (re)load POS data, make changes to POS options and review read-only POS configuration data in the POS Terminal Admin. The Admin PIN is different from the Windows application user password.
Before you set up the Admin PIN for the first time, fill in the Configurations fields and click Save. If you try to set up the Admin PIN before saving your configuration, an error message will display on the Set Admin PIN screen. Click the Change PIN button at the bottom of the POS Terminal Admin screen to create or change the Admin PIN.
 Change PIN. Change PIN. |
| Terminal Inactivity Time Out | Determines when the POS terminal will automatically log out after remaining inactive for the set time. Time can be set to a minimum of three minutes and a maximum of 90 minutes. |
Load POS Data
| Field | Description |
|---|---|
| Data and Pictures | Loads patron/menu data and patron pictures. |
| Data Only |
Only loads patron/menu data. |
| Pictures Only | Only loads patron pictures. |
Miscellaneous
| Field | Description |
|---|---|
| View Licensing Info. | Displays information related to the software incorporated by the POS system. |
| Export Support File |
Exports a POS error message log file for Campus Support to troubleshoot terminal database, messaging, or log failures that occur. The Export Support File tool should only be used in coordination with an Infinite Campus Support Representative. |
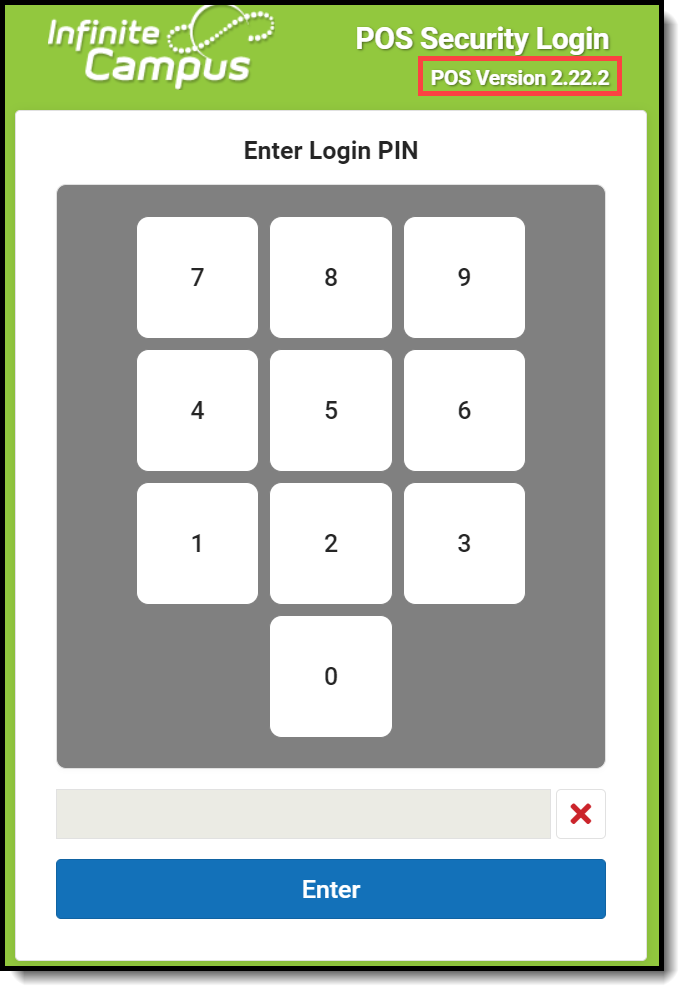
Find the POS Version on Your Terminal
To find out which version of Point of Sale your terminal is running, open the Campus Point of Sale tool. The version of Point of Sale that your terminal is running displays in the upper right-hand corner of the login screen.
 POS Version
Laptop and Tablet Display Settings
POS 2.0 was developed with a responsive design. Because of that, POS 2.0 can be used on a standard touch screen terminal, a laptop, a Windows 10 tablet such as a Surface Pro and a Windows 10 8" tablet such as the POS-X Ion tablet.
We recommend using the following display settings on these types of terminals. Be sure to validate the application is the correct size on your terminal.
| Terminal | Recommended Display Settings |
|---|---|
| Surface Pro |
|
| POS-X Ion Tablet |
If POS 2.0 does not display correctly on your terminal, you can shrink the size of this page using the Ctrl - feature from the Windows virtual keyboard. |
Uninstalling the Terminal
Point of Sale terminal requires the application and the related terminal data. Terminal data is stored in a separate directory and is managed separately.
The terminal software may be uninstalled and then re-installed on the terminal if needed.
Option 1: Uninstall using the Apps & features option in Windows Settings.
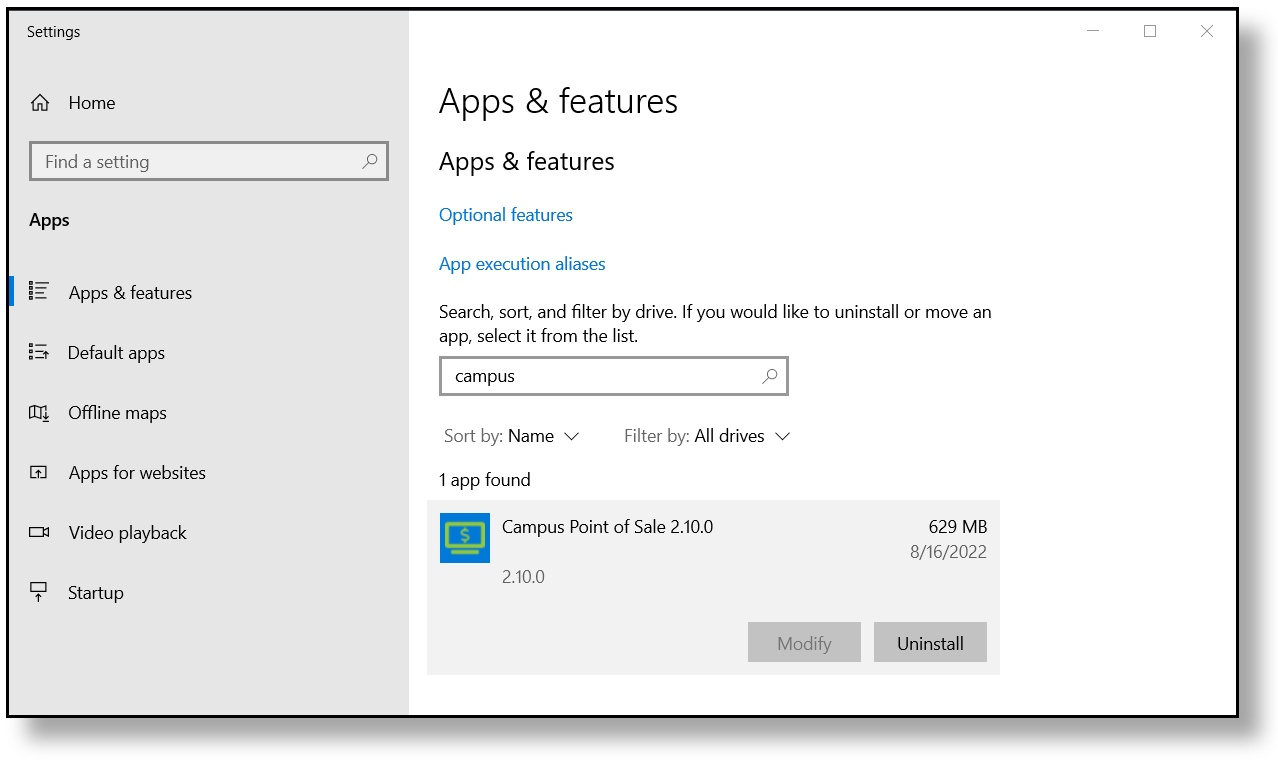 Apps & features
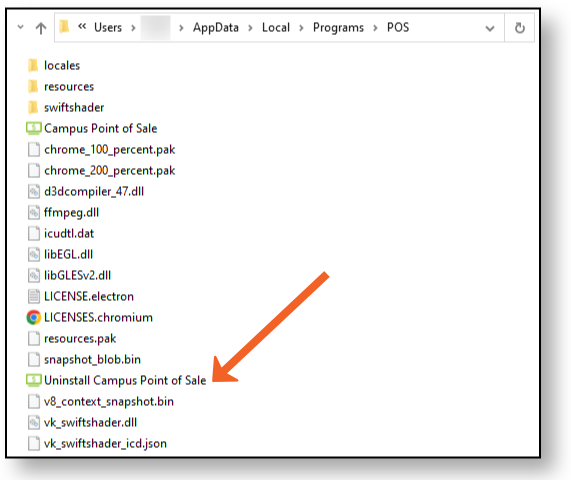
Option 2: Uninstaller Application
The uninstaller can be found in the installed folder. The default location is C:\Users\<username>\AppData\Local\Programs\POS
 Uninstaller Application
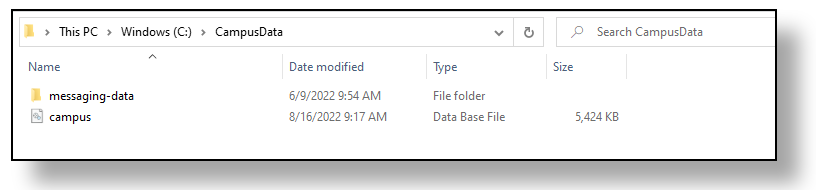
Removing Point of Sale Data
Point of Sale/Terminal data should only be removed if the terminal is being decommissioned and will not be used for Campus Food Service or if recommended by Campus Support.
Terminal data includes the database of transactions processed on the terminal, student photos, and messaging queues. This data is stored in a top level directory on the hard drive. Uninstalling the software does not affect these files. If a terminal is being decommissioned, this folder should be deleted.
 Remove Point of Sale Data
