This functionality is only available to customers who have purchased Campus Point of Sale as add-on functionality.
Tool Search: Balance Letter
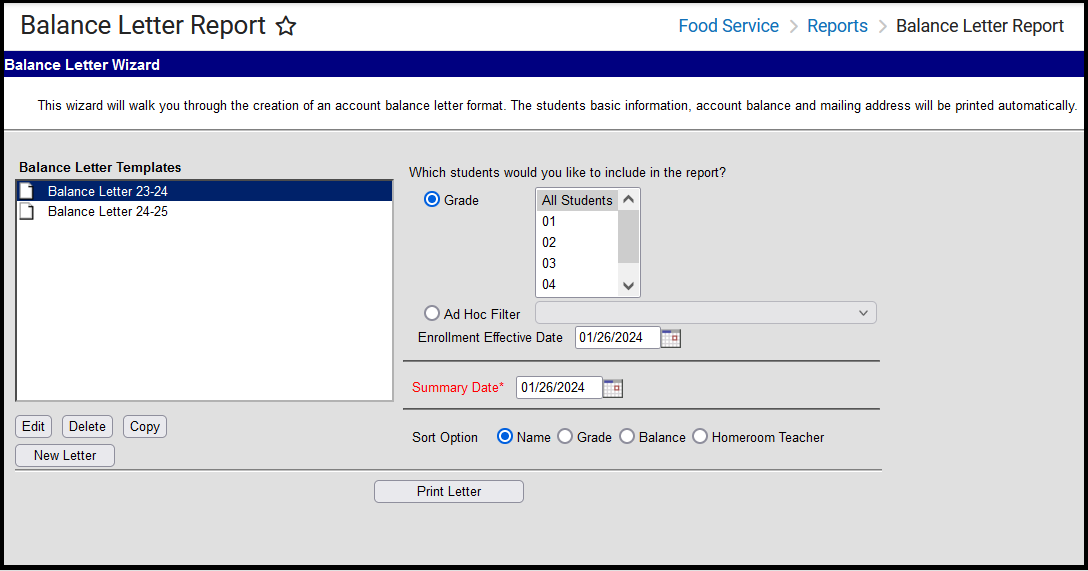
The Balance Letter Report allows you to create a letter that includes the patron’s POS account balance. It offers basic demographic information, an account balance, and the mailing address. Letters can be saved for quick retrieval and generation at future dates.
The Balance Letter does not work for students that are end dated. To send an account balance letter to guardians of end dated students, use the Patron Balance Report.
 Balance Letter Report
See the Food Service Reports Tool Rights article for information on rights needed to use this and other food service reports.
Create a POS Account Balance Letter Template
- Select the New Letter button located underneath the Balance Letter Templates area.
Result
The Trigger Criteria screen displays.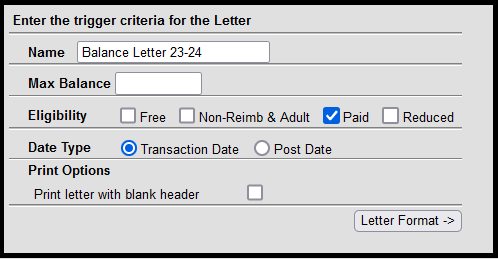
Use the information in the following table to complete the fields on this screen.
Field
Description
Name
This name should be representative of what the letter contains. For example, if the letter is only for students that have a reduced eligibility, the template might be named “Patron Balance – Reduced.”
Max Balance
Enter the maximum balance of the accounts that should be returned. This balance is limited to six digits – four places before the decimal point, two places after the decimal point (dddd.cc).
Eligibility
Select which patron eligibility statuses you want to return.
Date Type
Select one of the following options: Transaction Date or Post Date.
Transaction Date is the date the meal was purchased. Post Date is the date the transaction is listed on the account. These dates are often the same.Print Options
Mark this checkbox to print letters with the blank header.
- Click the Letter Format button.
Result
The WYSIWYG editor, where text for the letter is entered, displays.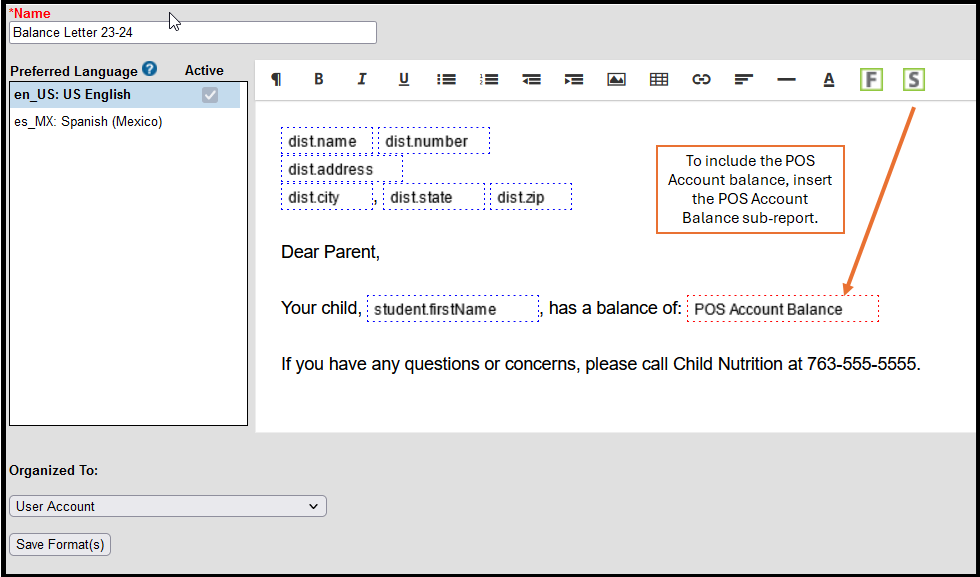
Type the text of the letter in the Format section in English.
Use the standard formatting buttons to emphasis important items.
Note the last two icons of the WYSIWYG editor. These are the Field Properties and Sub-Report Properties. Select items from these ad hoc fields to pull data connected to the letter.
To return the POS Account Balance, you must select the POS Account Balance from the Sub-Report Properties. Do NOT select the POS Account Balance from Field Properties. The Field Properties return static data contained in Campus and Sub-Report Properties return the most current calculated balance for the patron when letters are printed. Since the POS Account Balance can change throughout the course of a day, the Sub-Report Properties are required.
If necessary, enter translated text to send the same letter in non-English formats for those individuals who are assigned a Preferred Language that is not English. See the Letter Format for more information about this process.
- Select the Organized To dropdown list to assign the letter to a certain user group.
- Click the Save Format button.


Inserting an Image into a Letter
Images in any of the approved formats can be added to letters. If you have trouble with a .JPEG image in FOP, try opening it with an image processing program (such as Photoshop or Gimp) and then save it. Specifying 24-bit color output may also help.
For the PDF and PostScript renderers, most .JPEG images can be passed through without decompression. Grayscale, RGB, and CMYK color spaces render properly; however, for other output formats, the .JPEG images have to be decompressed.
Refer to the WYSIWYG Editors article for more information.
Generate the POS Balance Letter
- Select the letter to generate from the Balance Letter Template area.
- Select which Grades to include on the report. All students in the selected school can be selected, as well as individual grade levels. Alternatively, the user may select an Ad hoc Filter to use when generating the report.
- Enter an Enrollment Effective Date. This date will not include students who have ended enrollment as of this date.
- Enter a Summary Date. This date will capture the account balance as of that date. This is a required field and will be defaulted to the current date.
- Select the Sort Option for the letter.
- Click the Print Letter button. The report will generate, displaying the elements included in the report.
Edit or Deleting POS Balance Letters
To make changes to a letter, select the letter from the Balance Letter Templates area and select the Edit button. Follow the instructions for modifying criteria and save the changes.
To delete a letter, select the letter from the Balance Letter Templates and select the Delete button.
