Campus Parent: More > Meal Benefits Application
Campus Student: More > Meal Benefits Application
The Meal Benefits Application allows parents/guardians and emancipated students to electronically submit Meal Benefits Applications to their district.
In order to complete the Meal Benefits Application, the application signer must complete the following steps:
 Accessing the Meal Benefits Application
Step 1. Create an E-Signature PIN
If you already have a PIN or if your district does not require a PIN, skip to Step 2.
If required by your district, the E-Signature PIN allows you to submit an electronic signature with the application which is treated the same legally as a signature made on the paper application.
 Notification of No E-Signature PIN Established
To create an E-Signature PIN, click the Yes button. The Create your PIN editor will display.
To create a PIN, enter the PIN, Re-enter the PIN, enter your current Campus account Password and select the Submit button. Your PIN is now saved within Campus and available for use with any documents or forms which require a PIN for signature or verification. To change you PIN, go to the Account Settings tool.
 Creating an E-Signature PIN
Step 2. Review the Letter to Household
The application signer must review the Letter to Household prior to beginning the application process. This letter contains important information and guidance about the online Meal Benefits Application.
After you review or print the letter for reference, click the Next button to review the application's instructions.
FRAM Administrators
 Reviewing the Letter to Household
Step 3. Review Application Instructions
The application signer must also review the Application Instructions prior to beginning the application process. These instructions can also be printed and contain important information about the application process and submission.
After you review or print the Application Instructions for reference, click the Next button. The Signer Confirmation screen displays.
FRAM Administrators
 Reviewing the Application Instructions
Step 4. Review and Confirm Signer
Once both the Letter to Household and Application Instructions have been reviewed, the person completing the online application must confirm their identity as the application signer.
If the identity information is correct, select the Next button.
FRAM Administrators
 Verifying the Signer's Identity
 Step 5. Confirm Household Members
The application signer must confirm all people living within their household.
Mark the checkbox next to the name of each person within your household. Once all members have been marked, select the Next button.
In order to complete the remaining steps of the application process, it is critical Household members are identified.
FRAM Administrators
Campus considers the Eligibility Effective date when populating the student's School. If there are overlapping enrollments within the same calendar year, Campus uses the school from the most recent enrollment.
 Verifying Household Members
 Adding a Household Member
If a household member does not appear in the list, you can manually add them. This often occurs when someone has just moved into the household or the person filling out the application does not have access to a specific family member within the Portal.
The manually added student household member must exist in Campus at the time the FRAM Processor processes the application. If the manually added student member does not exist within Campus, the application cannot be processed and must be suspended if the district cannot confirm the validity of the student member.
- Click the Add Household Member button.
Result
The Add Student/Non-Student Member editor displays.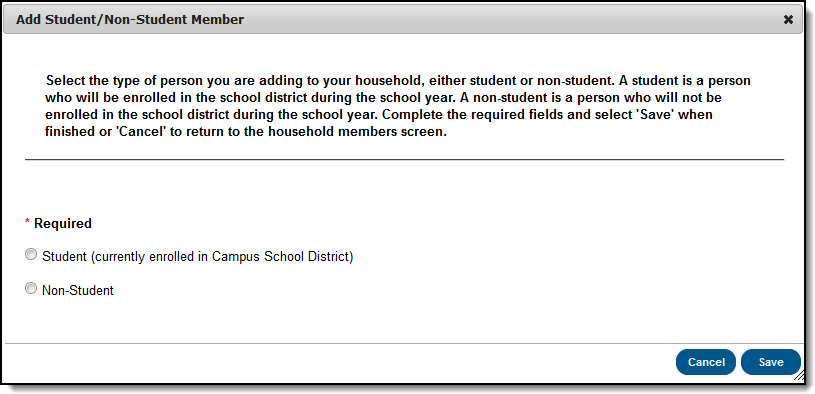
Select whether the person is a Student or Non-Student and click the Save button.
A Student is a household member who will be enrolled in the district during the school year.
A Non-Student is any household member who will not be enrolled in the district during the school year.
Result
The Add Student/Non-Student Member window displays.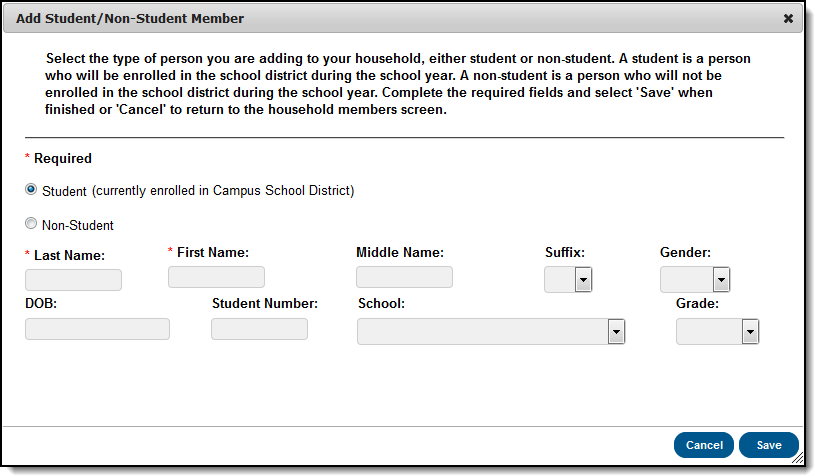
Enter information about the household member in all required fields and select the Save icon. Required fields display with a red asterisk.
Result
The Household Members Confirmation screen displays. The added household member appears on the Household Members screen with the words (Manual Add) appearing after the person's name. To remove the person from the household, select the black X on the far right of the screen.The School and Grade (and Student Number, if known) fields are important for application processing as the FRAM Processor uses these fields to better identify and match this student to records within Campus.
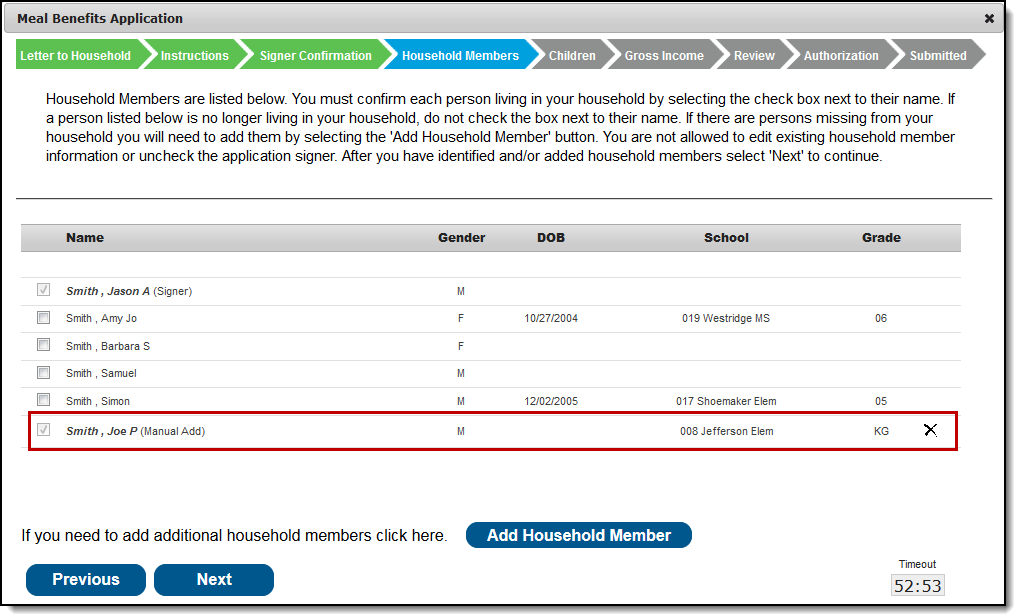
Once all household members have been identified, select the Next button.


Step 6. Indicate Meal Benefits
Once household members have been identified, the application signer is asked whether any household members receive SNAP, TANF or FDPIR benefits.
FRAM Administrators
 Identifying SNAP, TANF or FDPIR Benefits
| If household member(s)... | Then... |
|---|---|
| do NOT receive benefits | click No. You will be directed to the Children screen (see Step 7). |
| DO receive SNAP, TANF or FDPIR benefits | click Yes. Enter the benefit case number then click Next.
|

Step 7. Confirm Child Household Members
Now that household members have been established, children in the household must be identified. Mark the checkbox next to the name of each child household member then click Next.
If a household member is marked as a Child but does not have a current enrollment record in the district, a confirmation message displays after you click Next. On the confirmation message, you can correct any errors before continuing.

FRAM Administrators
 Identifying Child Household Members
Step 8. Indicate Foster Children
Once student household members have been identified, the application signer must indicate whether any of the student household members are foster children.
 Identifying Student Foster Children
| If a household member... | Then... |
|---|---|
| IS a foster child | click Yes. Mark the checkbox next to the name of each student household member that is a foster child, enter their Monthly Income and select the Next button. |
| is NOT a foster child | click No and go to step 9. |
 Selecting Foster Children
Step 9. Indicate Migrant, Homeless, Runaway, and Head Start Children
Once Foster students are identified, the application signer must indicate whether any of the student household members are Migrant, Homeless, Runaway, or Head Start children.
 Prompt for Migrant, Homeless, Runaway, or Head Start Children
| If a household member... | Then... |
|---|---|
| IS a Migrant, Homeless, Runaway, or Head Start child | click Yes. Select one of the following options from the Student Indicator dropdown for the appropriate student(s) then click Next: Homeless, Runaway, Head Start, Migrant.
|
| is NOT a Migrant, Homeless, Runaway, or Head Start child | click No and go to step 10. |

Step 10. Enter Household Gross Income
Now that household members have been identified, income must be entered for each member.
FRAM Administrators
Per USDA policy, income may only include whole dollar amounts.
| If... | Then... |
|---|---|
you want to enter income information | indicate each household member's income by selecting the Add Income button and entering their income amount. OR Mark the No Income checkbox for each household member that has no income. Once all household member income is entered, click Next. |
| you do NOT want to enter income information | click Next. If income is not specified, you are certifying that you have no income to report. Your application will be processed as No Income and be approved for free benefits. |


 Indicating Household Member Income
Step 11. Review Household Information for Accuracy
Now that household members (and their benefits) have been identified, household information must be reviewed for accuracy.
The Total Income column lists the total amount of money each household member makes based on the frequency noted (i.e., monthly, yearly, etc). Frequencies listed in this column are automatically annualized across all members. The Total Household Income field indicates the total amount of income the household (all members included) earns per year. The Total Household Size indicates the total amount of members within the household.
Review all the information on the screen and if it is accurate, select the Next button. If this information is incorrect, select the Previous button to go back to the previous step and correct inaccurate information.
FRAM Administrators
 Reviewing Household Information for Accuracy
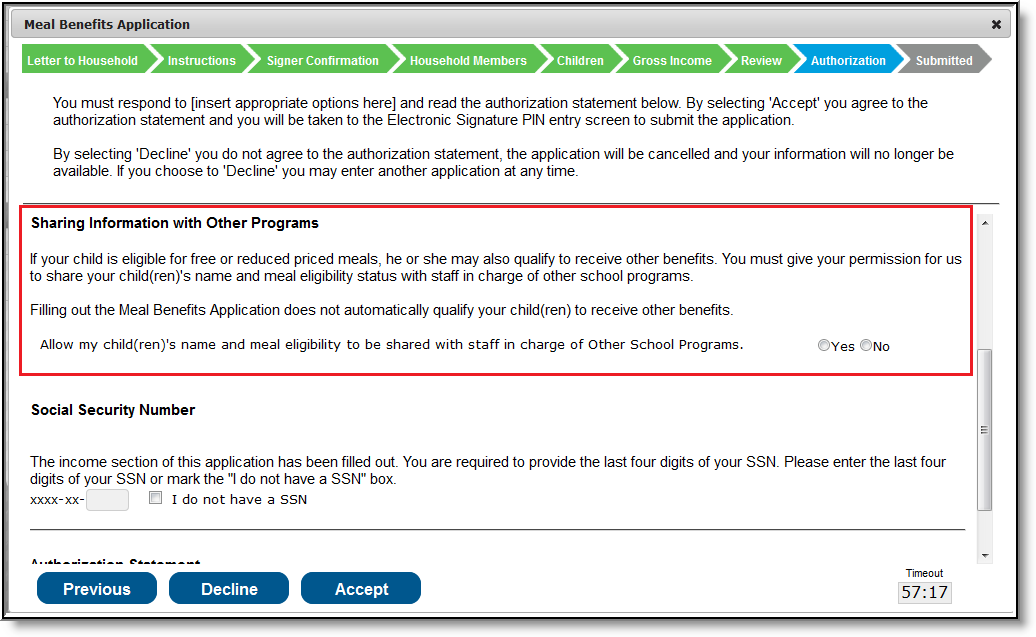
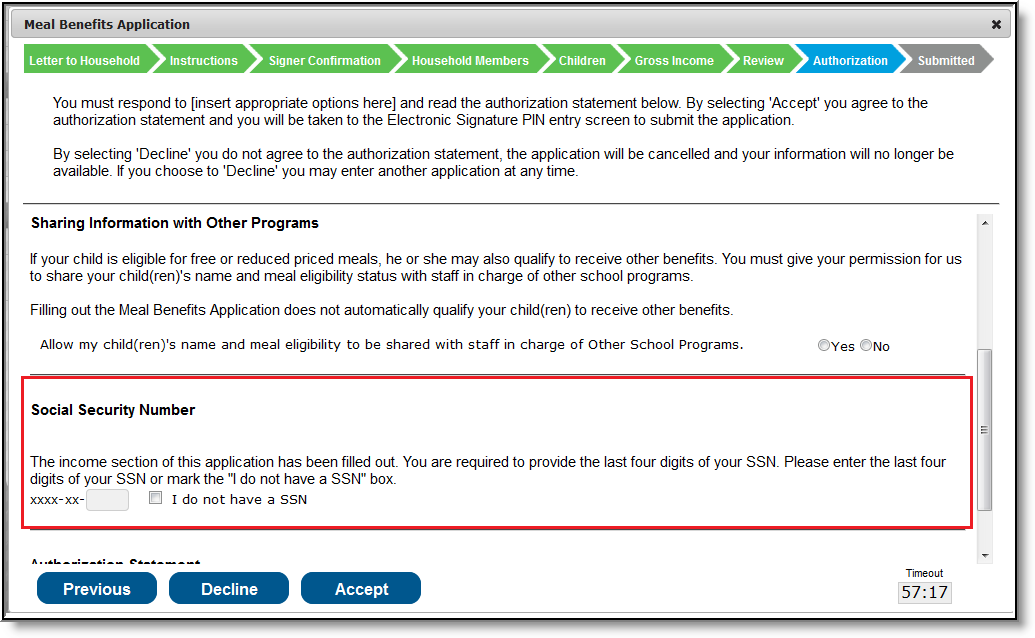
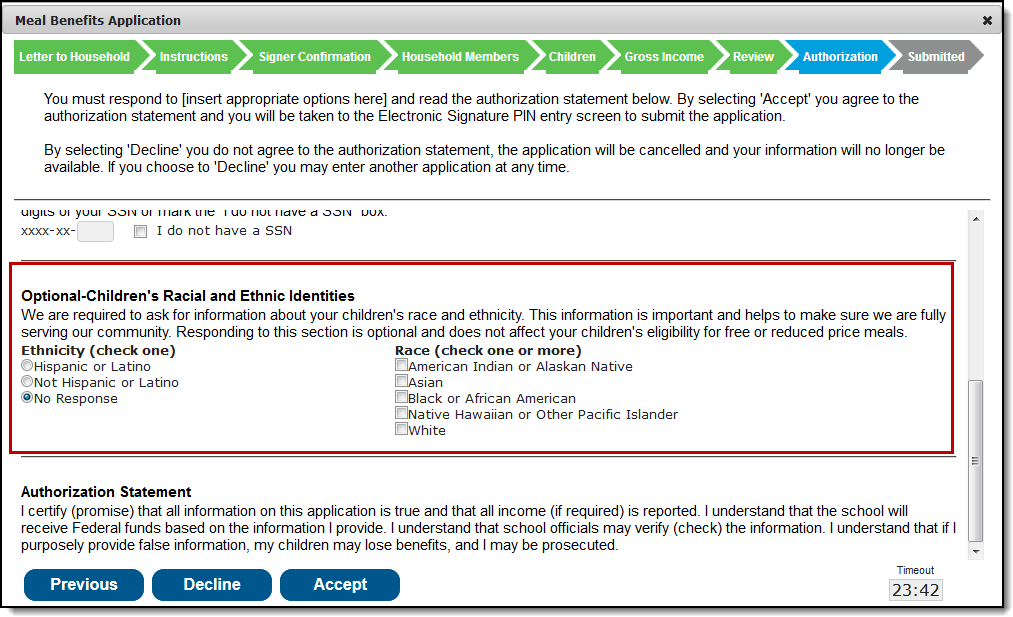
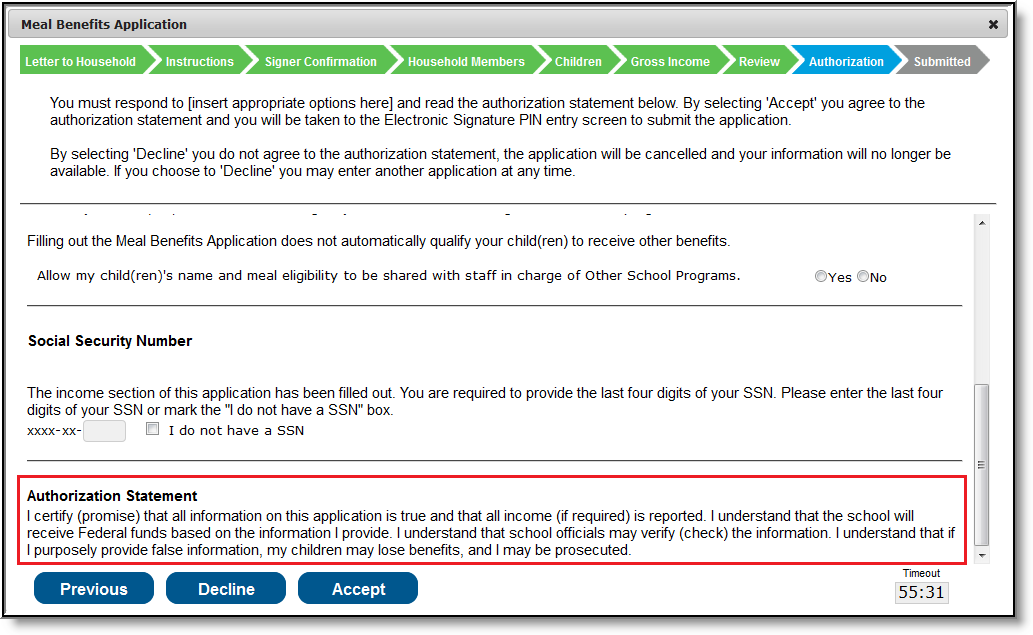
Step 12. Authorize Household Application
Now that all household information has been entered and confirmed as accurate, the household application must be authorized.
FRAM Administrators
Authorization information can be modified in the Application Instructions template within the Online Application Editor.
| Example | Description |
|---|---|
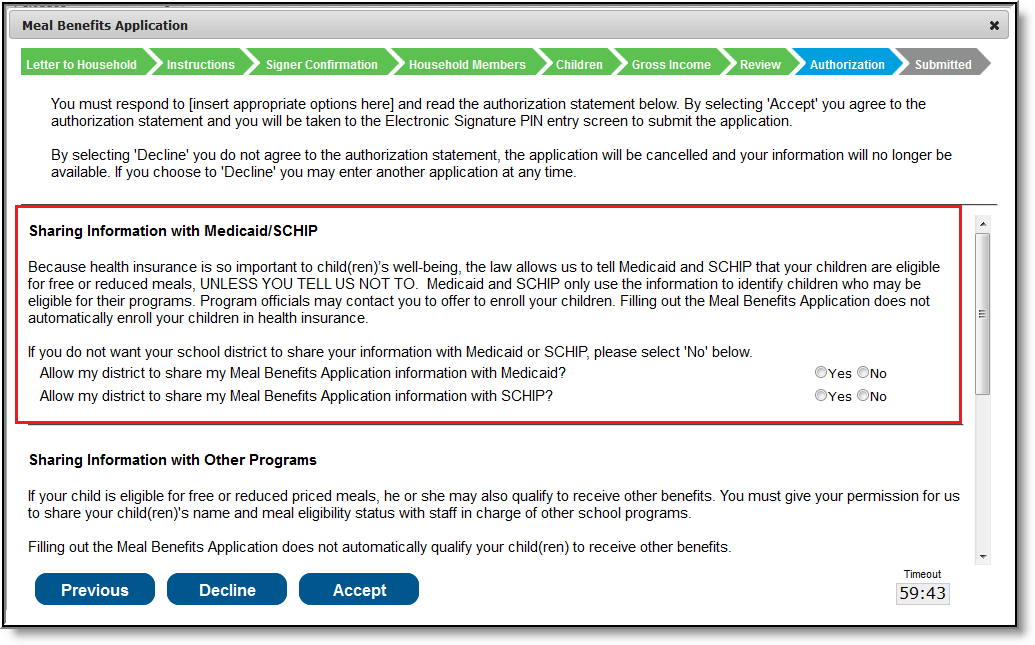
| The first step in the authorization process is to indicate whether you give your district permission to share your Medicaid or SCHIP information with Medicaid and SCHIP. Select the Yes or No radio buttons for each question. |
| If your district has created benefit permissions, you will be asked whether you consent to the district sharing your child's name and meal eligibility with each benefit program. Select the Yes or No radio button for each question shown in the Sharing Information with Other Programs section. |
| You must provide Social Security information. Enter the last four digits of your SSN or mark the "I do not have a SSN" box. |
| This section is optional and informational only. Responding to this section does not affect your children's eligibility for free or reduced price meals. |
| Review the Authorization Statement. If you agree with this statement, believe all entered information is accurate and would like to complete the application process, select the Accept button. If you do not agree with the application and Authorization Statement, select the Decline button. If the Decline button is selected, a message will appear warning you the application process will be cancelled and all application information entered will be deleted. |
Step 13. Electronically Sign the Household Application
Once you have reviewed the application and agreed to the Authorization Statement, you must review the Terms of Use.
 Terms of Use and Entering E-Signature PIN
If you agree to the Terms of Use and would like to sign the document with you legally-binding E-Signature, Enter your E-Signature PIN and select Submit.
If you do not want to electronically sign the application, select the Do not use E-Signature button. This action will cancel the application due to the need for the application to have a legally-binding electronic signature in order to meet state and federal guidelines
If you forgot your PIN, click the Forgot you PIN button. You will be redirected to the Reset your PIN editor where you can reset your PIN.
 Resetting a Forgotten PIN
Step 14. Review and Print Submission Notice
The application has now been submitted to the district for processing.
FRAM Administrators
 Application Submission Notice
You may print and/or save the Confirmation Submission Notice and the Benefits Application Summary Report for your records. You may also access this information in your Inbox.
 Inbox Message Indicating Meal Benefits Application Submission
Your Inbox will contain a message indicating submission of the Meal Benefits Application. Select the link to review the Confirmation Submission Notice and the Application Summary Report. The FRAM Processor(s) will also receive an Inbox notice indicating your application was submitted.
After the FRAM Processor has processed the application, you will receive an Inbox message indicating the application was processed. If your district has enabled the Include Approval/Denial Letter FRAM Preference, you will receive an Inbox message containing a PDF copy of your Approval/Denial Letter which indicates whether the application was approved or denied.
