This documentation applies to both versions of Online Registration.
Tool Search: Health Processing
Health Processing allows staff to review parent-submitted health information and add medications or conditions to the student's records.
 Health Processing
Once a parent or guardian has entered an online registration through the Portal, the designated health staff person can begin processing the application for specific health concerns. Applications can be reviewed by status, by first name/last name of the person who entered the registration, application number (assigned when the application is submitted) or an email address of the person who entered the registration.
Staff can only search for applications associated with the calendar rights assigned to them (unless the Disable Calendar Filter for Staff Processing checkbox is marked). For example, a user who has rights to the Middle School and not to the High School can only view and approve applications for students at the Middle School.
Health Processing Search Editor Fields
| Option | Description |
|---|---|
| Application Number | System-assigned number associated with the application. |
| Student Number | Locally assigned identification number for the student. This number is created when the enrollment is saved. |
| Student First and Last Name | Legally recognized name of the student. |
| First and Last Name | Legally recognized name of the parent/guardian who entered the application. |
| Email Address | Email address entered when the application was created, usually of the parent/guardian. |
| Application Start and End | Date fields used as a range to return applications entered between the two dates. |
| Application End Year | Indicates the ending school year for which the application is associated. For the 2024-25 school year, the end year is 2025. |
| Configuration Group | Indicates the Configuration Group for which the application is associated. |
| Application Status | Indicates the status of the application. This includes all core statues, link errors, post errors and custom statuses. Core statuses are as follows:
|
| Medical Status | Indicates the status of the student's medical/condition history.
|
| Health Type | Indicates the type of health record:
|
| Max Application Returned | This field can be used to minimize a large number of returned applications in the search results area. Options include 100, 500, 1000 and al. |
| Health Approval Status |
Indicates the status of the application for the entered health reasons:
|
Applications matching the entered criteria are displayed on the Search Results tab. Upon selecting an application to review, click Review Application to open the list of students in the application.
 Health Processing Search Results
Students in Application
On this screen, you can see all the students in the application, whether they have health conditions or medications attached to them, and if they have been reviewed. Select a student from the list to review their health conditions and medications.
 Students in Application
Health Conditions and Medications Review
When reviewing student’s health conditions or medications, the health staff sees information added by the parent. From this screen, the health staff can directly open the student’s health Conditions and Medications tools for data entry by using the buttons at the bottom of the screen. These buttons will open the student's Conditions or Medications tools in a separate browser tab and will continue to refresh that tab as they review other students and click those buttons again. See the Conditions and Medications articles for information on how to enter student medical information into Campus.
Click Flag as Reviewed for each Health Condition or Medication to track progress, enabling an easy return to Health Processing if interrupted.
 Health Review
There are three colors that will indicate the status of a health condition or medication:
- Yellow boxes indicate that the health condition or medication is New:
- If a new health condition is not linked via the OLR Lists Bank (in the person-healthConditions list), the box will remain yellow even after entering the health condition for the student.
- Once you have entered the unlinked health condition for the student and click Flag as Reviewed, the health condition will be listed on the review screen a second time with a red box around it. This is intentional, as the health condition in Infinite Campus technically was not in OLR and is not linked to the one entered in OLR in any way.
- If a new health condition is linked via the OLR Lists Bank (in the person-healthConditions list) and the condition is posted using the "Post Health Condition" button, the box will turn blue.
- New medications will always show as yellow boxes, even after entering the medication on the student.
- If a new health condition is not linked via the OLR Lists Bank (in the person-healthConditions list), the box will remain yellow even after entering the health condition for the student.
- Blue boxes indicate the following:
- Existing Health Conditions or Medications.
- New Health Conditions that were linked via the OLR Lists Bank (in the person-healthConditions list) and the condition was posted using the "Post Health Condition" button.
- Red Boxes indicate a Health Condition or Medication was not in the OLR application, but was in Infinite Campus.
Post Health Condition
The Post Health Condition button is used to post a new linked health condition to Campus.
 When this button is clicked, a pop-up window will appear, allowing the user to enter staff initials and include comments from the parent. Furthermore, the user can set a health condition flag for the student and add a user warning related to that flag.

The health condition must be configured to allow flags for these options to function correctly.
Health Processing Approval
Once all health conditions and medications have been verified for the student, the health staff will flag the student as Health Approved. Repeat these steps as needed for each student in the application. This will flip the Student's Review Status to Approved above and on the prior Student in Application screen.
 Health Review - Health Approve/Save
 Health Review - Student Application Health Staff Approved
To undo the approval, click the Undo Health Approval button (available for OLR Prime only).
 Undo Health Approval
Map Health Conditions
Locate and have available the Description and Code of the health condition from the Condition List (Student Information > Health Administration > Condition Setup). Health Conditions, Health Literals Values
- Select the person-Health Conditions from the OLR List Bank field.
- Click Add Row.
- Enter the Description and Code from the Condition List for the conditions that should be mapped on the List Bank Translations tool.
- Click Save. The Health Processing tool displays the mapped conditions.

In order to map the medical/mental health conditions:
- Mark the Post Health Condition for each condition that should be mapped.
- Staff need to add their initials.
- Open the conditions to review or post student conditions.
Verify the conditions are there by clicking the Medications tab on the Health Processing view. Medications do NOT post automatically.
If districts use the optional Type field when entering conditions into the Condition List (Student Information > Health Administration > Condition Setup), the Type and Condition must be entered together, with no spaces, in the OLR Lists Bank Code field.
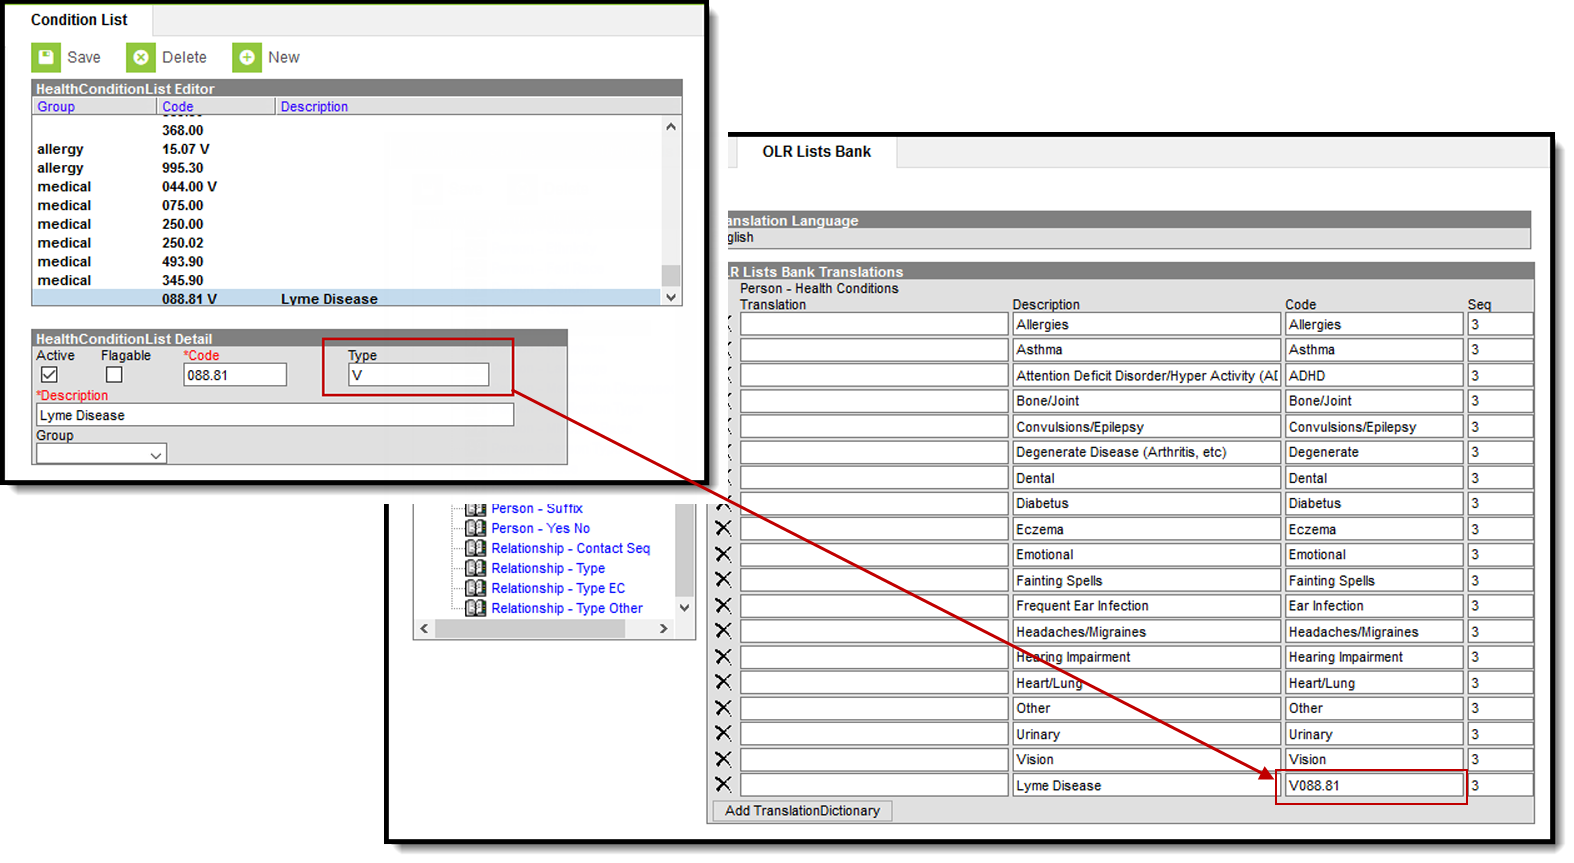 Condition List Type OLR Lists Bank Setup
