Tool Search: Walk-In Scheduler
The Walk-In Scheduler allows modification of a student's schedule and is accessed from the Student's Schedule by clicking the Walk-In Scheduler button in the action bar at the bottom of the page.
As part of the overall Scheduling process, enrolling students in Cross-Site Courses occurs AFTER all other Scheduling at both the Home School and the Serving School is complete and the Scheduling Trial is marked Active.
See the following for more information:
Cross-Site courses display with the Cross-Site indicator ( ) when searching for them, when they are placed/added to the student's schedule and when printing the student's schedule.
 Walk-In Scheduler Options for Cross-Site Courses
Read - View and access the Student Schedule.
Write - Add Course Sections using the Walk-In Scheduler.
Add - N/A
Delete - Remove course sections from the student's schedule.
See the Tool Rights section for more details on what actions can be performed with each right.
The information in this article assumes a basic understanding of how students are scheduled in the product and only covers how to schedule for Cross-Site.
See the following articles for a more detailed experience of scheduling tools:
Requests for Cross-Site courses are not possible. A student can never request a Cross-Site course and a counselor can never request a student to take a Cross-Site course at either the home school or serving school. The counselor must manually search for and add a Cross-Site course to the student's schedule.
As mentioned above, students should be scheduled into Cross-Site courses after all other scheduling (Scheduling Board, Requests & Rosters, Course Planner, Staff Planner, etc.) is complete at the school or district.
Cross-Site sections are EXCLUDED from the Scheduling Board.
- Cross-Site sections do not display on the schedule grid.
- Cross-Site sections are not deleted when saving Scheduling Board changes because they are excluded from the Board.
Cross-Site courses can be scheduled into the same block/period as a non-Cross-Site Course and into the same block/period as another Cross-Site Course. Keep, Drop and Replace functionality applies as well.
Cross-Site students are EXCLUDED from the following tools at the Serving School:
Cross-Site Enrollment Creation
A Partial Enrollment record is created at the Serving School as soon as a Cross-Site course is added to the student's schedule (i.e., the student is added to the section roster) with a start date of the first day the Course Section meets. Their enrollment record looks something like this:
 Partial Enrollment Created with Cross-Site Course Scheduled
The following fields are populated in the database in the Enrollment table with the creation of a Cross-Site enrollment:
|
|
Counselors at the Home School cannot overload a Course Section at the Serving School, regardless of assigned tool rights.
Sharing of Roster Data
Roster data is shared with the Serving School when a Cross-Site Course is added to a student's schedule. Modifications to that roster record trigger a Roster Add, Roster Update, or Roster Delete action to be sent to/from the Home School and to/from the Serving School.
Upon adding a roster record for the student (done via the Walk-In Scheduler), data is sent from the Home School to the Serving School that includes basic student demographic data, enrollment information, and roster data.
The student schedule at the Home School displays a Pending Roster label. At this time, the roster is locked and cannot be modified. The side panel does not open and a message indicates that the roster cannot be updated.
Logic checks that a census record does not exist at the Serving School; when data for that student is NOT found, a new Census record is created. When that data is missing, the are not included, a failure is sent back to the Home School and the roster add action fails.
Once the Census data is found or added at the Serving School, the Cross-Site Enrollment process continues with the creation of a Cross-Site Enrollment and the addition of a Roster record in that course.
- An Enrollment History record is created at the Serving School for the Home School.
- A Roster record is created at the Serving School.
- Upon refresh of the screen, the Pending Roster label is removed at the Home School and the student is officially added to the Interdistrict Cross-Site Course.
- An Enrollment History record is created at the Home School for the Serving School.
Schedule Management
Both the Home and Serving Schools are able to manage the student's schedule for the Cross-Site courses. Refer to the table below for what happens when a student is removed from the Cross-Site section by either the Home or Serving School.
| Action | Home School | Serving School |
|---|---|---|
| Section is deleted from the student's schedule PRIOR to the start of the course and the student is no longer enrolled in ANY Cross-Site courses at the Serving School. | Section Roster is deleted. | Enrollment record (and roster record) is deleted. |
| Section is removed from the student's schedule and the student is still enrolled in other Cross-Site Sections at the Serving School. | Roster for deleted section is removed. Roster information for other Cross-Site courses remains. | Enrollment record remains and dates are updated as needed to match the start dates of the enrolled course sections. |
| Section is end-dated on the student's schedule prior to the last day of the course and the student is no longer enrolled in ANY Cross-Site courses at the Serving School. | Section roster is end-dated and displays with an end date on the Schedule and in the Roster Update panel. | Enrollment record is end-dated, along with Roster record. |
| Section is end-dated from the student's schedule prior to the last day of the course and the student is still enrolled in other Cross-Site Sections at the Serving School. | Roster for ended section is updated to include the end date. Roster information for other Cross-Site courses remains. Schedule displays the end date in the course grid and in the Roster Update panel. | Enrollment record remains and dates are updated as needed to match the start dates of the enrolled course sections. |
Counselors at the Home School and Serving School can interact with the student's Schedule as needed to manage Cross-Site Students and Courses. There are limitations to what the Counselor can modify on a Cross-Site Student's schedule.
| Action | Home School Counselor | Serving School Counselor |
|---|---|---|
| End-date or delete Cross-Site Students from Course Sections | Yes | Yes |
| Manually add the Cross-Site student to more classes, both Cross-Site and regular classes | Yes | No |
| End the Cross-Site student's schedule | Yes | No |
| Load the Cross-Site student's schedule | Yes | No |
| Restore the Cross-Site student's schedule | Yes | No |
| Unload the Cross-Site student's schedule | Yes | No |
| Lock or unlock courses on the student's schedule | Yes | No |
| Mark the Lock, Repeat, No Credit checkboxes on the Roster Update panel | Yes | No |
| Modify the Start Date and End Date (when one already exists) on the Roster Update panel | Yes | No |
| Search for courses | Yes | Yes |
| Select a course to add to the student's schedule | Yes | No |
Search for a Cross-Site Course
Use the Search Panel to find Cross-Site courses to add to a student's schedule.
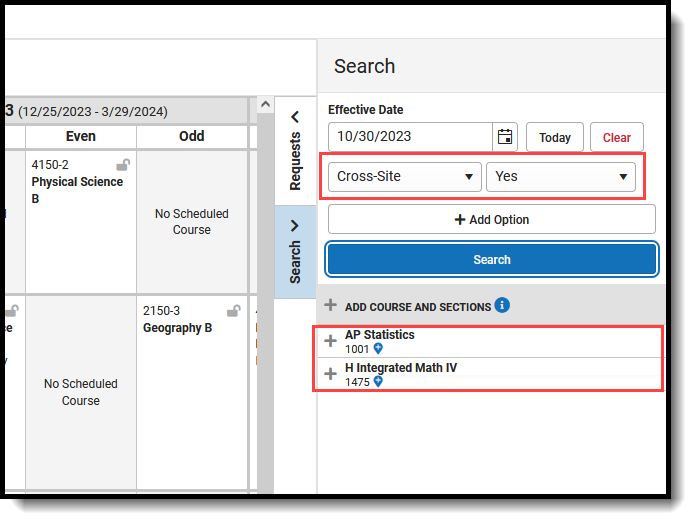 Walk-In Scheduler Search Panel set to Cross-Site Courses Only
Only current Cross-Site Courses/Sections are included in the search. Mapped Cross-Site Sections that have passed the Section End Date do not display in the search results.
- Enter the Effective Date of the student's enrollment in the course (when the student BEGINS attending the course). Enter this in mmddyyyy format, choose the calendar icon to select a date, or click the Today button to begin the course on the current date. Entered dates must be within the term dates of when the course meets. The entered date remains after adding a course.
- Select the Search Option from the dropdown list to Cross-Site and select Yes as the Parameter dropdown to return ONLY Cross-Site courses. To add more options, click Add Option.
- Click the Search button for matching results to display.
- Select the desired course from the search results by clicking the name of that course. This highlights its location on the student's schedule, and closes the Search Panel. Reopen the panel by clicking the Search option.
- Or, click the plus sign to the right of the course name to display the course sections and select a specific section.
- When the Cross-Site Course meets during a period where a standard course already exists, the row for that new course displays in green. The Schedule Update modal displays:
- When the course should be skinnied with the currently scheduled course, move the Drop/Keep option to Keep and enter an Effective Date to indicate when the student begins attending the course. Entered dates must be within the term dates of when the course meets.
- When the course should not be skinnied with the currently scheduled course (current course is dropped), move the Drop/Keep option to Drop and enter the Effective Date to indicate when the student begins attending the course. Entered dates must be within the term dates of when the course meets.
- When the course meets in an empty period (that cell currently reads No Scheduled Course), select the course and notice that the cell now has the course section highlighted in green.
- Click the cell where the course is scheduled.
- Modify the Effective Date (defaults to the current date) to add the student to the section roster on the section modal.
- Upon saving the effective date and any other information in the modal, the course is added to the schedule.
Once Save is clicked, a confirmation modal displays explaining that a partial enrollment is created at the Serving School when the student does not already have an enrollment record at that school (it is possible for a student to be enrolled in several Cross-Site Courses at several schools).
Click Continue to save the course to the student's schedule AND to create the partial enrollment.
 Confirmation of Partial Enrollment Creation
The Partial Enrollment record has a start date of when the student begins attending the course section at the Serving School (start date of the section or the effective date when the student starts after the section start date), and with the Start and End Statuses that are marked as Cross-Site Default. Hovering over the Cross-Site Course displays the Serving School and the number of seats available for Cross-Site students.
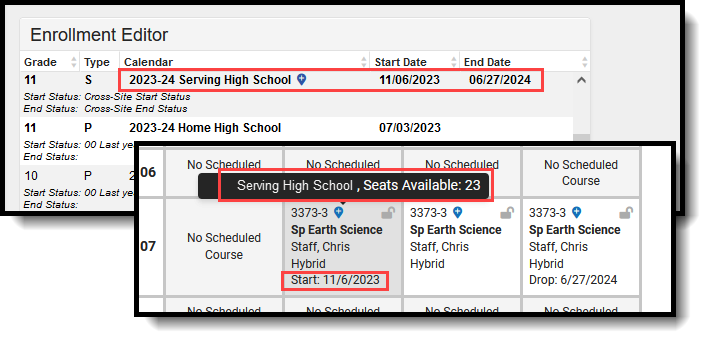 Cross-Site Course Added to Schedule at Serving High School with a Start Date of November 6
The Seats Available count displays a value between 0 (zero) and the Max Seats value. When students are scheduled into a Cross-Site section, that value reduces like it normally would.
When the Serving School modifies the Max Seat Count to a value that is less than the number of currently scheduled students, the number displays as 0 (zero). This section would display in red on the student's schedule, indicating the section is full. Any Cross-Site students scheduled into that section remain scheduled.
When the student is taking multiple courses at the Serving School, only one Cross-Site Enrollment is created, and the confirmation modal does not display. When the student is taking multiple courses at multiple Serving Schools, a Cross-Site Enrollment is created for each separate school.
Scheduling Units update accordingly with the addition (or subtraction) of a Cross-Site Course.
 Scheduling Units for Cross-Site Course
In a situation where the available seat has been scheduled BEFORE the addition of the Cross-Site course has been saved on the student's schedule, a validation occurs to ensure there are available seats. When the available seat is no longer available, a warning message displays indicating the section is now full. Cross-Site Courses CANNOT be overridden by counselors at the Home School.
Modify Cross-Site Section Rosters
Changes can be made to Cross-Site Sections manually on the student's schedule that affect the Course Section Roster list. This modifies the list of students the teacher may see in their class roster. The Roster Update panel displays when existing courses are selected. This can be done by the student's counselor at their Home School or by the counselor at the Serving School.
Be aware of start and end dates at both the home school and serving school.
- When a mapped section start date of the Serving School is AFTER the Home School term start date, a roster start date is added that is the Section Start Date at the Serving School.
- When a mapped section end date of the Serving School is BEFORE the Home school term end date, a roster end date is added that is the Section End Date at the Serving School.
- When a mapped section start and/or end dates of the Serving school fall OUTSIDE of the Home School term start/end dates, no roster start and/or end dates are added, as it assumed that they are the Home School Term Dates.
Add a Start Date to a Cross-Site Course AFTER the Term Start Date
When a student begins enrollment AFTER the start of the term, enter the date the student began attending the course. The start date may be different because the student's enrollment started after the start of the term, or the student switched course sections after the start of the term, or it's a temporary class that doesn't follow the standard term dates.
- Select the appropriate course from the student's schedule. The Roster Update panel opens.
- Enter the Start Date in mmddyy format, or use the calendar icon to select a date, or click the Today button to enter the current date. To remove the date, click the Clear button.
- Click the Save button when finished. The entered start date displays with the course.
Changing start dates may affect assignments that have been entered or historical attendance data.
 Cross-Site Section Start Date AFTER the Term Start Date
Add an End Date to a Cross-Site Course
When a student ends enrollment in a course (dropping a course, rather than ending enrollment in the school), enter the date the student stopped attending the course.
- Select the appropriate course from the student's schedule. The Roster Update panel opens.
- Enter the End Date in mmddyy format, or use the calendar icon to select a date, or click the Today button to enter the current date. To remove the date, click the Clear button.
- Click the Save button when finished. A warning message displays, indicating the Cross-Site Section is being ended. To continue with the removal, select OK. The course is ended and the entered end date displays with the course as the Drop date.
When the student drops the course on the last day of the term, the Drop Date displays on the course section, and that course that is scheduled in future terms is removed.
 Cross-Site Course - Dropping a Course
Delete a Cross-Site Course from the Schedule
When the student is only taking ONE COURSE at the Serving School, deleting a course from the schedule also deletes the Partial Enrollment at the Serving School.
- Select the appropriate course from the student's schedule. The Roster Update panel opens.
- Click the Delete button. A warning message displays indicating that ALL attendance and grading information is removed and the partial enrollment is deleted.
- Click OK to continue. The course and all its data is removed.
 Delete Cross-Site Course Confirmation where Partial Enrollment is deleted
When the student is taking MORE THAN ONE COURSE at the Serving School, the partial enrollment remains.
- Select the appropriate course from the student's schedule. The Roster Update panel opens.
- Click the Delete button. A warning message displays indicating that ALL attendance and grading information is removed. The Partial Enrollment at the Serving School remains.
- Click OK to continue. The course is removed.
 Delete Cross-Site Course Confirmation where Partial Enrollment Remains
Unload a Student's Schedule with Cross-Site Courses
Cross-Site Courses CANNOT be restored. They have to be manually re-added to the student's schedule.
Unload removes any course that is unlocked on the student's schedule.
- Click the arrow next to Load button and select Unload. An Unload Rosters confirmation message displays.
- Review the information in the confirmation message, specifically:
- Unlocked courses (rosters) in the schedule are deleted from the selected terms, and with that, any grades and course section information is also deleted.
- Cross-Site course sections are removed and CANNOT be auto-restored. The Partial Enrollment at the Serving school is end-dated/deleted as well.
- Choose which Terms to unload. All terms are selected automatically (all unlocked courses are removed). To unload for Quarter 4, for example, remove the checkboxes for Quarters 1, 2 and 3.
- Click the Unload button in the confirmation message to continue.
When completed, the student's schedule displays No Scheduled Course for the terms where scheduled courses were unloaded.
 Unload Rosters Confirmation Warning
Restore a Student's Schedule with Cross-Site Courses
Cross-Site Courses CANNOT be restored. They have to be manually re-added to the student's schedule.
The Process of restoring a student's schedule can still be done for all non-Cross-Site Courses.
Use this option when the action of ending a student's schedule was done incorrectly, or when a recently dropped course needs to be restored.
- Click the arrow next to the Load button and select Restore. A Restore Rosters modal displays.
- Enter the Start Date for the day the schedule should be restored. Entered dates must be within the term dates of when the course meets and are entered in mmddyyyy format.
- Click the Restore button in the confirmation message to continue.
The student's schedule is restored as of the entered date. Courses for the term in which the date falls becomes the start date. Only the most recently ended course sections are restored.
Cross-Site Display on the Schedule
Cross-Site courses display in the Calendar view and the Term view of the Schedule. When selecting a course to view the detail, the Cross-Site indicator displays next to the course name, and lists the location and the instructional setting of the course, along with the Teacher Display Name in the header.
 Schedule Calendar View
|  Schedule Term View
|
When the Serving School does not meet on a particular day (the Calendar Day is not marked as an Instruction day), that instance of the course is highlighted to indicate the class does not meet on the student's schedule. This is visible when using the Calendar option to view the Day, Week or Agenda views of the student's schedule.
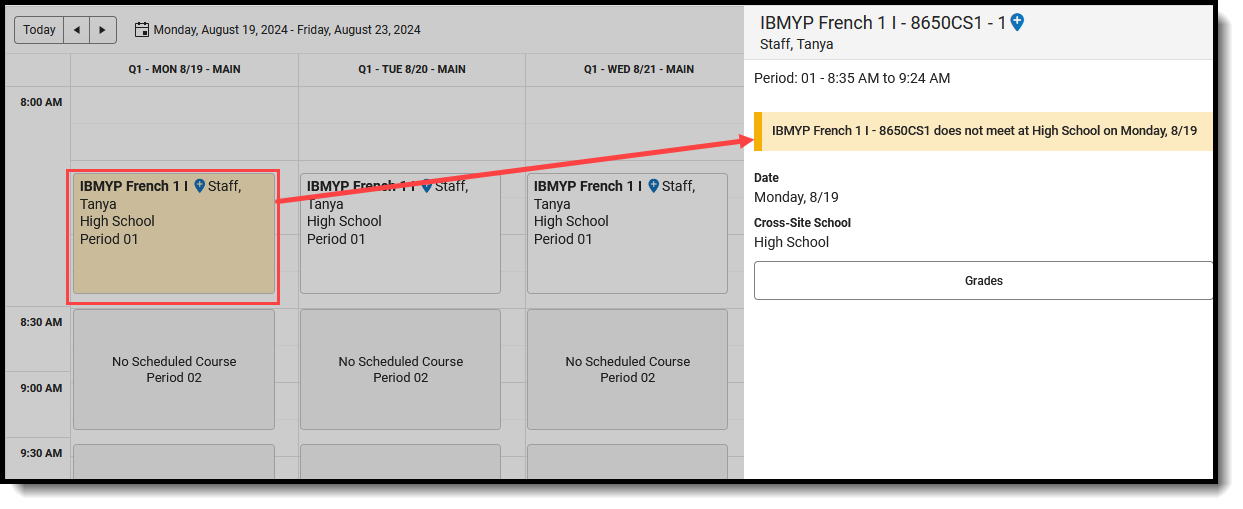 No Class Scheduled at Serving School
Print Cross-Site Courses on the Schedule
The Cross-Site indicator displays in the Reports Panel by the Cross-Site Serving School Name when the Additional Enrollment Schedules tool right is assigned.
 Print Reports Panel
Cross-Site Courses print on the following Schedule Reports:
- The Current View prints the student's schedule in the selected view (Day, Week, Agenda, Term).
- The All Terms view prints the courses on the student's schedule for all terms.
- The All Terms Course View prints all of the student's courses on one page.
 Schedule Reporting - Cross-Site Courses
At the Serving School, the Cross-Site indicator prints next to the student's name on these reports:
At the Home School, the Cross-Site indicator prints next to the Course names, Sections of Courses, and Sections mapped from a Serving School:
