| What can I do? | What do I need to know? |
|---|---|
Search for Patrons
| Quick Steps | ||||||||||
|---|---|---|---|---|---|---|---|---|---|---|
Tips The checkmark next to the patron's name indicates they had a transaction processed within the last hour. | ||||||||||
| Example | ||||||||||
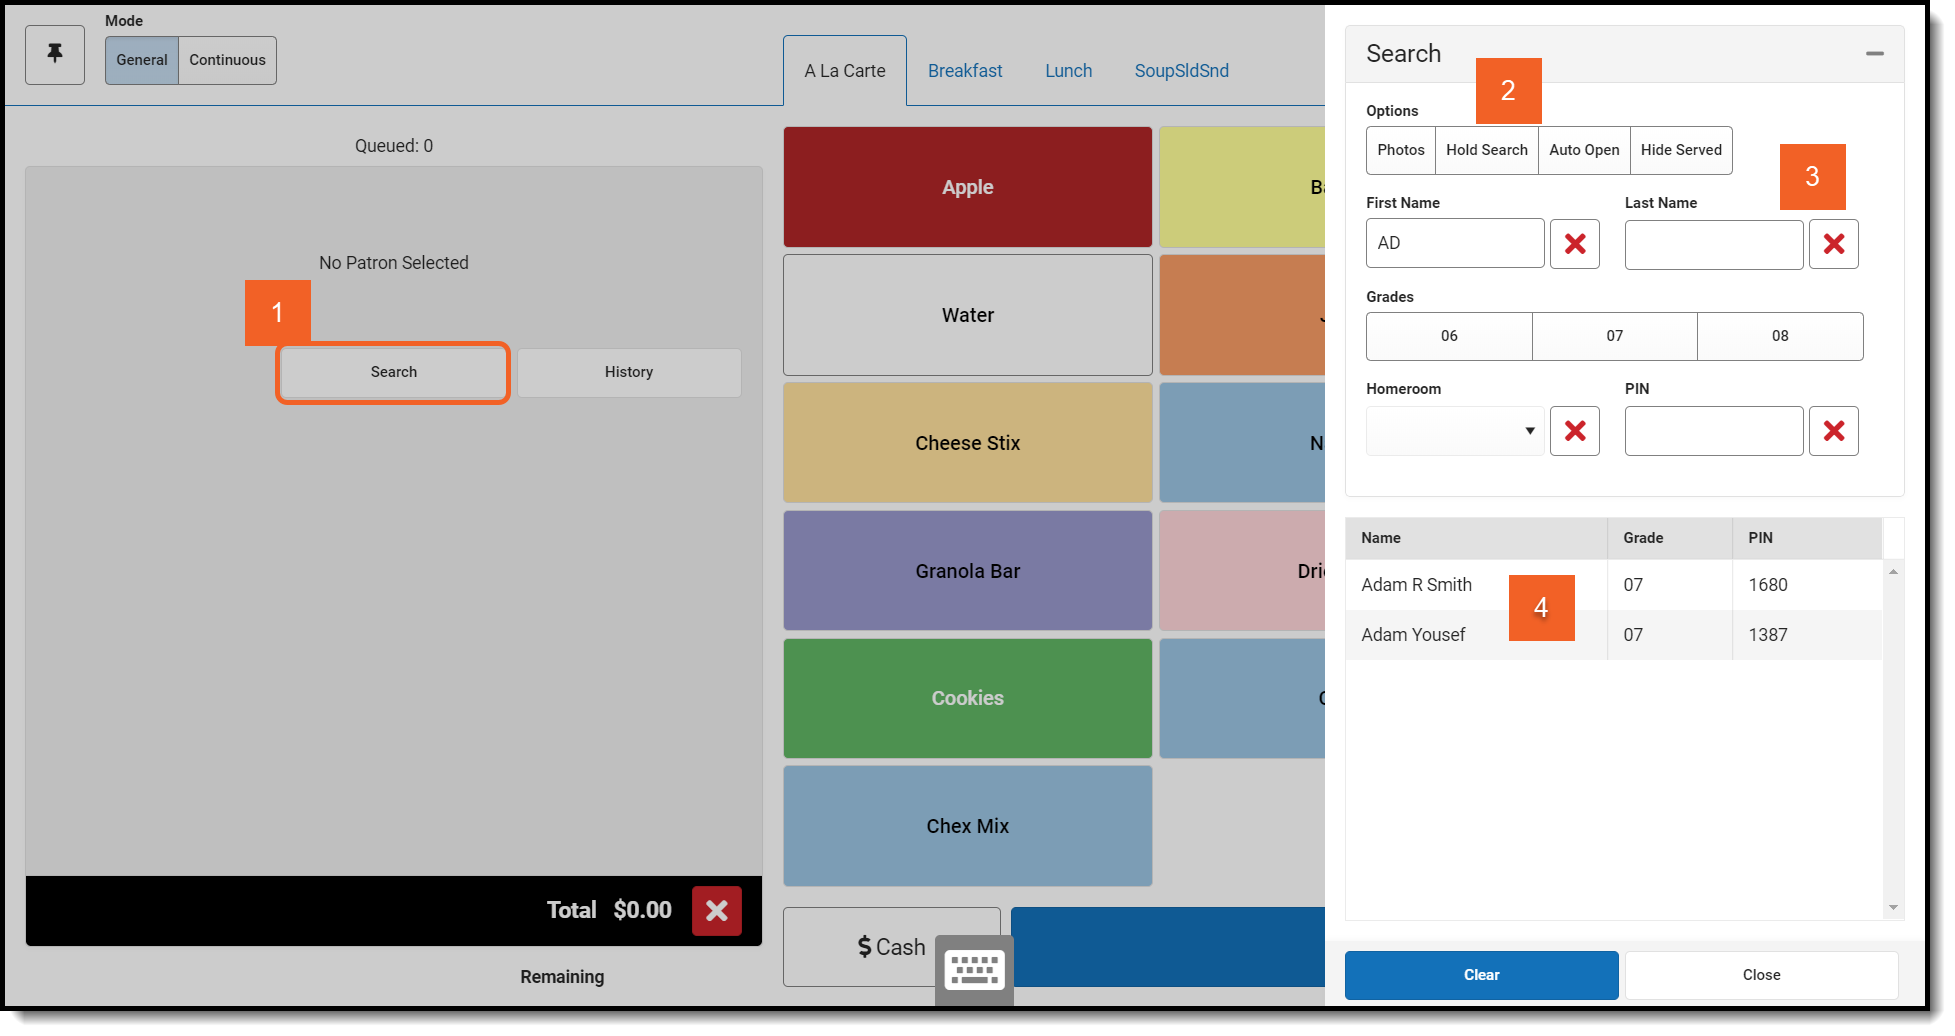 |
Charge a Patron's Account
| Quick Steps |
|---|
|
| Example |
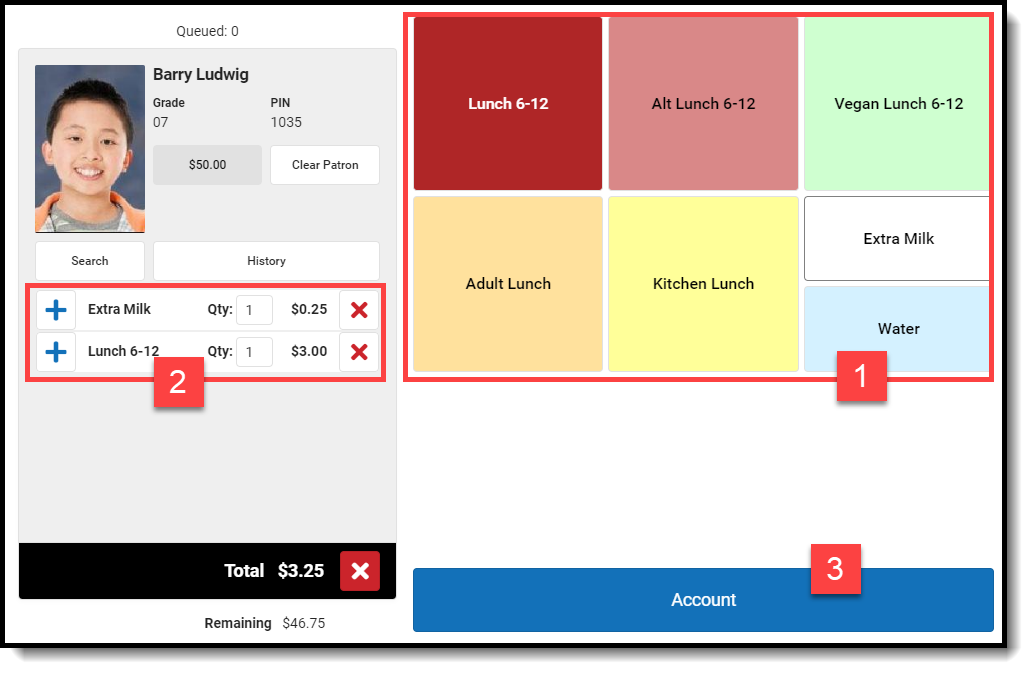 |
Pin Purchasable Items
- Pinned items are added to every transaction, but they can be removed before a patron is charged.
- Pinned items stay pinned until you unpin them or log out.
- You can pin up to 6 items.
- You can still add non-pinned items to a transaction by selecting purchasable items from the menu.
- Pinned items don't display in the transaction area until a patron is selected.
| Quick Steps |
|---|
Tip: To unpin items, tap the
|
| Example |
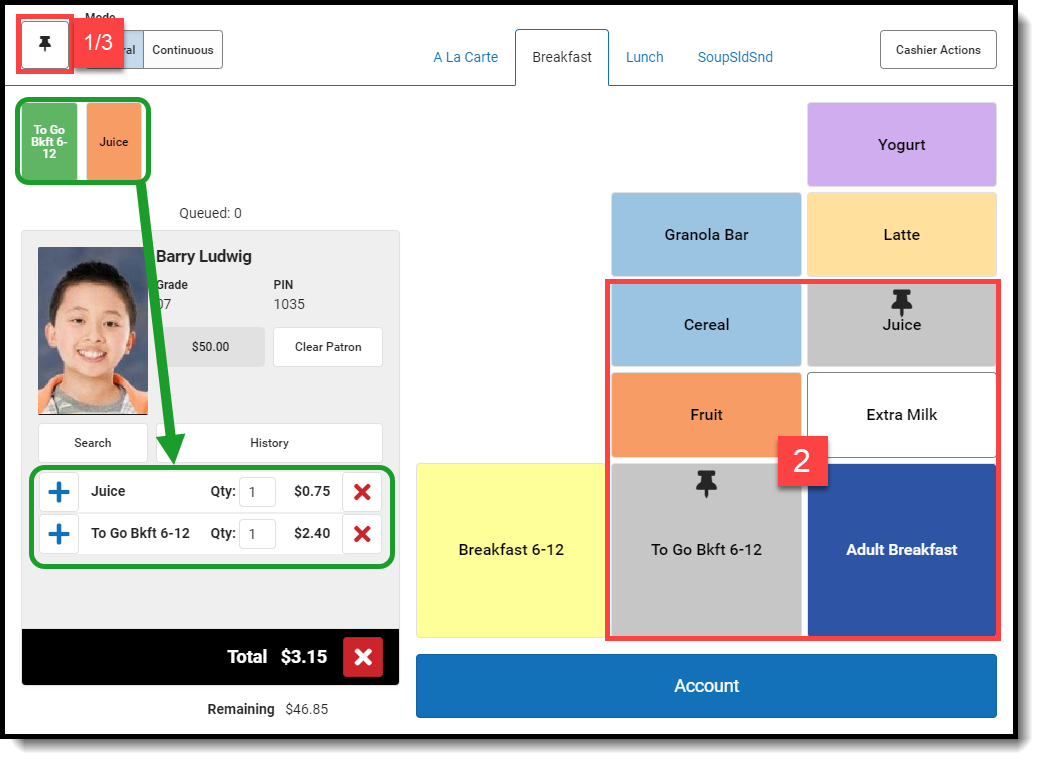 |
 Pin button at the top left-hand side of the screen to enter the pinning mode.
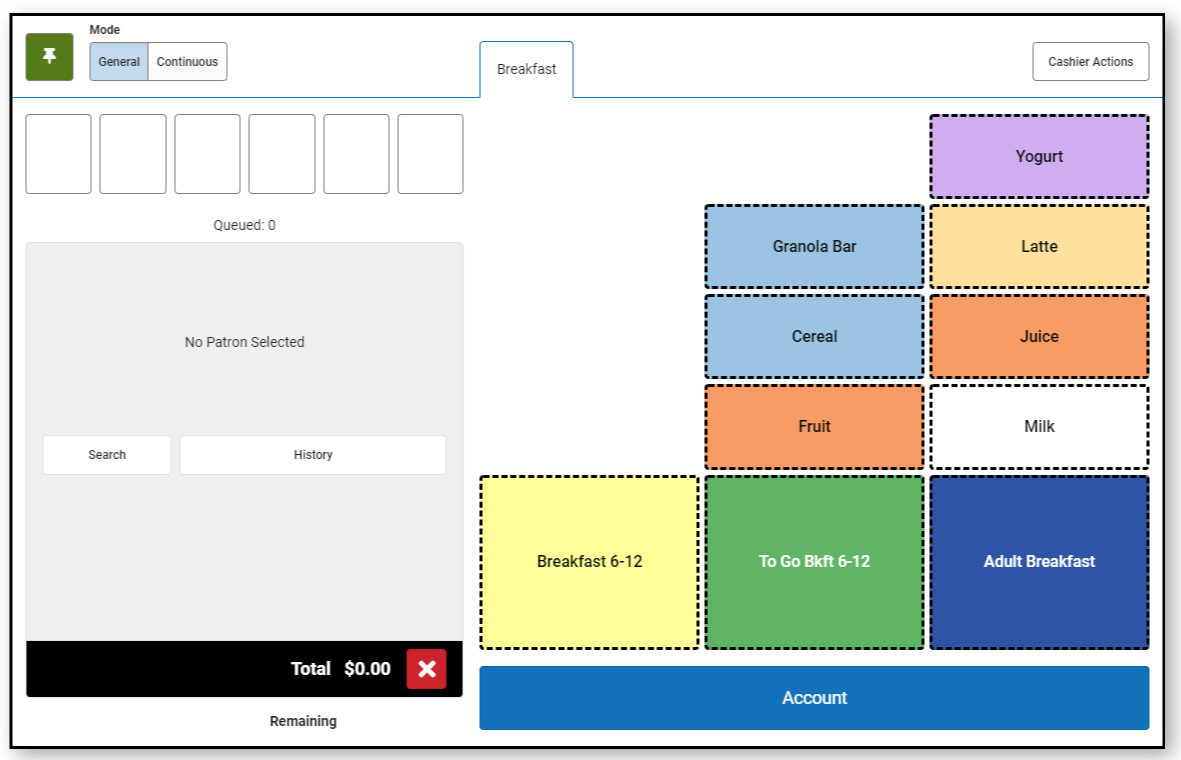
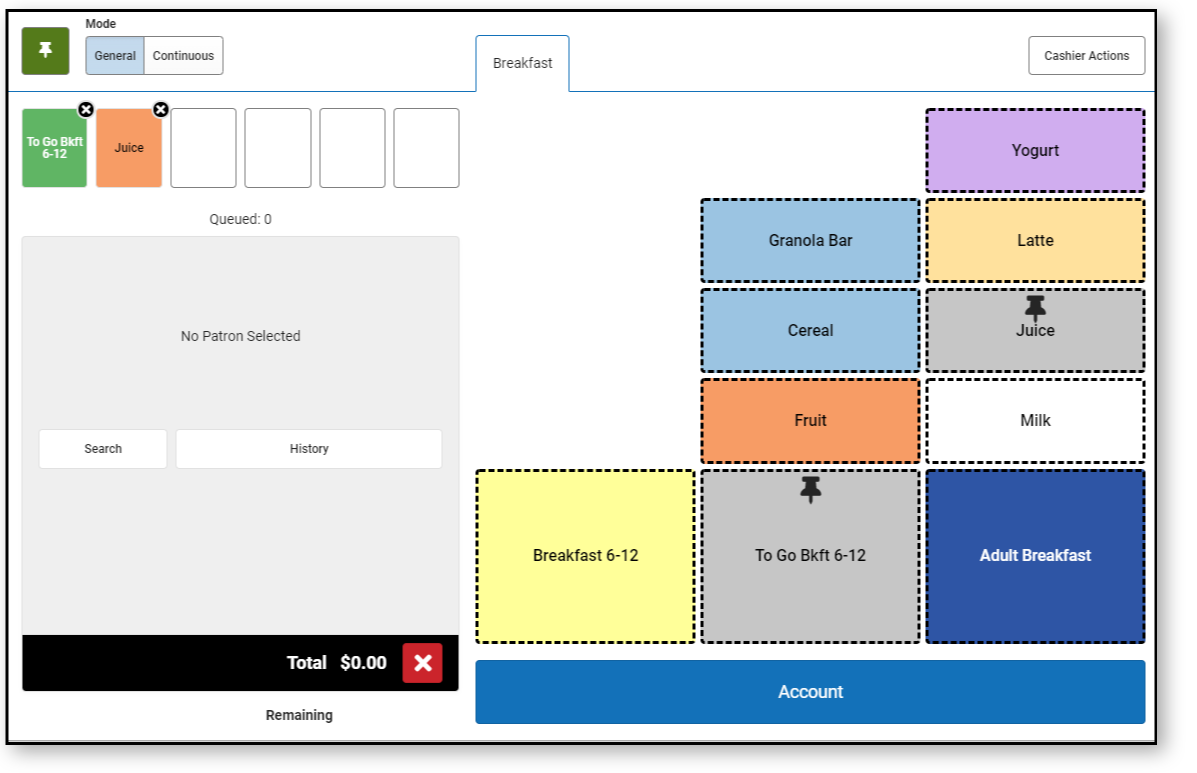
 Pin button at the top left-hand side of the screen to exit the pinning mode.
 Pin button then tap the X on the item(s) you want to remove. Tap the
  Pin button again when you are done.
Enter a Cash Payment
| Quick Steps |
|---|
|
| Example |
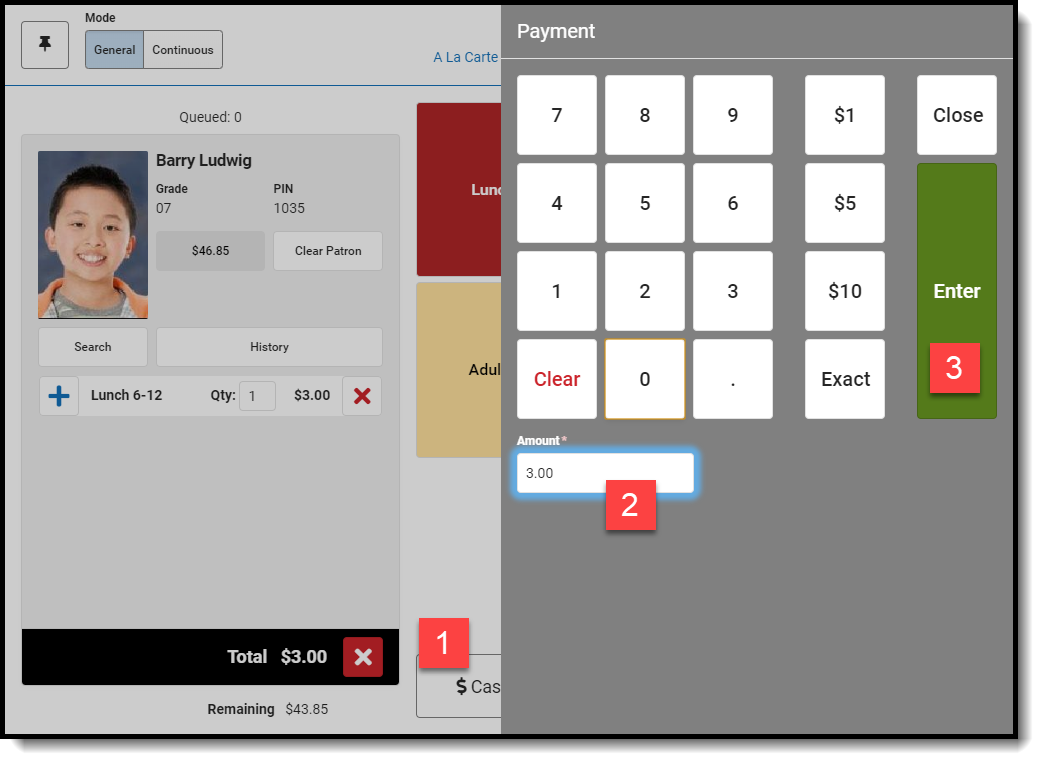 |
Enter a Check Payment
| Quick Steps |
|---|
|
| Example |
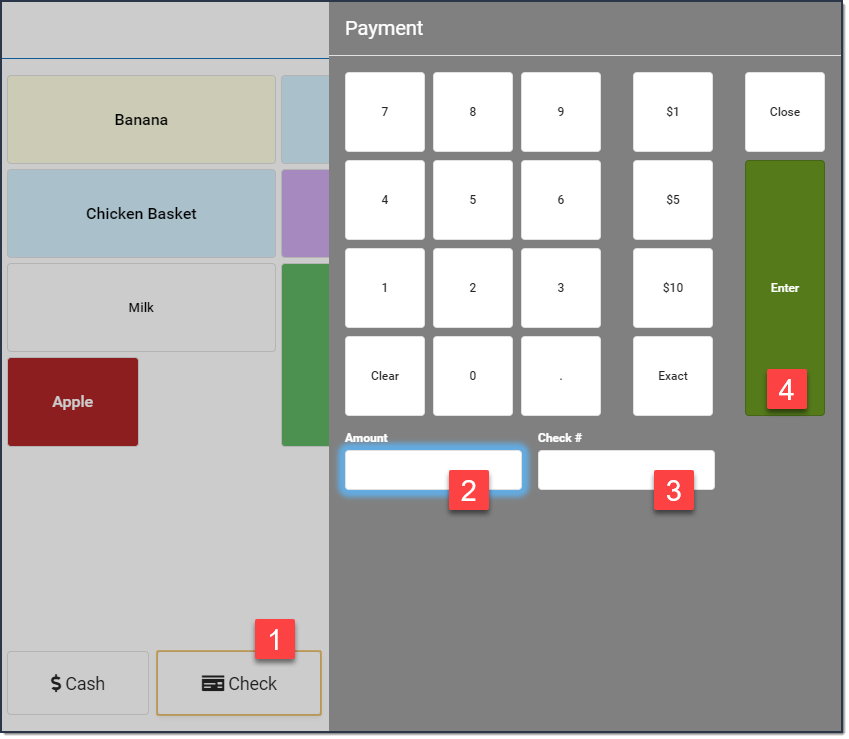 |
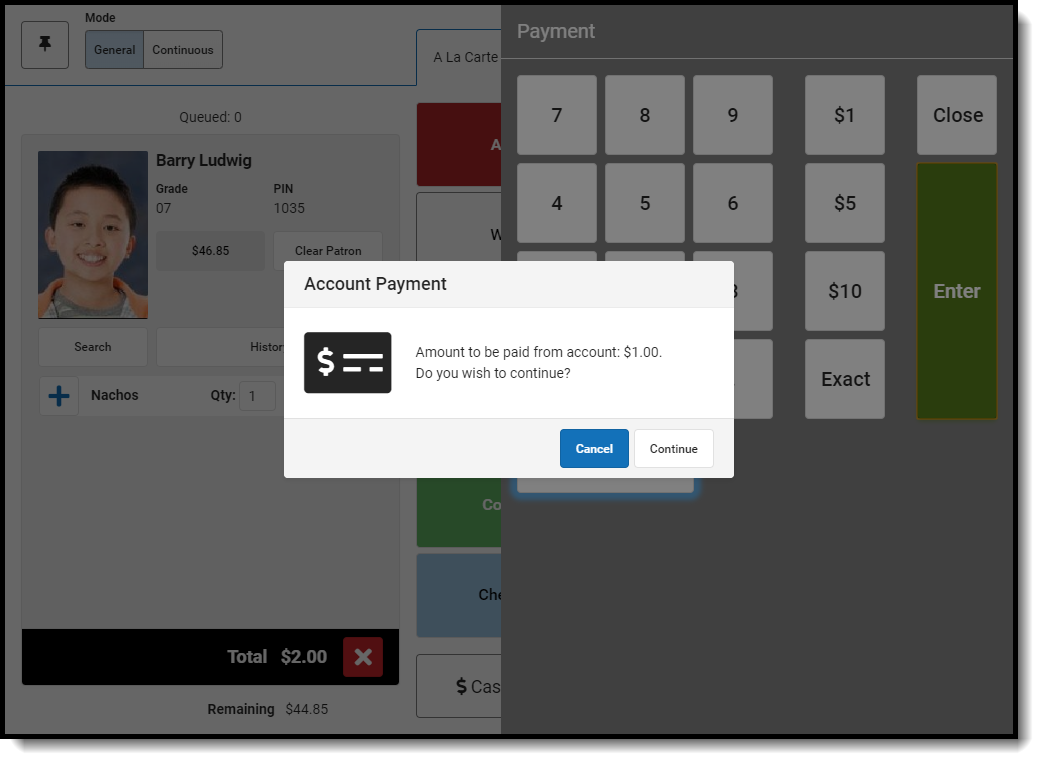
Enter a Combination Payment
Patrons can pay for a transaction with cash OR check AND money from their account.
It is not possible to pay with cash AND check in the same transaction.
| Quick Steps | ||||||
|---|---|---|---|---|---|---|
|
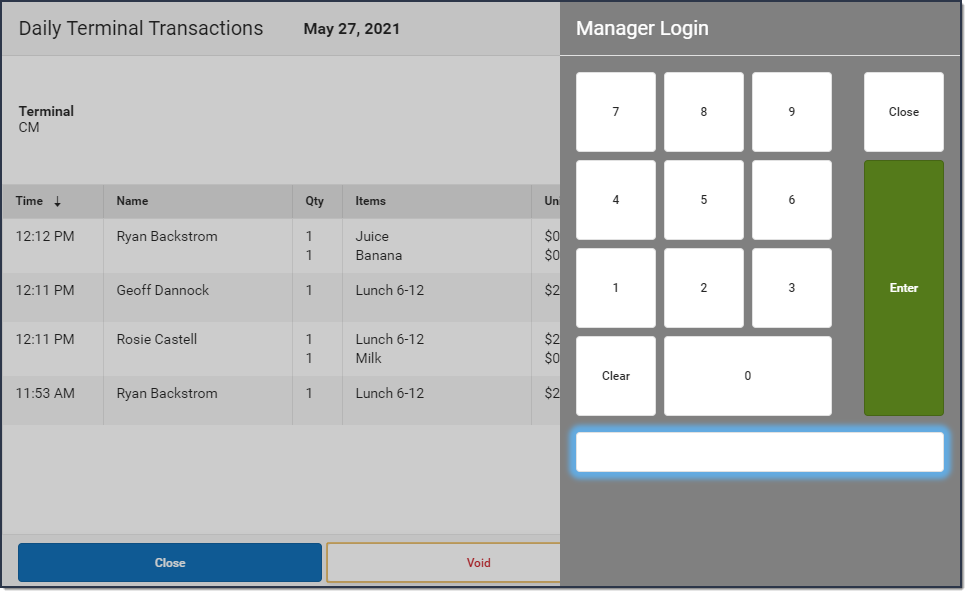
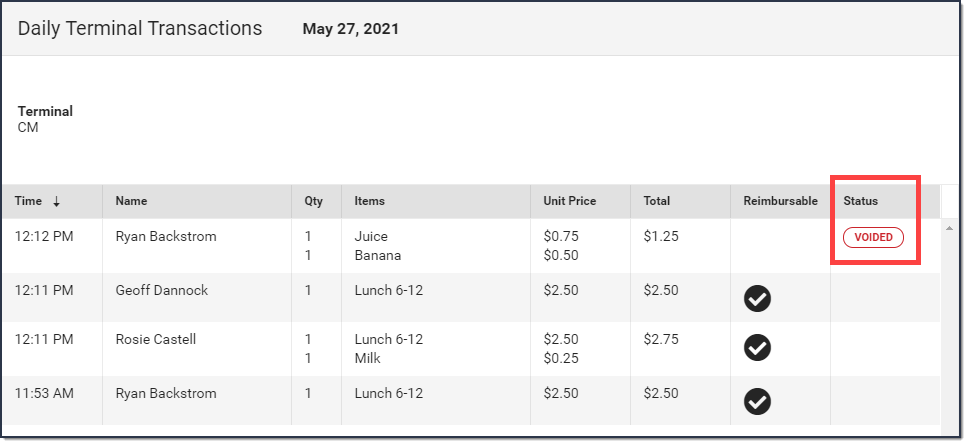
Void a Purchase
With the assistance of a head cashier or other administrator who has been assigned a Manager PIN, transactions can be made void at the terminal after a purchase is made.
A transaction can only be voided on the same terminal and on the same day as the transaction occurred.
| Quick Steps |
|---|
|

Deposit to an Account
Use the following steps to deposit money into an account. To use this method, do not select items for purchase. The option to deposit money may not be available on your terminal. See your Food Service Director/Manager if you have questions about your terminal's options.
| Quick Steps |
|---|
|
| Example |
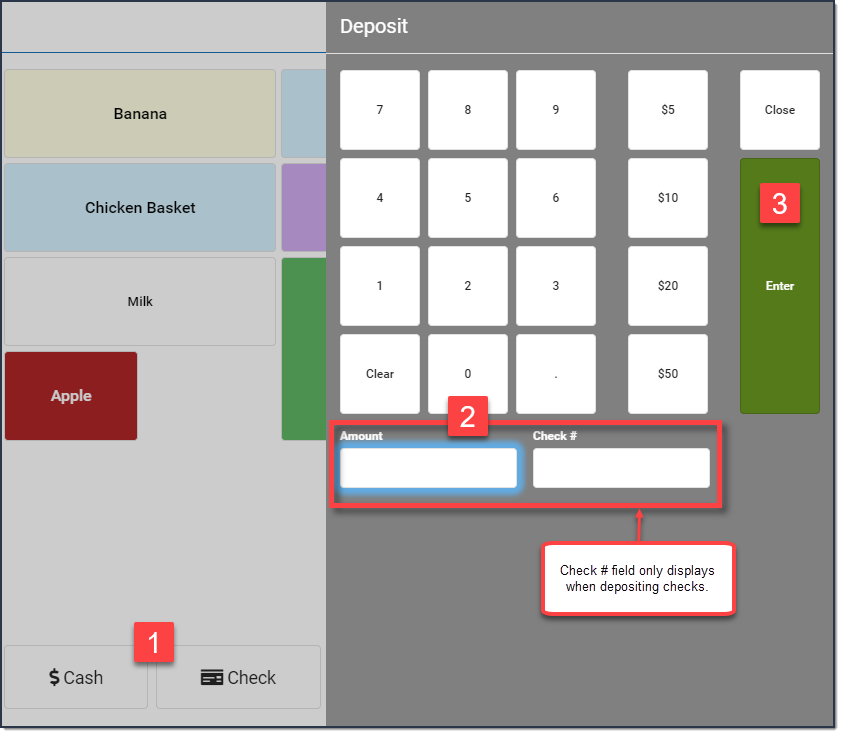 |
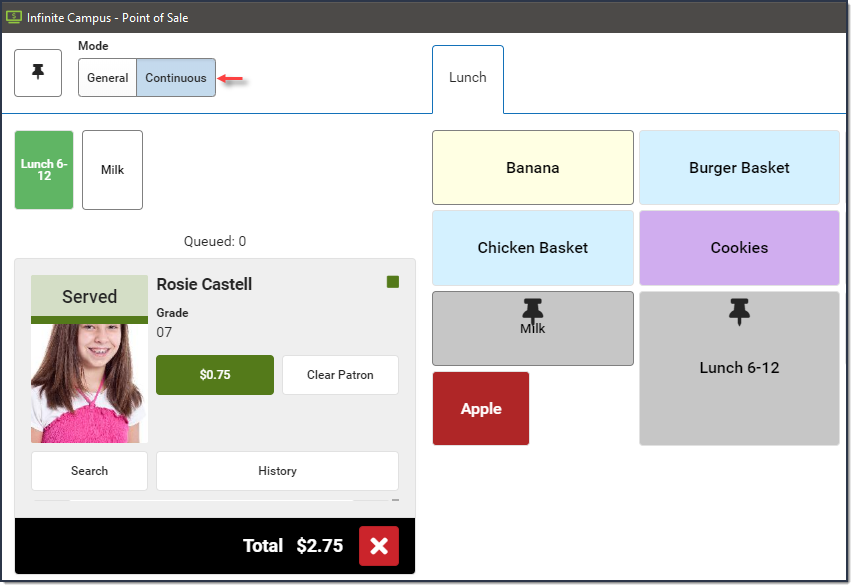
Set up and Use Continuous Serve
Continuous Serve is used when all patrons are purchasing the same menu item(s). As a best practice, set up Continuous Serve before you serve your first patron.
| Set up Continuous Serve |
|---|
| To set up Continuous Serve, use the instructions for pinning purchasable items found in the Pin Purchasable Items section of this article. Pinned items are automatically charged to the patron's account while you are using Continuous Mode. Be sure to choose all of the items that ALL patrons will be purchasing. |
| Use Continuous Serve |
If you need to add or remove items for a single patron's transaction, switch to General Mode before the patron loads. |
| Example |
 |
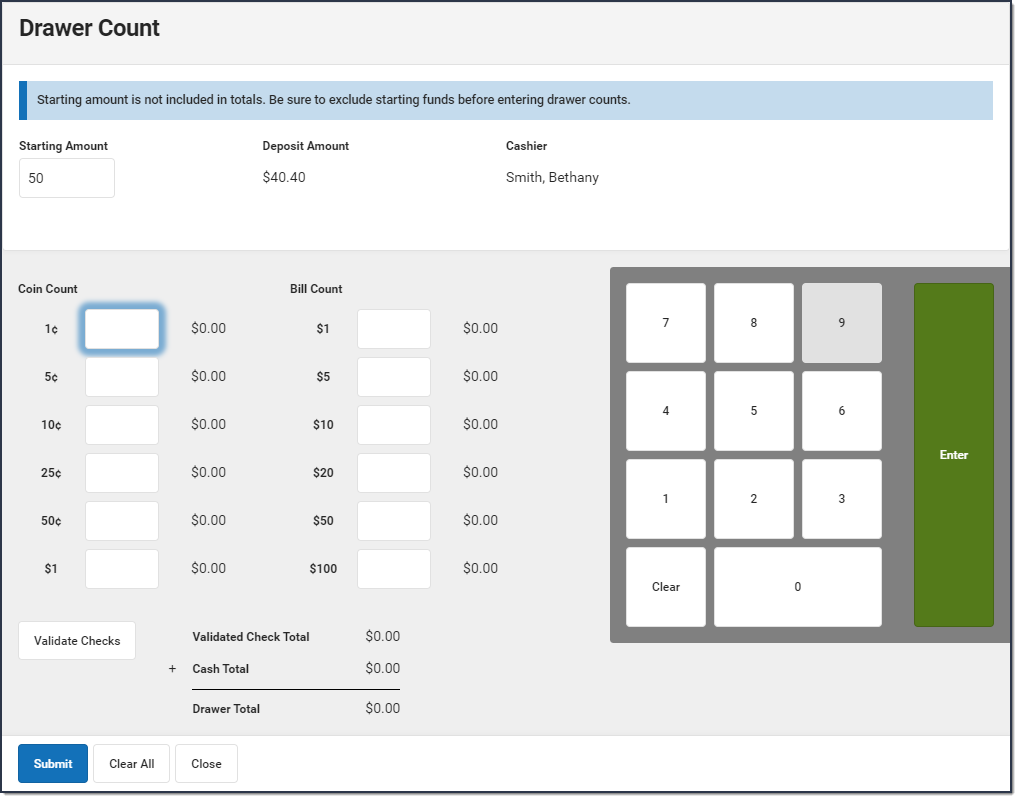
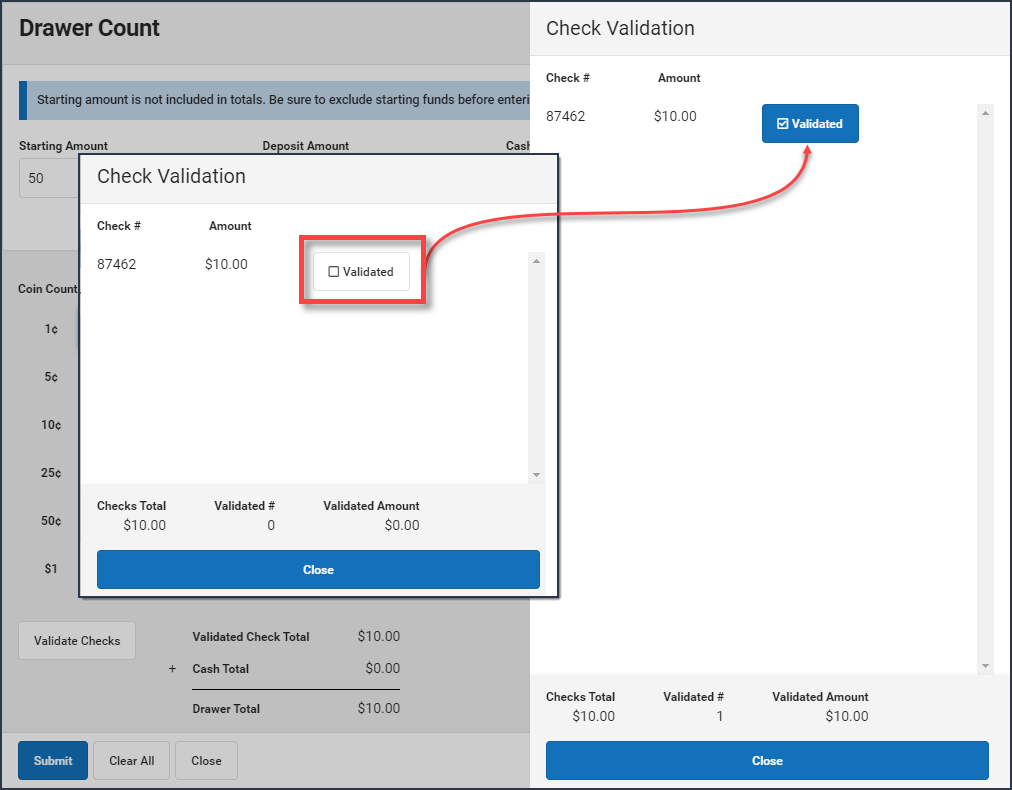
Drawer Count
The Drawer Count should be performed at the end of each serving period. Starting cash is included in the Drawer Count, and it must be counted at the end of the serving period, even if no cash or checks were received.
| Quick Steps |
|---|
|
| Example |
 |
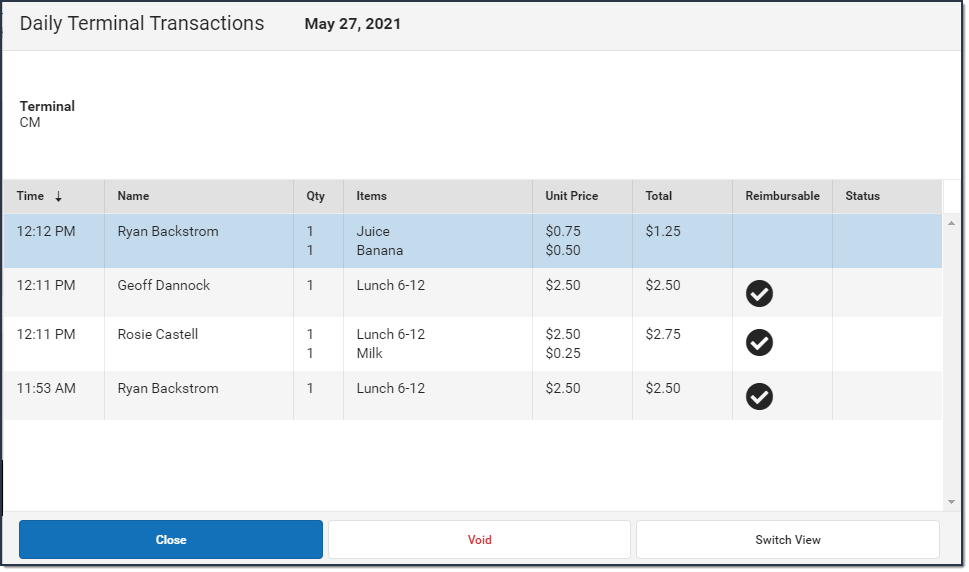
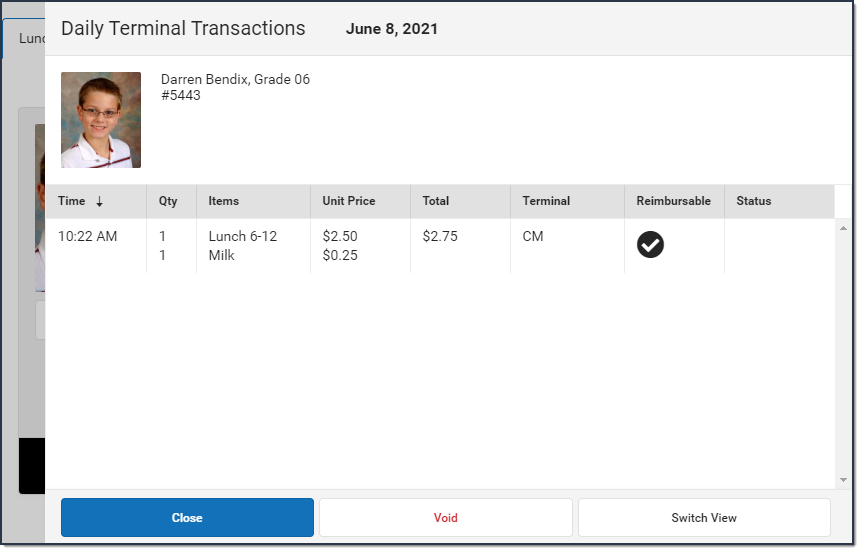
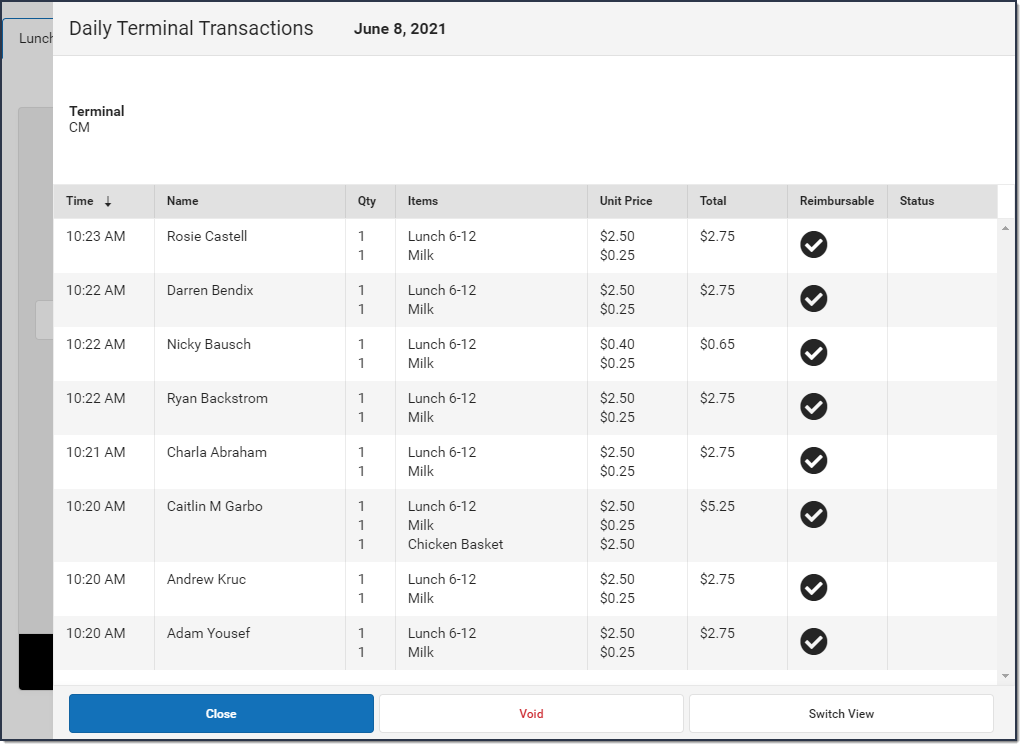
View Daily Terminal Transactions
There are two options for viewing a single day's transactions on one terminal:
- You can view transactions for one student.
or - You can view all transactions for all students.
Transactions from other locations, including online payments by parents to add lunch money, can be viewed on the patron's History. Transactions processed using Quick Serve appear with a Quick Serve label, and transactions entered elsewhere, such as Food Service Deposit, Food Service Journal, or online payments (such as parents adding lunch money), will be labeled "Journal."
| Quick Steps - View transactions for one student |
|---|
|
| Quick Steps - View all transactions for all students. |
|
Overview of the Terminal Layout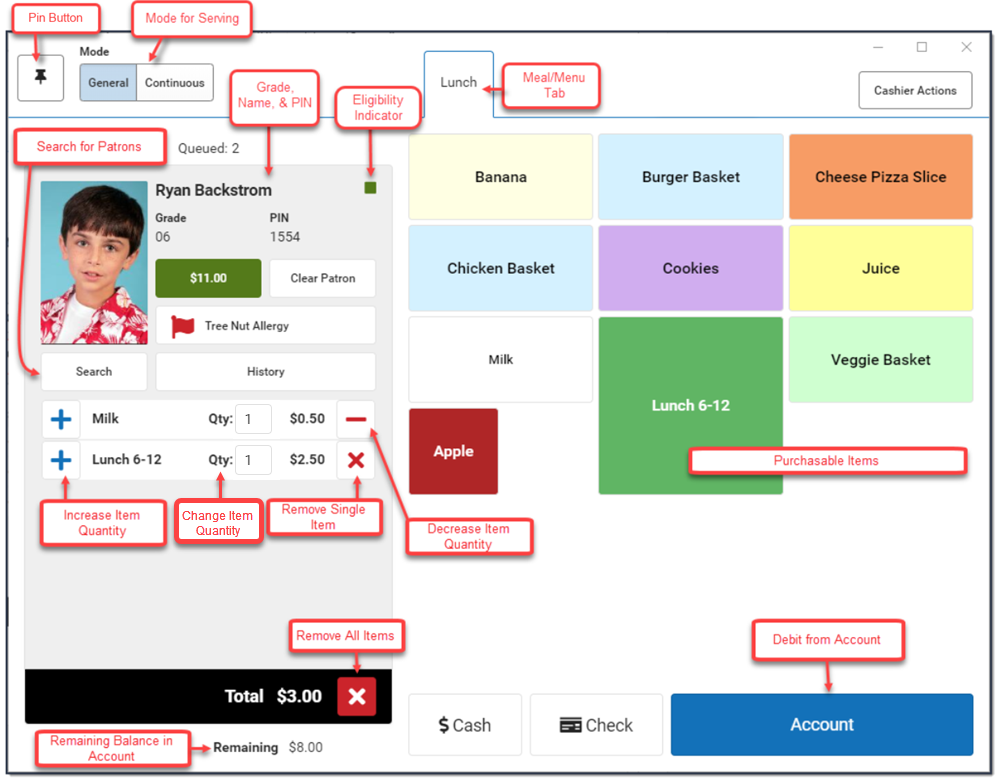

Button/Field Area | Description |
|---|---|
| Pin Button | This button is used to turn the pinning mode on and off. Pinning mode allows you to pin purchasable items. |
| Mode | Two modes are available for processing meal transactions.
|
Meal/Menu Tabs | Each tab contains the menu needed for a specific meal/serviceable time. |
Patron Picture | The picture of the patron being served. |
Grade & Name | Indicates the patron's name and current grade. |
Eligibility Indicator | Indicates the patron is eligible for Free or Reduced meals. The following describes each color: |
Allergy Alert | Indicates the patron's allergy(s). Description of allergy visible. If description is more than will fit on button, the description will end with “…” indicating there is more information. Clicking on the Allergy alert button will open a side panel with full allergy description. |
Account Balance | Indicates the patron's current account balance. Background colors defaults to green, but changes if account is low – yellow, negative – red. Low balance threshold comes from patron account detail, Reminder value. If patron does not have a reminder amount, balance will not display with a low balance color. |
Search | Opens a side panel allowing cashier to search for a patron by last name, first name, and grade |
History | Opens a slide out with a list of all patron's transactions for the current terminal for the current date. Can void transaction from this slide out. |
Item Description | Describes each item added to the patron's order. Once the current transaction is completed, the item section will be cleared for next transaction. |
| Qty | Editable quantity that can be changed using the pop-up key pad or by tapping the increase/decrease buttons. |
Increase quantity | Clicking on the plus icon will increase the quantity of an item in the transaction by 1. If item quantity is greater than 1, the Qty value will show in the item description line. |
Decrease quantity | If item quantity is greater than 1, the X (delete) icon on the item transaction will change to a “-“. Clicking on the “-“ will decrease the quantity of an item in the transaction by one. Once the quantity of the item gets to 1, the “-“ will change to a delete icon. |
Item Total | Item price X quantity of item in transaction |
Transaction Total | Sum of all item totals in transaction |
Remaining Balance | Patron account balance – Transaction total |
Delete Item | If the delete icon is selected for an item in the transaction, that item will be removed from the transaction. |
Clear Transaction | If the Clear transaction icon is selected, all of the items in the transaction list will be removed |
Account (Debit from Account) | Charges (debits) the patron's order to their account. |
Purchasable Items for Selected Meal/Menu Tab | Selectable items which are added to a patron's order when touched. These items will not be charged to the patron's account until the transaction has been paid for. |
| Cashier Actions | This button displays the Cashier Actions panel where cashiers can complete a drawer count, view the Meals Served and the Daily Transaction Count, and log out of the terminal |
