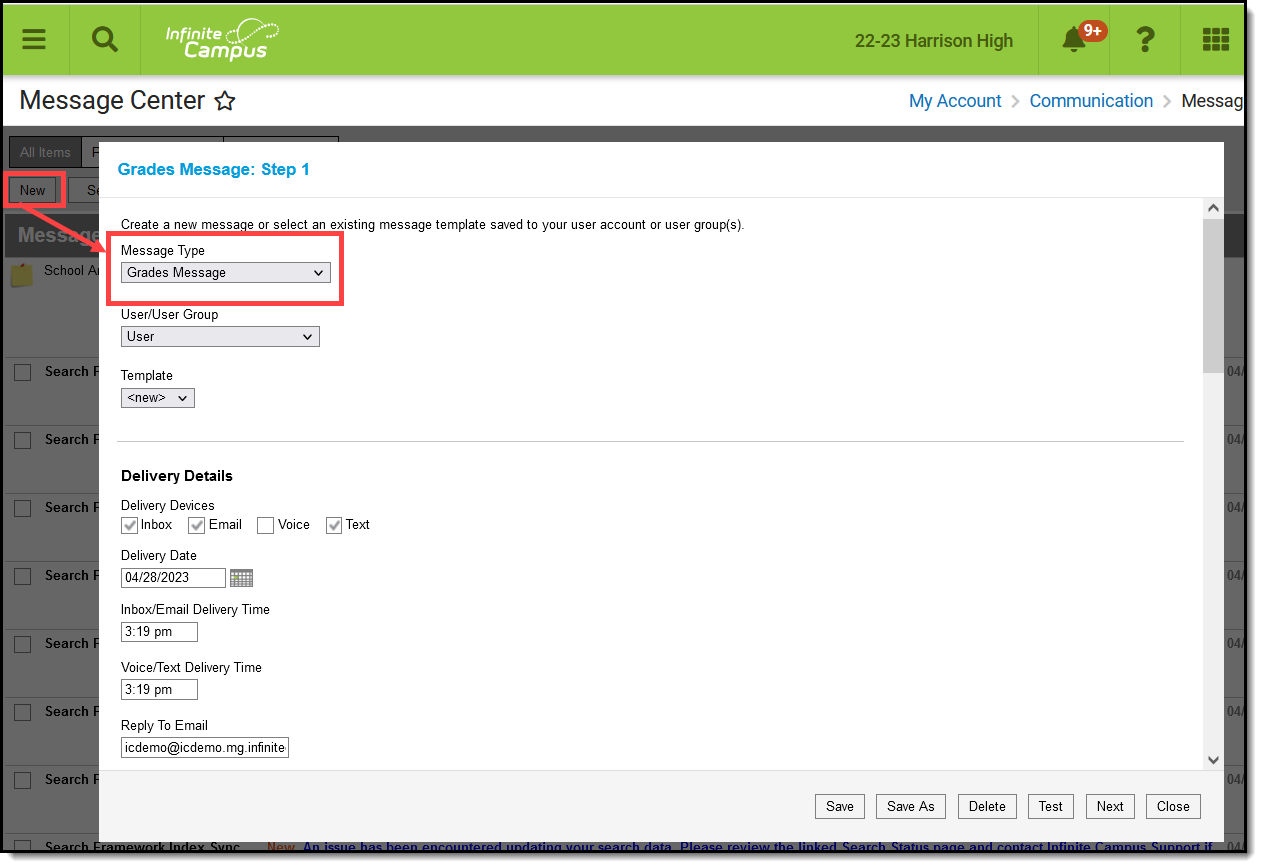
Location: Classroom Messenger > New > select Message Type: Grades Message
Send a Grades Message to students and guardians to notify them when the student has received a specific grade either as an In Progress or a Posted Grade.
Use this tool to create a message to send, or to save a message template for later use.
 Create a Grades message to notify students and their guardians about specific grades.
 Tool rights to create Grades messages are found in Additional Access Rights > Instruction Messaging.
See the table of contents on the right for the steps of how to create a message.
Templates
When you create a message, you have the option of selecting an existing message template or starting from scratch. See the Create a Template for Sending Messages article for more information about templates.
Use the User/User Group and Template fields to select which template you'd like to start with, or choose a Template of new. The User/User Group dropdown list has options for your own account (User) and for each of the User Groups you are a member of. If you have the correct tools rights, you can save templates to a user group, which would make that template available to all users in the group.
If you select a specific template, fields in the message auto-populate based on that template, but are still editable for this instance of the message.
Step 1 - Delivery and Message Details
The Delivery and Message Details options available depend on your district's messenger settings.
Step-by-Step Instructions
Delivery Details
|
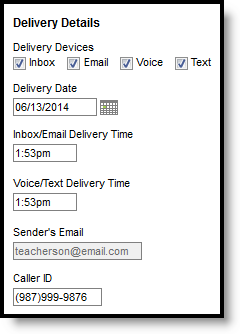
The Delivery Device options determine how the message is delivered to the recipients. Different fields display for each device; all appropriate fields display if you choose more than one device.
Note that there are separate Delivery Times for Inbox/Email messages and Voice/Text messages. Inbox/Email messages can be sent at any time, but you may want to limit the delivery of Voice and Text messages to daytime and evening hours.
|
|
Additional Delivery Options
The columns on the right of this table indicate which fields display for which devices, (I)nbox, (E)mail, (V)oice, and (T)ext.
| Option | Description | I | E | V | T |
|---|---|---|---|---|---|
| Delivery Date | The date the message is scheduled to be sent. The default setting is the current date; change the date to send the message on some date in the future. | X | X | X | X |
| Inbox/Email Delivery Time | The time the message is scheduled to be sent on the Delivery Date. The default setting is the current time; change the time to send the message at a future time. | X | X |
|
|
| Voice/Text Delivery Time | The time the message is scheduled to be sent on the Delivery Date. The default setting is the current time; change the time to send the message at a future time. |
|
|
X | X |
| Sender's Email | The email address that displays in the From field of the email. This email address populates based on the Email Settings set up for the district and is either the default email address selected for the district or your email address entered in Census. This field may be editable, or read only, based on district settings. |
|
X |
|
|
| Caller ID | The phone number that displays on the recipient's caller ID. This phone number populates based on the Caller ID Preferences set up for the district. |
|
|
X |
|
Delivery Dates in the Future
A Grades message pulls recipient data based on the date that the message is created, not when it is scheduled to be delivered.
For example, if scheduling a message to be sent in the future for posted grades, but the grades have not yet been posted, the message will indicate that there are no recipients because at the time the message is created, no students fit the grade criteria.
Message Details
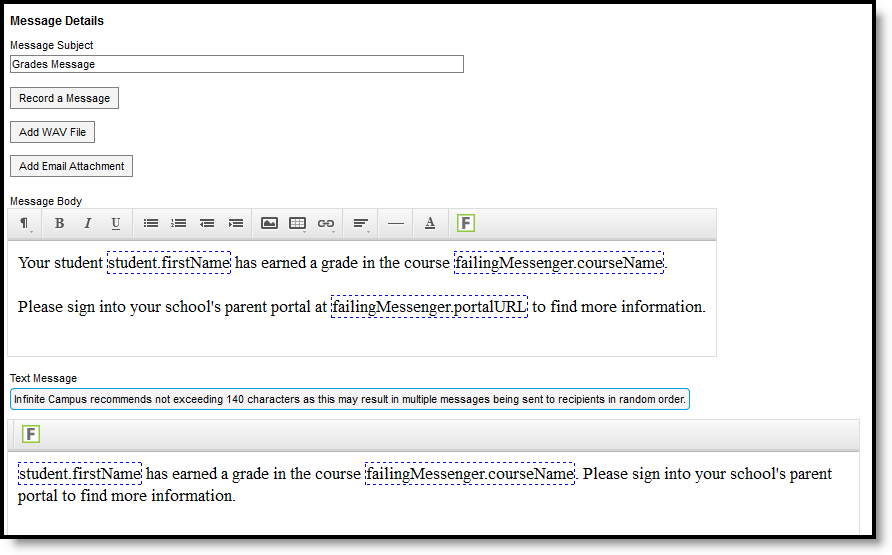
For a Grades Message, the Subject, Body and Text Message fields auto-populate with a sample of content that you could use, including Campus fields that populate based on the recipient. For example, the student.firstName field will populate with the student's actual first name in each message based on the recipient. Modify this text as desired. .
Message Details
The columns on the right of this table indicate which fields display for which devices, (I)nbox, (E)mail, (V)oice, and (T)ext.
| Message Details | Description | I | E | V | T |
|---|---|---|---|---|---|
| Message Subject | The subject line of the message. | X | X | X | X |
| Record a Message | This link opens up a public voice file recorder where you can record a voice message for this message. Once you've recorded a message, use the Add WAV File option to upload the file to the message. | X | |||
| Add WAV File | Upload an existing WAV file of a voice message. | X | |||
| Add Email Attachment | Allows you to upload a file attachment, based on your district's Digital Repository Preferences.
Note that file names that include special characters cannot be uploaded. Special characters include : / \ , [ ] { } ( ) ! ; " * ? < > | CR, LF, '..' or Tab. |
X | |||
| Message Body |
The message sent to the recipient. Default text displays providing an example of the type of Grades Message that you could send, but is entirely editable. Format using the options above the message. The image icon allows you to insert a web link to an image. The link icon, which looks like a chain, allows you to insert a web link.
In the example, the fields outlined in blue are Campus fields, which display information based on the recipient. For example, the student.firstName field displays the first name of the student recipient for each message. Use the green F button to access available Campus fields.
Message Body supports the use of Chinese characters in email messages only. |
X | X | X | |
| Text Message |
The message sent to the recipient. Default text displays providing an example of the type of Grades Message that you could send, but is entirely editable. Text messages cannot be formatted.
In the example, the fields outlined in blue are Campus fields, which display information based on the recipient. For example, the student.firstName field displays the first name of the student recipient for each message. Use the green F button to access available Campus fields.
There is a character limit of 400 characters for text messages. Once the limit of 400, a warning message displays and the message cannot be saved until it is shortened.
However, Campus recommends limiting the length of text message to 140 characters, since longer messages will be sent in multiple chunks and may not be delivered in the correct order. |
X |
Step 2 - Students and Recipient Criteria
The second step of sending a message is selecting which students and guardians could be included in the recipient list and which grades determine that inclusion. Student and guardians of students who meet the recipient criteria are sent the message.
Step-by-Step Instructions
Available Sections include your sections in the current term and one term previous. Leave All Students selected to include all active students in the selected Section or mark Specific Students to choose individuals. Move students to and from the Student List using the Add and Remove buttons. Add All and Remove All options are at the bottom of the lists.
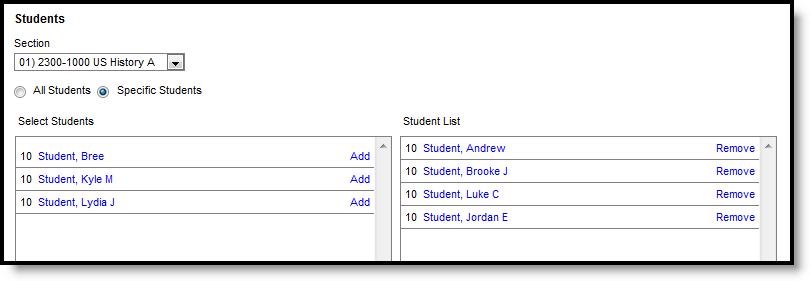
List of Specific Students
Blended Learning
If your school is using Blended Learning, an icon displays next to each student's name indicating their blended learning group.
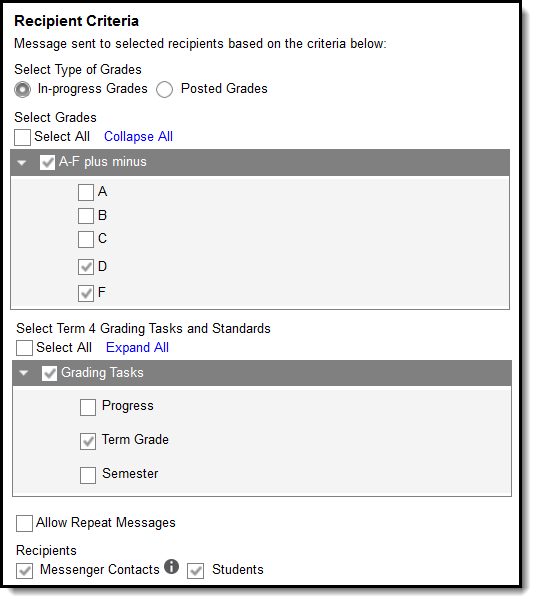
Once you've selected students as possible recipients, determine the Recipient Criteria for the message: which grades from which tasks and standards cause a message to generate.
|
There are three options to filter which grades meet the criteria:
Below these options is a checkbox to Allow Repeat Messages, which allows multiple messages to be sent to the same recipient for a given Section/Term/Task. If this checkbox is not marked, a messenger contact can only receive one message for a given Section/Term/Task - additional message beyond the first are not sent.
Indicate whether the Recipients for the message should include Messenger Contacts and/or Students. Messenger Contacts are those who have a Relationship to the student marked as Messenger.
|
|
Step 3 - Review and Send Messages
The final step of creating and sending a message is to review recipients and send the message.
Step-by-Step Instructions
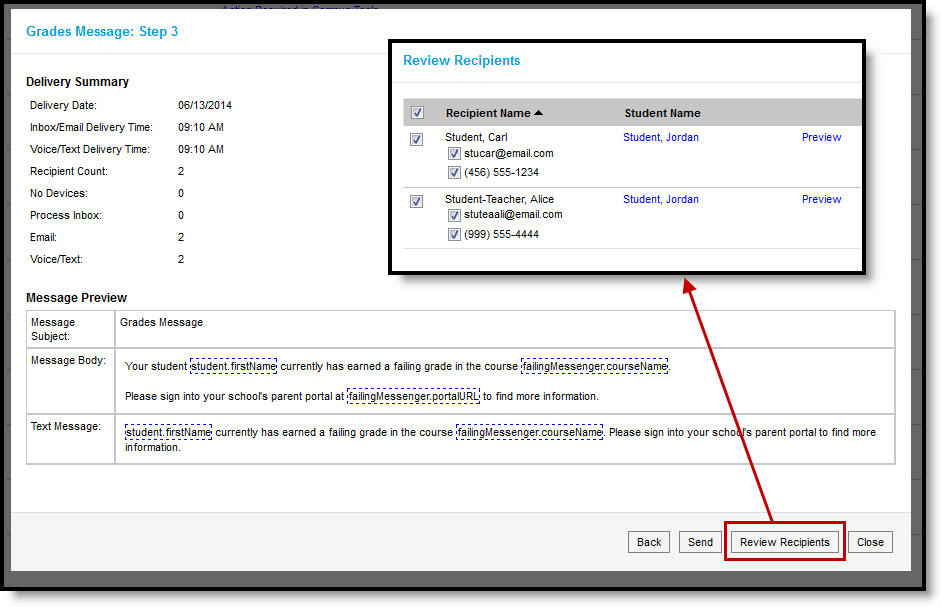
The Delivery Summary displays the options selected in the Delivery Details at the beginning, and the Recipient Counts, as well as a Preview of the Message(s) with any attachments. Recipient Counts indicate the total number of recipients, as well as:
- The number who will not receive the message through any means (No Device),
- The number with a Portal account who could receive the message through the Process Inbox, and
- Those who had email addresses or phone number in Census with the appropriate messenger settings who received the message through those methods (Email and Voice/Text).
The Message Preview displays all messages that will be sent to recipients.
To review specific recipients, click Review Recipients. To remove a recipient prior to sending the message, or to remove a delivery device, unmark the checkbox next to the individual or any of their message devices. Click the student's name to view their summary. Click Preview to view the message as that recipient would see it, with the appropriate Campus fields populated.
Recipients who do not have any devices listed below their names (such as email addresses and phone numbers) will not receive the message.
If you've made any changes to this screen, click Save and then Close to return to the preview screen. Otherwise, click Close to return.
Reviewing Recipients
Click Send to send the messages. If any of the delivery devices is recognized as invalid, an error message displays and messages are not sent. In this case, click Review Recipients again and unmark the checkbox next to the erroneous email address or phone number and click Save and Close. Messages will not be sent to this device. Click Send again to send the message to the remaining devices.
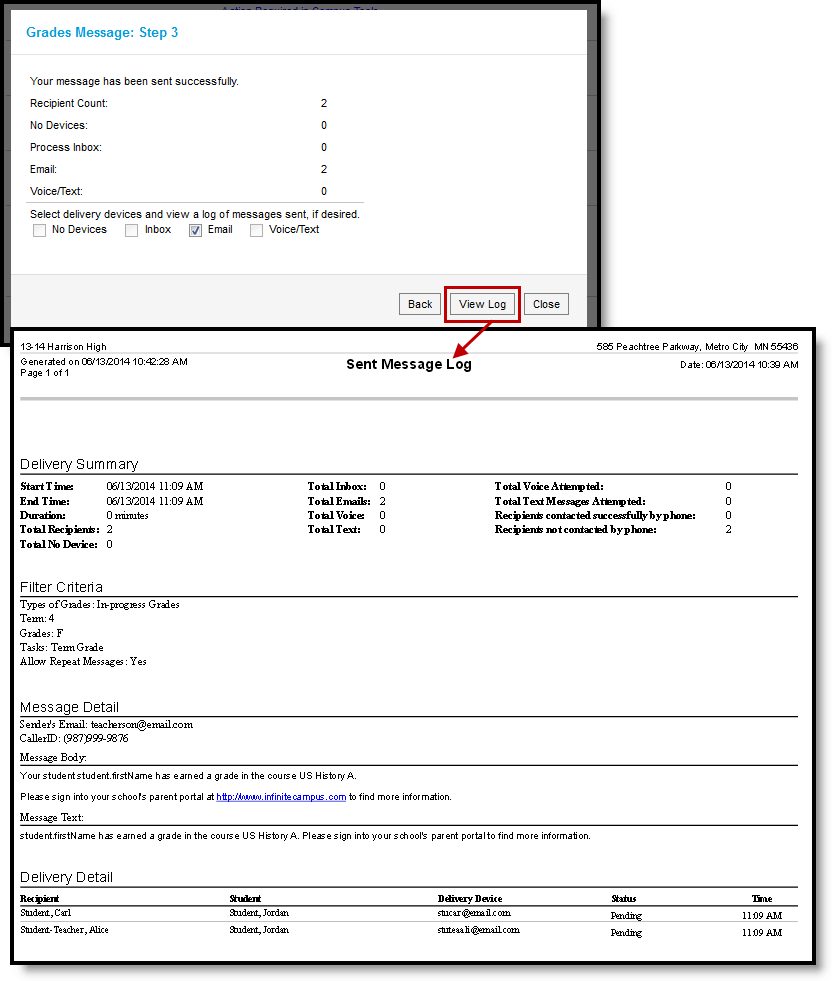
Once messages are successfully sent, a summary screen displays recipient counts. To view a log of messages sent, mark the checkbox next to the delivery devices and click View Log. A printable log generates that includes the following sections:
- Delivery Summary - Includes Date and Time of the message and counts for devices, with both attempted and successful counts where appropriate.
- Filter Criteria - Includes the criteria that determined which students and guardians were sent the message.
- Message Detail - Includes the content of the message(s) and appropriate information about the sender (email address and phone number).
- Delivery Detail - Lists the students and guardians who were sent the message, the Delivery Device(s), the Status of the message, and the Time the message was sent.
Leave all device checkboxes blank to view a general message log of just Delivery Summary, Filter Criteria, and Message Detail.
Message Log after a Message is Sent
