The Schedule Wizard is being removed from the product as of the Campus.2435 Release (August 2024).
Use the following tools for scheduling and planning purposes:
Tool Search: Schedule WIzard
Schedulers often use a spreadsheet or a magnetic white board to visualize and build their master schedule. The Schedule Wizard features a master schedule build assist tool that represents school schedules in the same way, called a White Board. This displays after a user selects and opens a Trial.
This tool allows users to drag and drop course sections on the computer screen in the same way magnetic squares are used on a white board.
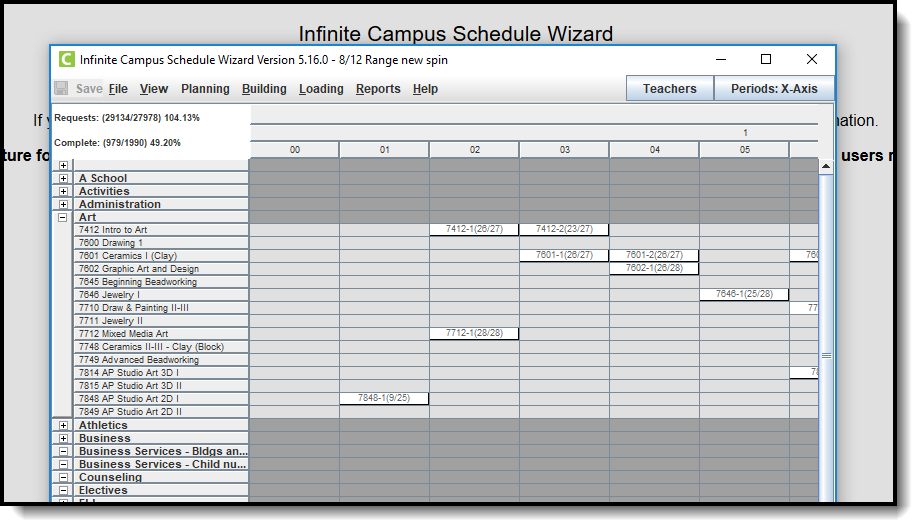 Schedule Wizard White Board
The Schedule Wizard White Board allows users to easily see teacher conflicts and room conflicts as the schedule is built. There are many hover boxes and right-click menus that aid in the building of a school’s master schedule.
- Course names display in numeric or department order on the left side. To work on a specific set of courses, like English, the other department names may be collapsed for easier viewing.
- Terms and days displays across the top.
- Periods may be across the top or down the side.
- Sections appears on the grid as they are scheduled.
- Sections may be displayed by number (course/section and total students), teacher, room, or scheduling group assigned to the section.
The White Board provides access to other Schedule Wizard tools:
Course and Section Display
The default display for the White Board is courses in descending alphabetical order on the left-hand side (y-axis) and calendar terms across the top (x-axis). If departments have been assigned to courses, these are alphabetical as well (i.e., Art, Business, etc.). This view can be changed using the Toggle Options that appear on the left-hand side in the Action Bar.
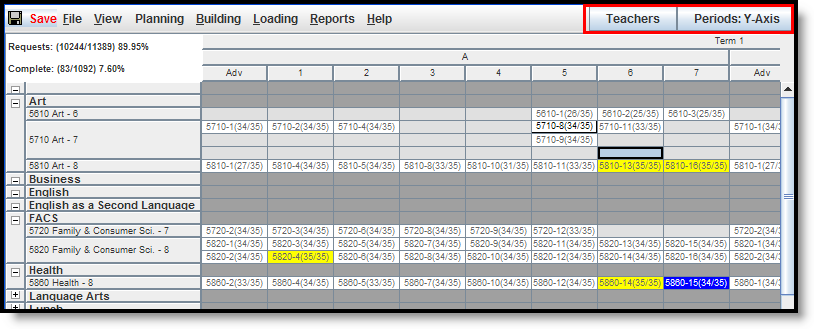 Toggle Options
Clicking the Teachers button changes the left-hand side display to be the names of all active teachers on the y-axis, and periods remain in the x-axis. For another view, click the Periods: Y-Axis button to display the names of the teachers with the periods in the y-axis and the terms and schedules display in the x-axis.
 Toggle Options - Periods Y-Axis
When viewing sections on the white board, course sections that are auto-built appear in grayed-out text. Manually-placed sections appear in bold text. If an auto-built section is moved once it is loaded, that section appears in bold text.
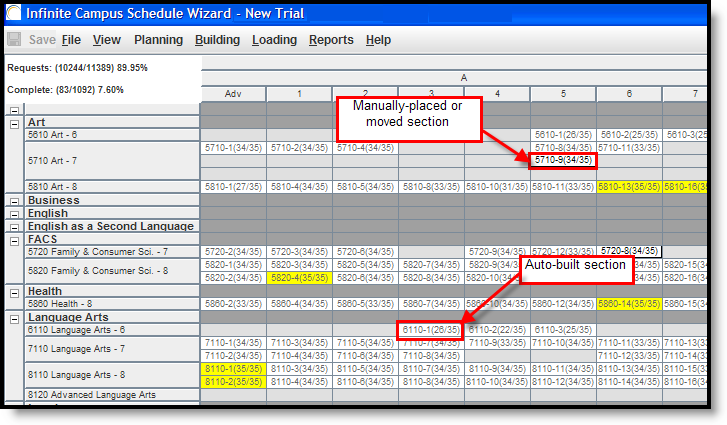 Auto-built Sections and Manual Section Display
Navigate the White Board
The White Board contains all options for building, managing and loading a master schedule. The following information can be used as a reference when navigating the White Board.
Action Bar
As in the Campus application, the Action Bar lists the items a user can access and the actions that can be performed.
 White Board Action Bar
Save
The Save icon changes to a red color any time a change is made in the whiteboard. Data does not automatically save and the user should ensure that every time a change is made, the save icon is selected. A validation displays if the user exits without saving. From this message, the user can select to save the trial changes, not save the trial changes or cancel.
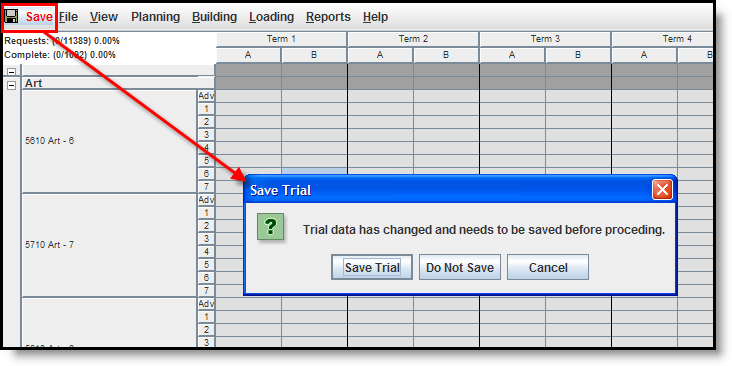 Save Action Validation Message
NOTE: If saving changes takes minutes to complete AND your state uses Ed-Fi for collecting student and school data, verify Ed-Fi Configurations for past school years have been deleted.
The current school year and the last school year can remain. For example, a district that has configurations for the 2017-18, 2018-19, 2019-20 and 2020-21 school years can safely delete the 2017-18 and 2018-19 configurations.
File
The File option allows the user to select a different trial for viewing in the White Board and to Exit the Schedule Wizard. Shortcut keys are also noted for easier navigation.
- Select Trial opens the Trial menu.
- Exit closes the Schedule Wizard.
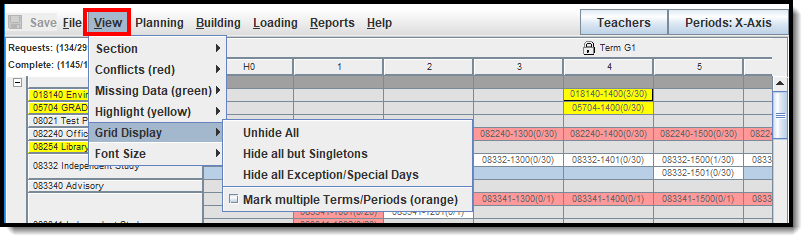
View
The View option lets a user select settings that alter the display of the trial load to modify how sections display and displays conflicts for certain issues in red, missing data in green, etc. It is not necessary for all of these options to be selected. Choose which viewing option is best.
 White Board View Menu
The following table provides the available options for each selection.
Option | Selection | Description |
|---|---|---|
Section | Number | Displays the section number in the white board, along with the course number when the schedule is loaded. In the image above, this is the chosen display for sections. |
Teacher | Displays the name of the teacher assigned to the section. | |
Room | Displays the room number of where the section is scheduled to meet. | |
Group | Displays the name of the group assigned to the section, based on the assigned Team chosen on the Section tab. | |
Conflicts (red) | Teacher | Displays sections where the teacher has a conflict with the placement of the section in red. |
Room | Displays sections where the assigned room has a conflict with the placement of the section in red. | |
Roster | Displays sections where students are scheduled into more than course section in the same period. | |
Request (singleton) | Highlights sections of singletons that occur in the same term/period as another singleton. | |
| Student to Student | Highlights those sections where student conflicts exist. Student conflicts can be added in the Student Constraints tool or in the Planning area of the Schedule Wizard. | |
Missing data (green) | Teacher | Displays sections where a teacher is not assigned in green. |
Room | Displays sections where a room is not assigned in green. | |
Group | Displays sections where a team is not assigned in green. | |
Courses with Sections left to Build | Displays courses that still need additional sections built in green. | |
Highlight (yellow) | Courses without enough seats | Displays sections that need a higher seat count in yellow. |
Full Sections | Displays full sections that are greater than or equal to the Max Students count. This is the maximum number of students that can be scheduled into the sections of the course. This field is on the Section editor and the Course editor; it only needs to be populated in one location (either on the Course editor or the Section editor). When using the Schedule Wizard to build course sections, this field MUST be populated with a value that is greater than zero. If the Max Students count is 15, the section is highlighted when there are 15 students in the section and when there are 16 (or more) students in the section. It is NOT highlighted if there are 14 students in the section. | |
Empty Sections | Displays empty sections (no seat count) in yellow. | |
Singleton Courses | Displays courses that meet one time during the year in yellow. A singleton course is defined a course that meets one time (only one course section exists) and the Sections to Build field on the Course editor or in the Course Planner has a value of 1. When multiple sections are dragged onto the White Board for this course, it is no longer considered a singleton, but the course still displays in yellow because of the Sections to Build value. | |
Sections with a locked roster | Displays sections where the roster has been locked (no further changes being made) in yellow. | |
| Grid Display | Unhide All | When selected, all items that may have been set to hide now display. |
| Hide all but Singletons | Removes all course sections from the Whiteboard unless those courses occur one time during the day. | |
| Hide all Exception/Special Days | When selected, all course sections scheduled for an exception or special day are removed from the White Board. These sections are often associated with special period schedules used for shortened days or schedules for Responsive Scheduling setups. | |
| Mark multiple Terms/Periods (orange) | Highlights all course sections that occur more than one time. | |
| Font Size | Small (100%) | Change the font size of the White Board to better see the information on the grid. |
| Medium (125%) | ||
| Large (200%) | ||
| Very Large (300%) |
Planning
The Planning option provides access to the Course Planner and Staff Planner tools, and to the Student Constraints tool. Once the calendar for the next school year is built, set course rules, teacher constraints, room constraints for all courses being taught in the next school year and set staff restrictions and FTE information before course requests are made. These options open a new instance of the Wizard applet.
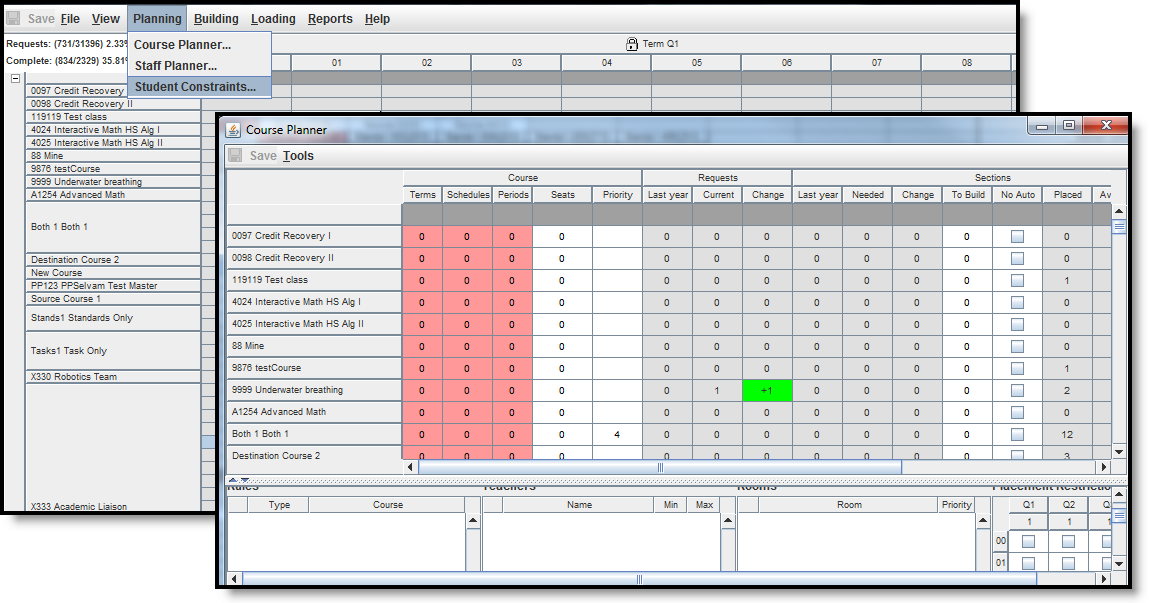 White Board Planning Menu
Building
The Building menu uses the information entered in the Course and Staff Planners and adds it to the course and section display on the white board.
- A Full Build populates all entered course information.
- A Full Unbuild removes all entered course information.
- The Builder Configuration tool sets the requirements for how the wizard builds the courses.
Courses can be built individually as well, and then locked so no further changes can be made, including the removal of that information when a full unbuild is done.
See the Building Tools article for more information.
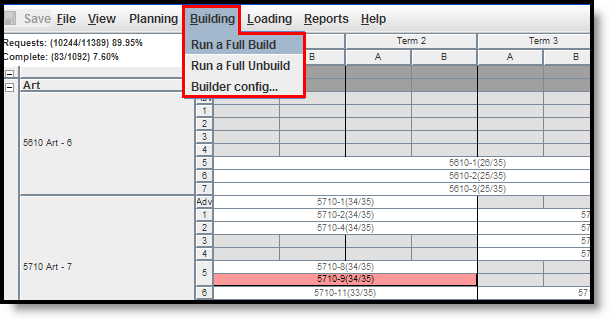 White Board Building Menu
Loading
The Loading menu provides options for loading student requests into the built courses and sections. Users can load all requests, unload all requests and manually build a section roster. In addition, users can also configure the AutoLoader and the Section Balancing tools.
See the Loading Tools article for more information.
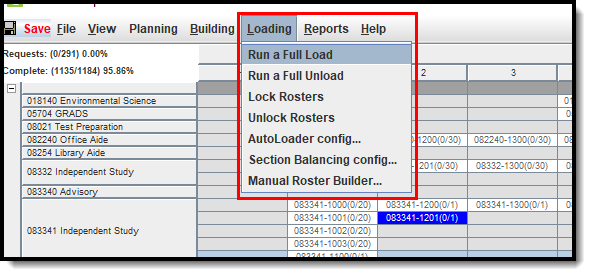 White Board Loading Menu
Reports
The scheduling reports available in the Schedule Wizard replicate some of the reports available in the Campus Scheduling module. Available reports are:
- Schedule Units
- Request Detail
- Request Conflicts
- Master Schedule
- Seat Count
- Requests Satisfied Summary
- Room Usage
- Open Rooms
 White Board Reports Menu
Reports generated in the Schedule Wizard use the selected trial, not the active trial from the Campus product.
See the Schedule Wizard Reports article for more information.
Information Hover Boxes and Right-Click Options
There are several places in the Wizard where hovering over a section (placing the cursor over a section, course, etc. and leaving it there to display an information box), a course or other area displays a window where key information may be found to aid the scheduler in placing sections, detecting issues and determining how successful the current trial meets the needs of students.
The following table lists what information is included in the pop-up options.
Area | Pop-Up Display |
|---|---|
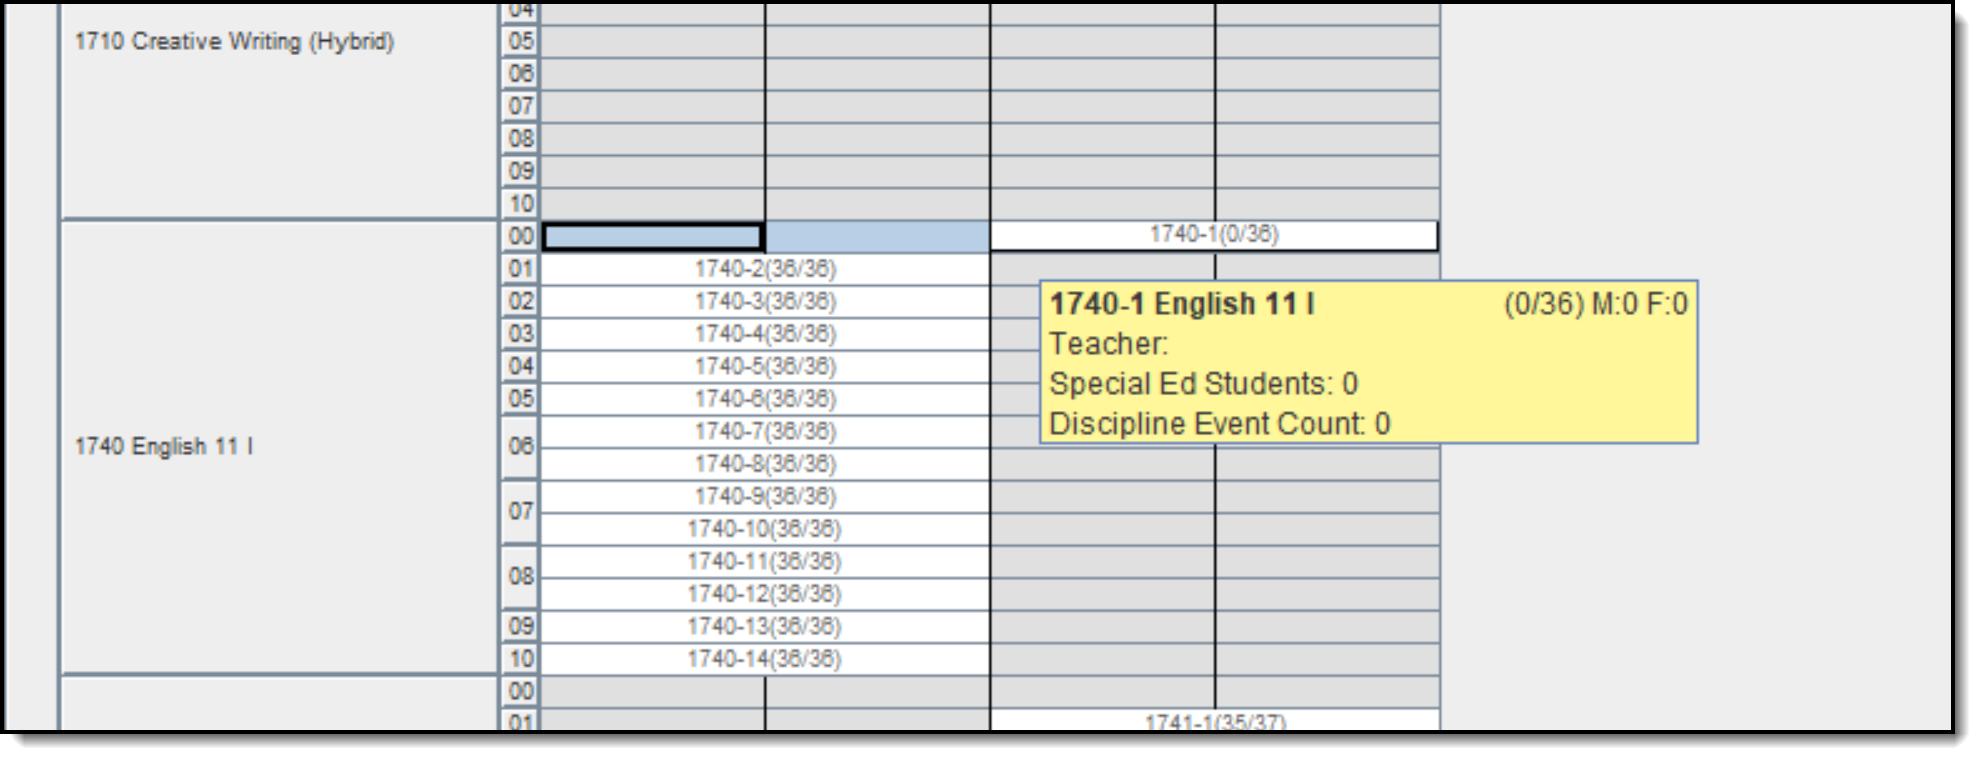
The section pop-up indicates the section number, the number of students on the roster (both a total and by gender), the teacher assigned to that section, the room the section meets in, as well as the team/scheduling group to which that section belongs. The total number of behavior events (lifetime total) displays, as well as the number of Special Education students in that section. When a section is combined with another or more than one course section, the total number of combined seats for each of the combined sections display. Users can see the total seat count per individual section, and the total combined seats.This functionality requires all of the combined courses in question to either not have a room assigned, or all be assigned to the same room. | |
Hovering over a course indicates the number of requests satisfied (students who have been scheduled in a section of a course) out of the total number of requests, the number of seats filled, the number of sections placed and needed (determined by dividing the total number of requests by the student max defined on the course), and if entered the number of sections to build. Any rules defined for the course also show in this pop-up. | |
Department shows the number of requests (fulfilled and grand total) for courses in that department, as well as the number of seats scheduled and taken for courses in that department. | |
Useful for determining if a sufficient number of sections are available during that period, as well as the number of seats available and filled in that period of the day. | |
Useful for determining if a sufficient number of sections are available during that term, as well as the number of seats available and filled. |
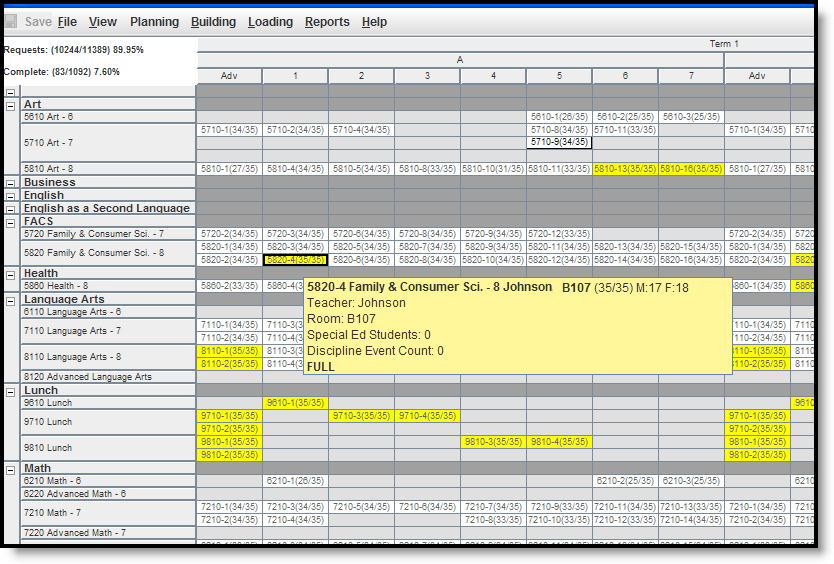 White Board Hover Display
The following tables list the actions that can be done when right-clicking (CTRL-CLICK when using a Mac) on an area.
Course
Right-Click Options | Description |
|---|---|
Renumber Sections | This option reviews all section numbers assigned to the placed course sections and renumbers them to be in numeric order. If a section 2 appears before a section 1 of the course, section 1 appears first after the renumbering. Renumbering order is done by Term sequence, Period Schedule sequence, Period sequence then Teacher Name. |
View Request Conflicts | Displays a list of other course sections where student requests conflict with the section. |
View Unrostered Students | Displays a list of students who were not scheduled into course sections for that course. |
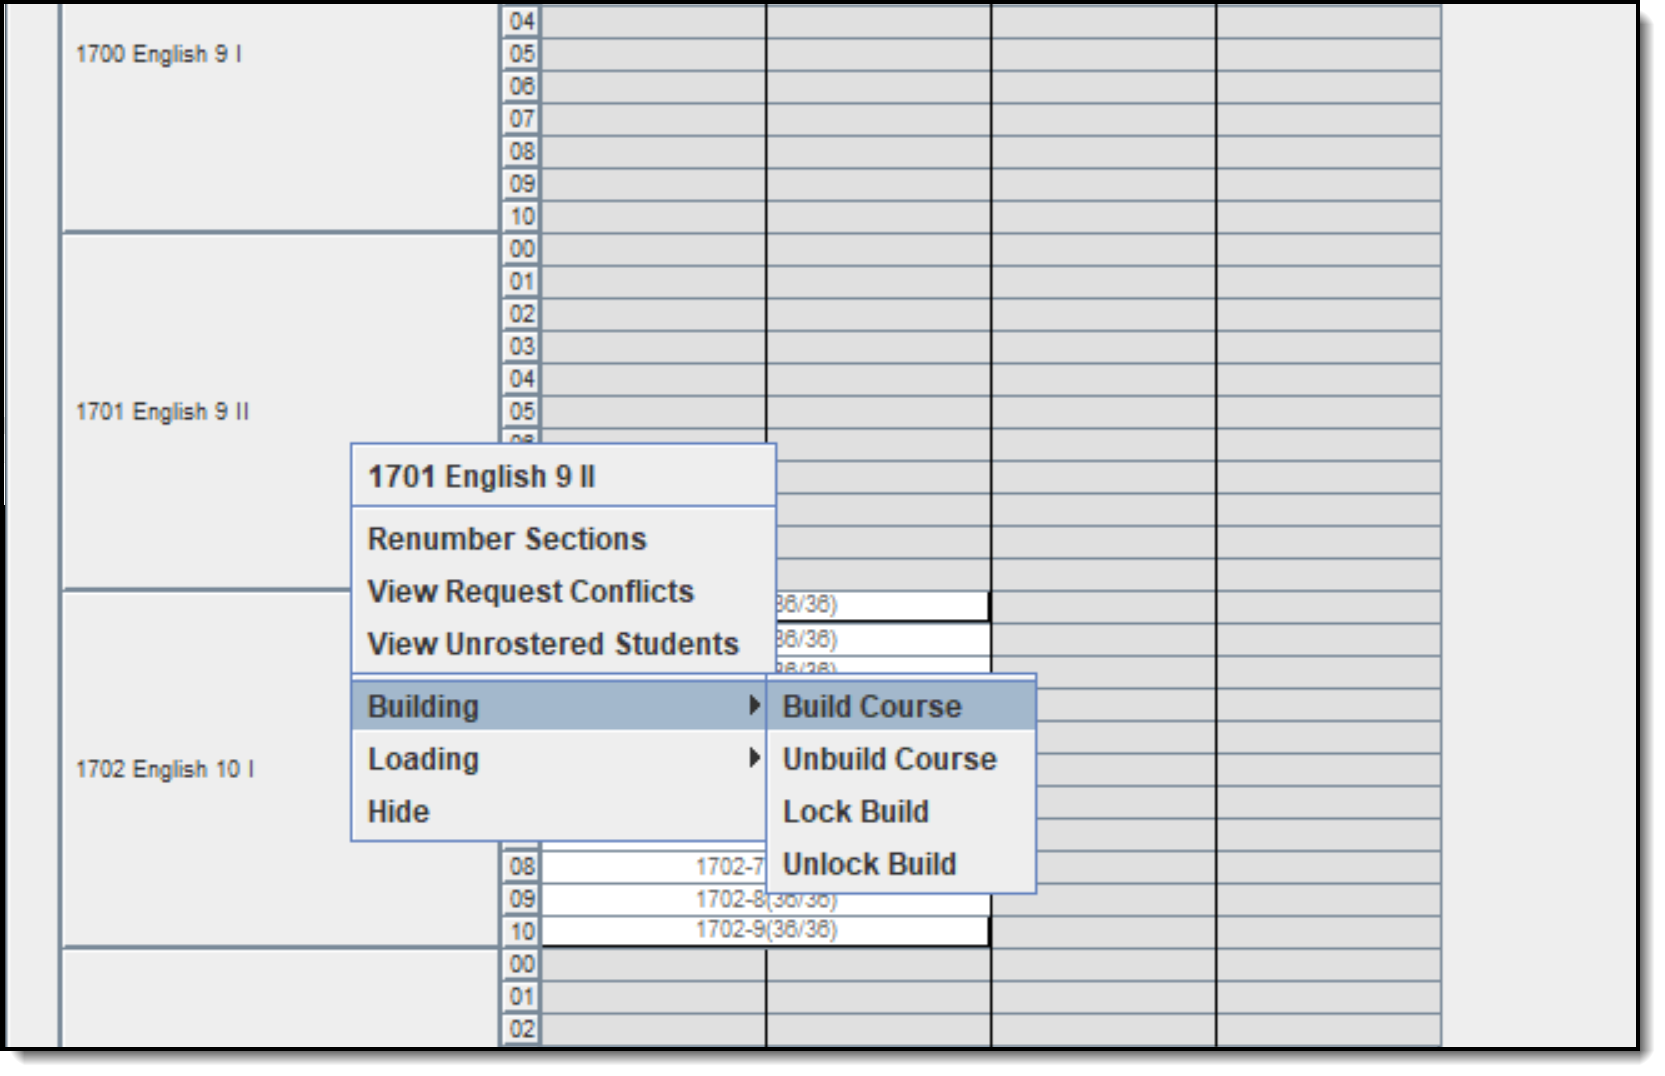
Building | The following options are available: Build Course Unbuild Course Lock Build Unlock Build |
Loading | The following options are available: Load Course - add course requests for the course Load Course by Grade/Gender - choose which grade levels and which genders to load into the courseUnload * Course - remove course requests for the course Lock Roster Load - choose which grade levels to lock into the the course, meaning those students are never removed from loading and building of the course Unlock Roster Load - choose which grade levels to unlock from the course, meaning the previously locked students can be removed from the course |
Hide | This option removes the selected course from the outline in the Schedule Wizard. Data remains and is viewable once again after selecting the View menu, Grid Display and Unhide All. |
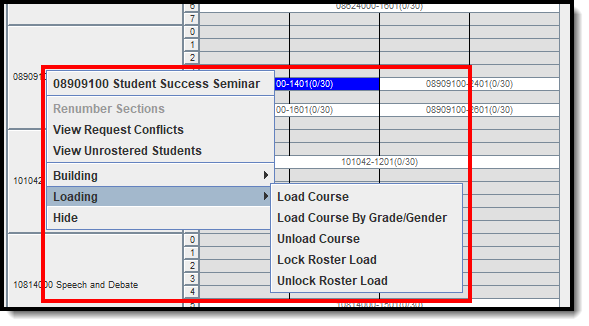 Course Right-Click Options
Section
Right-click Options | Description |
|---|---|
Edit Section Number | Allows the user to rename the section number. Valid entry for this field is a numeric value between 0 and 32767. |
Assign Teacher | Displays a list of teachers who can be (in white) and cannot be (in red) assigned to the section. |
Assign Room | Displays a list of room numbers which can be (in white) and cannot be (in red) assigned to the section. |
Assign Group | Displays a list of schedule groups that can be (in white) and cannot be (in red) assigned to the section. Groups must first be created in the Scheduling Group tool for the selected calendar/trial. |
| View Section Roster | Displays a list of students placed into that section.
Students can be locked from this view to ensure the student remains in this section, even if the build is unloaded or the course is unloaded. |
View Request Conflicts | Displays a list of other course sections where student requests conflict with the section. |
Building | The following options are available:
|
Loading | The following options are available:
|
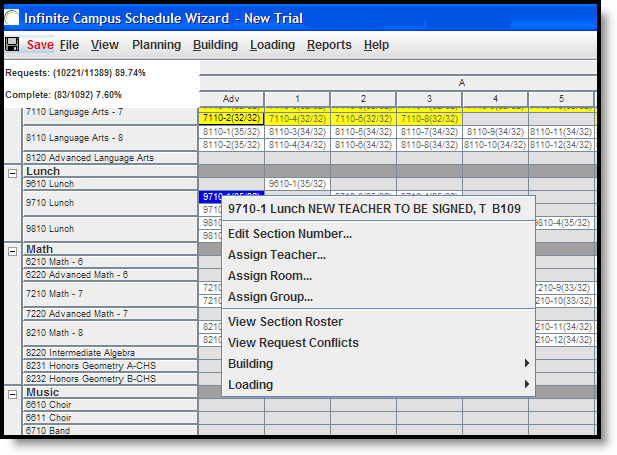 Section Right-Click Options
Term
Option | Description |
|---|---|
Lock Rosters | Locks ALL rosters for the term. |
Unlock Rosters | Unlocks ALL rosters for the term. |
Lock Build | Lock the course and section placement for the term. |
Unlock Build | Unlocks the course and section placement for the term. |
Load Term | Loads student requests for the term. |
Unload Term | Unloads student requests for the term. |
Hide | Hides the information of the term from the white board. |
| Unhide All | Unhides any hidden terms. |
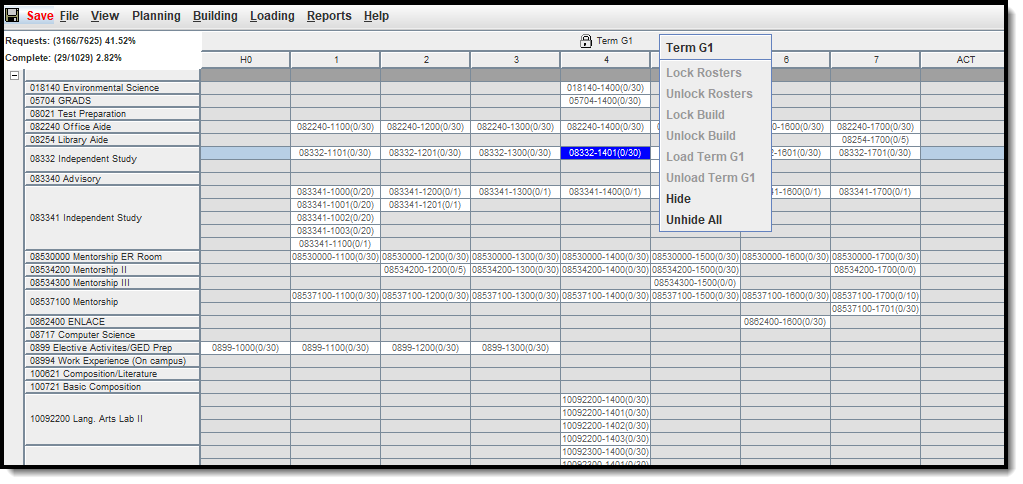 Term Right-Click Options
Department
Option | Description |
|---|---|
Renumber All Sections | Renumbers the sections to be in numeric order. Sections are created in numeric order, but if they are moved to appear differently (as in Section 2 occurs before Section 1), this action renumbers them to be in numeric order. |
Building | The following options are available:
|
Load | The following options are available:
|
Hide | This option removes the department and all its related courses from the outline of the Schedule Wizard. To display the department again, select the View option from the top of the wizard browser, and select Grid Display and Unhide All. |
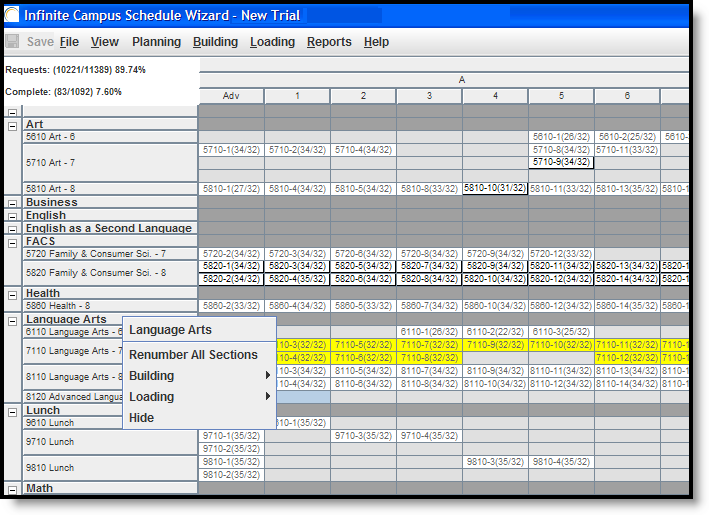 Department Right-Click Options
Period
Option | Description |
|---|---|
Unload Period | Unloads all data in the period. |
Lock Rosters | Locks all rosters for the course sections in the department. |
Unlock Rosters | Unlocks all rosters for the course sections in the department. |
Lock Build | Lock the course and section placement for the period. |
Unlock Build | Unlocks the course and section placement for the period. |
Hide | This option removes the department and all its related courses from the outline of the Schedule Wizard. To display the department again, select the View option from the top of the wizard browser, and select Grid Display and Unhide All. |
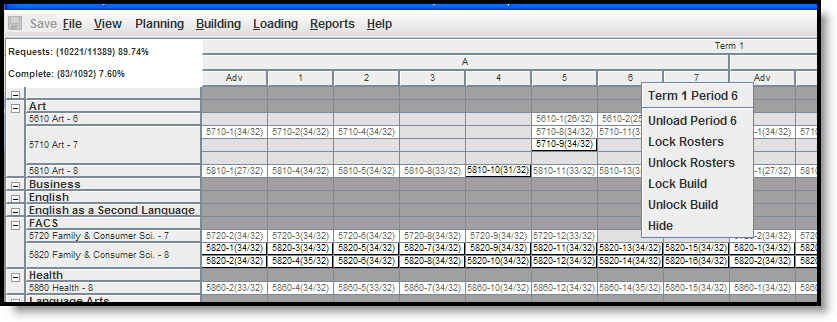 Period Right-Click Options
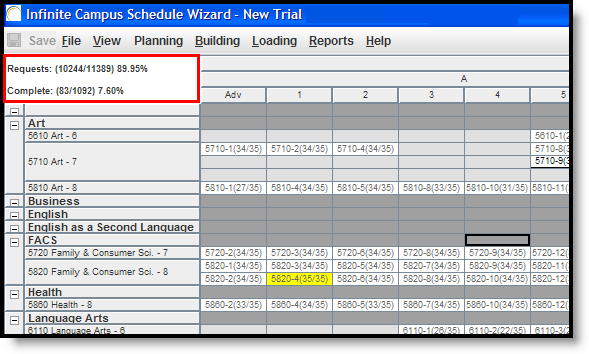
Percentages
There are two percentages listed in the top left corner of the Wizard’s whiteboard. The first one, Requests, indicates the number of seats filled / number of requests. The second one, Complete, represents the percentage of students who have all of their requests met. However, if the student does not have any course requests, this is included in the Complete percentage.
Alternate requests are not included in these values.
If a student is hand-scheduled into a course (therefore, there are no requests for those courses), or if the student has an alternate course request, the first number of the Requests percentage increases.
 White Board Percentage Options
Drag and Drop Functionality to Build, Move and Delete Course Sections
Build New Course Sections
Build new sections for a course by right-clicking on the course name and select Build Course. The Schedule Wizard creates the number of sections defined in the Sections to Build field on the Course editor based on the constraints entered for the course.
 Build New Course
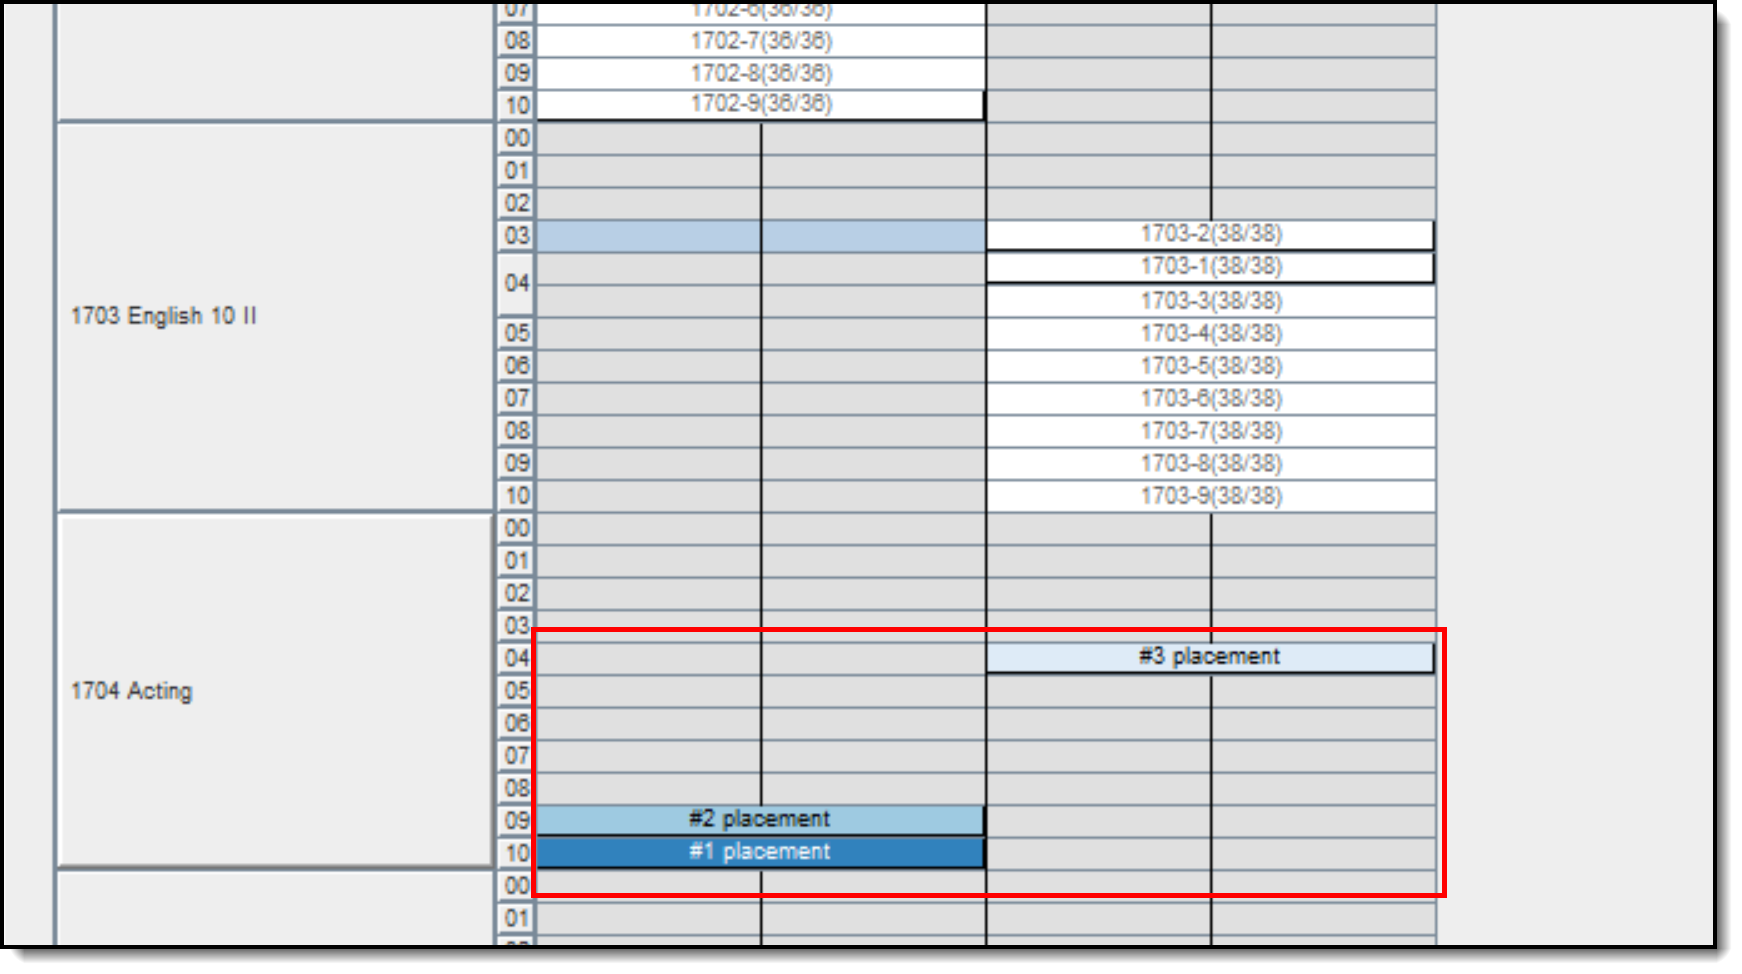
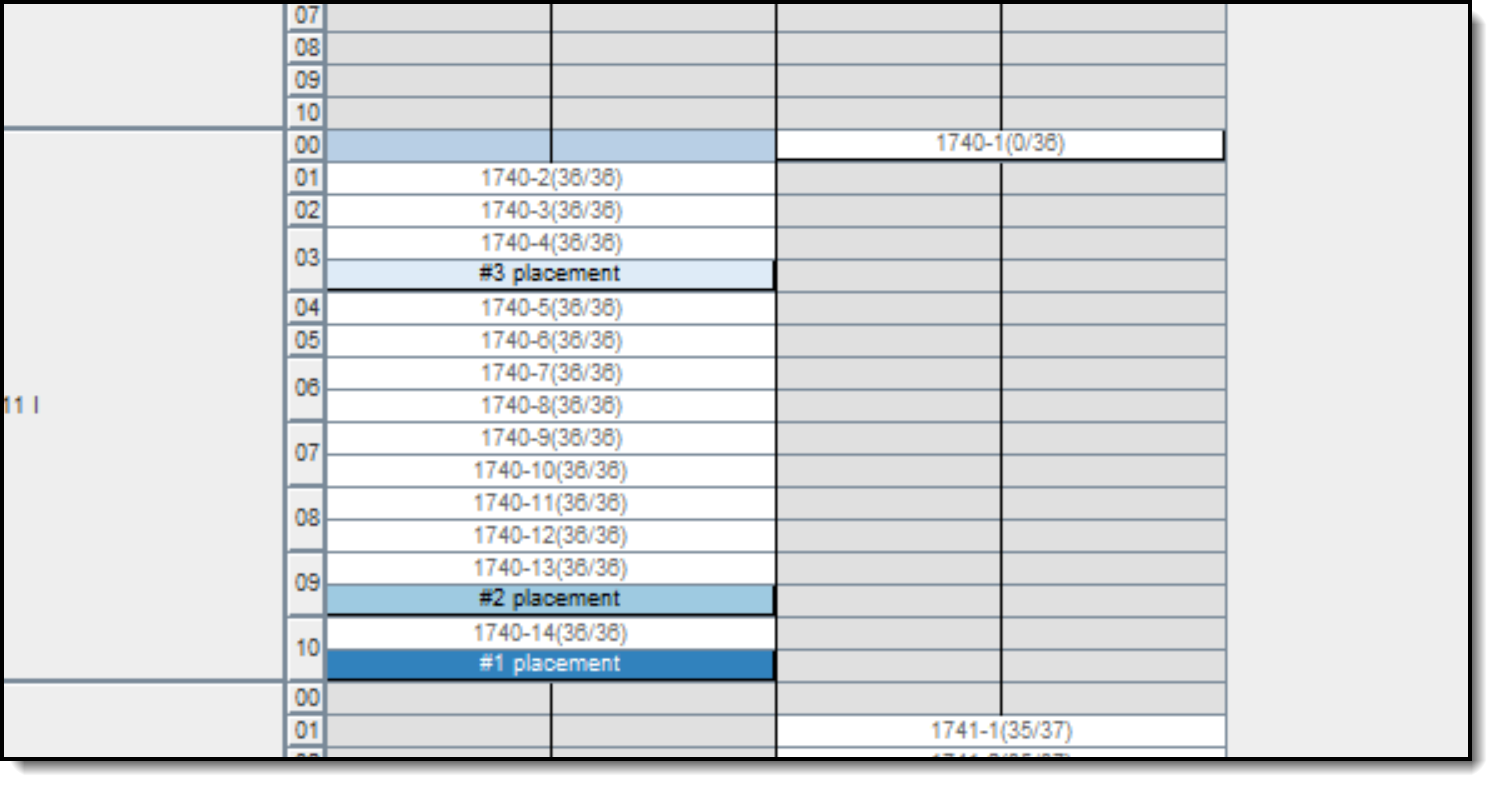
Build new sections for a course by clicking and dragging the course name into the desired term and period grid. When the Building Cofiguration option of Drag and Drop: Enable preferred section placement is marked, a Conflict Matrix or "heat map" is used to locate the best placements for that section. The three best placements for that new section are displayed, and includes the teacher and room assignments. The first placement is the same location the Auto-Build logic would choose if a single section were placed.
Submit feedback for this Conflict Matrix using the Feedback button on the Schedule Wizard Launch page. This takes you to the Basic Conflict Matrix in Schedule Wizard forum topic where you can add your suggestions and comments for this feature.
 Conflict Matrix for Building Course Sections
Move Course Sections
Select the section and drag the section to the desired location. The section appears in the new period column (depending on preferences established).
 Moved Section
Moving course sections also uses a Conflict Matrix to determine the best placement for a section. The three best placements for that new section are displayed, and includes the teacher and room assignments. The first placement is the same location the Auto-Build logic would choose if a single section were placed.
 Moved Section Conflict Matrix Display
Delete Course Sections
Delete a section by dragging the section completely to the left on the course grid.
Next Steps
Review the Checklist for Scheduling and Other Scheduling Tools documentation.
- Use the Course Planner or Staff Planner to build the schedule based on entered constraints for the teacher and for the courses.
- Build the Schedule using the Building Tools.
- Load course requests using the Loading Tools.
- Generate Reports to review the placement of courses.
- If all scheduling items have been completed, mark the Trial active. Additional changes can be made to the active trial in the Campus interface.
