The Schedule Wizard is being removed from the product as of the Campus.2435 Release (August 2024).
Use the following tools for scheduling and planning purposes:
Tool Search: Schedule Wizard
Campus Schedule Wizard provides the ability for master schedulers at a school or district level to plan necessary courses and staff needs, build a schedule of courses around the planned information and load students into those courses based on requested course information.
Before using the Schedule Wizard, review the Checklist for Scheduling to ensure prerequisites have been done. It is also recommended that schedulers enroll in an ICU course for scheduling.
The Schedule Wizard honors team membership, maintains gender balance and ensures numerical balance among sections of a course. The Wizard’s drag and drop interface can be configured to match the working style of the schedulers. If a section of a course is moved within a master schedule that is being developed, the Wizard can be configured to instantly reload the requests associated with that course.
 Schedule Wizard
Read - Open the wizard and view course placements.
Write - Select trials and modify course and section placements.
Add - N/A
Delete - N/A
See the Tool Rights section below for more details on what actions can be performed with each right.
Alerts can be set within the Schedule Wizard to help the scheduling team see patterns within the evolving master schedule. While traditional scheduling reports are available, the Schedule Wizard has been designed to save paper by displaying essential information on the interface.
The Schedule Wizard should be used AFTER students have entered course requests and the number of sections and courses and appropriate number of resources is available.
Users should be aware of what calendar and school they are currently viewing in the Schedule Wizard. If the current calendar is selected and changes are made to the active trial for the current year, all student schedules and related grades will be lost.
To prevent users from accessing the Schedule Wizard during a non-scheduling time, remove tool rights to this option. Removing rights prevents the user from accidentally changing the active trial when it should not be changed.
When the request percent is at least 90%, most schedulers begin to manually modify schedules in the Walk-in Scheduler. It is very rare to get a trial that is 100% complete.
Security and Data Precautions
The Schedule Wizard tool works to fulfill requests into a given trial. As a stand-alone application that downloads and runs on a user’s computer separate from the Campus server, there are several precautions that should be taken to avoid corrupt data.
- Only one computer at a time per school should have access to the Schedule Wizard.
When trials (versions of the master schedule) are saved back to the Campus database, they are saved based on an automatically assigned identification number. Having multiple computers attempt to save data associated with the same calendar and trial back to the database causes corrupt information, as the trials may intermingled in the database.
- Any changes made should be done using the Schedule Wizard or the Campus application, not both at the same time.
Since the Wizard downloads the data and works with it outside of the campus server, data should not be changed in both places at the same time. Doing so would create more course sections and student schedules than are needed.
- Making section changes in the Campus application (on the active trial) and saving those changes in the Schedule Wizard causes an error and those changes may not be saved.
When this happens, a message displays indicating some of those data changes may not have saved. Close and re-open the trial in the Schedule Wizard. As mentioned previously, make changes either in the Schedule Wizard or in the Campus Application.
- Once done with scheduling for the year, the wizard should NEVER be used to modify or change the year’s schedule.
There are several pieces of data that are tied to sections - namely attendance, grades and teacher grade books. If a user were to make significant changes to a schedule once this data was entered, orphaned records would be created. It is highly recommended that a currently active year NEVER be changed in the Wizard.
- Districts that use OneRoster connections to sync to other systems, including Campus' Digital Learning Partners, should NOT use Schedule Wizard at any point after their data has been synced during that school year.
At the beginning of the school year, districts should not sync with OneRoster vendors until student scheduling is finalized. Syncing prior to finalizing scheduling may result in data issues for OneRoster vendors, such as duplicate class records or loss of class data.
When considering the configuration of user accounts, please note that Schedule Wizard authenticates with a SSO enabled account; however, the SSO authentication only occurs once. This means if a Schedule Wizard JNLP file is saved to your desktop, it cannot be accessed directly (unlike local Campus accounts which allow this behavior). This is for security reasons. To re-open a saved trail, select Schedule Wizard from the Campus Index and re-login.
Kentucky Districts
After using the Schedule Wizard, rerun the Attendance Refresh.
The Schedule Wizard
After all pre-scheduling tasks have been completed (see the Checklist for Scheduling), the Schedule Wizard can be launched to place course sections in the appropriate periods and to complete student schedules. This is a complex wizard and is designed to encourage creative schedule building.
Any number of alternative scheduling trials can be created within a calendar. These alternative trials are represented in a hierarchical tree, or trial.
A trial can also be thought of as an instance of a master schedule. One trial can be dramatically different from another trial. The Schedule Wizard requires that each trial within a calendar conform to the same underlying calendar structure. In other words, a trial based on quarters cannot be in the same schedule structure as another based on trimesters. However, it is possible to have multiple schedule structures, where the sixth grade has different terms and periods then the other grades.
To experiment with alternate calendar structures, ask the Campus administrator to set up alternate schedule structures for the calendars (e.g., PHS 05-06A, PHS 05-06B) and roll the current year’s information into each of them.
This should be done in a staging site, not in the live database.
Access the Schedule Wizard
Java must be downloaded prior to use. Follow browser guidelines for doing this.
- Select the Schedule Wizard option.
- Click the Launch button next to the Schedule Wizard link on the gray screen.
- Background analysis is performed and a new window displays asking for a username and password. Enter the Login Name and Password as one would log into Campus. (When the user has exceeded the number of failed login attempts, an error message displays. If this occurs, contact your Campus Administrator).
- Click the Login button. The Trial Selection screen displays.
- Click the plus
") sign next to the name of the Calendar, or double-click on the folder next to the calendar name.
sign next to the name of the Calendar, or double-click on the folder next to the calendar name. - Select the appropriate year for which to schedule students.
- Select the appropriate trial and click the Open button in the lower-right hand corner of the window.
Access the Schedule Wizard on a Mac
The Gatekeeper security feature, introduced in OSX 10.78 Mountain Lion, enforces code signing and verifies downloaded applications before allowing them to run. The Schedule Wizard is a JAVA webstart program that is not supported by Apple. When the Schedule Wizard is launched on a Mac, Gatekeeper returns an unidentified developer error.
If you encounter an error like the following image when launching the Schedule Wizard, follow the steps below. This process only needs to be done one time, as after following these steps, subsequent attempts to open the Schedule Wizard occur without issue.
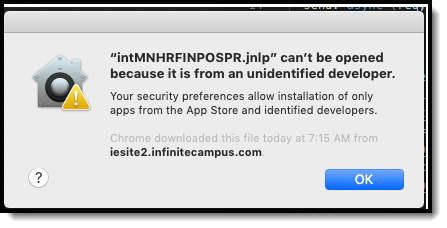 Gatekeeper Error Message
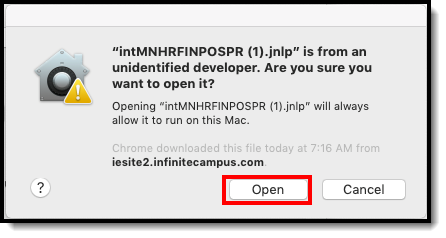
- Navigate to your computer's System Preferences, and select Security and Privacy, then choose the General tab.
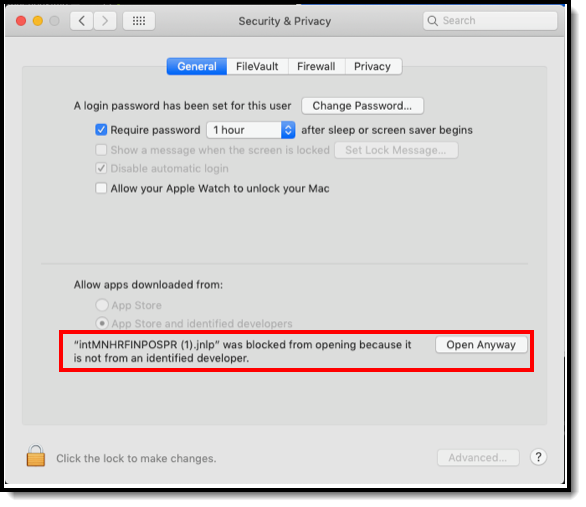
- In the Allow apps downloaded from section, click the Open Anyway option. This opens the Schedule Wizard.


Schedule Wizard Screen Size
On 4K monitors and higher (monitors with a screen resolution of 3840 horizontal pixels and 2160 vertical pixels), the Schedule Wizard login screen and subsequent Schedule Wizard screens display in a very small window that cannot be increased. To override this scaling, follow the procedures below:
- Open your File Explorer.

- Navigate to Windows (C): > Program Files > Eclipse Adoptium > jjdk-8.0.312.7-hotspot > bin.
- Locate javaws, right-click on that item, and select Properties.
- Select the Compatibility tab.
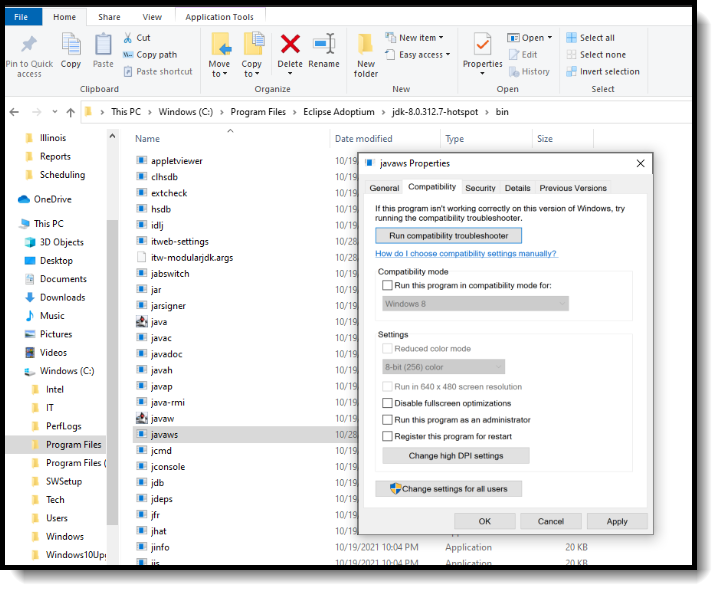
- Click the Change High DPI Settings and mark the Override high DPI scaling behavior checkbox, and change the dropdown selection to System.
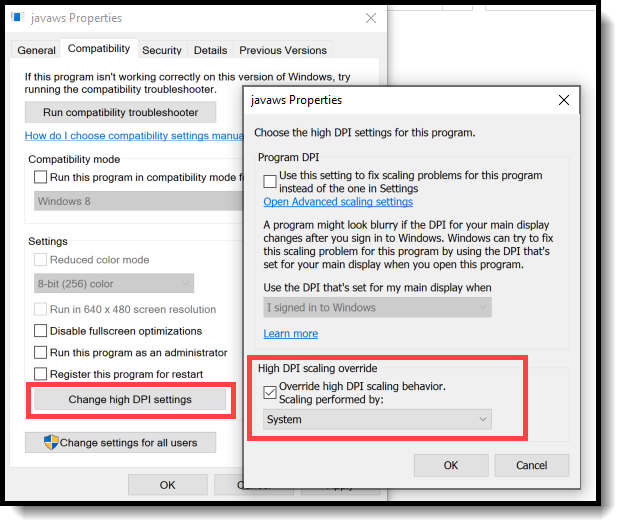
- Click OK on the javaws Properties.
- Click Apply on the Compatibility properties. and then click OK.


You may need to restart your computer. The Schedule Wizard login now displays in a regular size.
Technical Requirements for Running Schedule Wizard
As of December 31, 2019, the license structure for Java Runtime Environment (JRE) has changed. The following options are available:
- Remain on JRE version 1.8.0_202 (recommended).
- Upgrade JRE versions and provide payment to Oracle (not managed by Infinite Campus).
- Download and install Open JDK (no charge). Follow the procedures below to use the Open JDK option for both Mac OS and Windows.
If you have downloaded the updated version, but would like to return to JRE version 1.8.0_202 (may be labeled as Server JRE (Java SE Runtime Environment) 8u202), follow these instructions.
To see which version of Java you currently have on your machine, follow these instructions.
Check out the Open Webstasrt JDK video for more information!
Mac Instructions
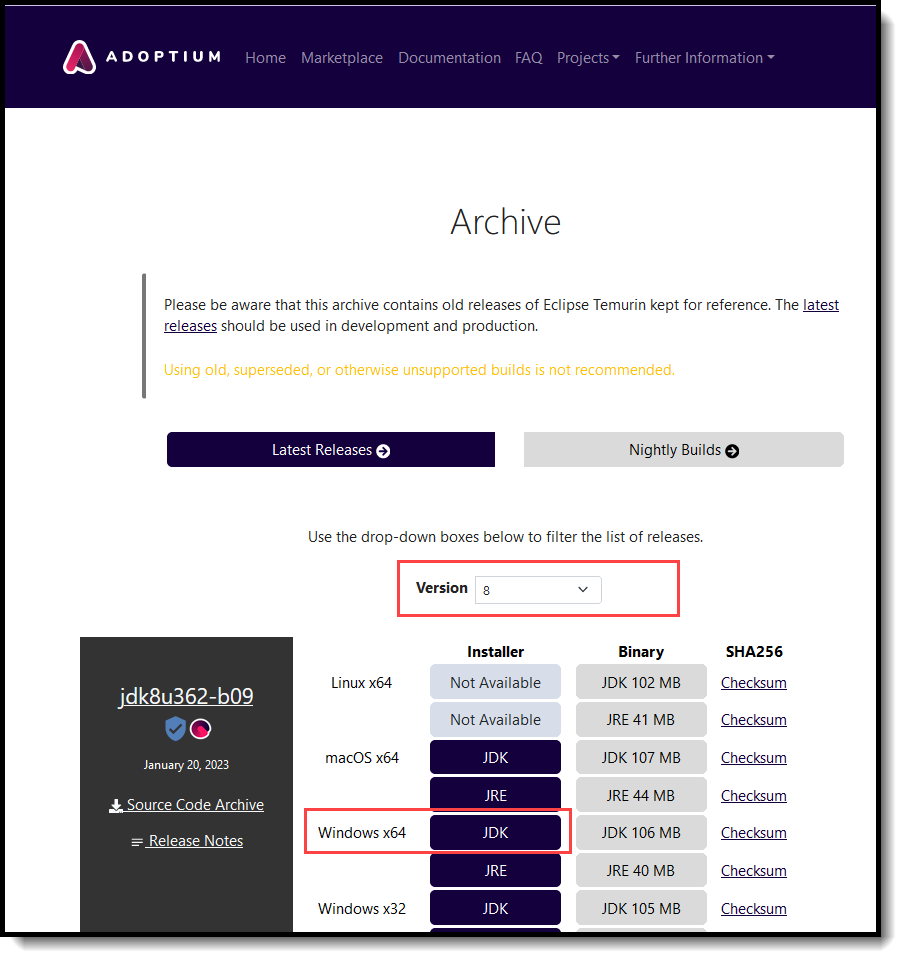
- Navigate to https://adoptium.net/temurin/archive/?version=8Navigated.
- In the Version dropdown, select 8. Then choose and click on the JDK Installer for version 8 of OpenJDK.

- Open the installed file on your browser to launch the install wizard.
- Click Continue on the Introduction page.
- Click Continue on the License page.
- Click Agree for the Terms of the Software License Agreement.
- Click Install on the Installation Type page and allow the installation to complete.
- Click Close on the Summary page to exit the install wizard.
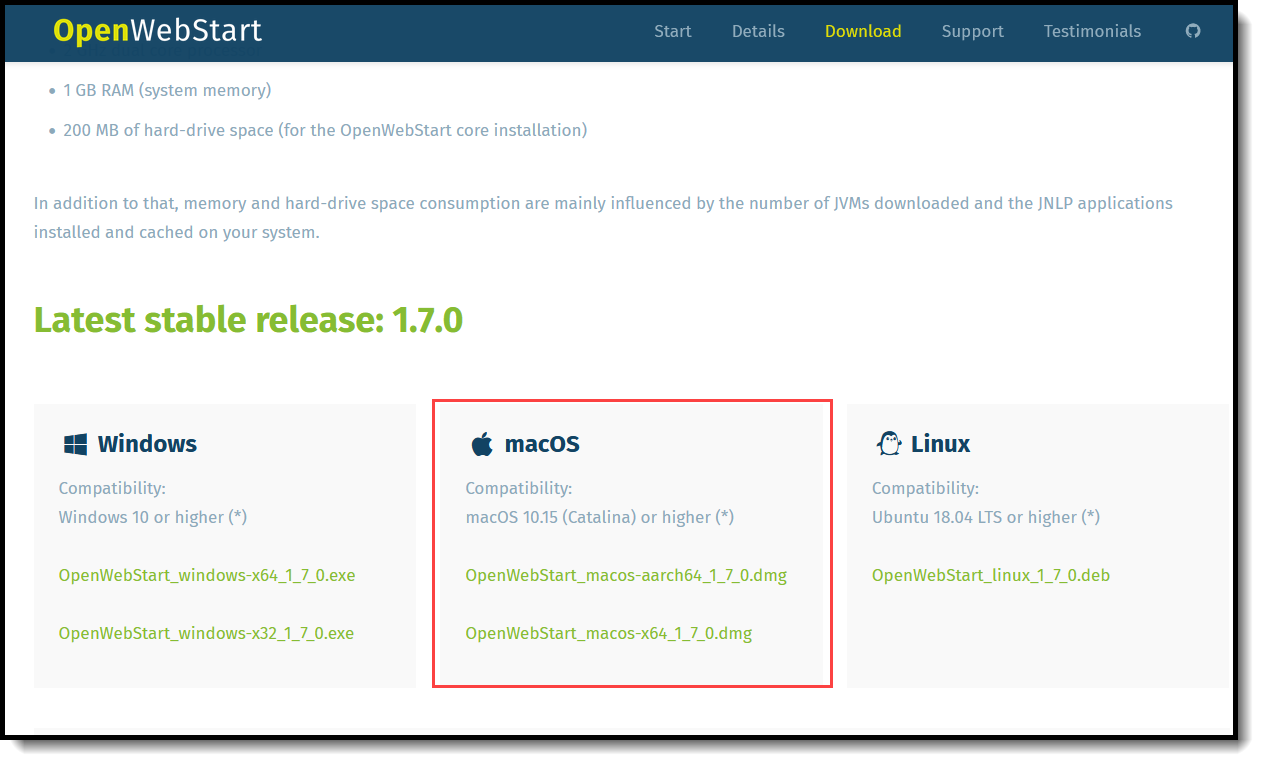
- Navigate to https://openwebstart.com/download/.
- Click the link to install OpenWebStart on macOS.
- Open the installed file on your browser to launch the setup wizard.
- Select I accept the agreement on the License Agreement page and click Next.
- Select the installation mode and click Next.
- Select the files to be associated on the File Associations page and click Next. Allow the installation to complete and click Finish to exit the setup wizard.
- After OpenWebStart is installed, open the OpenWebStart Settings and navigate to the JVM Manager.
- Click Find local to find all local JVMs on your machine. Remove or deactivate all JVMs newer than version 8 by clicking on the “…” on the right side of each JVM line.
- Click OK to apply the changes.
- Once OpenWebStart has been installed, log into the Campus application and launch Schedule Wizard as you normally would.
- Launching Schedule Wizard from the Campus application downloads a file with a .jnlp file extension. Locate that file in the downloads folder on your computer.
- Right-click on the .jnlp file and select Get Info from the menu that appears.
- A dialog box opens (see image). Click the Open with chevron and select OpenWebStart javaws.app. You can also click the Change All button to associate any future Schedule Wizard launches with this program, which means you won't have to repeat this step in the future.
- Close the dialog.
- Re-launch Schedule Wizard. It should now be associated with the correct program to run Schedule Wizard.


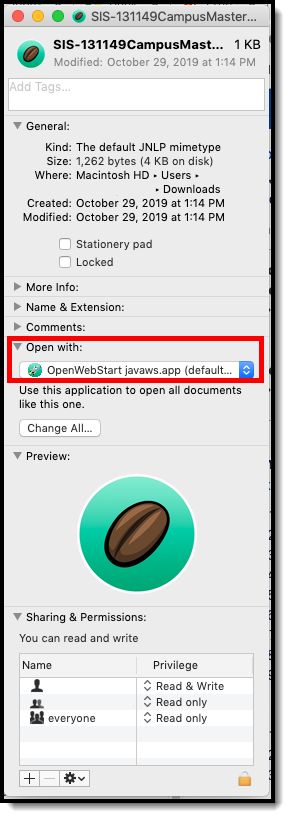 Associate /jnlp with Schedule Wizard
Windows Instructions
First, uninstall Oracle Java from your computer. Once removed, Adopt Open JDK can be installed.
There are TWO installations that must be done - one for the OpenJDK Adoptium update and one for the IcedTea-Web installation.
OpenJDK Adoptium Installation
- Navigate to https://adoptium.net/temurin/archive/?version=8Navigated.
- In the Version dropdown, select 8. Then choose and click on the JDK Installer for version 8 of OpenJDK.
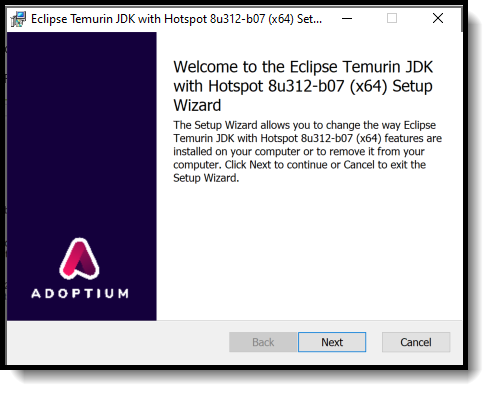
- Open the installed file on your browser to launch the install wizard.
- Click Continue on the Introduction page.
- Click Continue on the License page.
- Click Agree for the Terms of the Software License Agreement.
- Click Install on the Installation Type page and allow the installation to complete.
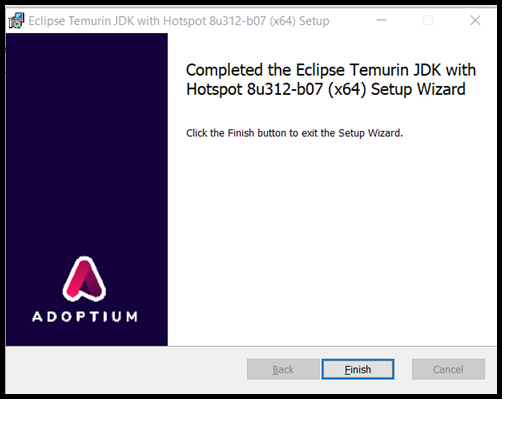
- Click Close on the Summary page to exit the install wizard.
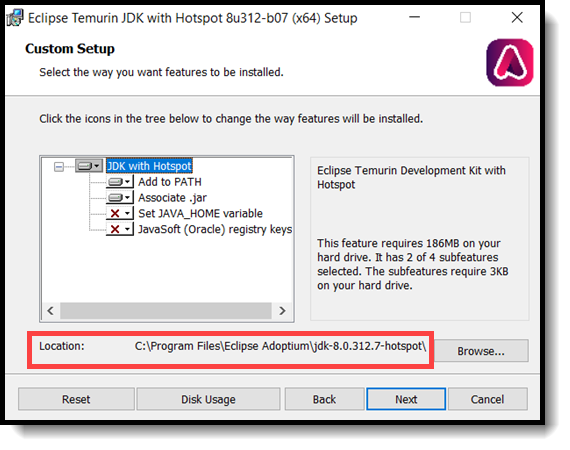
- In the downloads list in your browser, select the OpenJDK8U-jdk_x64_windows_hotspot_8u312-b07.msi file to save. The Setup wizard displays.
- Click Next or Run on the Setup wizard.
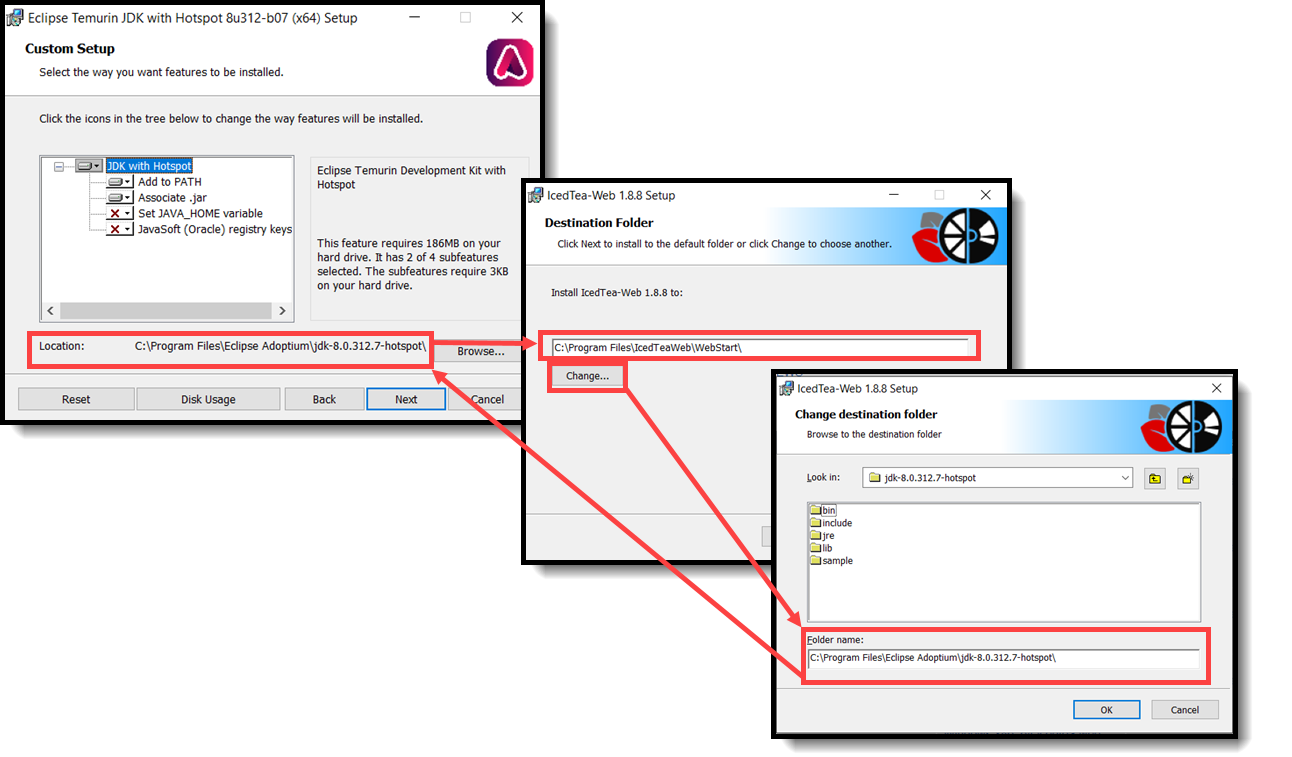
- On the Custom Setup editor, take note of the Location of this installation (screen capture, write down, etc.). This is needed in Step 6 when installing IcedTea-Web. Note that the jdk version/numbers may vary.
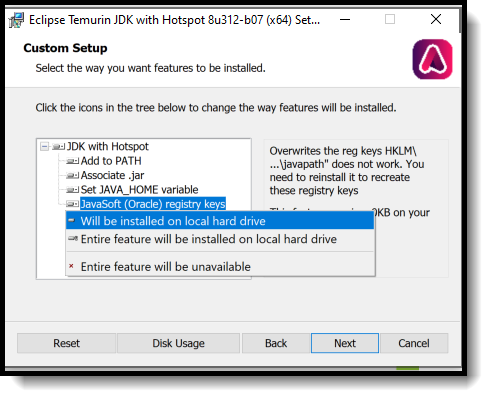
- On the Custom Setup editor in the Setup Wizard, the last two options - Set JAVA_HOME variable and JavaSoft (Oracle) registry keys - first display with a red X. Click the dropdown arrows next to these options and change to Will be installed on local hard drive.
- Click Next.
- Click Install. It will take a few seconds for this installation to complete.
- Once complete, click Finish. The first installation is now complete.


IcedTea-Web Installation
- Open https://adoptopenjdk.net/icedtea-web.html.
- In the table of icedtea-web builds, locate the version icedtea-web-1.8.8 row. Under the Windows column, choose Windows (MSI) x86_64 icedtea-web-1.8.8.

- Click the downloaded file. In the downloads list, open the downloaded file to launch the IcedTea-Web 1.8.8 Setup Wizard.

- Click Next.
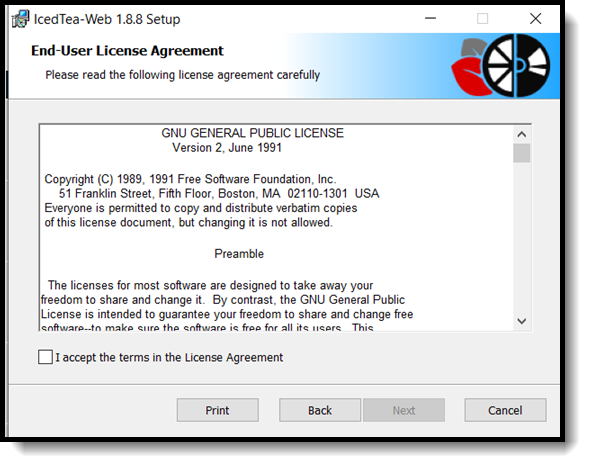
- Accept the License Agreement and click Next.
- Edit the folder directory (click Change) to be the SAME directory as you installed openjdk8. This was noted in Step 8 when installing OpenJDK. In the image below, the original location for the IcedTea-Web program needs to be changed from C:\Program Files\IcedTeaWeb\WebStart\ to C:\Program Files\Eclipse Adoptium\jdk-8.0.312.7-hotspot\. Note that the jdk8 version/numbers may be different.
- Click Next, then click Install.
- When the install is complete, click Finish.


The Schedule Wizard can now be launched. Note the following:
- A full restart of your computer after installation is recommended.
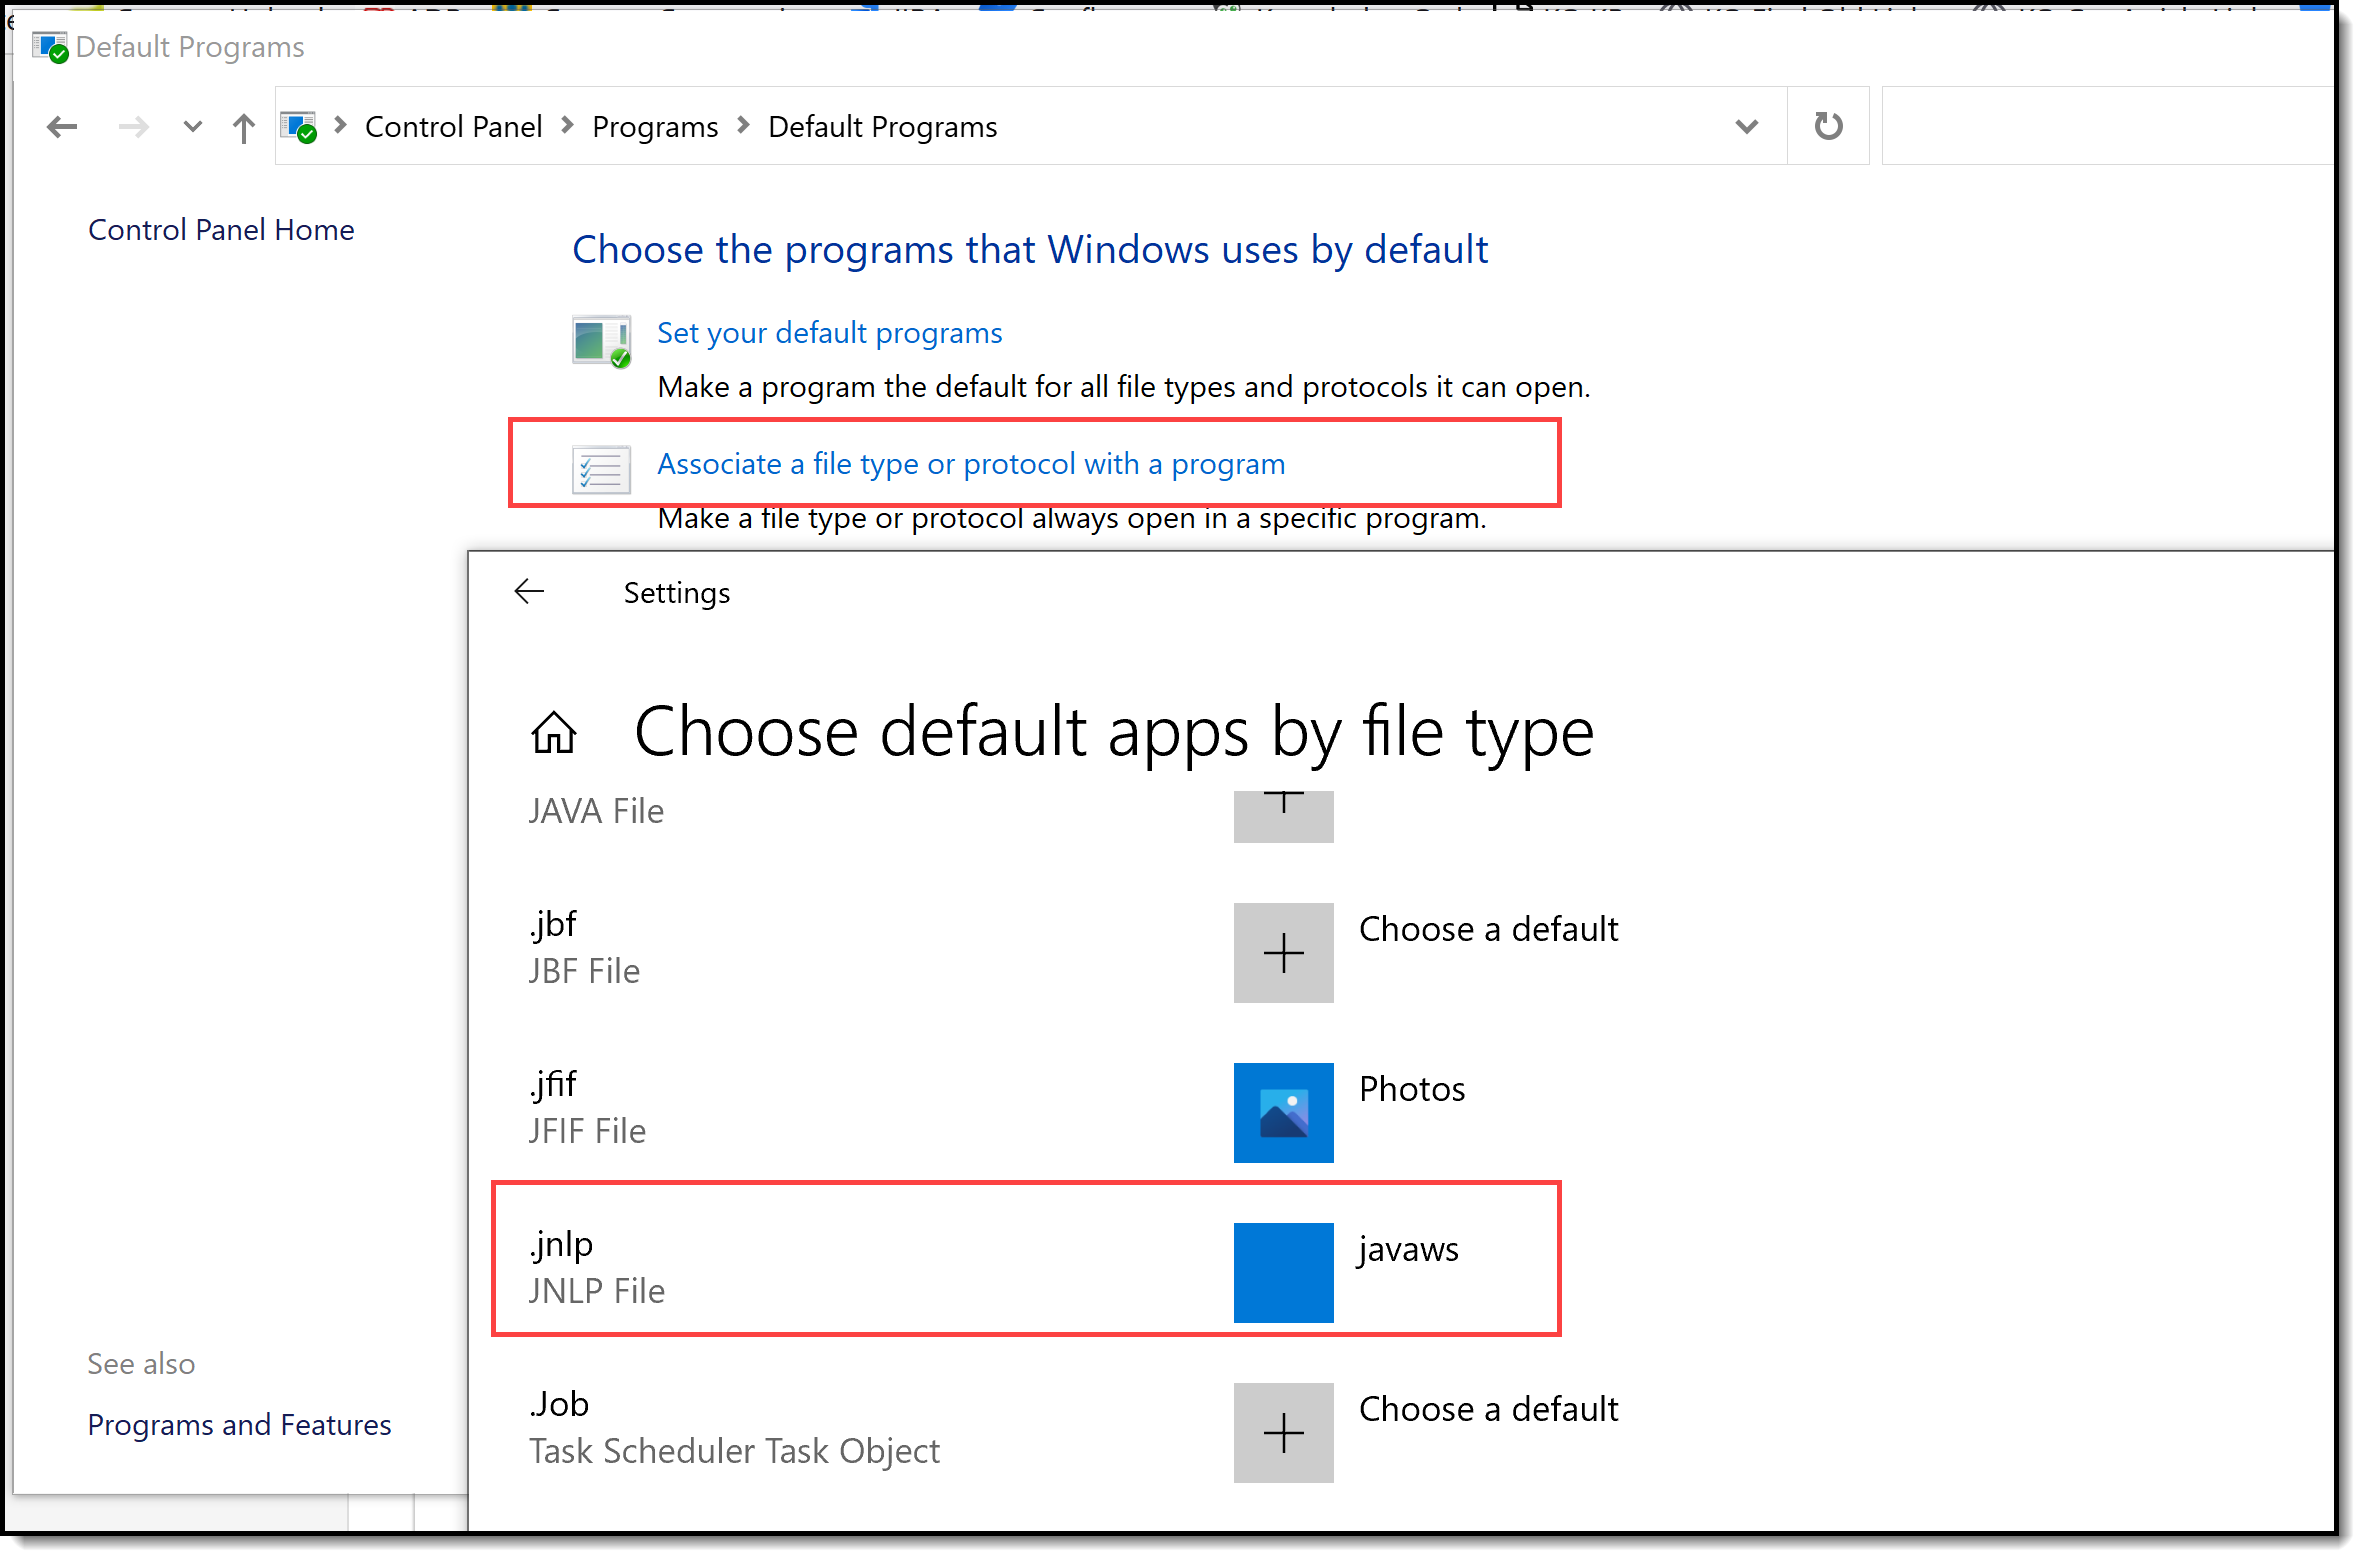
- When using the Firefox browser, the .jnlp file needs to be associated with javaws. Verify this is done by accessing the Default Programs in the Control Panel. It looks similar to this:
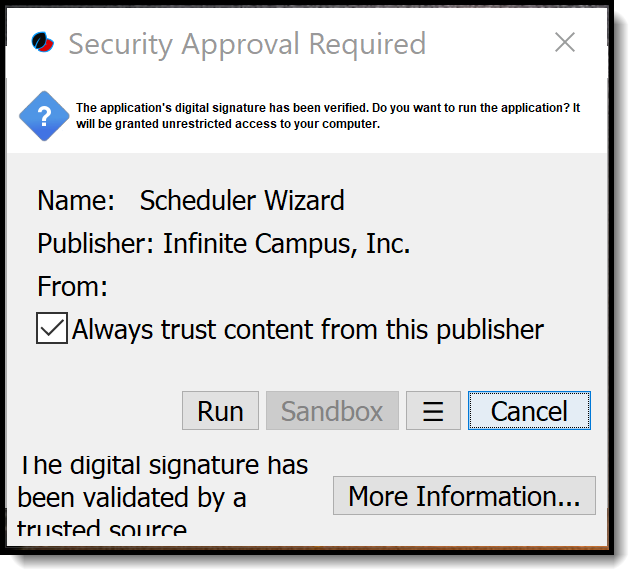
- After launching the Schedule Wizard, a Security Approval Required popup may display behind all open applications. Click Run to continue with the launch.
- When launched, the font size/screen size may display in an unreadable size. Follow the instructions above for adjusting screen size.


Schedule Wizard Tools
See the following articles for detailed instructions on using the Schedule Wizard:
