Tool Search: Schedule
The Walk-In Scheduler allows modification of a student's schedule, whether a student needs to drop and add a course, or a new student enrolls in the school at any time during the year. Changes made to the student's schedule occur in real time, which means when a student is added to a course section, the teacher of that course section can see the student was added to the course roster, and can record attendance for that student and begin tracking assignments for that students.
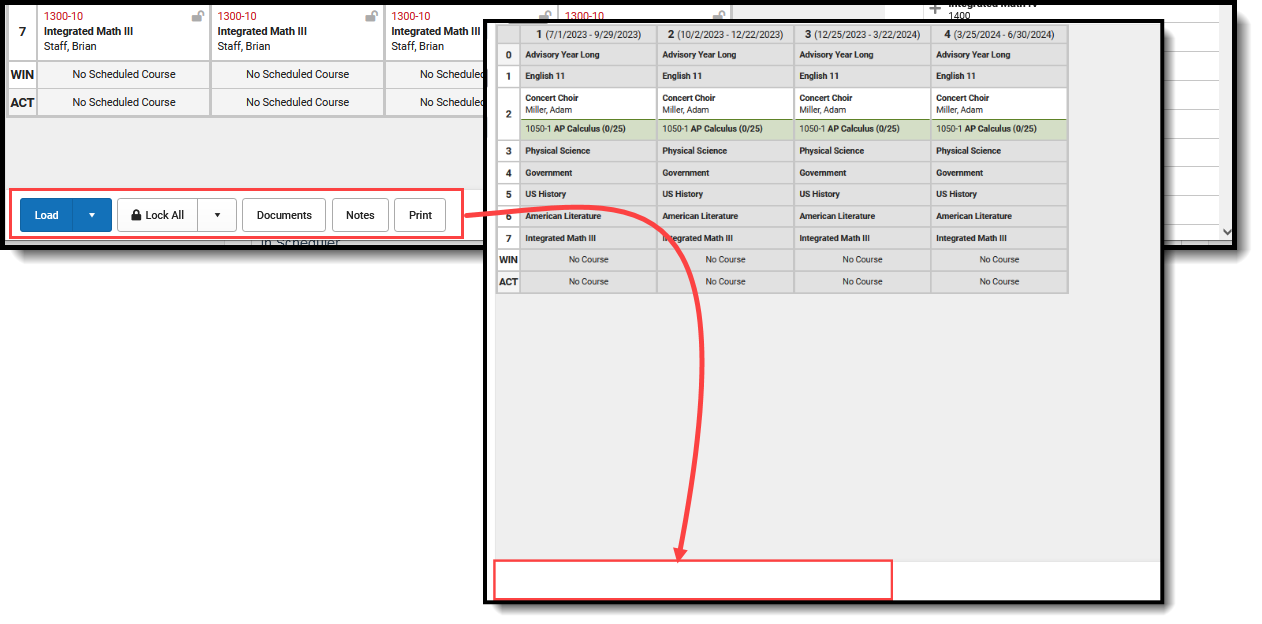
The Walk-In Scheduler is accessed from the Student's Schedule. Click the Walk-In Scheduler button in the action bar at the bottom of the page. Walk-In Scheduler is not available on monitors smaller than 1024 x 768 or on devices due to the amount of information visible in the Walk-In Scheduler.
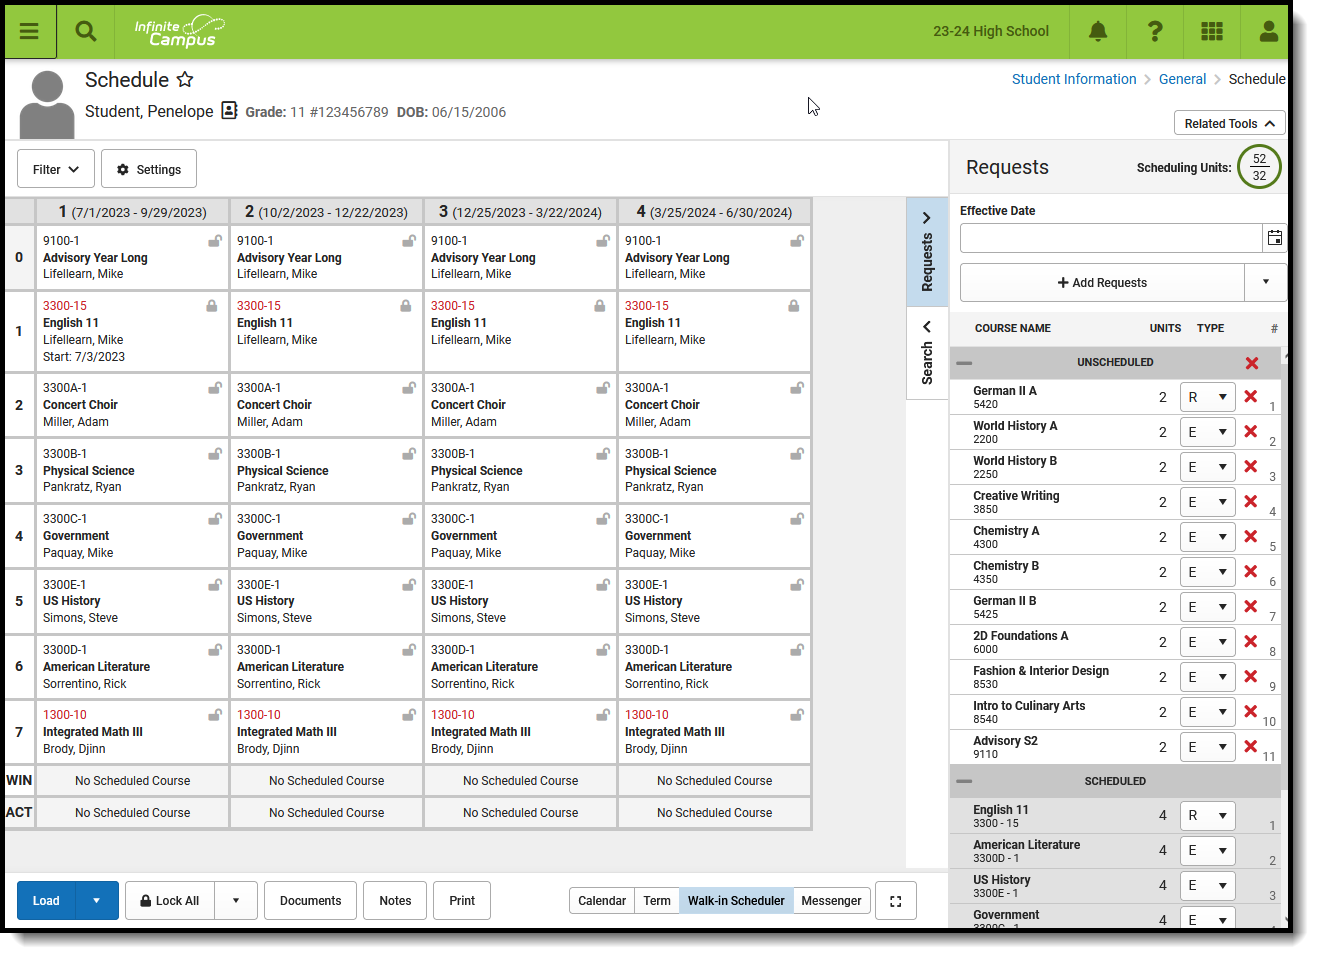 Walk-In Scheduler
Read - View and access the Student Schedule.
Write - Add Course Sections using the Walk-In Scheduler.
Add - N/A
Delete - Remove course sections from the student's schedule.
See the Tool Rights section below for more details on what actions can be performed with each right.
The Walk-In Scheduler is available for students whose enrollment is marked as No Show. For this situation, the Schedule Term View and the Walk-In Scheduler display identical course information, with text indicating the end date of the section is not within the start and end dates. Dropped course requests display in the Request Panel for reference, and can be printed using the Student Request report. See the No Show Enrollments section on the Enrollment editor for more information.
The Walk-In Scheduler may be locked when the Trial associated with the selected calendar is being worked on by another user in the Scheduling Board. A message displays at the top of the screen indicating this. See the Scheduling Board and the Scheduling Board Trials articles for more information.
Navigation of Walk-In Scheduler
When first accessing the Walk-In Scheduler, verification is done to ensure scheduling is happening in the active year. When the active year is NOT selected, a warning message displays (first image below). Change the selected year in the Context Editor (second image below), and continue managing the student's schedule.
School years are marked as Active in the School Year Setup tool.
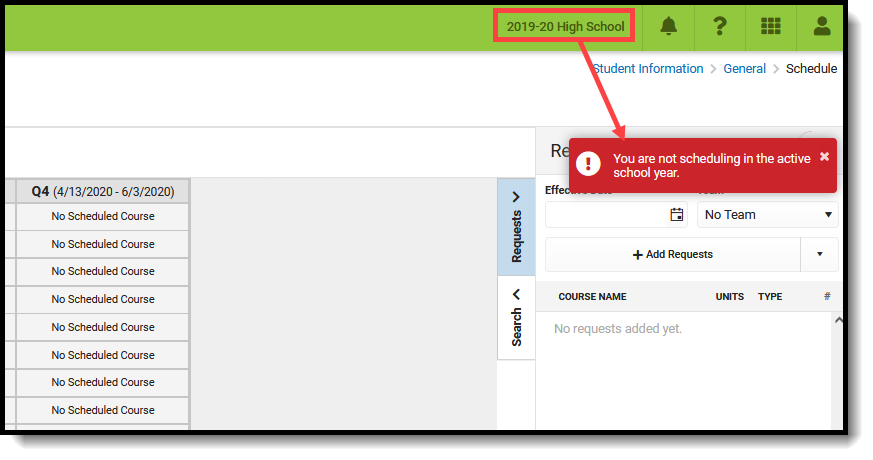 Selected school year is NOT the active school year
| 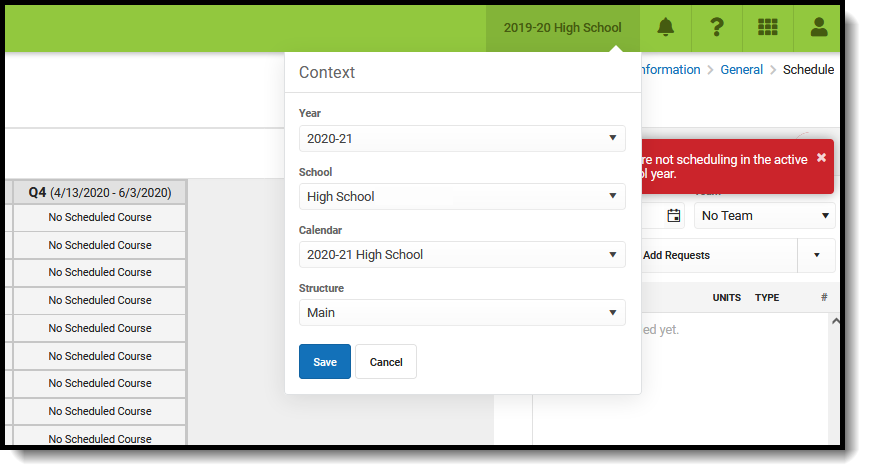 Change the selected school year in the Context Editor
|
| Feature | Image |
|---|---|
| Select which terms, courses, period schedules, and day schedules display in the schedule grid by using the Filter option. |
|
| Determine what displays in the schedule grid by turning on or off certain Settings. |
|
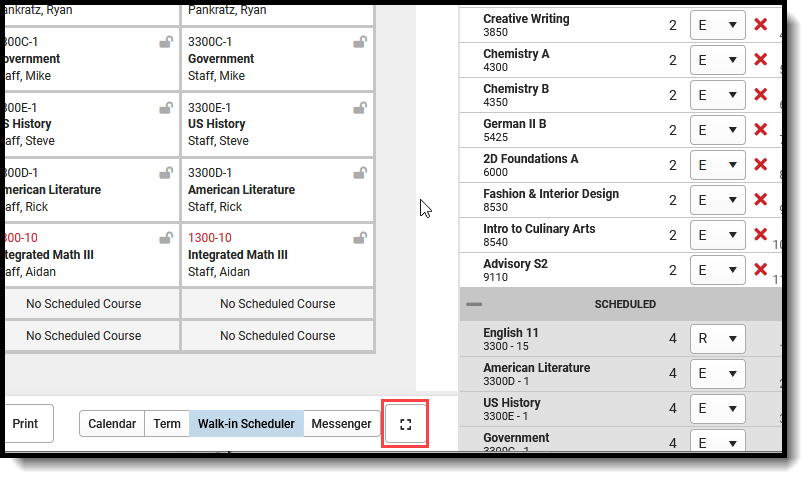
Use the Full Screen icon to display just the Walk-In Scheduler in the entire browser window. This removes all tabs, all indexes, all headers, and just displays the Course grid and the Requests and Search panels. Click the icon again or click the ESC key to return to a non-full screen view. |
|
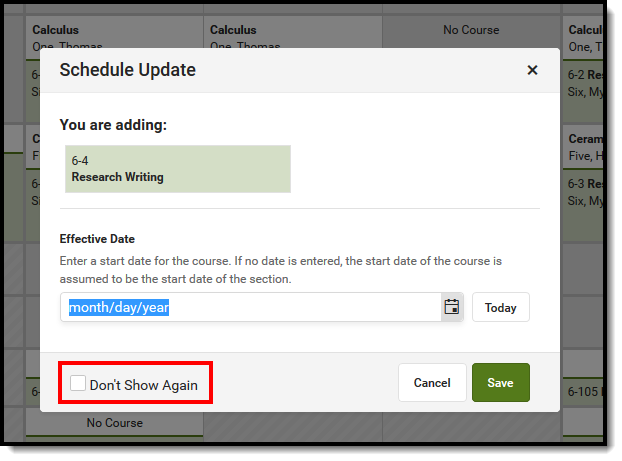
Opt out of seeing the action modals that display when performing an action by marking the Don't Show Again checkbox. This applies to any active session (open browser tab), and only works for simple cases (one action per modal). |
|
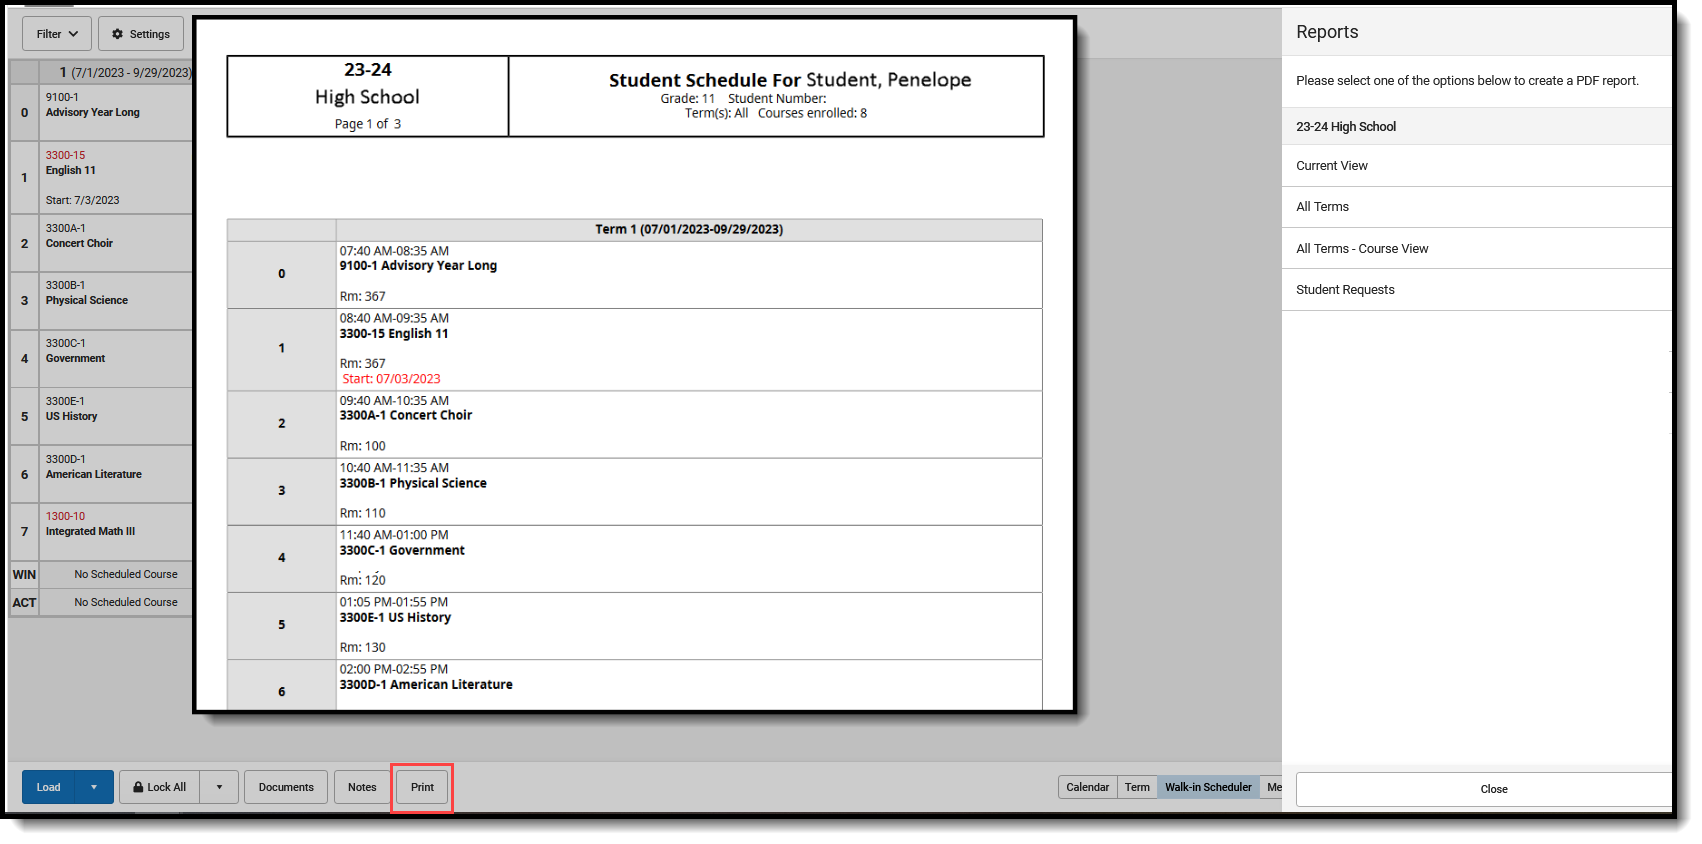
Access Schedule Reports by choosing the Print button from the bottom of the page. Available reports display in the side panel.
Reports print in PDF Format. Additional reports may be available at your school and/or district. |
|
| When selecting a course from the Requests or Search Panels, the course grid is considered active and cells where that selected course is scheduled are color-coded. When the grid is active, the Load, Lock All, Documents, Notes and Print buttons in the Action bar do not display. |
|
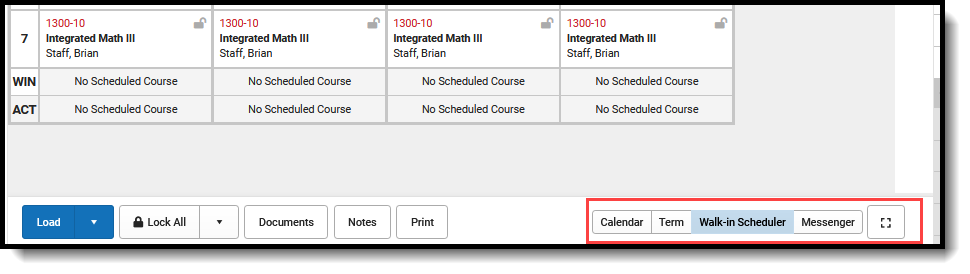
Access other Scheduling tools from the Action bar.
|
|
Search for courses to add to the student's Schedule using the Search panel. Search by several different course related options, like Course Name or Number, Period, Term, etc. Up to five search values can be chosen. After searching for a course, click the plus sign next to the course name to display sections of the course and assigned teachers. |
|
| View a list of already requested courses, add more course requests, and see courses the student has dropped on the Requests panel. |
|
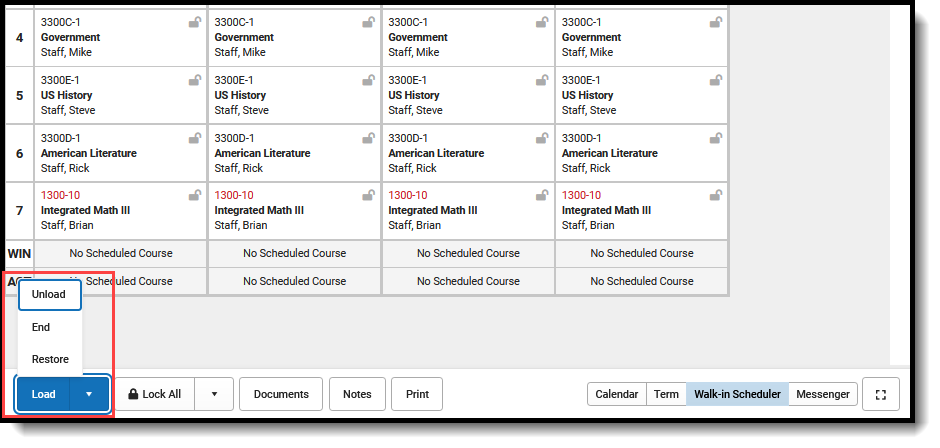
| Load Course Requests using the Load button in the Action bar. Courses can also be ended en masse, completely unloaded (unless a course is locked), and restored (when a schedule has been ended on one date and the student returns at a later date). |
|
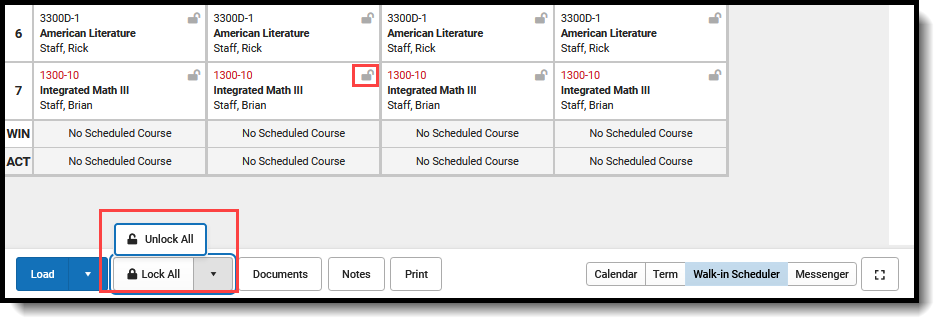
Lock courses or unlock courses as needed using the Lock All button. Locking keeps the courses on the schedule when a schedule is unloaded on the Walk-In Scheduler or in the Scheduling Board. Unlocking a course allows that course to be removed and another course added in its place. The Lock All/Unlock All option in the Action bar locks or unlocks ALL courses on the schedule. To lock or unlock an individual course, click the padlock for that course in the grid. |
|
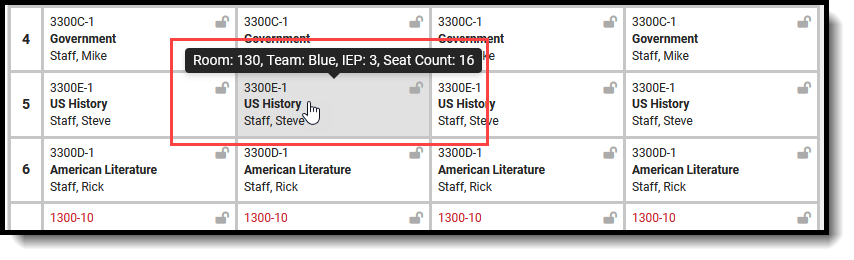
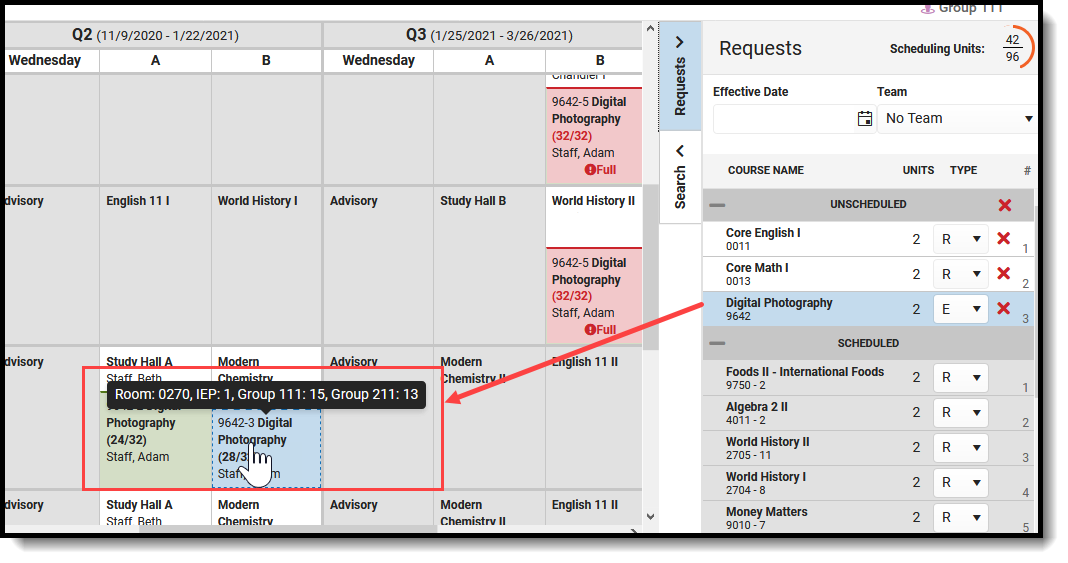
The courses in the grid display the course number and section, the course name and the teacher name. See a quick glance at a course section on the student's schedule by hovering over the section - where the course is scheduled to meet (room number), assigned scheduling team (when assigned), total students in the section who have an IEP, and the total seat count (how many students are scheduled plus how many students can be scheduled). When there is a student constraint, that information also displays in the hover. This just shows that there is a constraint, not any student specific information. The second digit of the Seat Count number is determined by the value entered in the Max Students field on the Course Information editor and/or the Section editor. A course section is only considered full (displays in red) when the Max Student value has been met. Enrollments marked as No Show are not included in the seat count total. When a course and course section do not have the Max Students field populated, the hover does not include the seat count prior to the section being added to the schedule. However, the section information of the search results shows the seat count (before the teacher's name). Once the section is added to the schedule, the hover includes the seat count. Seat count is also included when seeing where a section could be placed. It displays in parentheses after the name of the course. |
|
| When adding courses, review the information on the modal to ensure the correct course is added, the correct start date is entered, etc. Modals display when any change is done to the student's schedule - when current courses are updated, when courses are dropped, when ending rosters, when restoring rosters, for instance. |
|
Keyboard Shortcuts
The following shortcuts can be used when accessing the Walk-In Scheduler:
- Arrow through the time slots. Use all four directional arrow keys to highlight time slot cells and scroll through the courses.
- Press enter to open courses. Highlight a course using the tab key and press the Enter key to open the Course Side bar.
- Tab through the courses and non-timed activities. Use the Tab key to move through the courses and click Enter to open the Course Side panel (shows the course name, teacher, period name and time).
- Arrow through the days. Use the arrow keys to navigate through the schedule.
- Escape to close side panels and modals. Click the ESC key to close open side panels.
- Choose the noted letters to perform the following tasks:
- R to toggle the Request Panel.
- S to toggle the Search Panel.
- F to expand the view to Full Screen.
- ALT-C to Cancel Selection (when in Request Selection mode).
Certain browser settings (like spell check) may interfere with the use of keyboard shortcuts.
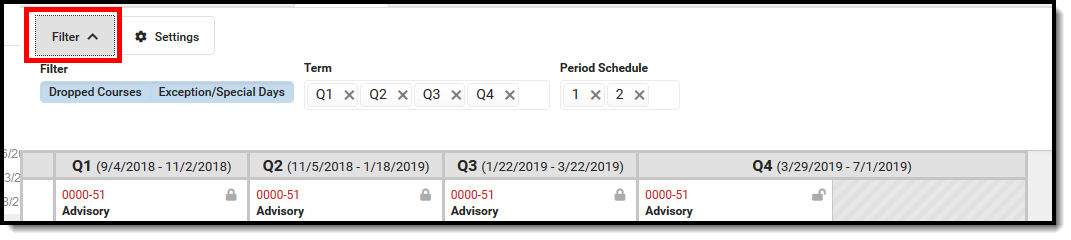
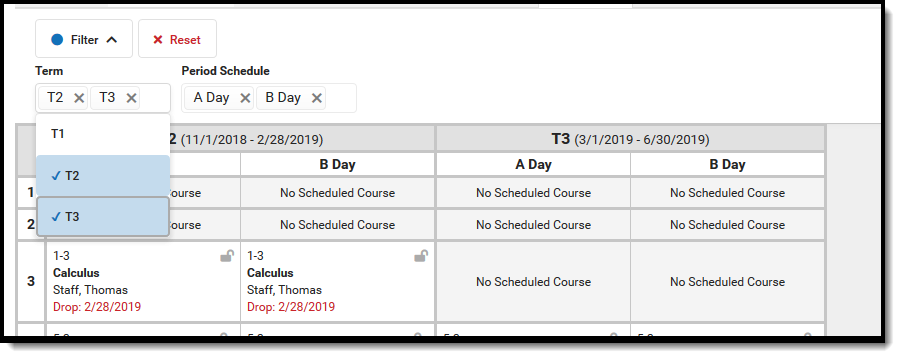
Filter Options and Settings
The Filter and Settings allows users to choose what displays in the schedule grid and how it displays. At the beginning of a school year, it might be useful to see all terms and period schedules, but as the year progresses and Term 1 is over, this term can be removed, so only the current and future terms display. Or, a user doesn't want to the see course numbers and section numbers in the schedule grid, just the name of the course. All of these can be set per user and changed as often as needed.
 Filter Options and Settings
Both the Filter options and the Settings panel remember selections made, meaning once a selection is made (filter) and saved (settings), the options remain even when navigating away or logging out of Campus, and is remembered the next time the user logs in.
Filter Options
When first accessing the Filter, the schedule grid displays all terms and period schedules, both active and dropped courses, and any special days marked on the Calendar Days tool, like Responsive Scheduling Days.
Some filter options may affect the searching and placing of courses on the grid. Messages display when these options may need to be changed or to remind the user that not all items may be shown in the grid due to filter selections.
When changes are made, a Reset button displays, Click this to return all filter options to the original display.
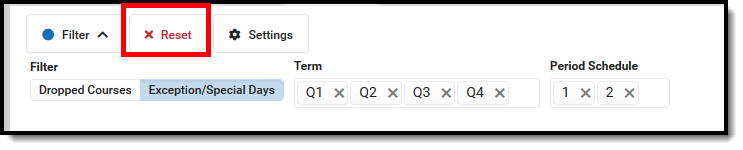 Filter Reset
| Option | Image |
|---|---|
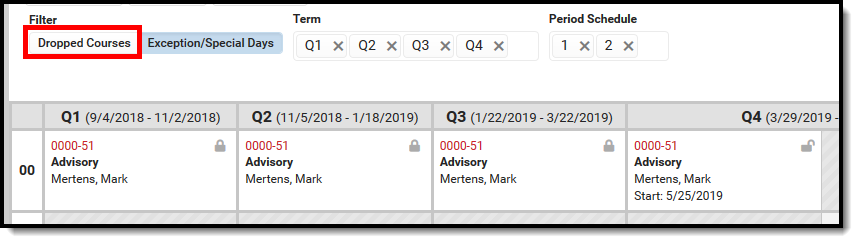
Show only active courses by clicking the Dropped Courses option.This removes any courses from the grid that the student has dropped (ended school enrollment prior to the end of the term OR ended their enrollment in the section after the term started). The first image to the right shows the Dropped Courses option selected (highlighted), and the dropped Advisory course in Term 4. The second image shows the Dropped Courses option not selected, and the dropped Advisory course no longer displays. This option displays only when the selected student has a dropped course on their schedule. |
|
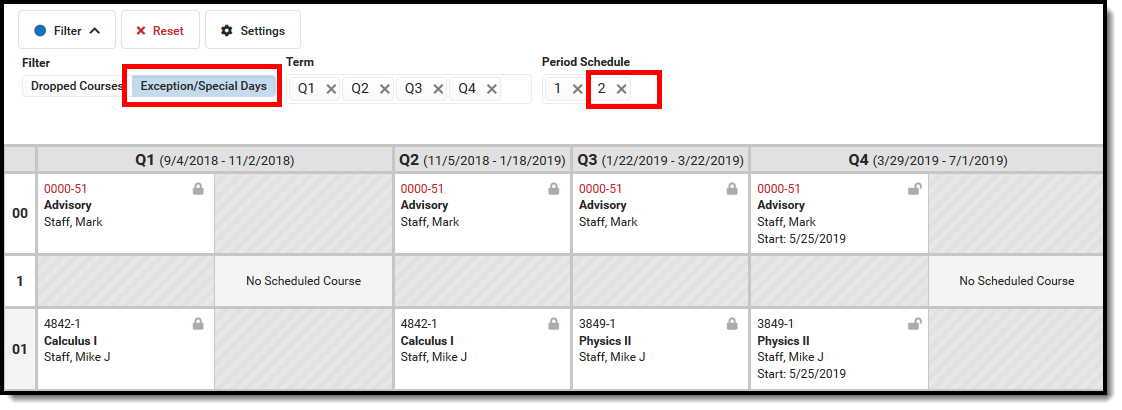
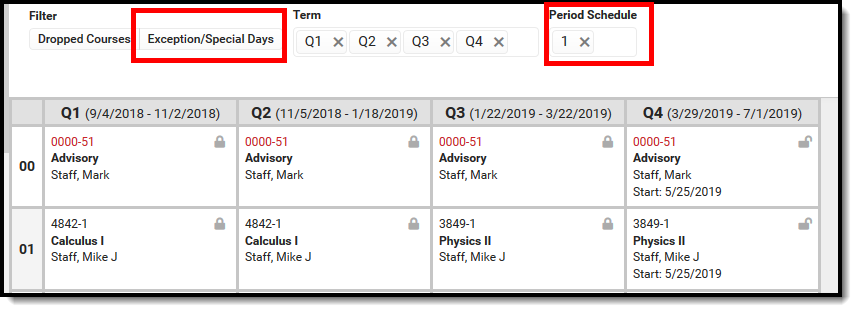
Hide any Exception/Special Days (final schedules, responsive scheduling) from the grid. In this calendar, all exception/special days are scheduled in the Period Schedule 2.
This option displays only when the calendar includes special days. |
|
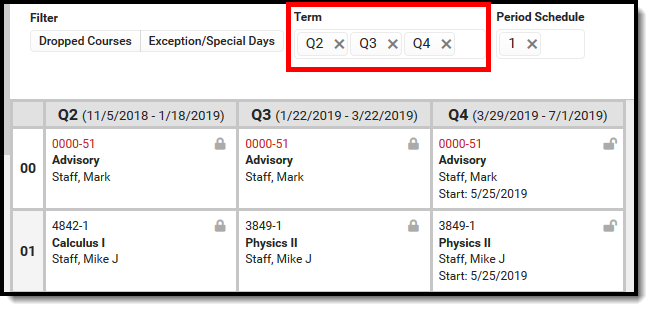
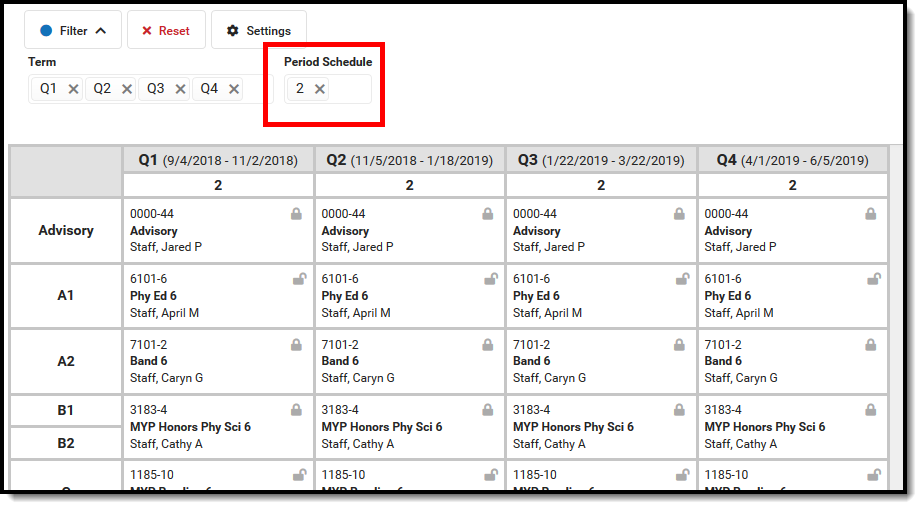
Only show specific terms. Click the X next to the Term name to not have courses scheduled in that term display in the grid. Since Term 1 has passed and no more schedule changes can be made for that term, Q1 can be removed. The first image shows the complete school year with all four terms displaying. The second image shows the schedule grid with the first term removed. |
|
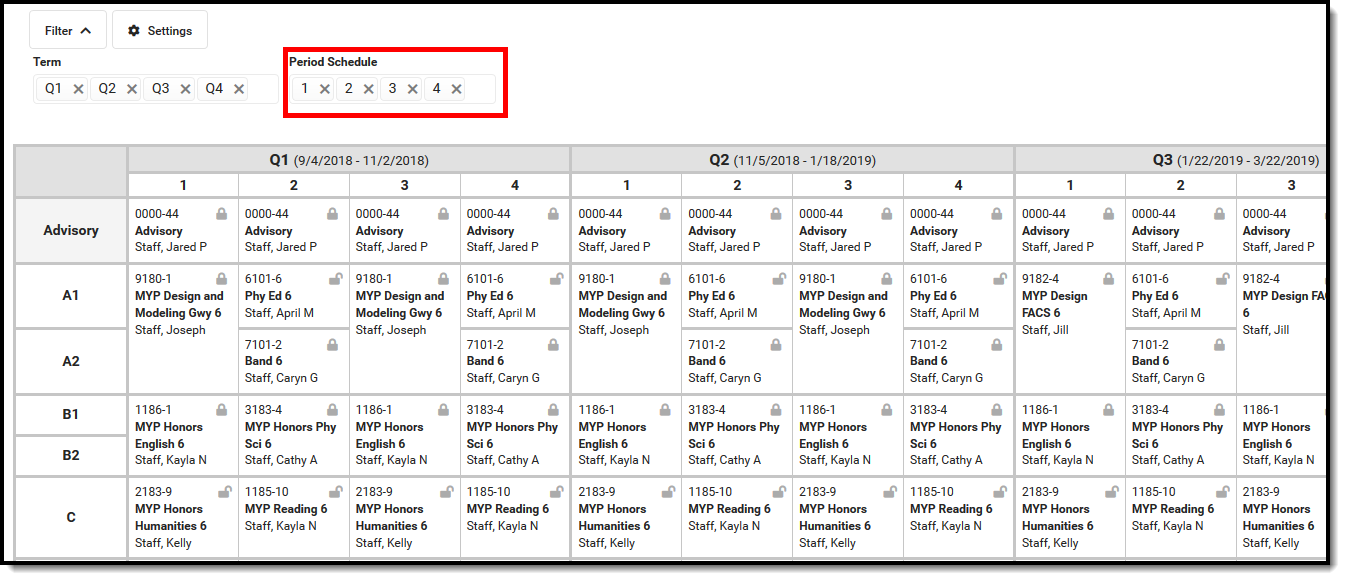
Show only courses in the main Period Schedule. Removing period schedules from view is helpful when there are many responsive or special days (see the previous information on this option) or when there are several rotating schedules for a school in a middle or elementary school, for example. In this example, the calendar has four terms and four period schedules. The first image shows all of these options selected. Notice that Term 4 doesn't display without scrolling and there is no way to determine which periods are connected to which period schedule. The second image shows all but one period schedule selected. This makes viewing the courses for that period schedule manageable, and all terms display without scrolling. This option displays only when multiple Period Schedules are available in the selected calendar. |
|


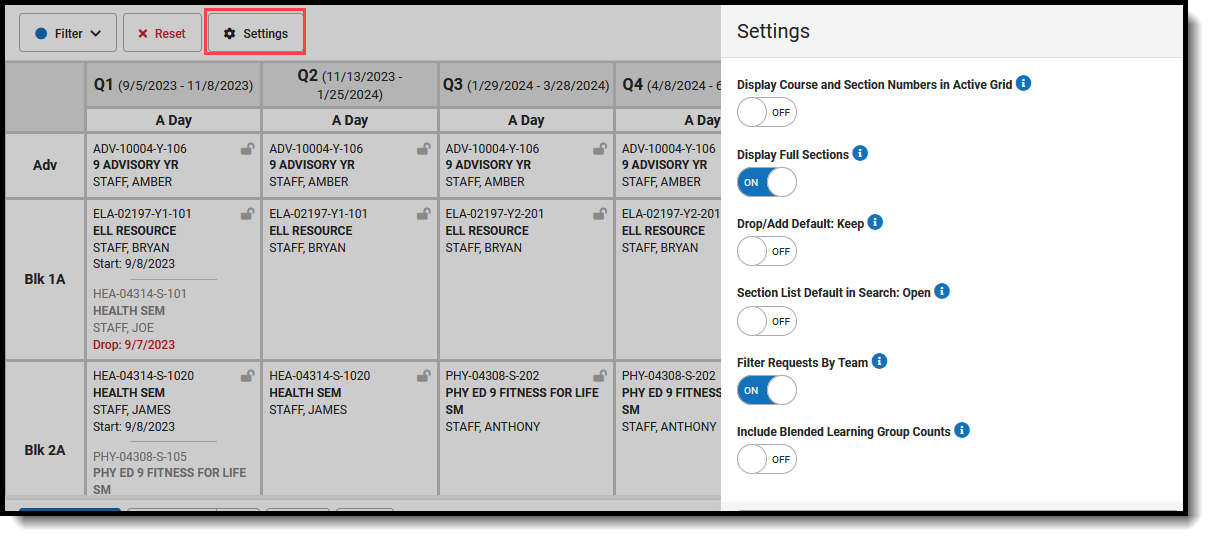
Settings
There are five different settings that can be turned on or off when working with course requests and searching for courses. Each option also includes a short description of that setting that displays when clicking the info icon. Note that some of the settings may increase the overall height of the grid, which could limit the amount of data that displays. This image shows the default settings.
 Settings - Default Selections
Changes automatically save (i.e., there's no need to click a save icon).
| Option | Setting On | Setting Off |
|---|---|---|
Display Course and Section Numbers in Active Grid With the setting on, the course number and section for the currently placed course displays. With the setting off, the course number and section for the currently placed course does not display, and only the name of the course displays. | The Advisory course includes the course number and section number.
| The Advisory course only includes the course name, not the number or section.
|
Display Full Sections With the setting on, sections that have reached the entered max seat count display in search results and in the schedule grid. Full sections display in red. With the setting off, sections that have reached max seat count do not display in search results or in the schedule grid. | Study Hall section 1 has reached capacity and displays in red in the active grid and in the search results.
| Since Study Hall section 1 has reached capacity, it no longer displays in the search results and cannot be selected for placement.
|
Drop/Add Default: Keep With the setting on, the Update modal highlights the option to keep the course in the schedule when courses overlap or meet in the same period. With the setting off, Update modal highlights the option to drop the course in the schedule when courses overlap or meet in the same period. | When adding a course to the schedule in the same period as another course, Keep is highlighted when confirming the placement.
| When adding a course to the schedule in the same periods as another course, Drop is highlighted when confirming the placement.
|
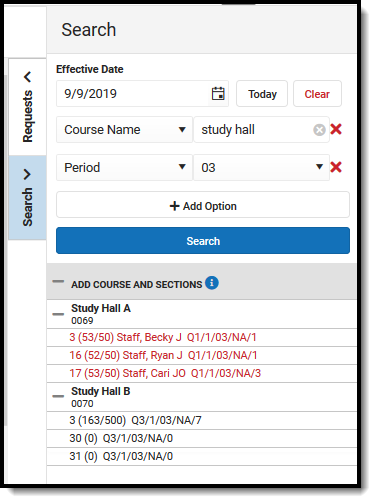
Section List Default in Search: Open With the setting on, searched courses return expanded, showing available course sections. With the setting off, searched courses return collapsed. | Study Hall sections expand automatically.
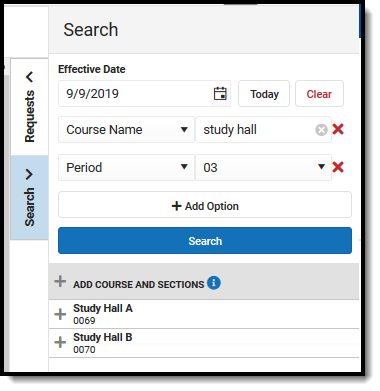
| Select the plus sign to display the course sections.
|
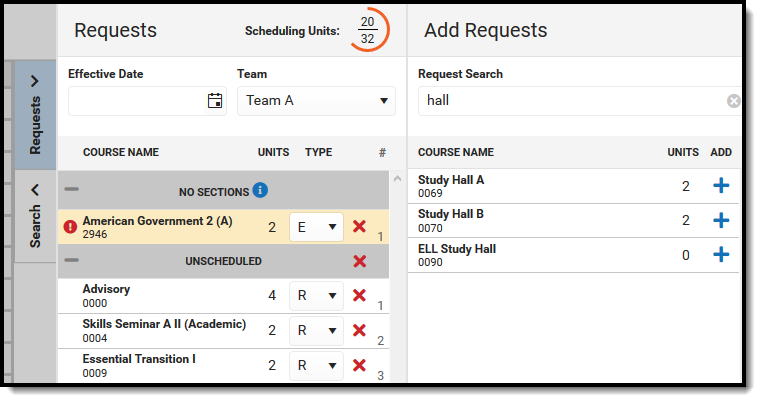
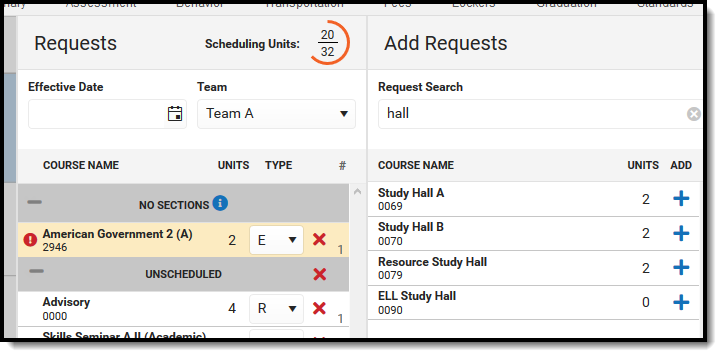
Filter Requests By Team With the setting on, searching for requests restricts the results to those courses taught by the team assigned to the student or assigned to no other team. With the setting off, there is no restriction on the request search. | This student is assigned to Team A. Only sections of Study Hall also assigned to Team A are returned in the results.
| For the same student, an additional Study Hall option is available in the results.
|
| Include Blended Learning Group Counts With the setting on, hovering over a course in the student's schedule includes a count of how many Blended Learning students are in that section. With the setting off, hovering over a course in the student's schedule does not show a count of Blended Learning students in that section. | 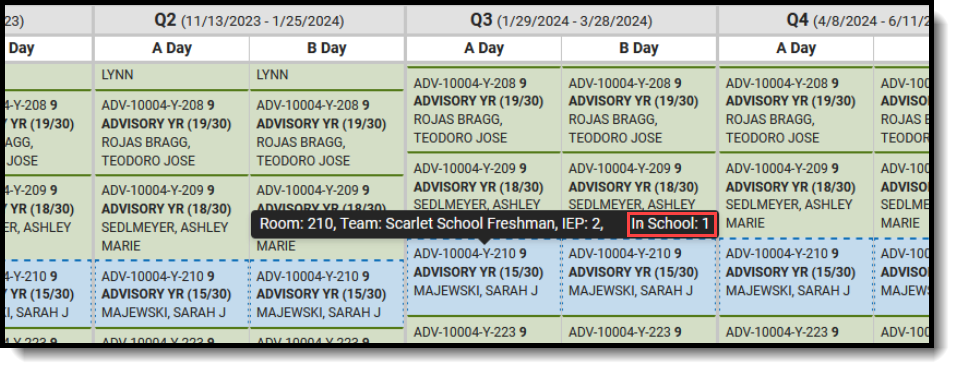 | 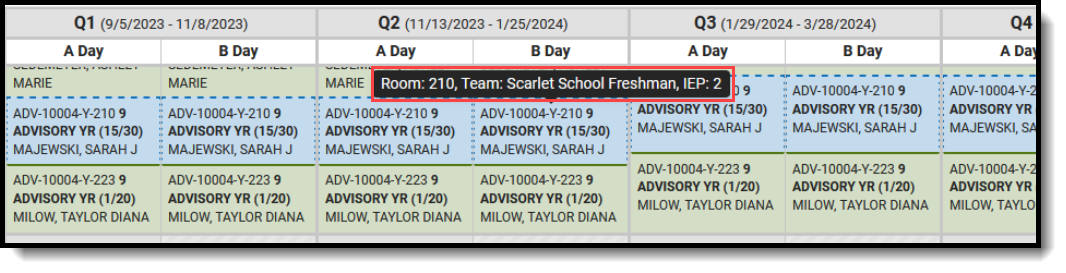 |

Manage Course Requests
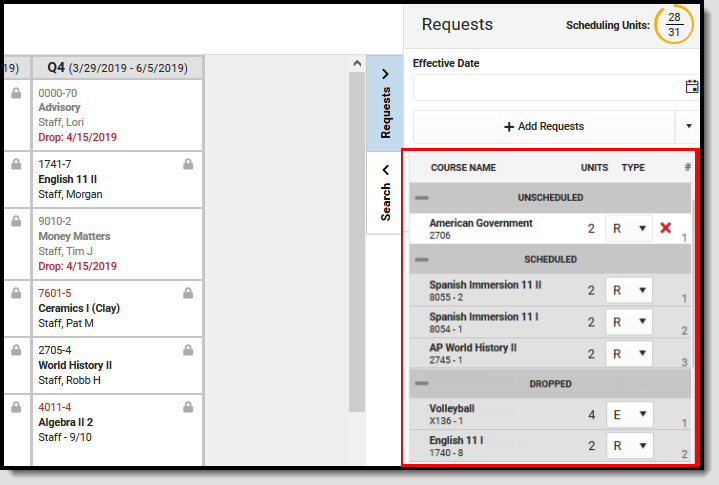
Course requests are managed using the Requests Panel, which opens on the right hand side of the student's Schedule.
 Walk-In Scheduler Requests Panel
Here, users can see which requested courses have been scheduled, and how many total scheduling units (periods times terms) the student has filled. Use the Add Requests button to add more course requests. Use the Search panel to find and place additional courses for the student.
Requests Panel and Add Requests Panel Details
Requests Panel
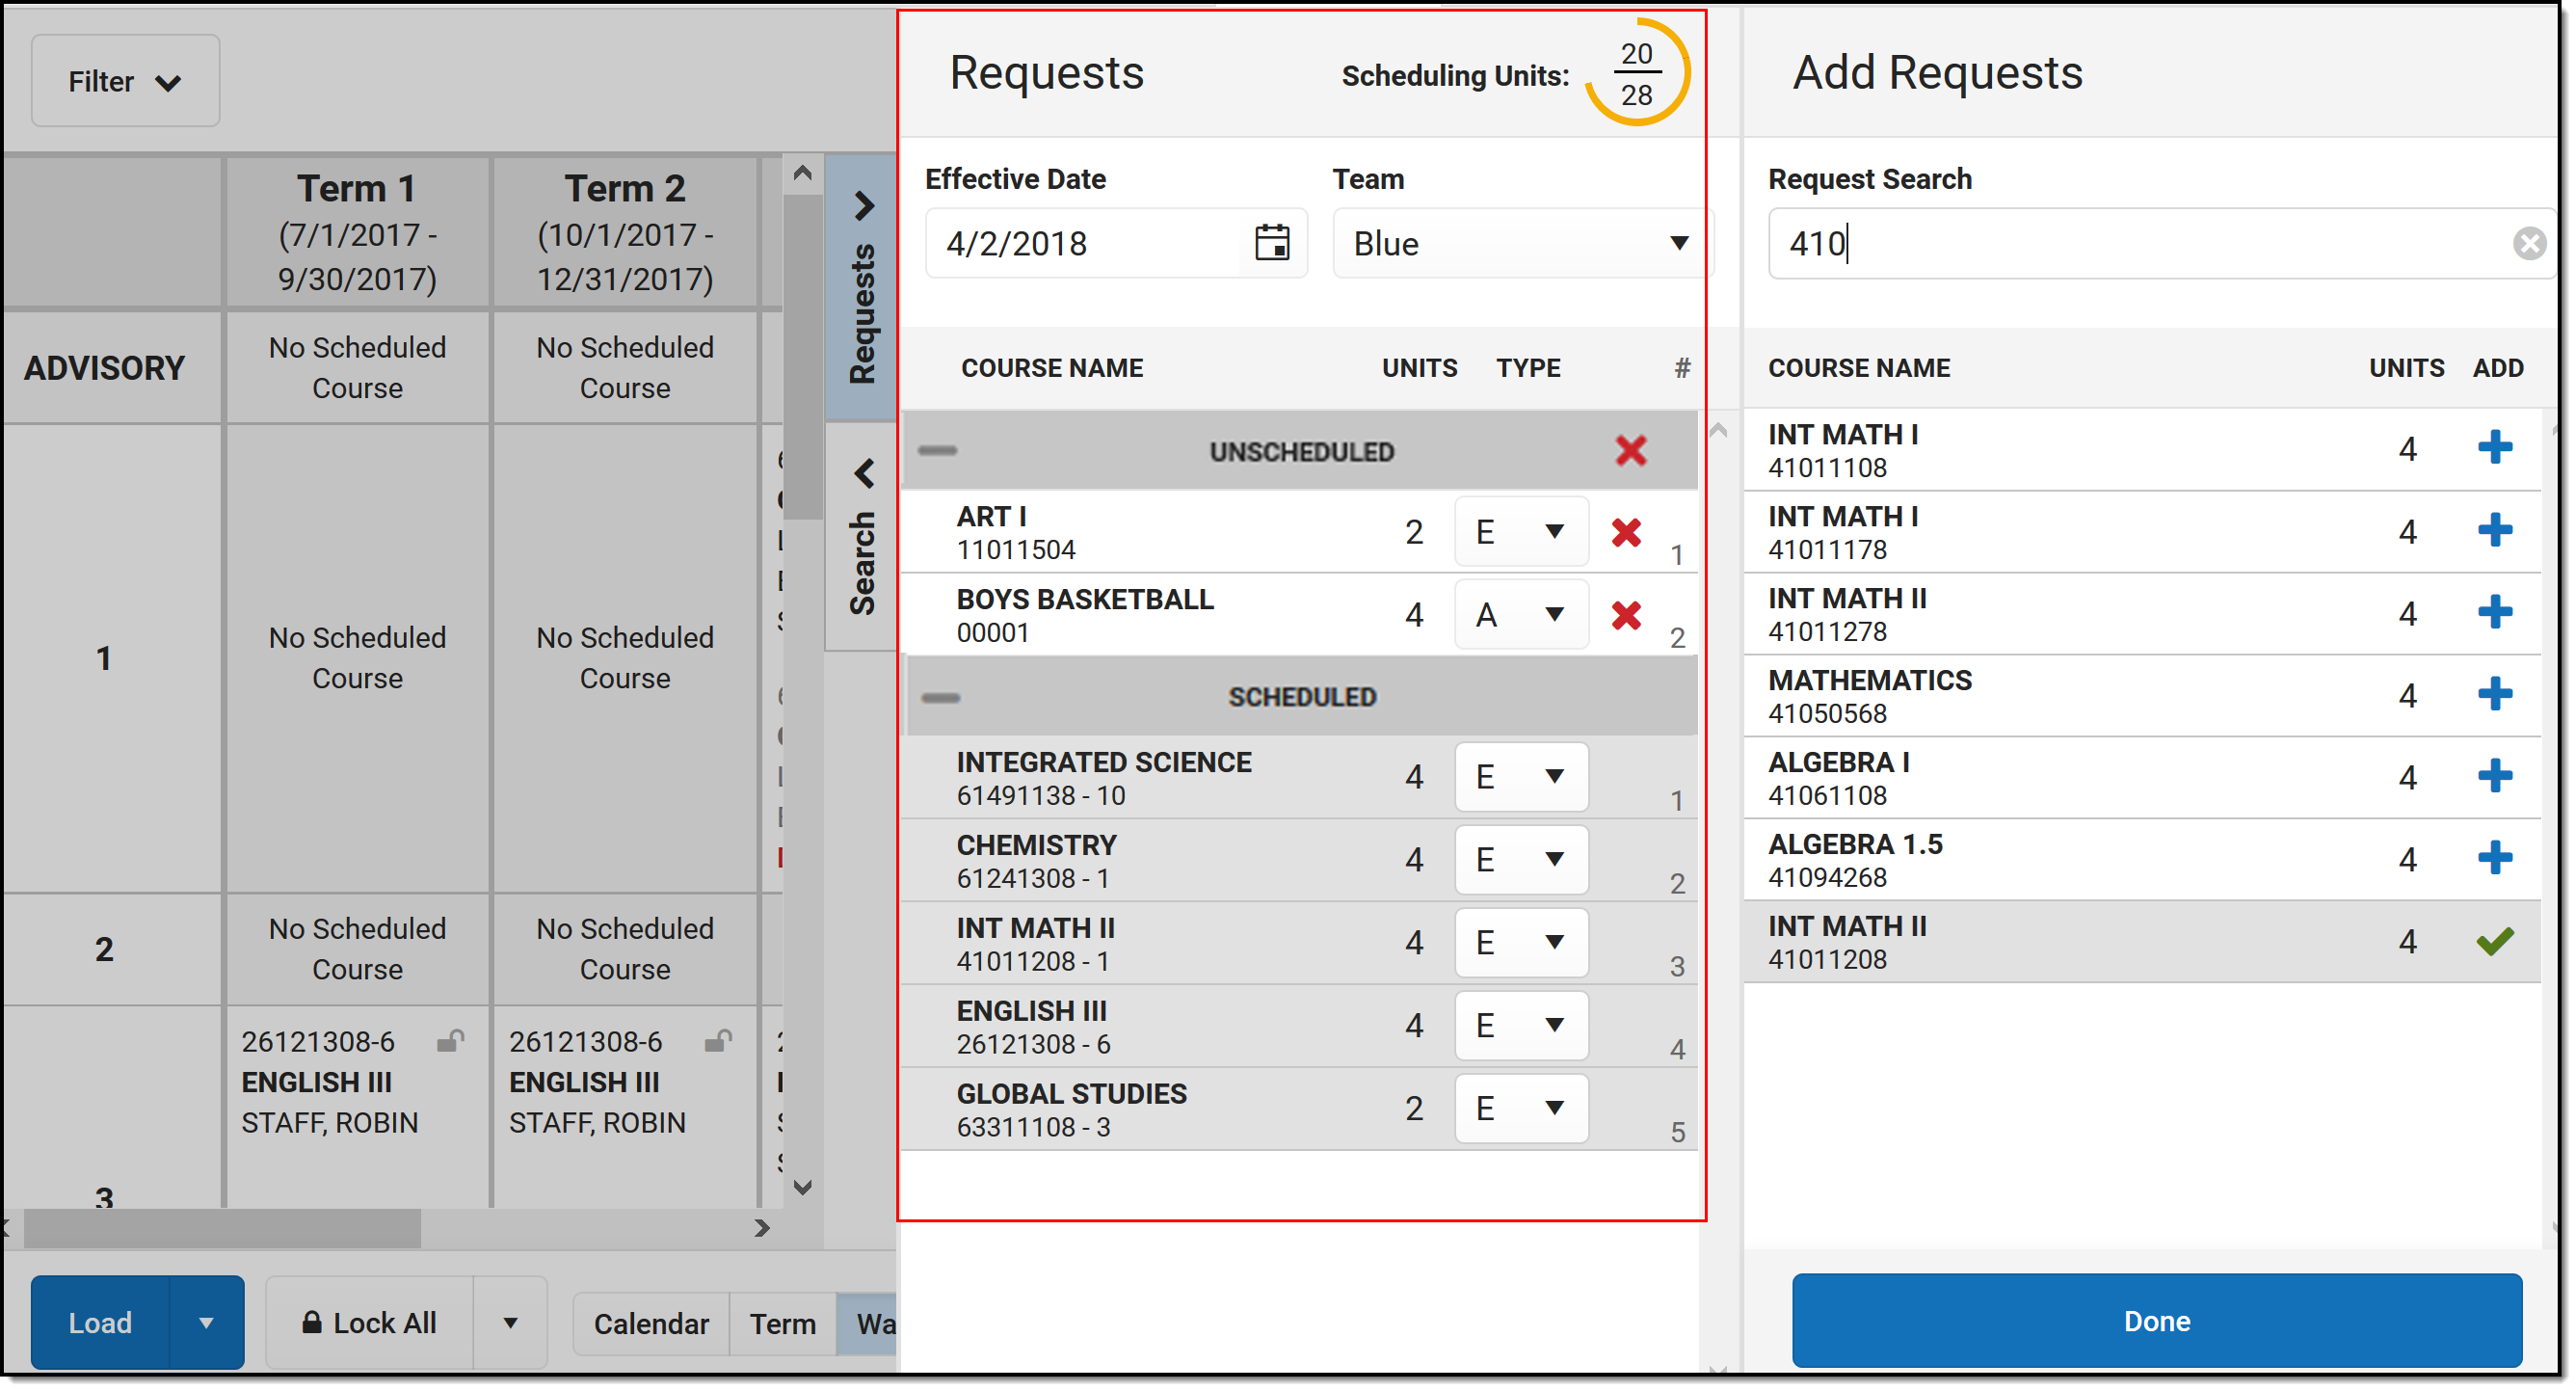 Requests Panel, Add Requests Panel
| Item | Description |
|---|---|
| Scheduling Units | The total number of Scheduling Units (potential credits) the student has scheduled displays at the top right. The bottom number indicates how many total units can be scheduled for a complete course schedule; the top number indicates how many units the student currently has requested, including the total already scheduled. The total number of scheduling units is the number of instructional course periods (set on the Course Information tool in the Terms field) multiplied by the number of terms in the calendar.
The color of the circle changes depending on the number of units requested, as does the total completion of the circle.
Decimals are rounded to the nearest whole number. A value of 33.8% rounds to 34 and displays orange; a value of 32.4% rounds to 32 and displays red. When a student has no requests, the completion circle does not display. Dropped course units are not included in the total scheduling units. When requests are added or removed, the Scheduling Units value changes accordingly. For skinnied courses, the calculation is as follows:
|
| Effective Date | The entered date determines when the student begins attending the course section. Entered dates must be within the term dates of when the course meets and are entered in mmddyyyy format. |
| Team | Teams are created in Scheduling Groups and can be used as a cohort function (often at Middle or Elementary schools), so all students assigned to that team are together in all courses. Teams are assigned to course sections, and when using the Scheduling Board to create schedules for the next year are included in the logic of loading section rosters. This only displays when Scheduling Groups are created for that school. A student can only be on one team at a time. When a section of a course has been designated for a particular team, only students on that team may be loaded into that section. However, a student can be manually added to that section, overriding the team feature when needed. |
| Add Requests | Opens the Add Requests panel where courses can be requested for placement. From the main Add Requests panel, enter either a course name or course number in the Requests Search field. Or, click the down arrow on the Add Requests button to use the Quick Add option, which allows entry of a course number, or the Add Planned Courses option, which adds courses from the student's Course Plan. |
| Course Types | Requested courses are organized into the following groups:
Each group can be collapsed or expanded by clicking the plus/minus sign to the left of the header. For Unscheduled, Inactive or No Sections types, click the red X to remove the course from the list of requested courses. |
| Course Name | The name of the course is listed in bold text, as it was entered into Campus (either in the Course Master or in Courses). The Course Number displays below the course name. |
| Units | Indicates the number of scheduling units that course meets. It correlates to the number of terms for which the course meets, and is used in the Scheduling Units calculation. |
| Type | Each request is assigned a request type - Required, Elected or Alternate. These are used in the Scheduling Board logic when placing courses sections for students. The assigned types can be changed as desired. Course requests made by or for a student are assigned a request type of Required, Elected or Alternate. These are request types only, separate from and not related to the types of courses being selected.
|
| Number | Provides a count of the number of requests. |
Add Requests Detail
This view displays when selecting the Add Requests button.
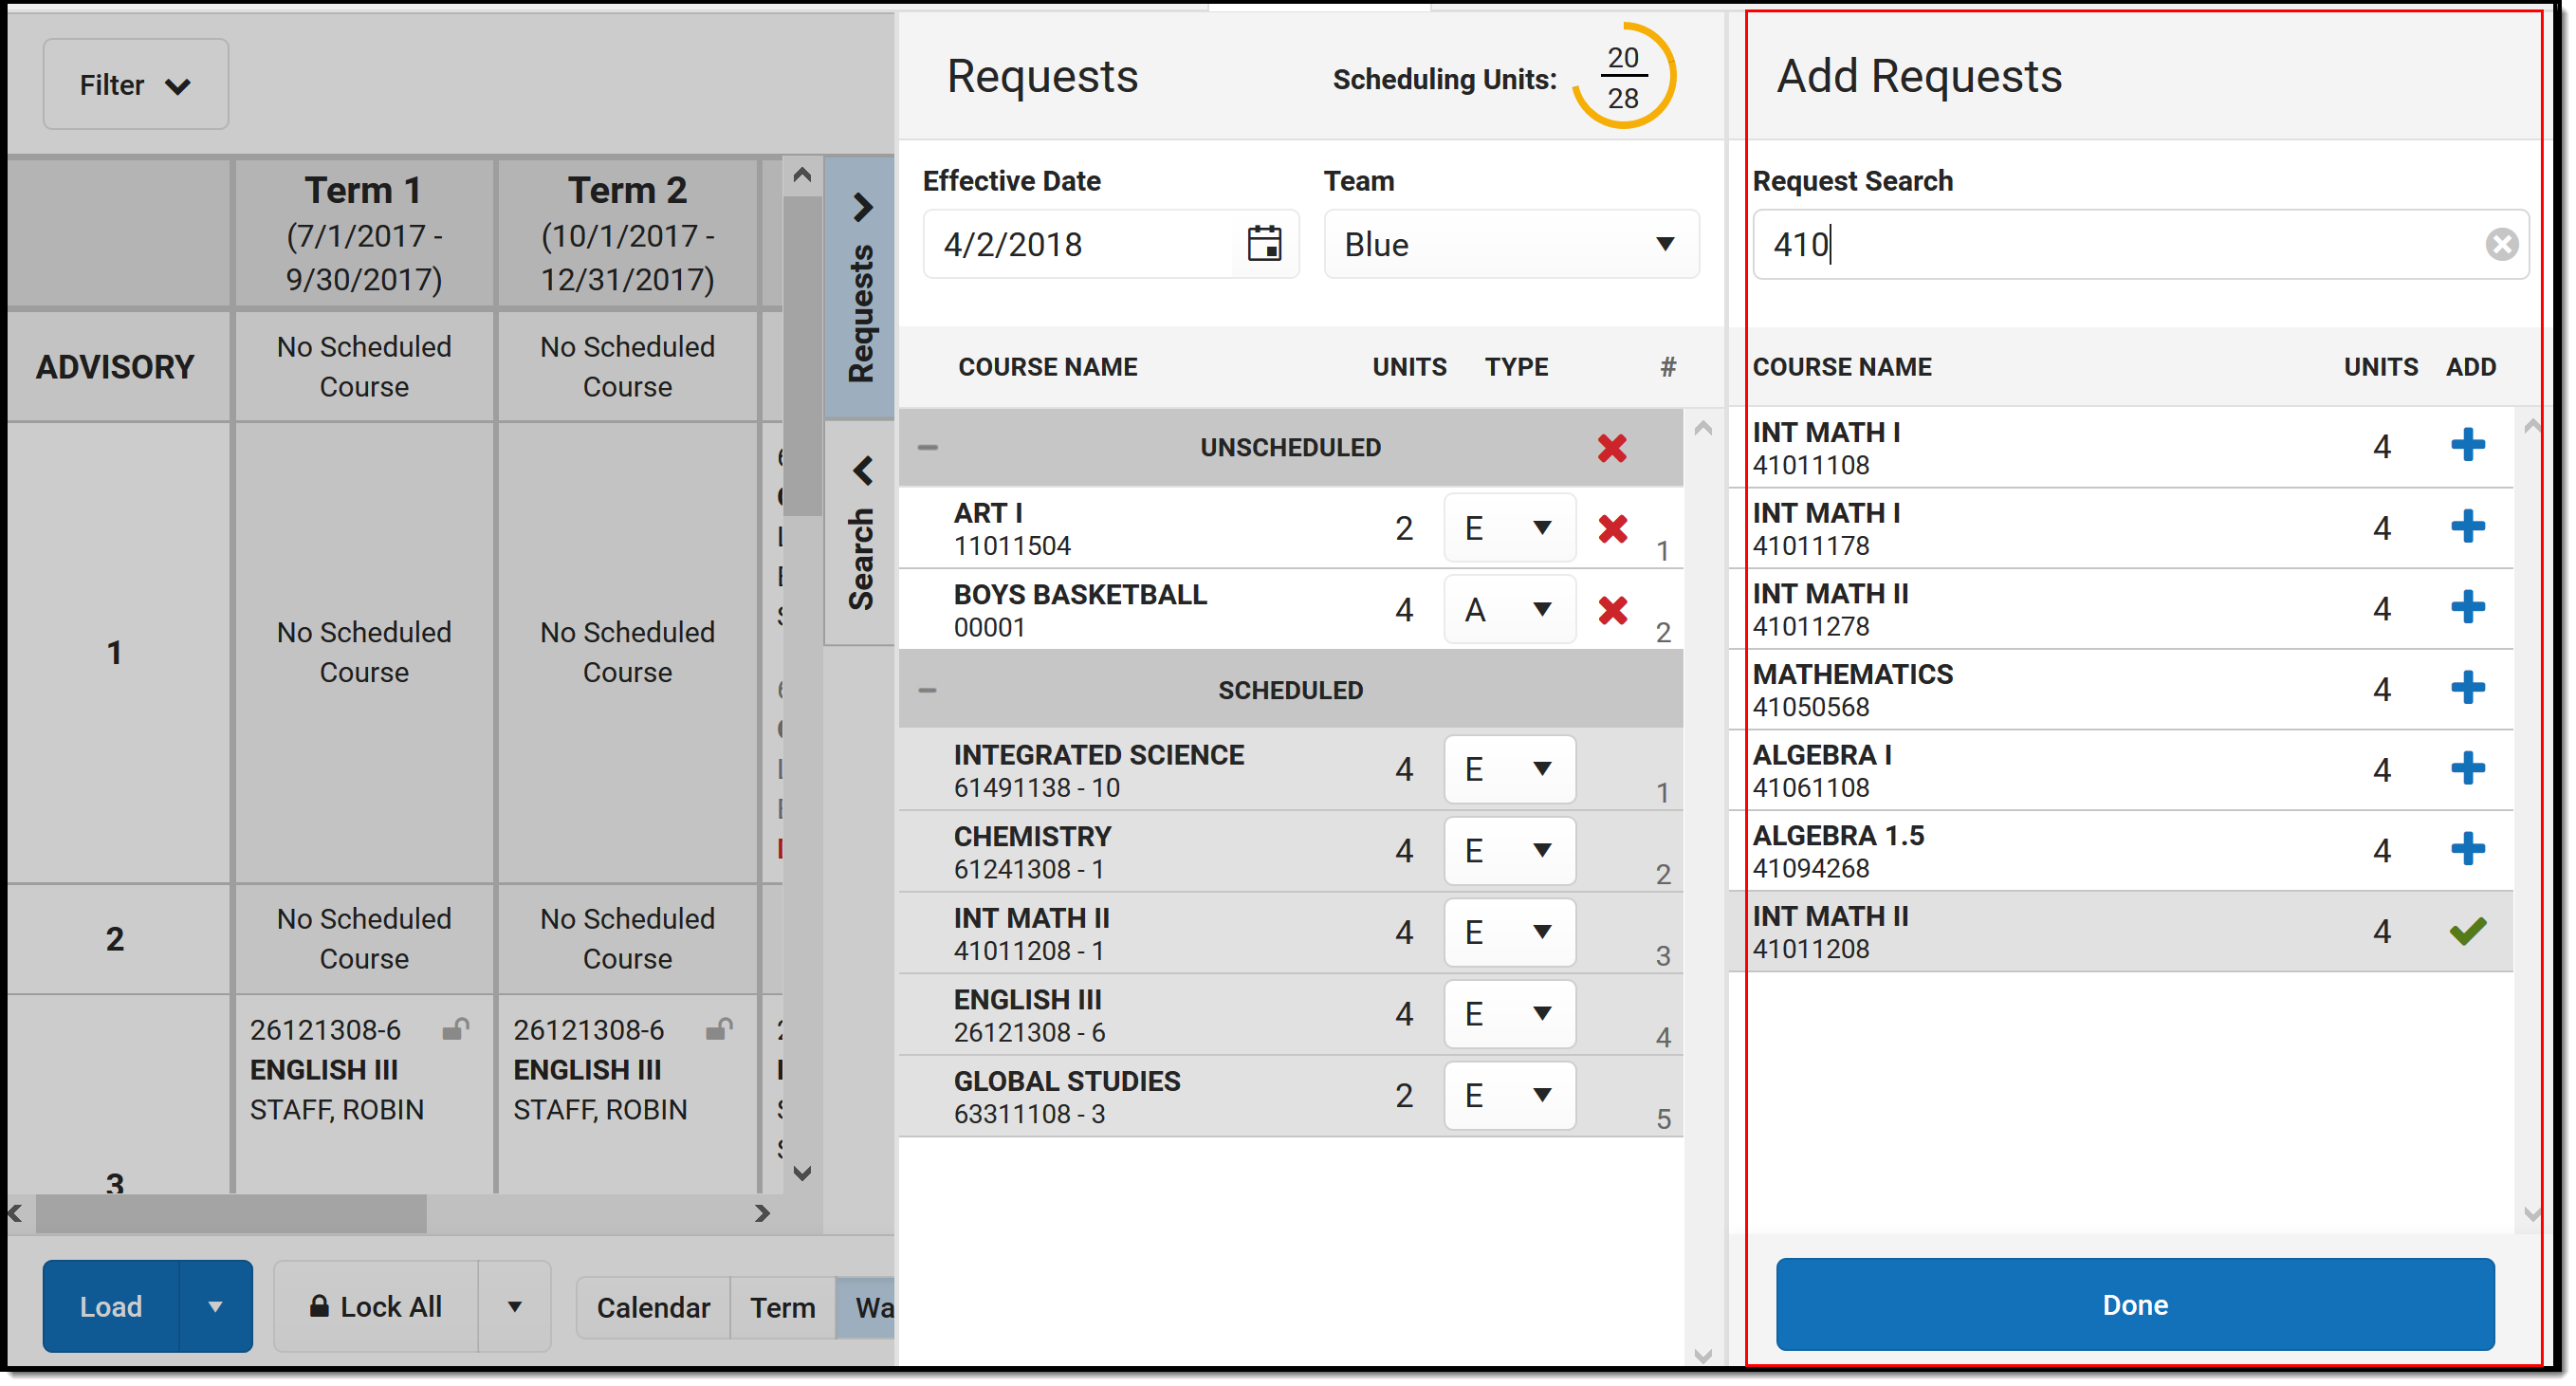 Add Requests Panel
| Item | Description |
|---|---|
| Request Search | Allows the searching courses for which to add a request. A course name or a course number can be entered, either in its entirety or part of the name/number. The search field returns results based on the entered values. When part of a course number is entered, or part of the course name, the list of matching courses changes. For a course number of 123456, when the entered value is 234, any courses that 234 value are returned. A value must be entered. |
| Course Name | The name of the course is listed in bold text, as it was entered into Campus (either in the Course Master or in Courses). The Course Number displays below the course name. |
| Units | Indicates the number of scheduling units that course meets. It correlates to the number of terms for which the course meets, and is used in the Scheduling Units calculation. |
| Add | Indicates the course can be added to the list of requested courses.
|
| Done | Closes the Add Requests Panel. |
Add Requests
- From the Requests panel, click the Add Requests button. An Add Requests panel displays with a list of active courses in the selected calendar. Courses that are not marked active are not included.
- Search for courses by typing in a course number or a course name.
- When the desired course is found, click anywhere within the course area to add the course to the schedule (or click the blue plus sign). A green message displays indicating it's been added to the list of requested courses. The added course also displays in a list of Unscheduled courses, meaning the course has not yet been added to the student's schedule.
- Repeat steps 1-3 as needed.
- When finished adding course requests, click the Done button in the Add Requests panel. The Add Requests panel closes.
Course requests are first sorted by the Course Number, then by the type of request (1. Required, 2. Elected, 3. Alternate). Alternate courses are listed in Request ID order (the first course marked as an alternate is listed first in the list of all alternate courses).
Quick Add Requests
This option allows for entry of memorized course numbers to the Requests panel. This is a useful option when a new student enrolls in the district, for example. A counselor can quickly add courses that the student must take, then use the other request options for filling in the schedule.
Keyboard shortcuts are not available when using Quick Add.
- From the Requests panel, click the down arrow next to the Add Requests button and select the Quick Add option. A Quick Add panel displays within the Add Requests panel.
- Enter a Course Number in the search field. Matching courses display with the name and the number of units.
- Hit the Enter key to add the course to the Unscheduled Course Requests list.
- Repeat steps 1-3 as needed.
- When finished quickly adding course requests, click the Done button in the Add Requests panel to close the panel.
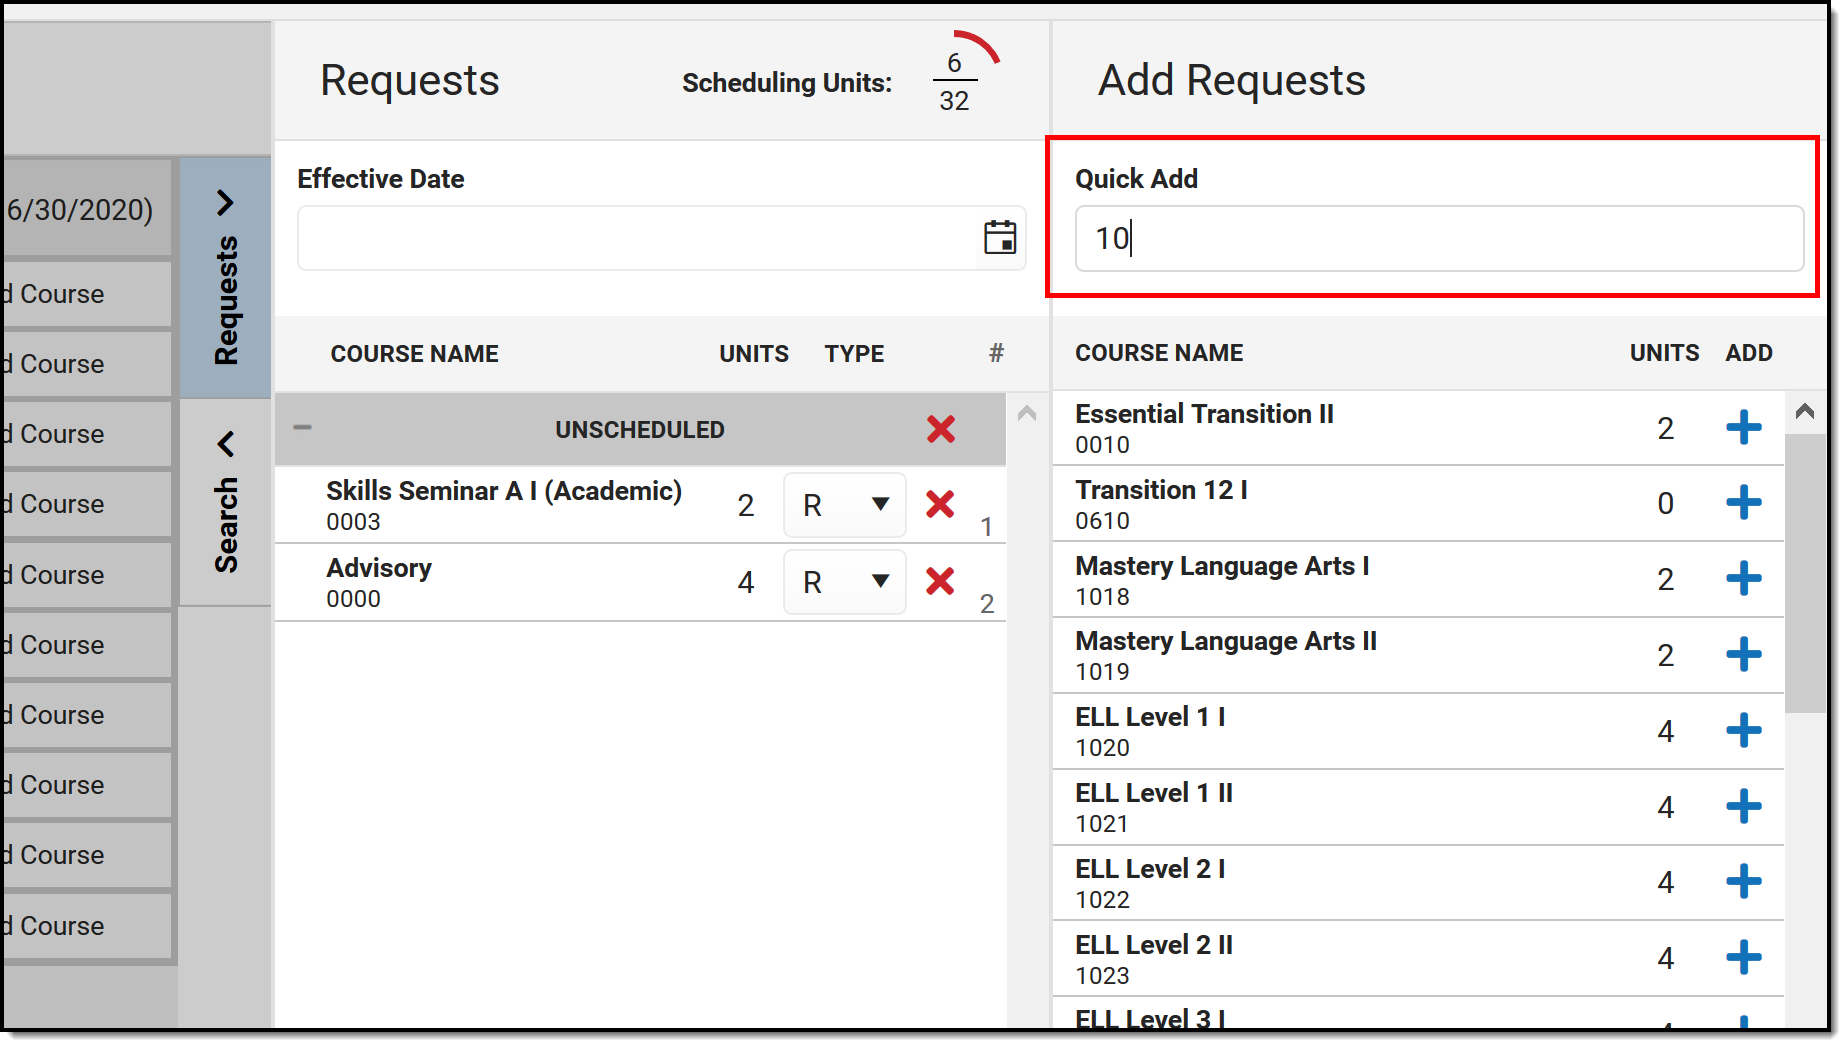 Quick Add Requests
Add Planned Courses
This option only displays when the student has a Graduation Program assigned and courses added to their Course Plan, and no other courses listed in the Requests panel. Courses planned for the 11th grade year are added when the student is enrolled in 11th grade (e.g., current year planning).
- From the Requests panel, click the down arrow next to the Add Requests button and select the Add Planned Courses option. All courses for that planned year are added to the Request panel.
- Modify the requests by changing the course type as needed.
It may be helpful to generate the Course Plan Report prior to adding the courses.
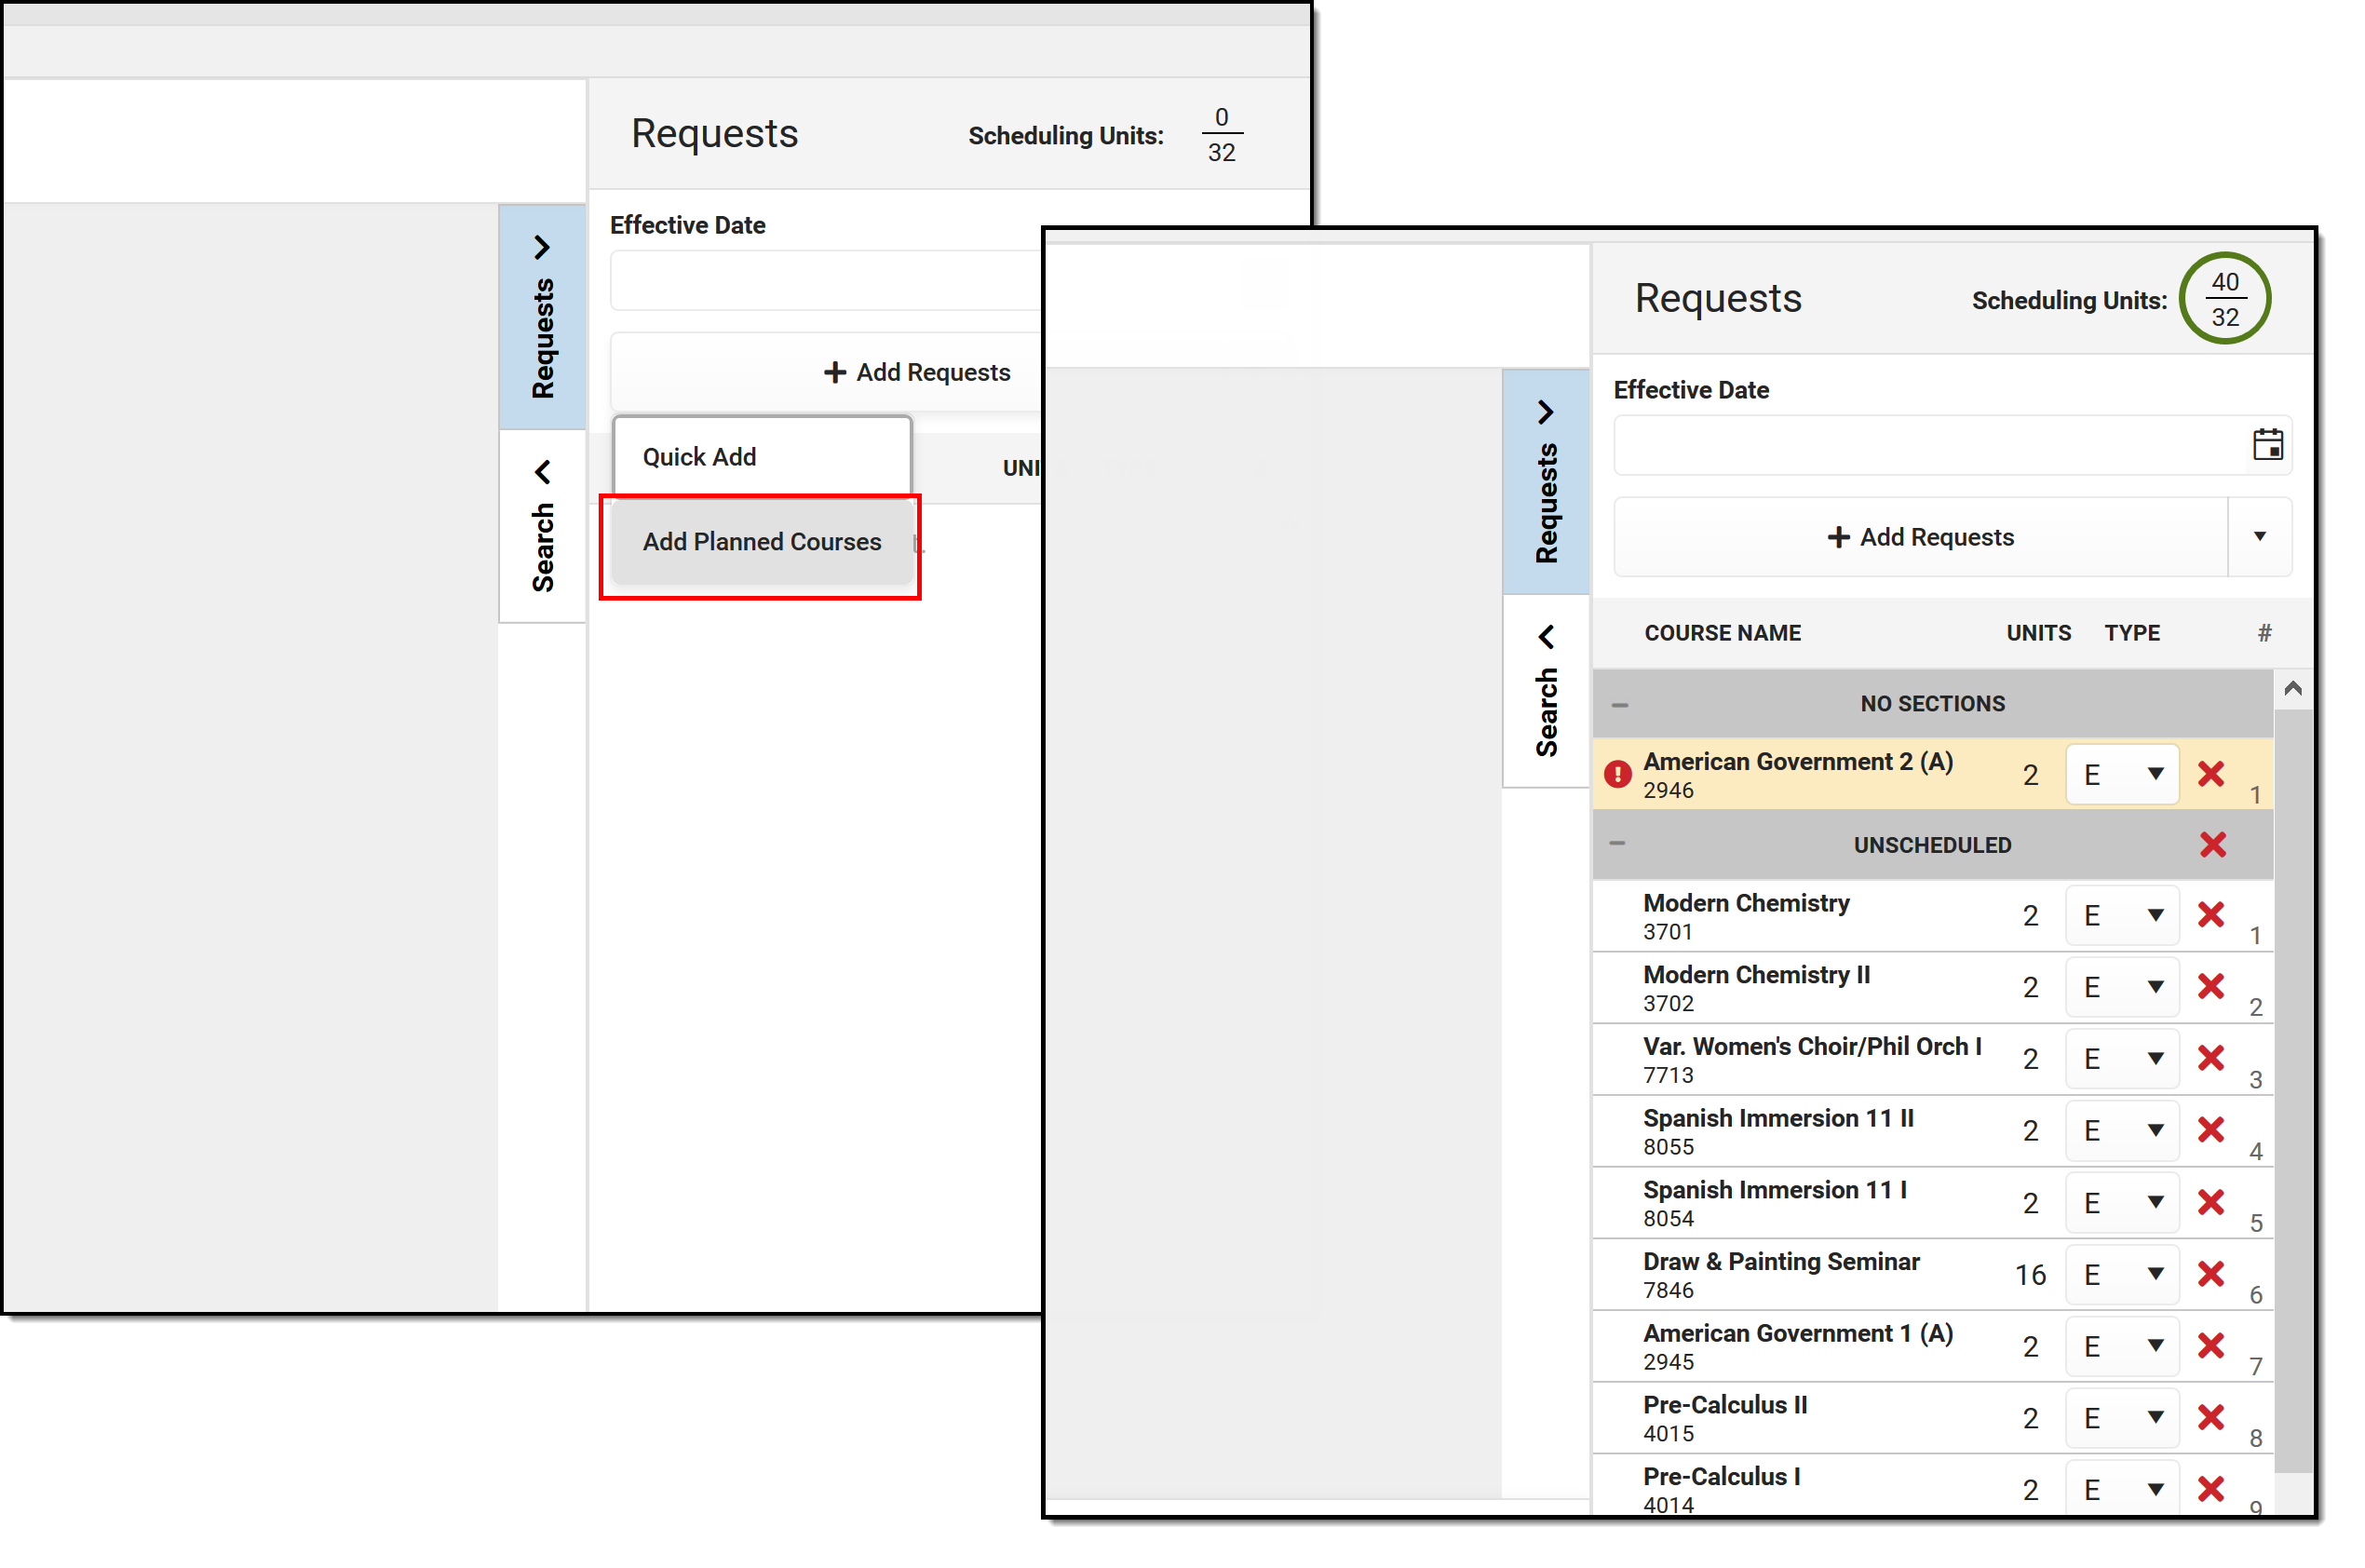 Add Planned Courses
Remove Non-Scheduled Course Requests
It is possible that some requested courses could not be placed on the student's schedule after requests were loaded. This could be due to the requested courses being full, or the courses didn't fit into available periods for the student. These requests become Unscheduled requests, and can be left alone. Or, to keep the Request panel clean (perhaps after the next year's schedule process is complete), these requests can be removed.
Remove a Single Non-Scheduled Course Request
Click the red X next to the course request that is to be removed. A confirmation that the course request was removed displays.
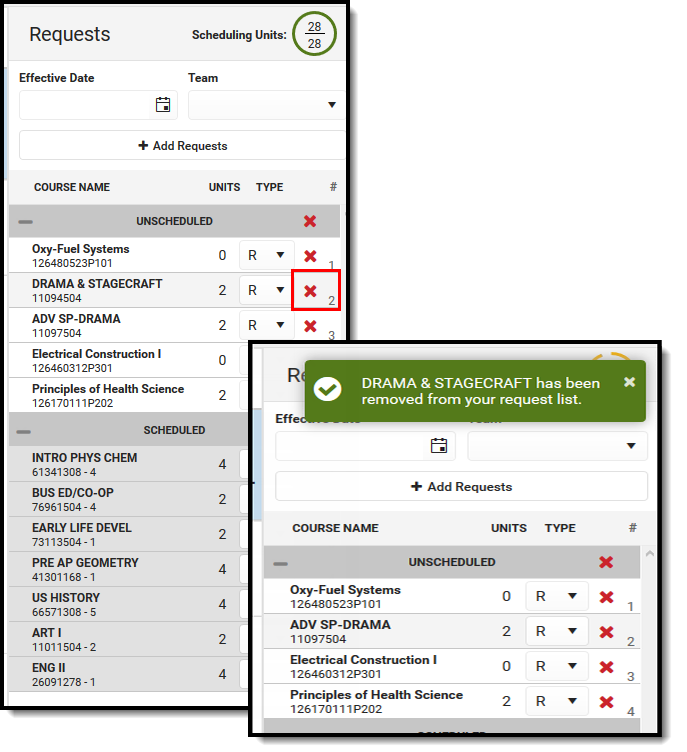 Remove a Single Unscheduled Course Request
Remove All Non-Scheduled Course Requests
Click the red X in the Unscheduled Course Types. A pop-up displays indicating this is the desired action - that all courses from the list of Unscheduled Requests should be removed. Click OK to continue. A confirmation that the course requests were removed displays.
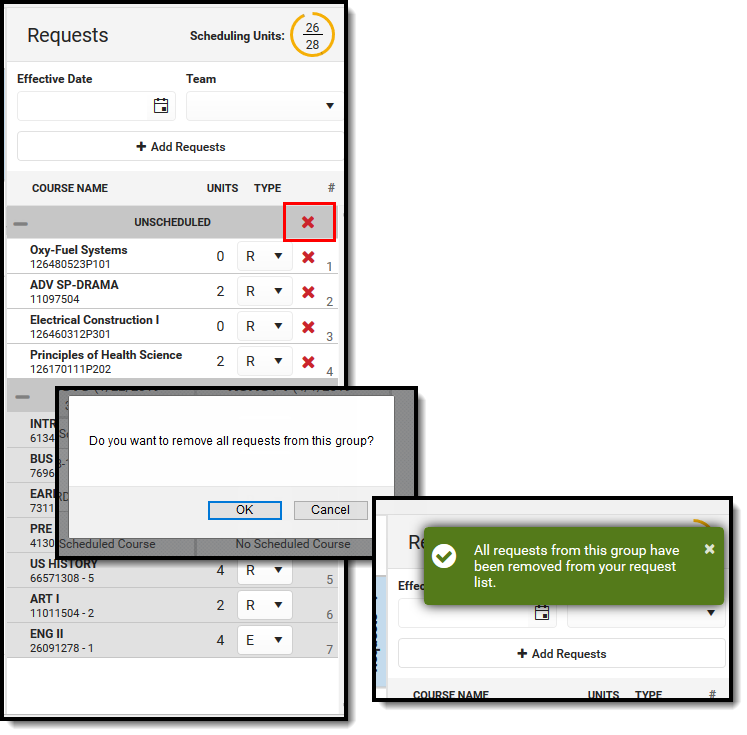 Remove All Unscheduled Course Requests
Change Request Types
For each course request, it is assigned a Type of R (required), E (elective) or A (alternate). Requests marked as R or E are given a higher priority in placement on a student's schedule, and tend to indicate the student would like to take those courses more than course requests marked as alternate. Note that these request types do not indicate a certain course is required for graduation. Those courses are set in Graduation Programs and are given even higher priority in the scheduling process.
Any request type can be changed to another request type by choosing the arrow next to the type and selecting a different option. A green checkmark indicates that is the currently selected type. The change is automatically saved and the list of course requests is updated.
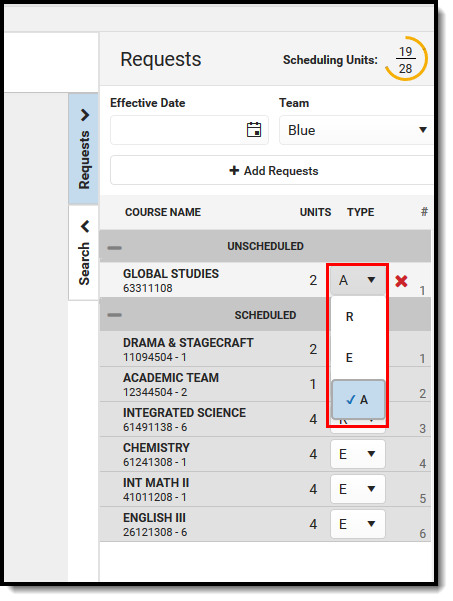 Request Type Selection
The number associated with the course request may change. Since required and elective requests are given priority when loading the schedule, a request marked as Required that is in position 1 may change to position 2 when the type is changed to Elective, and it might change to position 5 when the type is changed to Alternate.
Assign a Student to a Team
Teams need to be created in Scheduling Groups in order to assign a team and for this option to display.
Select the desired Team from the dropdown list. A green checkmark indicates that team is selected. The update is automatically saved. As noted above, a student can only be assigned to one team at any given time, and the student is only scheduled into course sections where that team is assigned.
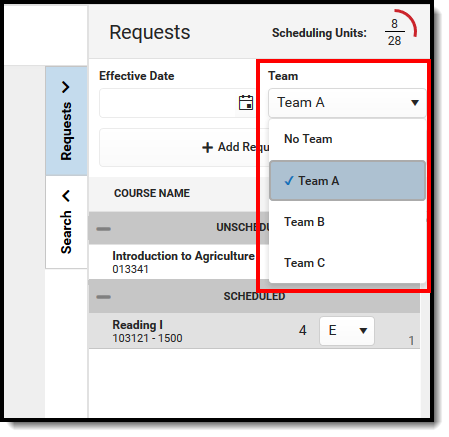 Change Team Selection
When a student is already scheduled into a course section for one team, and their team changes, those courses need to be manually changed (dropped, rescheduled) to keep the student with the appropriate team.
Add Requested Courses Using Manual Mode
Course requests can be added to the student's schedule without loading the requests. This is called the Manual Mode, and allows counselors or other staff to schedule an individual course.
When hovering over the placed section, information displays in the hover text of the placed section that includes the room where the section meets, how many students in that section have active IEPs, and the number of students assigned to which Blended Learning Groups (there may be more than one Blended Learning Group in any given section). See the Blended Learning Groups article for more information.
 Manual Mode Section Placement
Add an Unscheduled Course
- Select a course from the list of Unscheduled Courses Request by clicking on it. The course is placed on the schedule in cells highlighted in green. This action also closes the Requests panel. Hovering over a placed section turns it from green to blue, and the pop-up with room, IEP and blended group information displays.
- To place the unscheduled course into a period, click into one of the highlighted periods. A pop-up message displays confirming the addition of the course.
- Enter the Effective Date in mmddyyyy format, or click the calendar icon to choose a date, or click the Today button to add the current date as the effective date. This is the date the student BEGINS attending the course and is actively scheduled (on the roster) into that course section. The date can also be added to the Request Panel and applied to all added course requests. Entered dates must be within the term dates of when the course meets.
- Click the Save button on the pop-up message. The course is added into the chosen period and term, and the course request moves to be within the list of Scheduled courses.
 Manually adding a course section
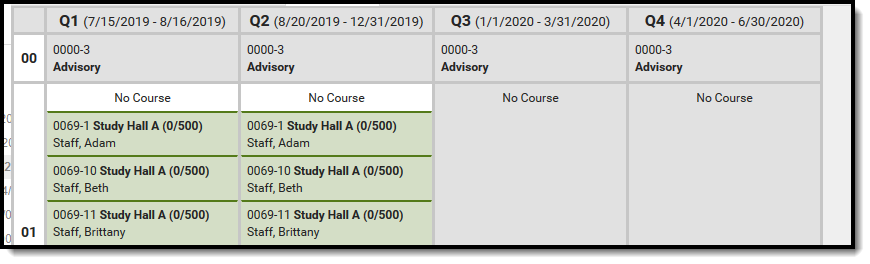
When adding requested courses, the course grid removes extraneous course information in an effort to display the entire schedule without needing to scroll. Depending on the calendar layout (amount of periods, terms, etc.), this may not happen. Currently scheduled courses only list the course name. For periods where there is no course currently scheduled, the words "No Course" display (instead of "No Scheduled Course"). After canceling the selection, or after adding a requested course, the full details of the course return. This also happens when placing a searched for course.
Messages in red text display when:
- Placing a section on the schedule grid when the student's enrollment dates are not within the section start and end dates.
- Updating the section roster (modifying the student's placement in the section) and the entered start date is past the section end date.
- Ending a student's placement in the section (dropping a course) and the entered dater is not within the section start and end dates.
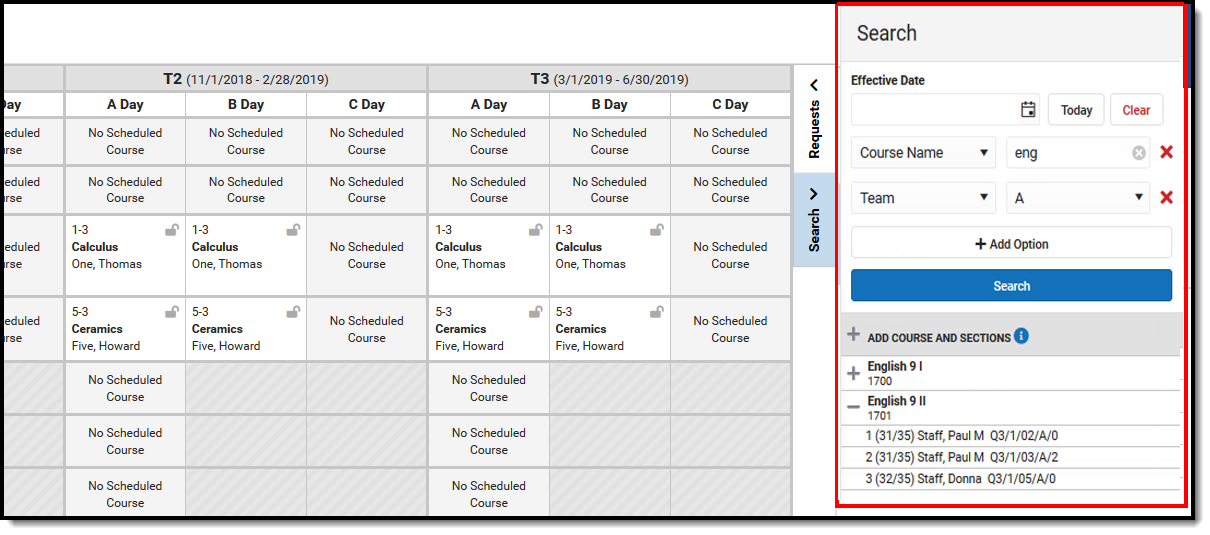
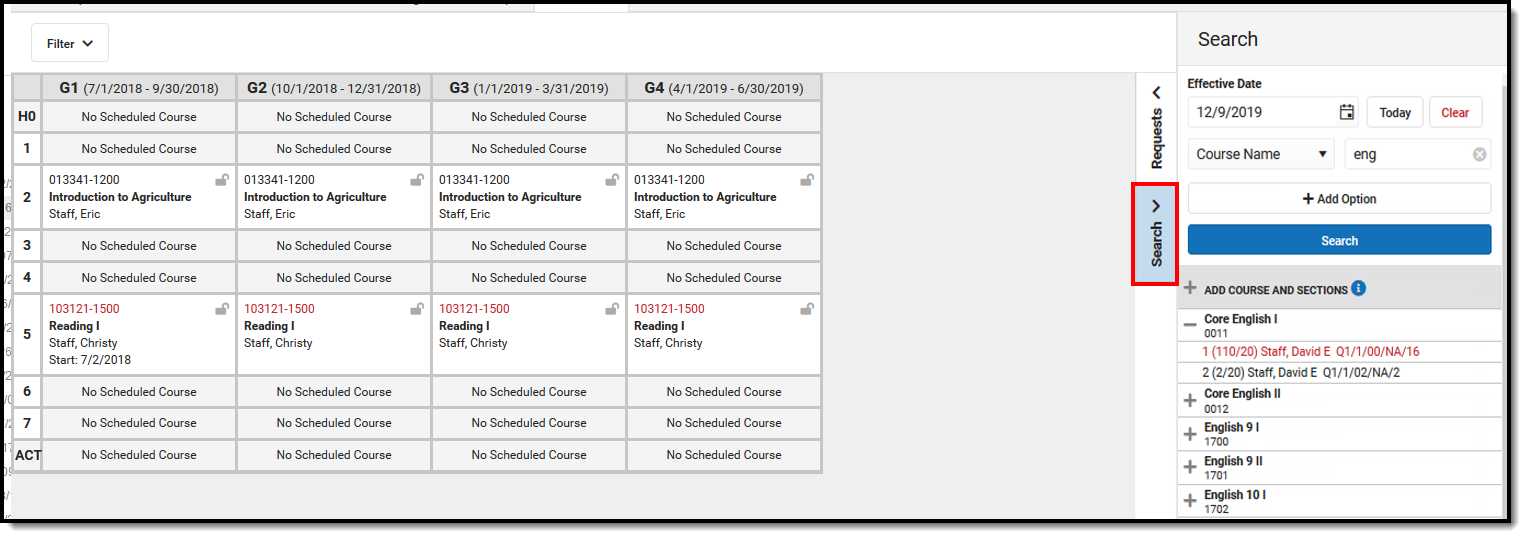
Search Panel
Use the Search Panel to find specific courses to add to a student's schedule by entering search criteria, or do a full course search by not entering any search criteria (this option is not recommended).
 Walk-In Scheduler Search Panel
Search for courses by entering one or more of the following options:
- Course Name (or part of the course name)
- Course Number
- Teacher's last name
- Term in which the course meets
- Period in which the course meets
- Schedule
- Team Name
- Department
These options are NOT case sensitive; entering a value of 'bac' returns the same values as entering 'BAC'.
Selected search parameters are retained for the user. The selected options chosen when working with one student's schedule remain when moving to another student.
When you have altered the Filter bar to hide some terms or periods you don't want to see, and attempt to search for a course, a warning message displays asking when you want to continue with your settings or reset them. For example, in the image below, Term 1 is not marked for display.
 Filter Bar Options - Term One Does Not Display
When searching for a course and choosing an option, the cells where that course is scheduled highlight in the background, along with a Hidden Section Warning, which states that not all sections for the selected course display because of the modified filter. Click the Continue button to not make any changes to your schedule display, or click Reset, which causes the hidden Term to display again.
Reset does a full reset on the filter bar, and terms and period schedules and types of courses must be selected again.
 Hidden Section Warning
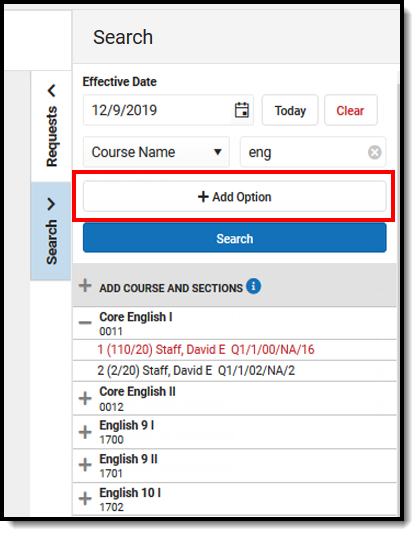
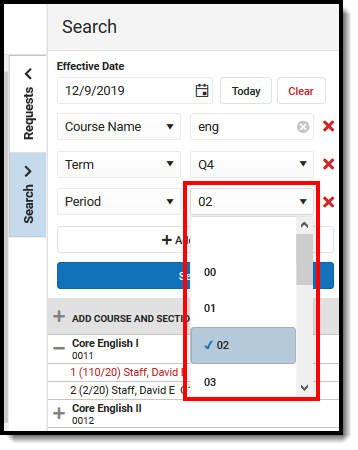
Click Add Option to add additional search criteria. This adds an additional Search criteria field. In the example below, the search criteria is currently looking for Course names that begin with "eng" and are scheduled into Term 4. A third option could be added to narrow the results to courses that begin with "eng", scheduled into Term 4, and meet during Period 2.
 Add Search Criteria
Click the dropdown arrow next to the search field to change the search option, and select specific values (Terms, Periods, Schedule Names, Department Names). Searching by Course Number, Course Name or Teacher Name requires entry of a value.
 Search Value Selection
Click the plus sign next to the Course name to view information about that course's available sections. The following information is included (refer to the highlighted section in the image following the table for reference):
| Information Included | Image | |
|---|---|---|
| Section Number | 1 | 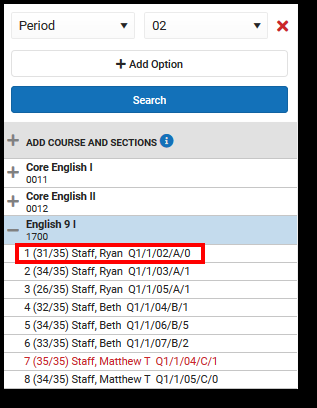 |
Total number of students already scheduled into that section (this displays in seats taken/max students when the Max Student seat count is populated on the course; when the max students field is not populated, only the number of seats taken displays) | 31/35 | |
Assigned Primary Teacher | Staff, Ryan | |
| The term in which that section first meets | Q1 | |
| The period schedule to which that section is assigned | 1 | |
| Ther period in which the section is assigned. | 1 | |
| The Team (i.e., Scheduling Group) assigned to the section | A | |
Total number of students who have IEPs scheduled into that section | 0 | |
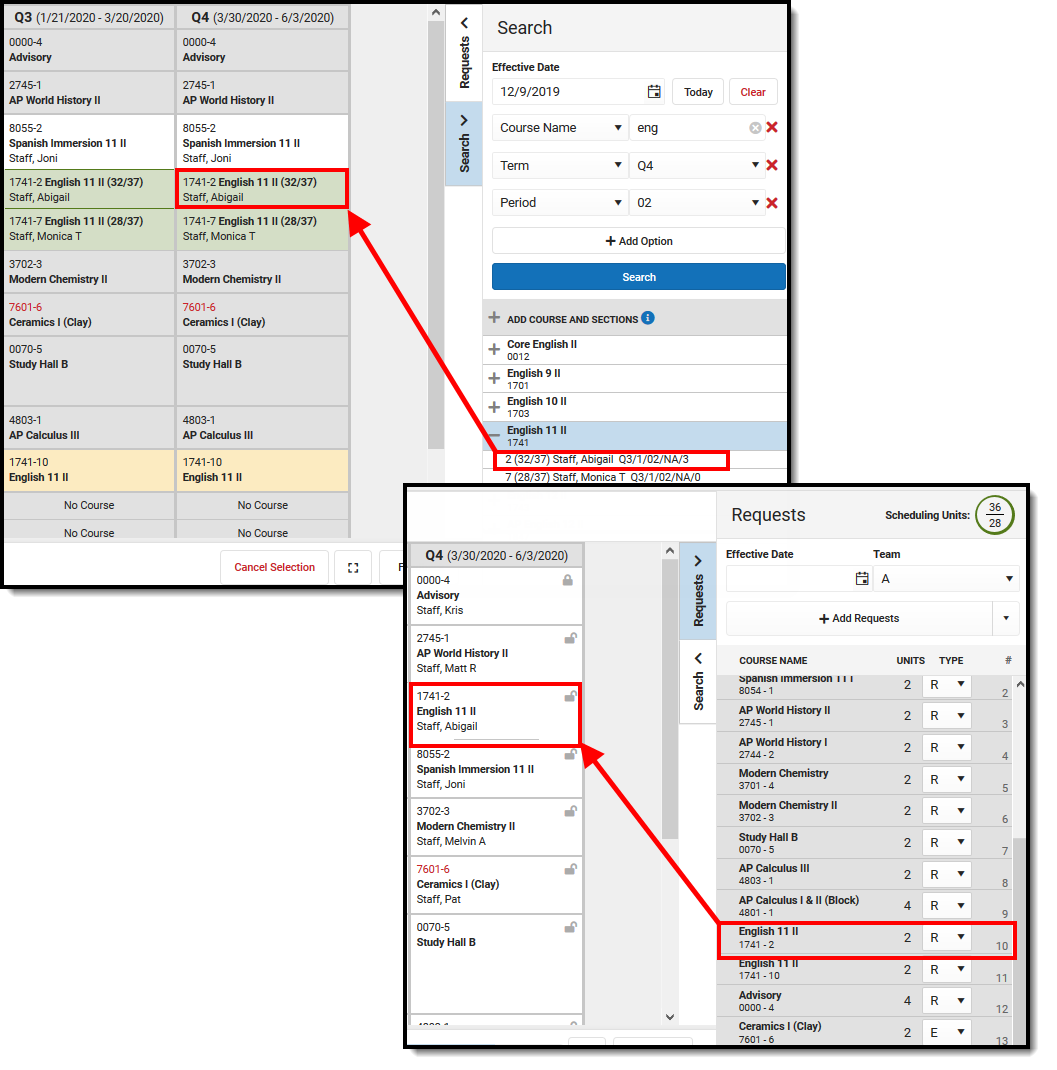
Courses added to the student's schedule from the Search list are added as a Request and are visible on the Requests panel.
 Search Course Added to Schedule Displays on Requests Panel
When a course is searched for and added to student's schedule, a warning message displays when that course already exists on the student's transcript. The message displays when the course number exists on the transcript and the Repeatable checkbox is NOT marked on the course.
 Course Already in Student Transcript
Use Wildcard Searching in any of the Search fields.
Search for a Course
- Enter the Effective Date of the student's enrollment in the course (when the student BEGINS attending the course). Enter this in mmddyyyy format, choose the calendar icon to select a date, or click the Today button to begin the course on the current date. Entered dates must be within the term dates of when the course meets. The entered date remains after adding a course.
- Select the Search Option from the dropdown list (Term, Course Name, Course Number, etc.) and enter the desired search criteria into the field or select the desired criteria from the dropdown list. To remove a Search Option, click the red X to the right of that option. To add more options, click Add Option .
- Click the Search button for matching results to display.
Add a Searched Course to the Schedule
- Select the desired course from the search results by clicking the name of it. Doing this highlights its location on the student's schedule, and closes the Search Panel. Reopen the panel by clicking the Search option. When this is done, notice that the selected course now has a checkmark next to it.
- Or, click the plus sign to the right of the course name to display the course sections and select a specific section.
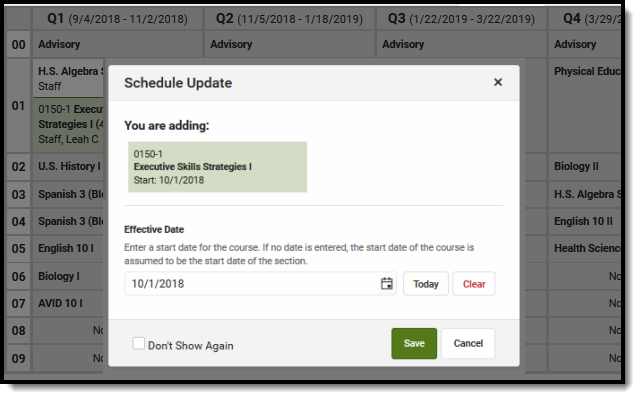
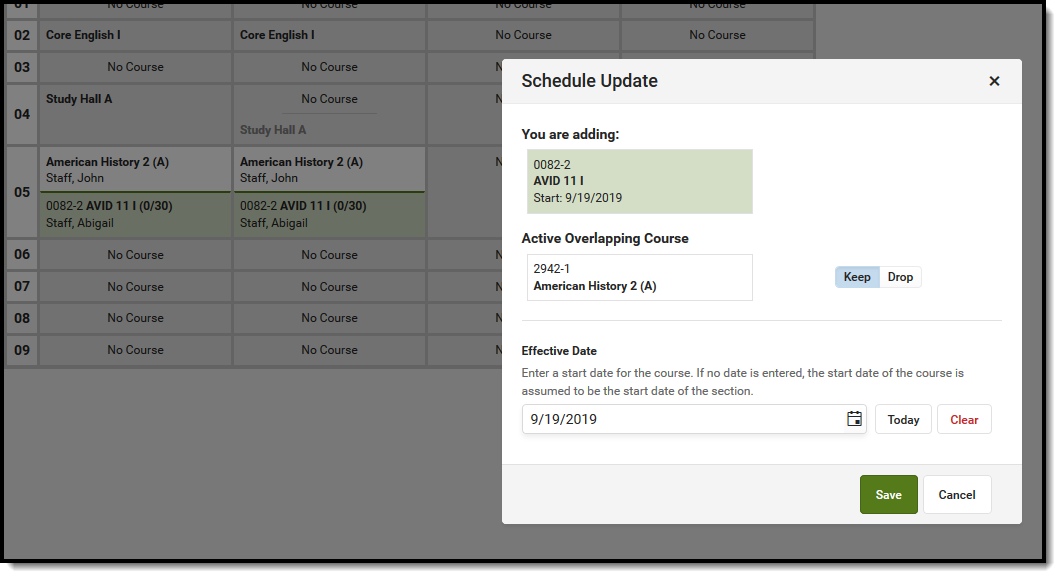
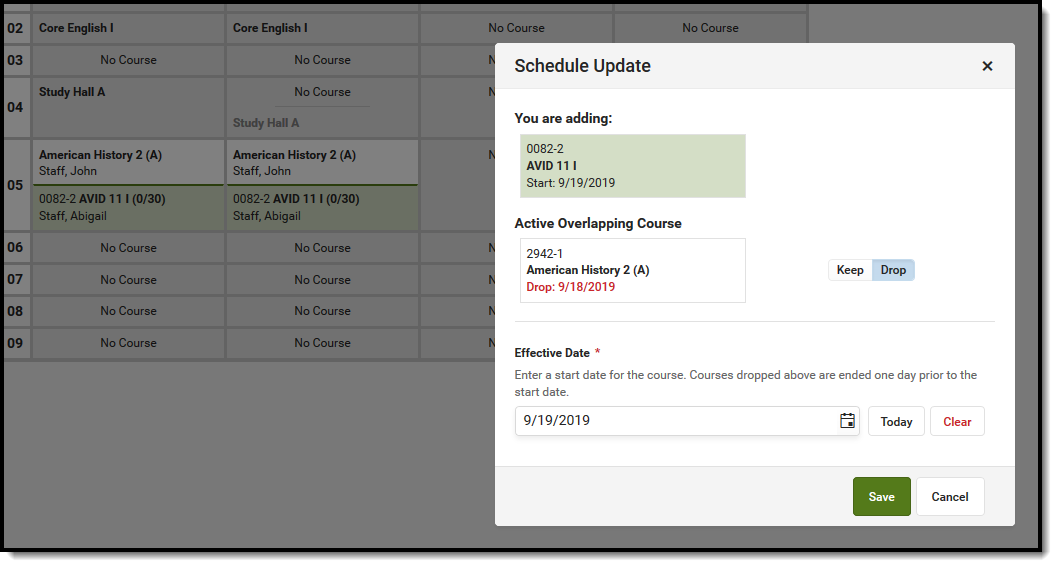
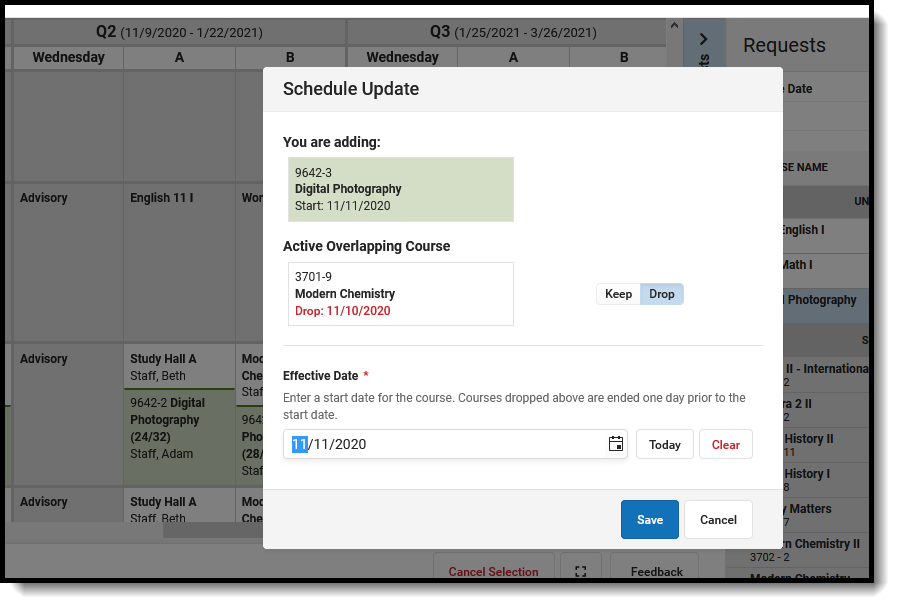
- When the course meets during a period where a course already exists, the row for that new course displays in green. In the Schedule Update modal that displays:
- When the course should be skinnied with the currently scheduled course, move the Drop/Keep option to Keep and enter an Effective Date to indicate when the student begins attending the course. Entered dates must be within the term dates of when the course meets.
- When the course should not be skinnied with the currently scheduled course (current course is dropped), move the Drop/Keep option to Drop and enter the Effective Date to indicate when the student begins attending the course. Entered dates must be within the term dates of when the course meets.
- When the course is being added to an empty period (that cell currently reads No Scheduled Course), select the course and notice that the cell now has the course section highlighted in green.
- Click the cell where the course was added and modify the Effective Date (defaults to the current date) to add the student to the section roster on the section modal.
- Upon saving the effective date and any other information in the modal, the course is added to the schedule.
 Search for and Add Course to Schedule
Depending on the options selected in the Schedule Update, the following may occur:
- When the course was skinnied with another course, the newly added course is added to that period with the entered Effective Date displaying as the Start Date.
- When the course was not skinnied with another course, meaning the existing course enrollment ends, the new course is added with the entered Effective Date as the Start Date and the existing course is dropped with an End Date of the previous day.
- When the course is added into a future term, the Effective Date is blank. When the course is added to the current term, the Effective Date defaults to the current date.
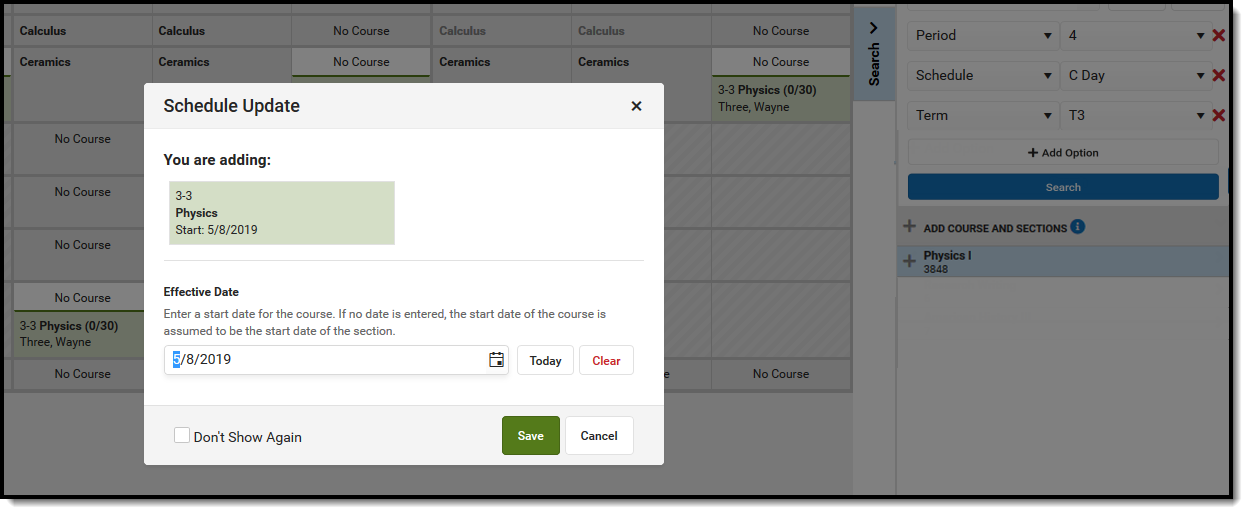
Add a Searched Course to the Schedule in an Empty Period
- Select the desired course from the search results by clicking the name of it. Doing this highlights its location on the student's schedule, and closes the Search Panel. Reopen the panel by clicking the Search option. When this is done, notice that the selected course now has a checkmark next to it.
- Click the Select button. In the Schedule Update modal, review that the correct course is being added to the schedule, and enter an Effective Date. Entered dates must be within the term dates of when the course meets and are entered in mmddyyyy format.
- Click the Save button to schedule the course.
Add a Course to the Schedule in an Empty Period that is at Capacity
When creating courses and course sections, a maximum number of students can be indicated. This value is used in the Scheduling Board to properly balance course sections and indicate when a new course section is necessary. Counselors can overload those filled course sections on the Walk-In Scheduler. While this process should be kept at a minimum, it may be necessary at times.
- Select the desired course from the search results by clicking the name of it. Doing this highlights its location on the student's schedule in red (indicating it is a full course), and closes the Search Panel. Reopen the panel by clicking the Search option and notice that the selected course now has a checkmark next to it.
- Select the course in the Schedule Grid. In the Schedule Update modal, review the message that indicates the section is full. To continue with adding the course to the schedule, enter an Effective Date. Entered dates must be within the term dates of when the course meets and are entered in mmddyyyy format.
- Click the Overload button to schedule the course.
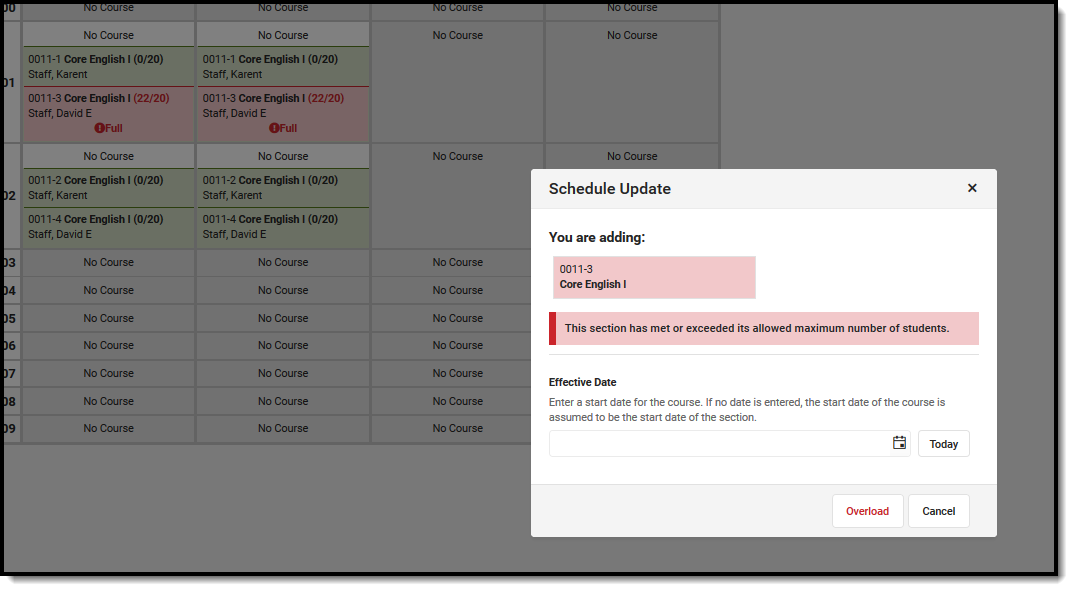 Add a Full Course Section to a Schedule
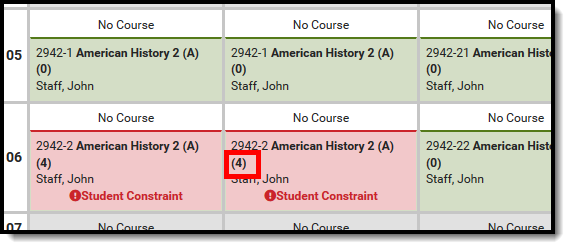
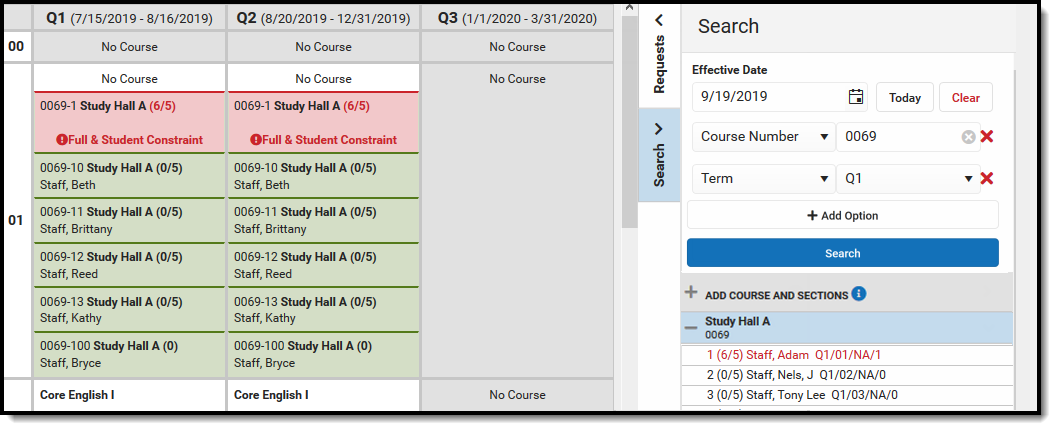
Add a Course to the Schedule in an Empty Period when the Student has a Constraint
Scheduling Constraints can be added between students to limit interactions as needed. There are two kinds - Strict Constraint, where the student DOES NOT get placed into the same course, and a more fluid Constraint, where the student SHOULD NOT be placed in the same course. There is logic in the Scheduling Board to build course sections and pay attention to these constraints; in the Walk-In Scheduler, these constraints can be overridden.
- Select the desired course from the search results by clicking the name of it. Doing this highlights its location on the student's schedule in red (indicating the student has a constraint), and closes the Search Panel. Reopen the panel by clicking the Search option. When this is done, notice that the selected course now has a checkmark next to it.
- Select the course in the Schedule grid. In the Schedule Update modal, review the message that indicates the section has a scheduling constraint. To continue with adding the course to the schedule, enter an Effective Date. Entered dates must be within the term dates of when the course meets and are entered in mmddyyyy format.
- Click the Override button to schedule the course.
When a course is both full and has a scheduling constraint, the warning message and action are combined.
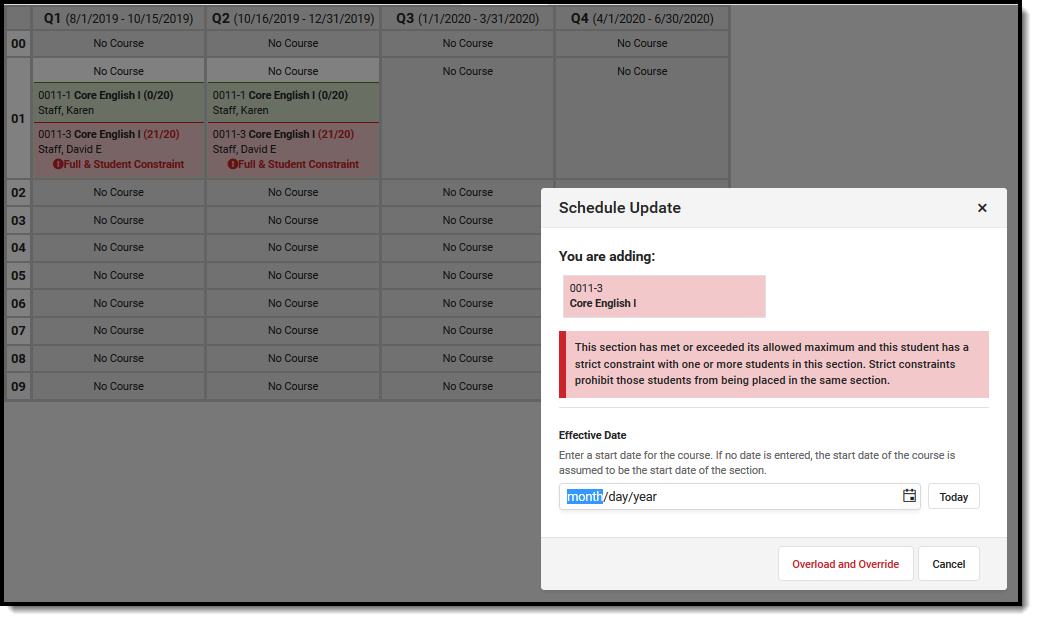 Full Section with Student Constraint
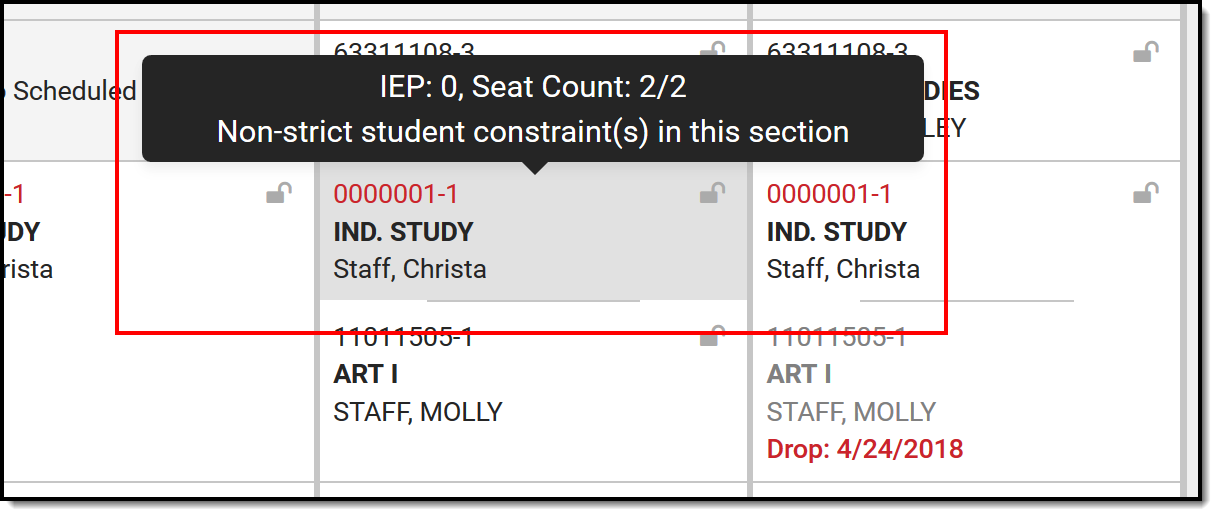
After the course is added to the student's schedule, hovering over that section displays that there are constraints between the selected students and other students, even when the selected student's start date in that section has a future date.
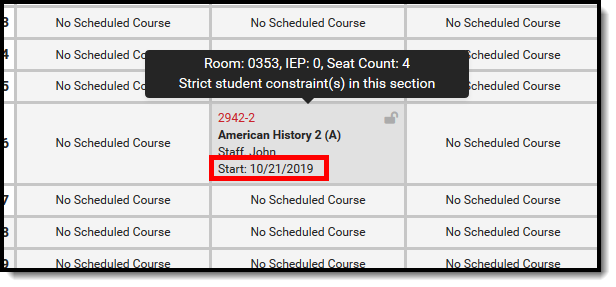 Student Constraint Indication with a Future Start Date
Modify a Student Schedule
Load Requests
This process loads courses included in the Requests panel.
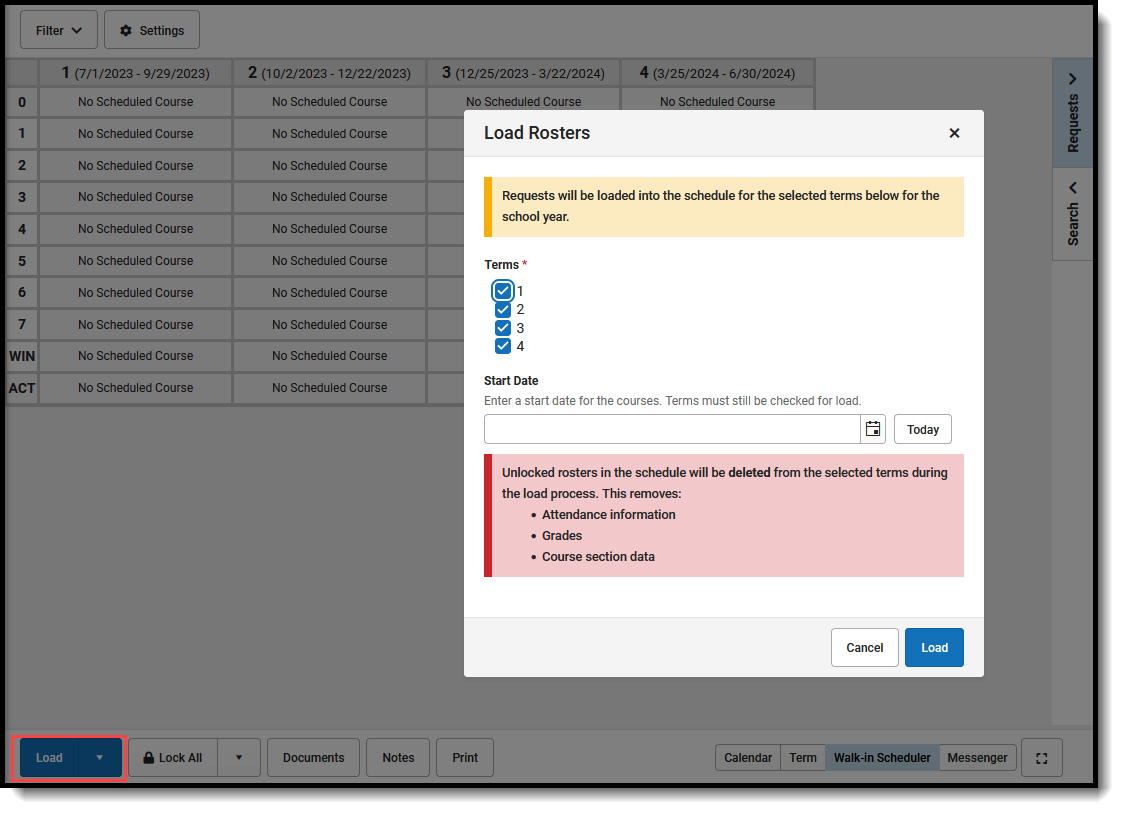
- Choose the Load button from the action bar. A Load Rosters modal displays.
- Enter a Start Date for the courses. This can be left blank when the student is assumed to be started on the first day of the term (when the course section begins).
- Review the information in the confirmation message, specifically the indication that unlocked courses (rosters) in the schedule are deleted from the selected terms, and with that, any recorded attendance, grades and course section information is also deleted.
- Click the Load button in the confirmation message to continue.
The student's requested courses are added to the schedule. Sections cannot be overloaded this way.
 Load Student Course Requests
Loading courses uses a complicated algorithm that follows these steps to assign a course placement for students:
- When the student is assigned to an Academic Plan where a requested course is included on a Course Requirement that is marked as Priority, those courses load first.
- Remaining courses are sorted by Schedule Load Priority set on the Course/Course Master editor and loaded in order.
- Courses in a given priority with only one available section (singletons) are loaded before other courses of the same priority.
- Remaining courses are loaded in a manner that attempts to balance section rosters equally on the same criteria as the Scheduling Board (see the Section Balancing Configuration information on the Loading Tools article for this logic).
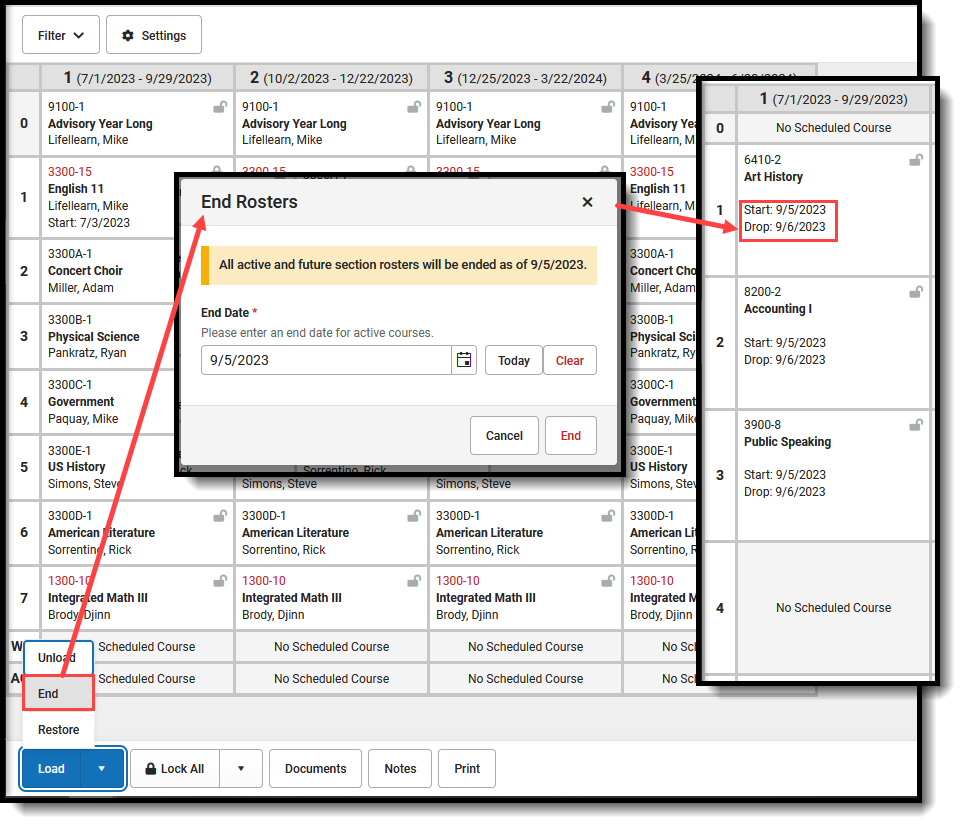
Unload Requests
- Click the arrow next to Load button and select Unload. An Unload Rosters confirmation message displays.
- Review the information in the confirmation message, specifically the indication that unlocked courses (rosters) in the schedule are deleted from the selected terms, and with that, any grades and course section information is also deleted.
- Click the Unload button in the confirmation message to continue.
When completed, the student's schedule displays No Scheduled Course for the terms where scheduled courses were unloaded.
Courses in all selected terms (all terms in the calendar are automatically selected) are unloaded (deleted). Remove the checkboxes from the confirmation message to unload courses for specific terms.
 Unload Scheduled Courses
End Entire Schedule
This option is used to end the student's schedule as of the entered date when the student is choosing other courses to attend, or needs to rework their schedule for a specific need. This process assumes the student has attendance in the current courses for at least one instance (a day, a course meeting, etc.).
- Click the arrow next to the Load button and select End. An End Rosters modal displays.
- Enter the End Date for the day prior to when the student is no longer attending the course. This date defaults to the current day. Click the Calendar icon to choose a different day or enter a different date in mmddyyyy format. When the student is enrolling in new courses on September 7, the entered End Date would be 09/05/20XX; the student's enrollment in existing courses is through September 6, which is the Drop date.
- Click the End button in the confirmation message to continue. Entered dates must be within the term dates of when the course meets.
The student's schedule is ended the day prior to the entered date. New courses can be added for the current term and future terms beginning with the day AFTER the Drop Date.
 End a Student's ENTIRE Schedule
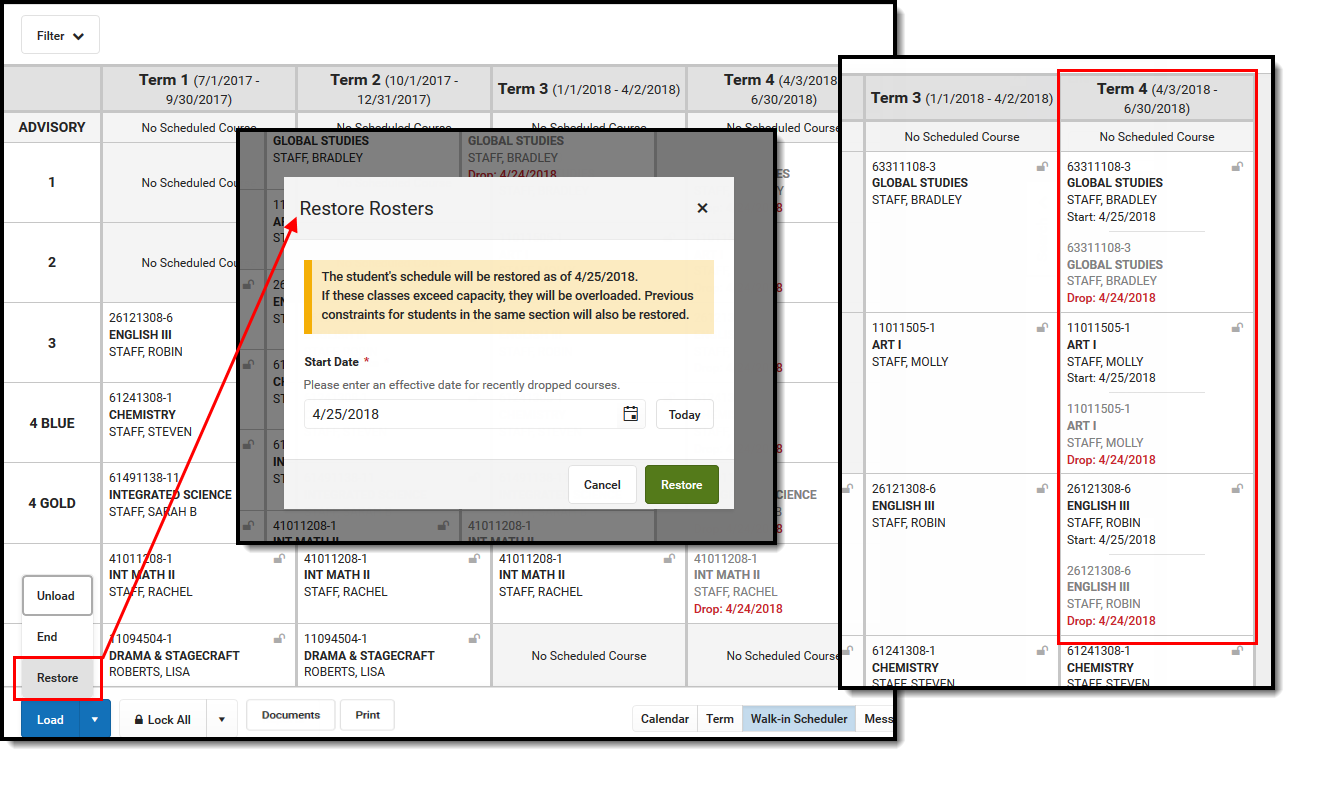
Restore Entire Schedule
Use this option when the action of ending a student's schedule was done incorrectly, or when a recently dropped course needs to be restored.
- Click the arrow next to the Load button and select Restore. A Restore Rosters modal displays.
- Enter the Start Date for the day the schedule should be restored. Entered dates must be within the term dates of when the course meets and are entered in mmddyyyy format.
- Click the Restore button in the confirmation message to continue.
The student's schedule is restored as of the entered date. Courses for the term in which the date falls becomes the start date. Only the most recently ended course sections are restored.
 Restore a Student's Schedule
Modify Section Rosters in a Schedule
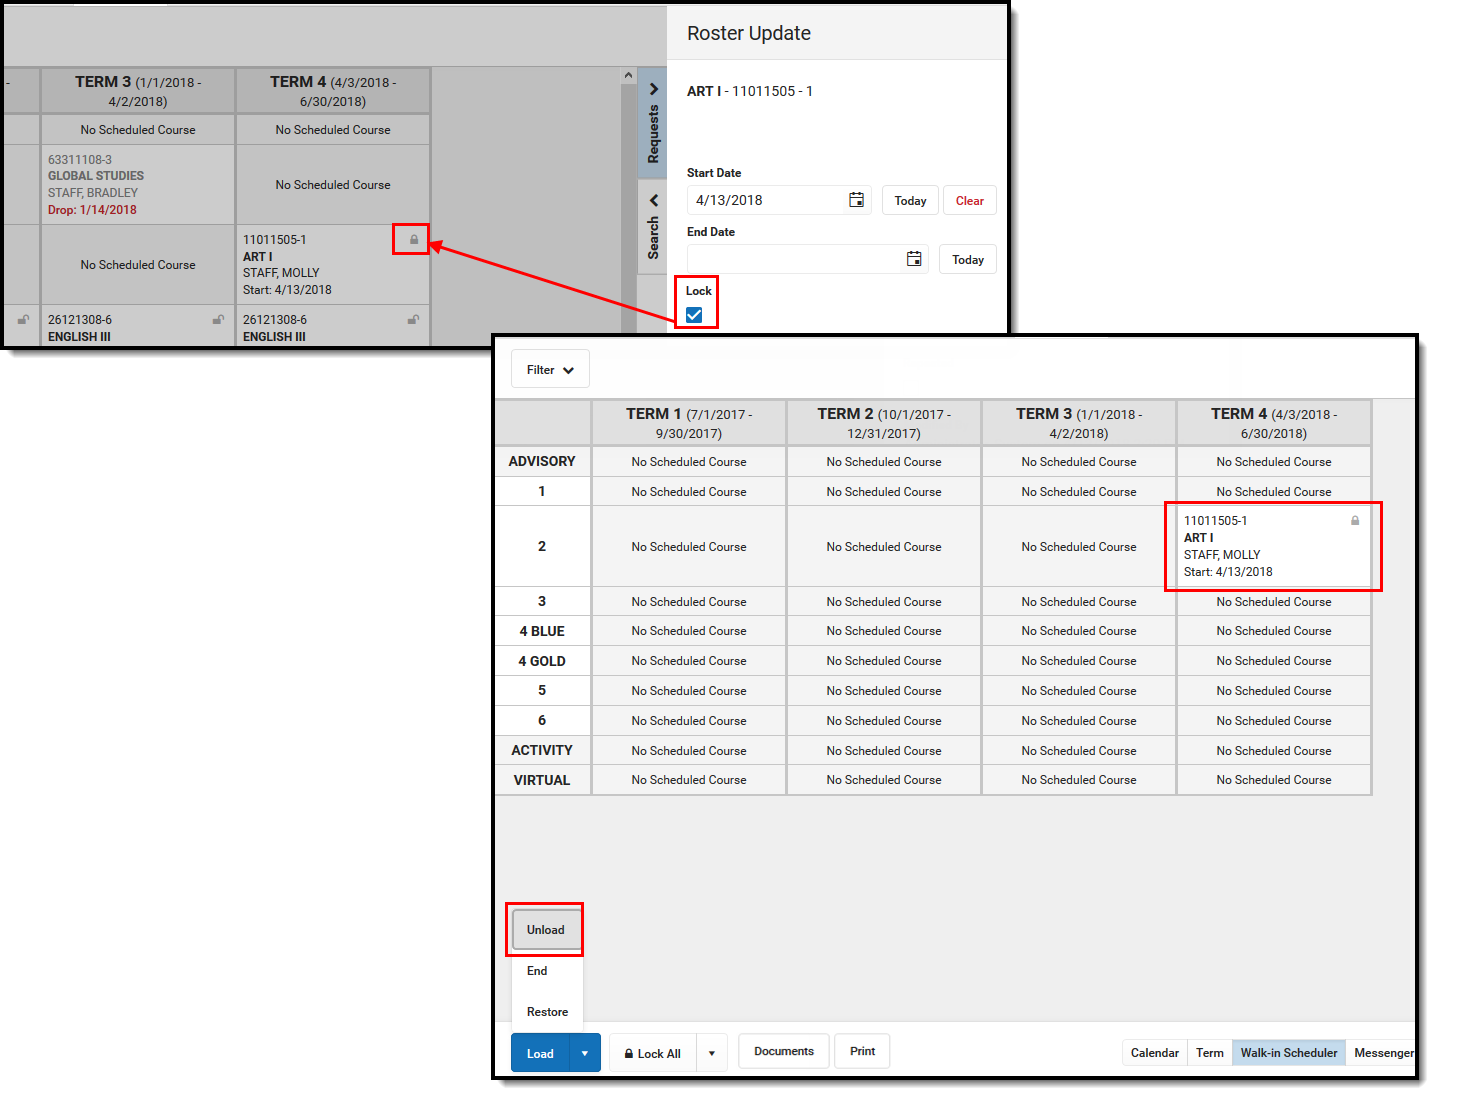
Changes can be made to existing courses on the student's schedule that affect the Course Section Roster list, and modify the list of students the teacher may see in their class roster. The Roster Update panel displays when existing courses are selected.
 Roster Update Panel
Roster Update Panel
This panel varies by state, as information in these fields may be used for state reporting purposes. See your specific state reporting product content for information on those fields.
| Item | Description |
|---|---|
Course Name Course Number Section Number | Indicates the selected course. The course name displays in bold, followed by the course number and then section number. |
| Start Date | Indicates the date the student began enrollment in the course. When blank, it is assumed the student began enrollment in the course on the first day of the term. Entered dates need to be within the selected term dates. Warnings display on the Roster Update panel when dates fall outside of the term for the selected section, outside of the student's enrollment or outside of the calendar dates. |
| End Date | Indicates the date the student ended enrollment in the course. When blank, it is assumed the student is (1) currently enrolled in the course section, and (2) was still enrolled in the section at the end of the term. Entered dates need to be within the selected term dates. Warnings display on the Roster Update panel when dates fall outside of the term for the selected section, outside of the student's enrollment or outside of the calendar dates. |
| Lock | When marked, the course section remains on the schedule, even when the Unload option is used to remove all scheduled sections. This option does not display when the course section was dropped prior to the current date. This applies when unloading a course from the Walk-In Scheduler or from the Scheduling Board. |
| No Credit | When marked, indicates the student received no course credit for the selected course. This is visible on the student's Transcript. When using the Transcript Post tool, the Credits Earned and Credits Attempted values for this course post as zero (0). That zero can be modified by editing the Transcript record manually. |
| Repeated | Indicates the student has taken the course previously. This is a label that is noted on the student's transcript. |
| Modified By | Lists the last staff person who made changes to the selected course section, along with the date and time. When a section is deleted from a student's schedule or when an end date is added to a course section on the student's schedule and attendance data is deleted, a record of this action is recorded in the Audit Attendance table. |
Add a Start Date to a Scheduled Course
When a student begins enrollment AFTER the start of the term, enter the date the student began attending the course. The start date may be different because the student's enrollment started after the start of the term, or the student switched course sections after the start of the term, or it's a temporary class that doesn't follow the standard term dates.
- Select the appropriate course from the student's schedule. The Roster Update panel opens.
- Enter the Start Date in mmddyy format, or use the calendar icon to select a date, or click the Today button to enter the current date. To remove the date, click the Clear button.
- Click the Save button when finished. The entered start date displays with the course.
Add an End Date to a Scheduled Course
When a student ends enrollment in a course (dropping a course, rather than ending enrollment in the school), enter the date the student stopped attending the course.
- Select the appropriate course from the student's schedule. The Roster Update panel opens.
- Enter the End Date in mmddyy format, or use the calendar icon to select a date, or click the Today button to enter the current date. To remove the date, click the Clear button.
- Click the Save button when finished. The entered end date displays with the course as the Drop date.
When the student drops the course on the last day of the term, the Drop Date displays on the course section, and that course that is scheduled in future terms is removed.
Delete a Student Completely from a Roster
Only delete a course completely when the student has NEVER attended any instance of the course.
- Select the appropriate course from the student's schedule. The Roster Update panel opens.
- Click the Delete button when finished. A warning message displays indicating that ALL attendance and grading information is removed.
- Click the OK button to continue. The course is removed.
Lock a Student's Course Selection
- Select the appropriate course from the student's schedule. The Roster Update panel opens.
- Mark the Lock checkbox.
- Click the Save button. Notice on the Schedule that the course now displays a locked padlock.
When the student's schedule is unloaded, this locked course remains in the scheduled period.
To remove the lock, select the course from the schedule, and remove the selection from the Lock checkbox.
 Lock a Course Section
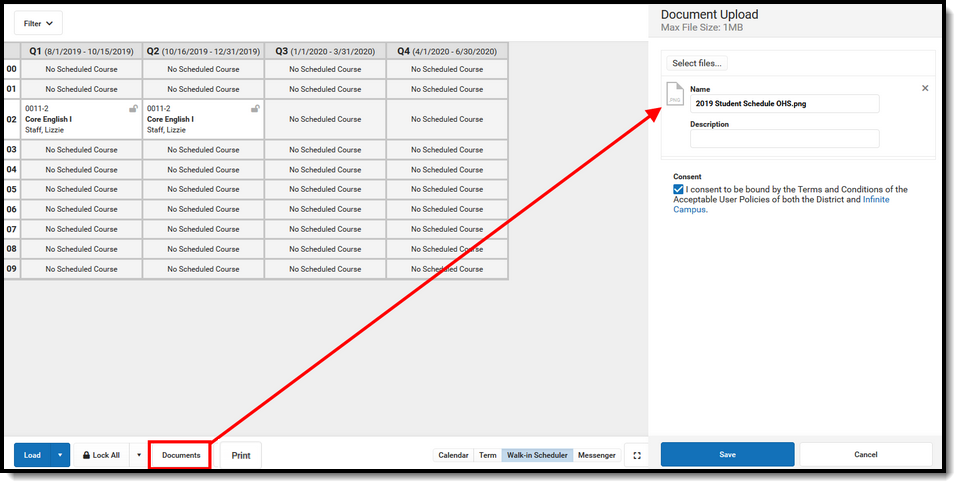
Documents
Upload previous student schedule reports from other schools, or other schedule-related information, for a particular student. This uses the Digital Repository futures. There is no limit to the amount of documents uploaded here, but be aware your district may have set a maximum file size value.
Only documents uploaded from the Schedule tool and Walk-In Scheduler tool display here. Other type of uploaded documents do not display. To see other types of uploaded documents, view them on the Person Documents tool.
Mark the Consent statement (files cannot be saved when this is not marked), and click the Select File button to locate and upload documents. File names must be unique. Click the Save button when finished. A successful upload displays a Done checkmark next to the Select Files button. Close the side panel by clicking the Cancel button.
 Schedule Document Upload
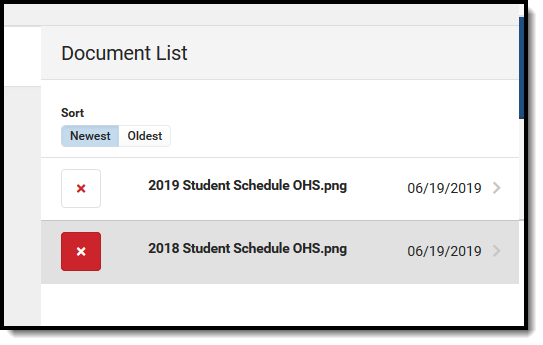
Uploaded files can be sorted by Newest (most recently uploaded) or Oldest. To remove an uploaded document, click the red X next to the file name.
 Delete Uploaded Documents
For more information on document upload, see the Manage Document Attachments article.
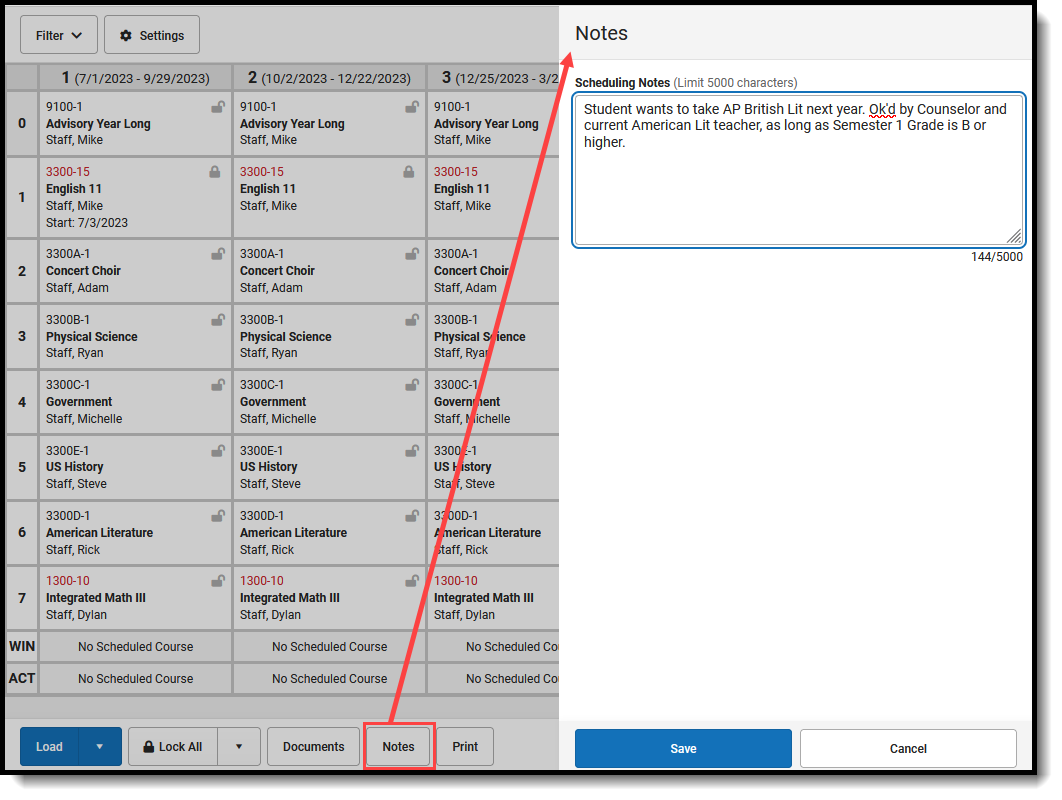
Notes
This feature was added in the Campus.2335 Release Pack (August 2023).
The Notes editor provides a place to track specific information about the student's requests, about certain courses they'd like to take, or about a student's desire to graduate mid-year. While information can be recorded on the student's Academic Plan or in the Contact Log, adding it to the Walk-In Scheduler as the student is working with the Counselor in real time allows a record to be kept of the conversation on the same tool in which course changes are being made.
 Walk-In Scheduler Notes
Click the Notes button in the Action bar, then enter the information in the text field in the Notes side panel.
- The entered Notes is specific to the selected student.
- There is a character limit of 5000. A counter below the text box keeps track of the total characters.
- The text box resizes vertically when the entered information extends beyond the capacity of the current field size. A horizontal scroll bar displays when the text extends outside of the box dimensions.
- The Filter Designer includes Walk-In Scheduler Notes fields for Student Data Type reports. See the Ad hoc section below for more information.
- Notes remain in this side panel until manually removed by a user.
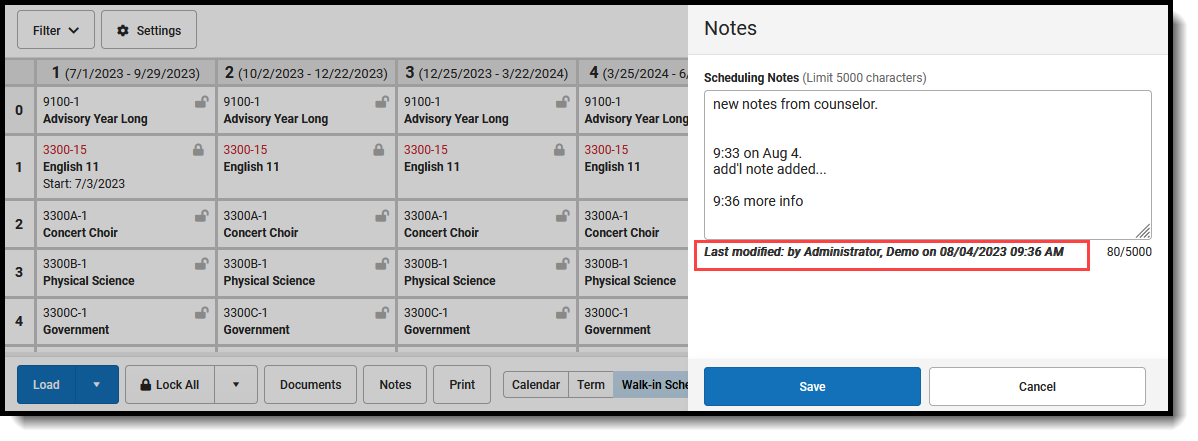
The Last Modified By and Date/Timestamp information lets other staff members who have tool rights to Walk-In Scheduler see who edited the field last.
 Last Modified By and Date/Timestamp on Entered Notes
When a note exists for the student, a blue dot displays next to the Notes button. This displays any time there is one or more characters entered into the field.
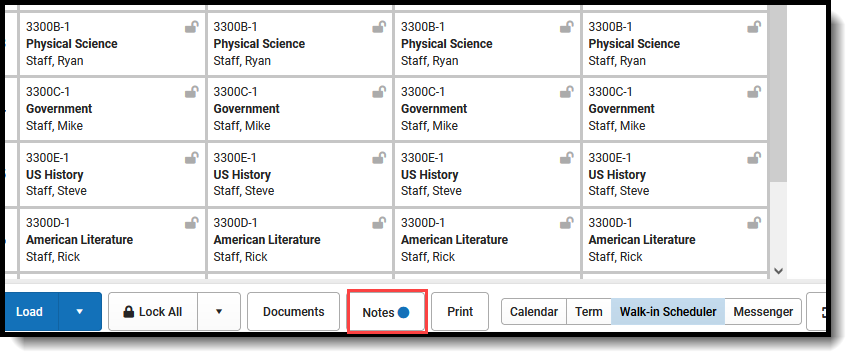 Indicator that at least one note exists for a student.
Additional Walk-In Scheduler Information
Tool Rights
- Student Information > General > Schedule
- Student Information > General > Schedule > View Attendance
- Student Information > General > Schedule > Grade Book
- Student Information > General > Scheduling Messenger
- Student Information > General > Schedule > Schedule Messenger > User Group Formats
- Student Information > General > Schedule > Additional Enrollment Schedules
In addition, R and W rights are required for overriding strict student constraints:
- Student Information > General > Schedule > Can Override Strict Student Constraints
- Student Information >General > Schedule > Can Overload Sections
R and W rights are necessary for access to the Walk-In Scheduler. D rights allow users to remove (delete) students from a Course Section.
- Student Information > General > Schedule
W rights to Student Attendance are necessary (in addition to D rights assigned to schedule) to delete the course when the student has attendance records associated to the section.
- Student Information > General > Attendance
Note that Calendar Modify Rights take precedence over tool rights. When a user is assigned the recommended tool rights, but not modify rights to the calendar, updates to the schedule are not made.
Ad hoc Information
Student Schedule information is available in the Query Wizard in Student > Learner > Schedule. Using these fields returns information on courses/course sections in which the student is currently scheduled. Fields for Section Student Detail, Roster Verification, Course/Section and Walk-In Scheduler Notes are also available.
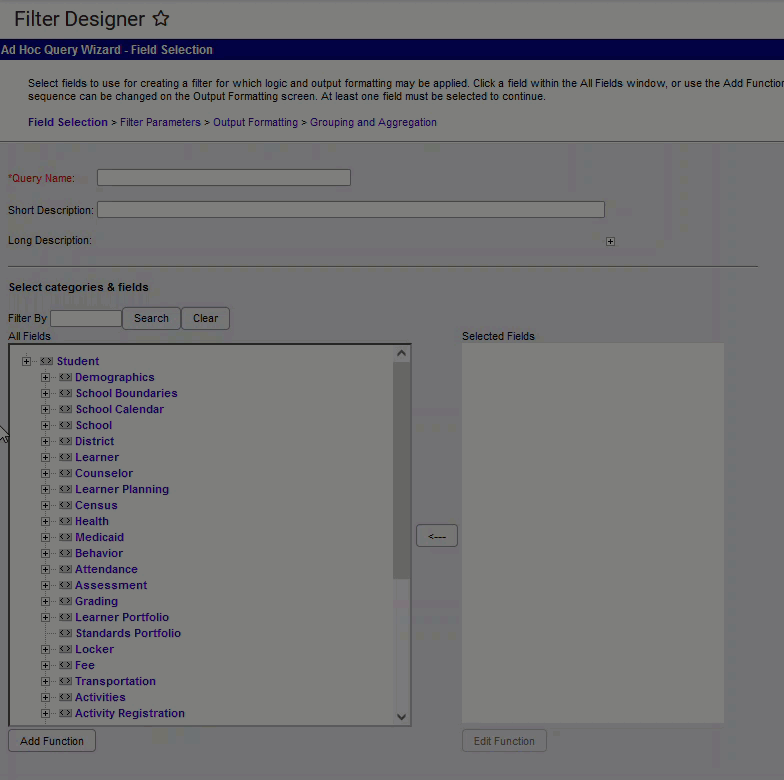
Course requests are available in Ad hoc Query Wizard in the Student > Learner Planning > Course Requests folder. Walk-In Scheduler Notes are also available here.
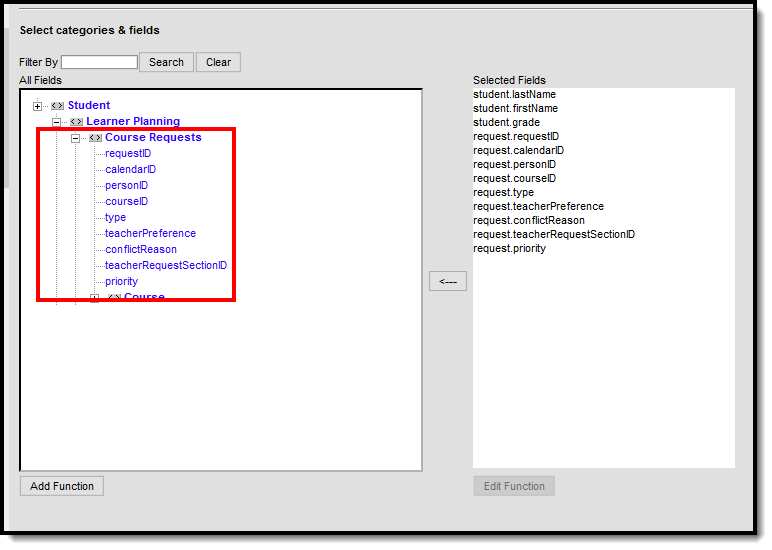 Student Course Request Ad hoc Fields
Course requests and request summary information is available in the Course Section data type in the Course > Course Information > Request Detail and Request Summary folders (second image).
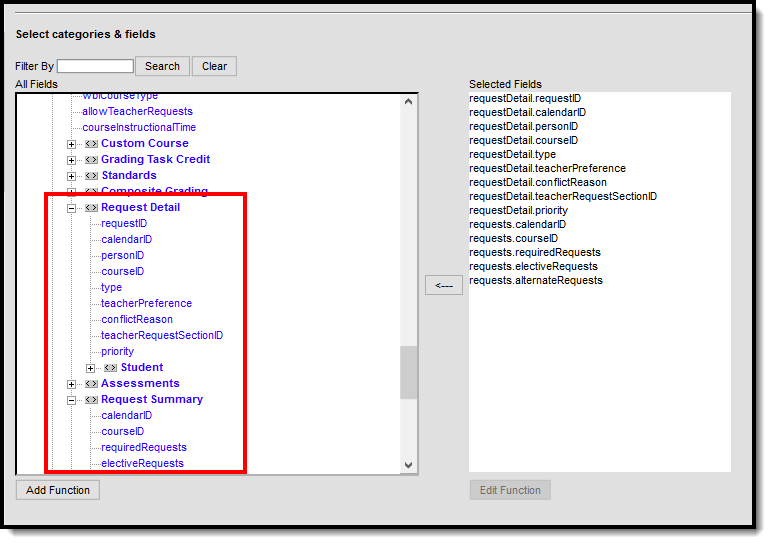 Course Request Detail, Request Summary Ad hoc Fields
Previous Versions
Walk-In Scheduler [.2335 - .2343]
Walk-In Scheduler [.2231 - .2331]
