Location: Message Center > New > select Message Type: Class Message
Send a Class Message to students and/or guardians to communicate class information to your sections, such as a reminder about upcoming parent/teacher conferences or other types of general notifications.
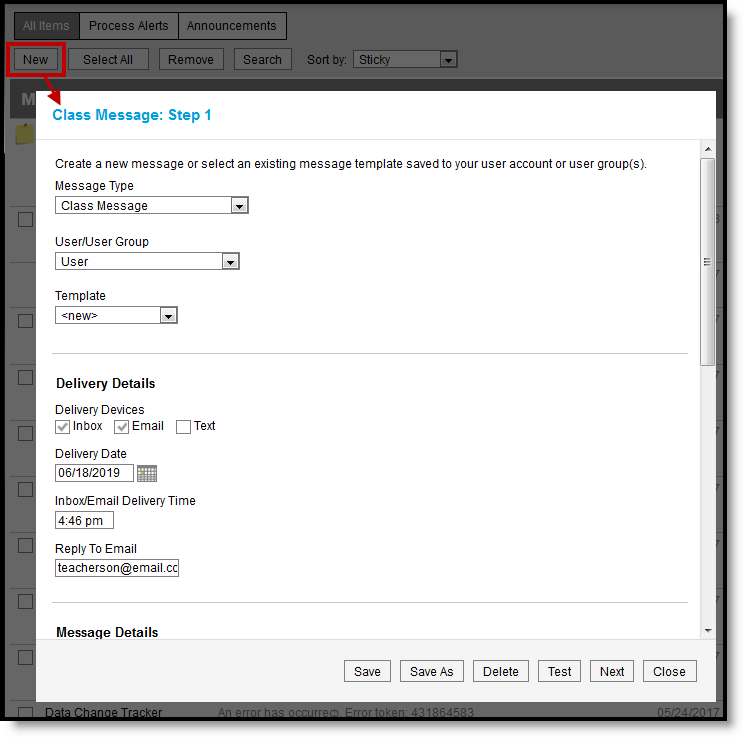
Class Message in the Message Center
Templates
When you create a message, you have the option of selecting an existing message template or starting from scratch. See the Create a Template for Sending Messages article for more information about templates.
Tool rights to create Class messages are found in Additional Access Rights > Instruction Messaging.
Creating a Message
- Select a Message Type of Class Message to send a message to students and/or guardians.
- If desired, select a Template from the list of your templates (User) or those made by others in group(s) you belong to (specific User Group). If you select a template, fields in the message auto-populate based on that template, but are still editable for this instance of the message.
- Modify Delivery Details for your message if desired:
- Devices: Inbox messages go to the message center in Campus Student and/or Campus Parent. Email messages go to the recipient's email address on file. Depending on district setup, Text and Voice may also be available; additional options display if either of these options are chosen.
- Delivery Date and Deliver Time: defaults to the current date and time. Schedule the message to be sent in the future if desired.
- Reply to Email populates with your email. Modify if desired.
- Enter a Subject and Message Body. Add an attachment if desired. Subject and Message Body support the use of Chinese characters for email messages only.
- Use the
 button to include Campus fields that populate based on the recipient, such as student.firstName that populates each student's first name in the message.
- Use the
- Click Next to move on and select recipients. Only use the Save/Save As buttons if modifying or creating a template.
- In Step 2, select message recipients, which are grouped by section. Indicate if you want to send the message to all recipients in the selected section(s) or select specific recipients.
- All: Expand a term and select Section(s). Indicate if the message should go to Student Messenger Contacts, Students, or both.
- Specific: Select a Section from the dropdown list, filter the list by messenger contacts or students, and add specific recipients to the Recipient List. You can add recipients from multiple sections.
"Student Messenger Contacts" are household member, usually parents/guardians, who have "Messenger" marked on their relationship with the student.
Students who have end dates on their section rosters before the end of the term will not be included in the message as recipients (nor will their Messenger contacts).
- Click Next to review the message prior to sending.
- In Step 3, review the Message Preview and Delivery Summary prior to sending the message. To view a list of indented recipients, click Review Recipients
- The number of users who do not have an email address on file or a Campus Student or Parent account is indicated in No Devices. Click Review Recipients to see which contacts will not receive the message. Recipients with no delivery devices listed under their name will not receive the message.
- Modify recipients from the Review Recipients list by unmarking checkboxes next to recipients or their delivery devices. Click Save.
- Click Send to send the message at the indicated time. If any of the delivery devices is recognized as invalid, an error message displays and messages are not sent. Return to Review Recipients to remove erroneous devices.
- Once messages are successfully sent, a summary screen displays recipient counts. To view a log of messages sent, mark the checkbox next to the delivery devices and click View Log to view a printable version of the log. This log is not accessible once you click Close.
