Tool Search: Locker Setup
The Locker Setup tool lists the locker numbers, combinations the locker may have and its location. Users can also assign lockers to a certain grade level. This is used in the Locker Schedule Wizard by assigning lockers only to students in the grade level.
Locker Types and Lock Types are maintained in the Attribute/Dictionary. See the Locker Types and Lock Types section on the Lockers (Admin) article for more information.
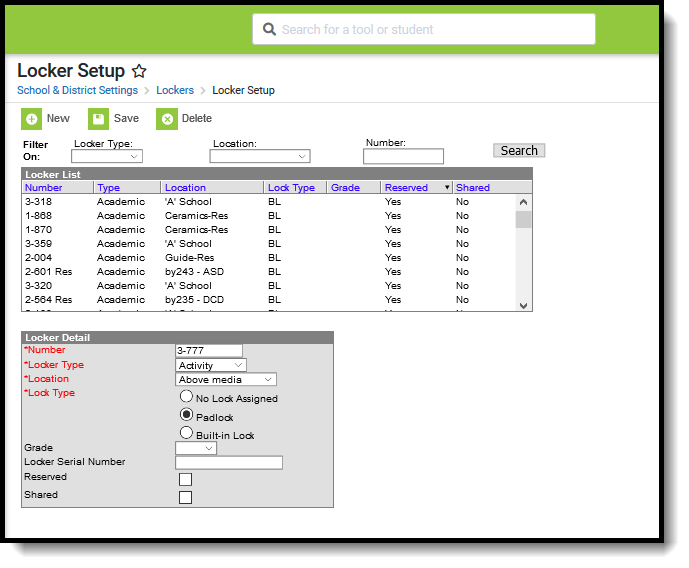 Locker Setup
Locker Filtering
Duplicate locker numbers cannot be created. For this reason, locker numbers, locker locations and locker types can be filtered to more easily find a locker and modify its settings or review its status. Use the Search button to filter the search active lockers by Locker Type, Location and/or Number.
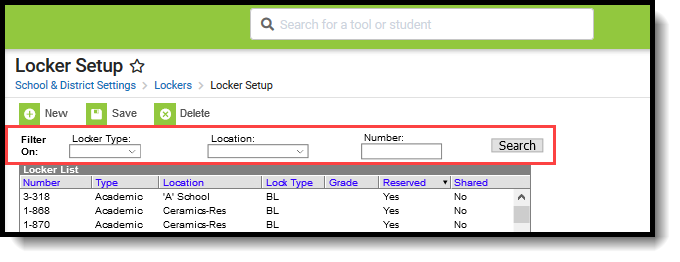 Locker Filter Options
For more detail about that locker, select the appropriate returned item and review the Locker Detail Information. Here, the number, type, location and lock type can be modified.
Lockers assigned to an inactive locker type (modified in the Attribute/Dictionary) display in gray text. That locker can be selected, but note that a new active Locker Type is needed.
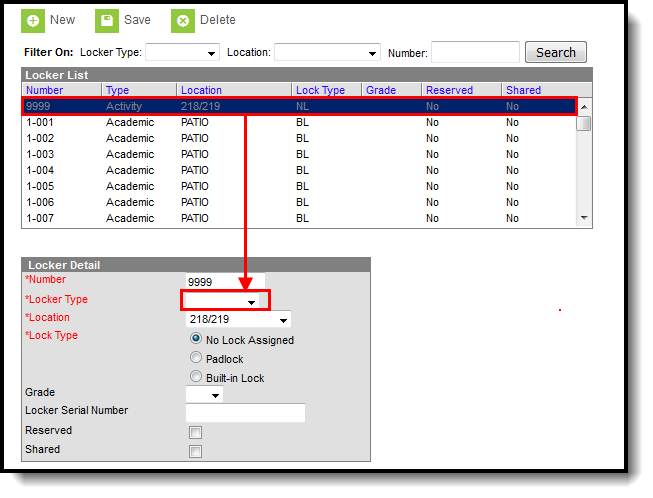 Locker Assigned an Inactive Locker Type
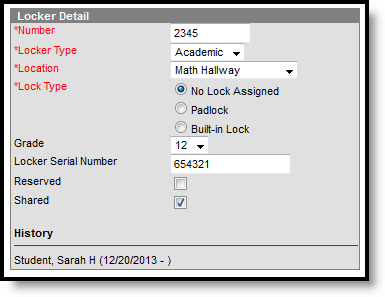
Locker Detail Editor
The Locker Detail editor lists the information about the editor. It also lists the students who have been or are currently assigned to the locker. The following fields are located on the Locker Detail Editor.
Field | Description |
|---|---|
Number | The locker number. This field can contain symbols, dashes, letters, numbers, etc., and can be up to ten characters in length. |
Locker Type | Indicates the reason the locker is assigned to the student. In some schools, multiple lockers are assigned to the student, one for academic purposes, one for PE purposes, one for music purposes. Locker Types are created in the Attribute Dictionary and should be created and saved before adding lockers. |
Location | Locker locations tell the student and staff where the locker is located in the building. Locker locations are created on the Locker Location tab. |
Lock Type | Indicates the type of lock associated with the lockers. Three options are available:
|
Default | Displays only when Built-in Lock type is selected. Indicates the currently active combination of the locker. |
| Seq(uence) | Displays only when Built-in Lock type is selected. Indicates the pre-determined order (users cannot change the sequence) in which the combinations are assigned using the Combination Rotation Wizard. |
| Combo | Displays only when Built-in Lock type is selected. Lists the lock combination used to open the locker. |
Grade | If the school assigns certain lockers to a certain grade level, select the grade level from the dropdown list. |
Locker Serial Number | Lists the serial number of the locker. |
Reserved | Indicates the locker is manually assigned and will not be available in the Locker Schedule Wizard or Locker Roster Assignment Wizard. |
Shared | Indicates the locker can be assigned to more than one student. |
| History | Lists the names and locker assignment dates of the students who were assigned the locker. |
Create a New Padlock or No Lock Type Locker
- Click the New icon in the action bar. A Locker Detail editor displays.
- Enter the Number of the locker. Users may check to see if the locker being created already exists by entering the number in the Filter On Number field.
- Select the active Locker Type from the dropdown list.
- Select the Location of the locker from the dropdown list.
- Select the Lock Type as Padlock or No Lock Assigned.
- If applicable, select the Grade level of the students who should be assigned to the locker. If the grade level does not matter, leave this section blank.
- Enter the Locker Serial Number of the locker.
- If the locker is reserved and should not be assigned, by the Locker Schedule Wizard, mark the Reserved checkbox. This will eliminate the locker from being assigned to students via the Locker Schedule Wizard.
- If the locker can have more than one student assigned to it, mark the Shared checkbox.
- When finished, click the Save icon. The new locker and all related information has been saved and will display in the Locker List.
 No Assigned Lock/Padlock
Create a New Built-in Lock Locker
- Click the New icon in the Action bar. A Locker Detail editor displays.
- Enter the Number of the Locker. This number may be up to ten characters in length. Users may check to see if the locker being created already exists by entering the number in the Filter On Number field.
- Select the Locker Type from the dropdown list.
- Select the Location of the locker from the dropdown list.
- Select the Built-in Lock radio button.
- Enter locker combinations within the Combo field. There should be a different combination in each Combo box in order for the locker to have a different combination when a different student is assigned the locker at a later time or for the next school year. These combinations are used in the Combination Rotation Wizard.
- Select which combination is currently the Default combination by marking the appropriate radio button.
- If applicable, select the Grade level of the students who should be assigned to the locker. If the grade level does not matter, leave this section blank.
- Enter the Locker Serial Number of the locker.
- If the locker is reserved and should not be assigned by the Locker Schedule Wizard, mark the Reserved checkbox. This will eliminate the locker from being assigned the students via the Locker Schedule Wizard.
- If the locker can have more than one student assigned to it, mark the Shared checkbox.
- Click the Save icon. The new locker and all related information have been saved.
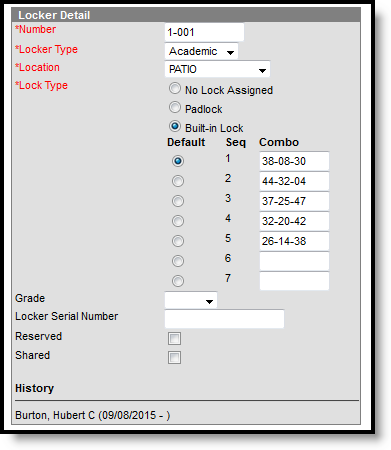 Built-in Lock
Delete a Locker
Lockers can be deleted, if necessary. This feature is useful for removing old lockers no longer in use or groups of lockers removed due to building changes. All locker assignments must be removed before a locker is allowed to be deleted.
- Enter the Locker Number to delete view in the Number field. This will return a list of lockers matching that number.
- Select the appropriate locker number to be deleted.
- Click the Delete icon. Any instance of the locker in the system has been removed.
