Tool Search: Data Import Wizard
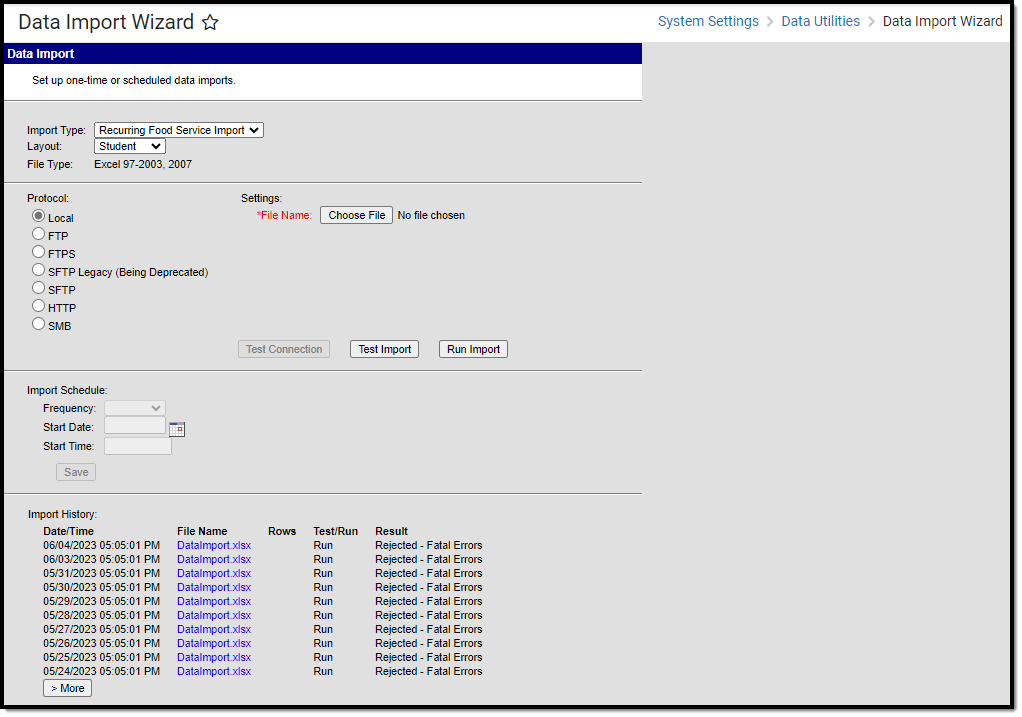
The Data Import tool allows districts to import data from a third-party into Infinite Campus. Users can establish protocol settings and an import schedule so that files exported from the third-party system can be imported into Infinite Campus on an hourly, daily, weekly or monthly basis.
The Data Import Wizard is not a general tool for importing any data into Infinite Campus. This tool is a framework for running custom import modules written by Infinite Campus Technical Services. If you are interested in importing third-party data into Infinite Campus, go to Campus Community and start a Data Services case. Someone from Technical Services will contact you to gather requirements and design import layouts, then they will develop and install a custom import module. This Knowledge Base article describes how to run the Data Import Wizard after the custom development is complete.
This article includes the following topics:
Tool Rights
Users must have full RWAD tool rights to the Data Service Broker and Data Import tools in order to properly access and use the Data Import Wizard.

Establishing Import Settings
In order for files to be properly imported into Infinite Campus, settings must be established for a protocol. The following protocols are supported for use with the Data Import tool:
Local
The Local Protocol option allows users to manually test and import a third-party data file. Imports cannot be scheduled with this option. Typically, this option is used to test and verify files exported by a third-party prior to scheduling them to run automatically using a different protocol, or to run them individually outside of a schedule.
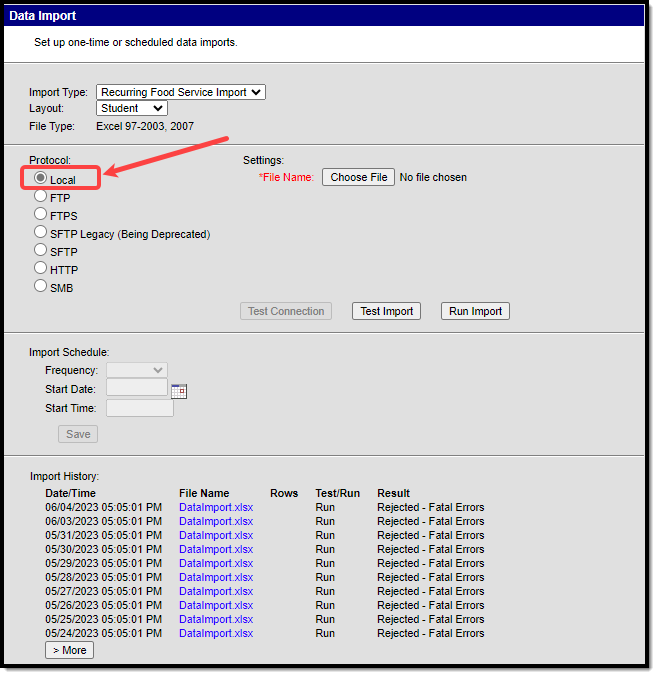
To import a local file:
- Select the Import Type.
- Select the Layout.
- The File Type is established during the initial implementation with Infinite Campus.
- Select the Local protocol radio button.
- Click the Browse button and select the file from a local hard drive or network. The selected file name will populate next to the File Name field.
- Select the Test Import button to perform a test run of importing the data included within the file. A separate window will appear, displaying import results and any errors/warnings which may have occurred.
This option is only a test and does not import data into any Infinite Campus database.
- Once the connection and test data have been reviewed, select the Run Import button to import file data into Infinite Campus.
- After data is imported, an Import History log will appear within the Import History section, detailing what data was imported and any errors/warnings which may have occurred.
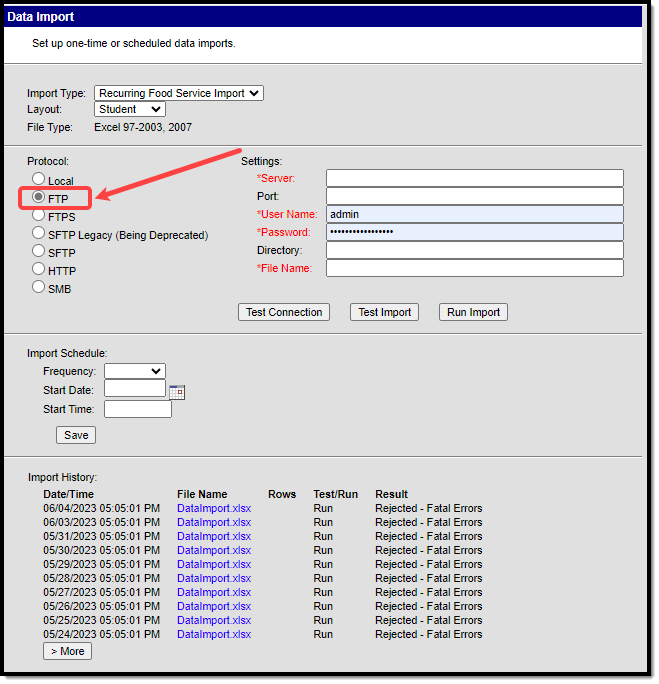
FTP
The File Transfer Protocol (FTP) can be used to establish a Infinite Campus-to-server connection for importing third-party data into the Infinite Campus database.
Users may create and save an Import Schedule to have files import automatically. See the Establishing an Import Schedule section for more details.
To import data via FTP:
- Select the Import Type.
- Select the Layout. See the Understanding File Layouts section for more information.
- The File Type is established during the initial implementation with Infinite Campus.
- Select the FTP protocol radio button.
- Enter the address of the FTP server in the Server field.
- Enter the Port (if necessary).
- Enter your User Name for the FTP server.
- Enter your Password for the FTP server.
- Enter the Directory where the file is stored (if necessary).
- Enter the File Name. It is critical the name of the import file remains the same each time it is replaced on the server. This ensures the Data Import tool is able to properly identify it each time it is scheduled to import the file
Click the Test Connection button to ensure connection with Infinite Campus is correct.
Users are highly encouraged to test the connection prior saving Data Import settings.
Select the Test Import button to perform a test run of importing the data included within the file. A separate window will appear, displaying import results and any errors/warnings which may have occurred.
This option is only a test and does not import data into any Infinite Campus database.
To import data into Infinite Campus immediately, select the Run Import button. An Import History log will appear within the Import History section, detailing what data was imported and any errors/warnings which may have occurred.
For more information on Import Schedule options, see the Establishing an Import Schedule section.
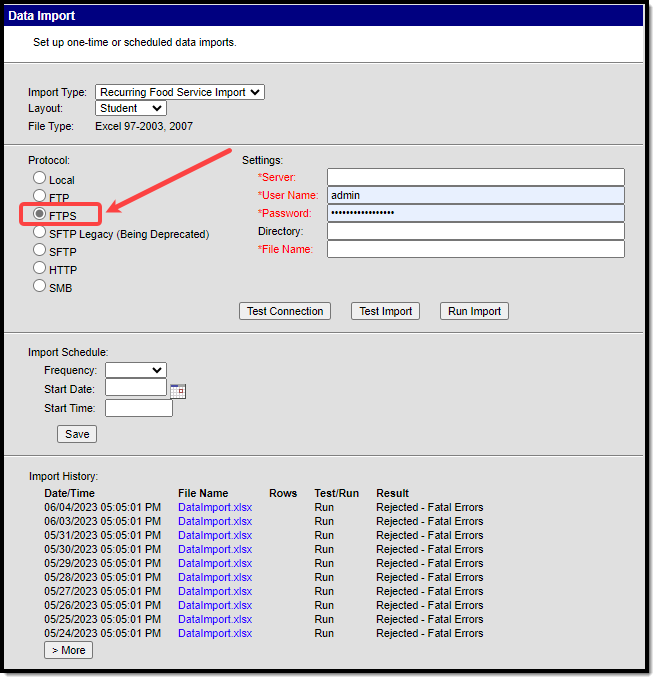
FTPS
The File Transfer Protocol Secure (FTPS) is an extension of the File Transfer Protocol (FTP) that adds support for TLS cryptographic protocols which can be used to establish an Infinite Campus-to-server connection for importing third-party data into Infinite Campus.
Users may create and save an Import Schedule to have files import automatically. See the Establishing an Import Schedule Section section for more details.
To import data via FTPS:
- Select the Import Type.
- Select the Layout. See the Understanding File Layouts section for more information.
- The File Type is established during the initial implementation with Infinite Campus.
- Select the FTPS protocol radio button.
- Enter the address of the FTPS server in the Server field.
- Enter your User Name for the FTPS server.
- Enter your Password for the FTPS server.
- Enter the Directory where the file is stored (if necessary).
- Enter the File Name. It is critical the name of the import file remains the same each time it is replaced on the server. This ensures the Data Import tool is able to properly identify it each time it is scheduled to import the file.
Click the Test Connection button to ensure connection with Infinite Campus is correct.
Users are highly encouraged to test the connection prior saving Data Import settings.
Select the Test Import button to perform a test run of importing the data included within the file. A separate window will appear, displaying import results and any errors/warnings which may have occurred.
This option is only a test and does not import data into any Infinite Campus database.
To import data into Infinite Campus immediately, select the Run Import button. An Import History log will appear within the Import History section, detailing what data was imported and any errors/warnings which may have occurred.
For more information on Import Schedule options, the Establishing an Import Schedule section.
SFTP Legacy (Being Deprecated)
An updated SFTP library was added to the Data Import Wizard to ensure support of modern key exchange algorithms. If you used the SFTP protocol in the past, this is your current SFTP configuration. To avoid disruption and eventual removal of this configuration, you MUST transition to using the SFTP protocol option.
DO NOT USE THIS OPTION

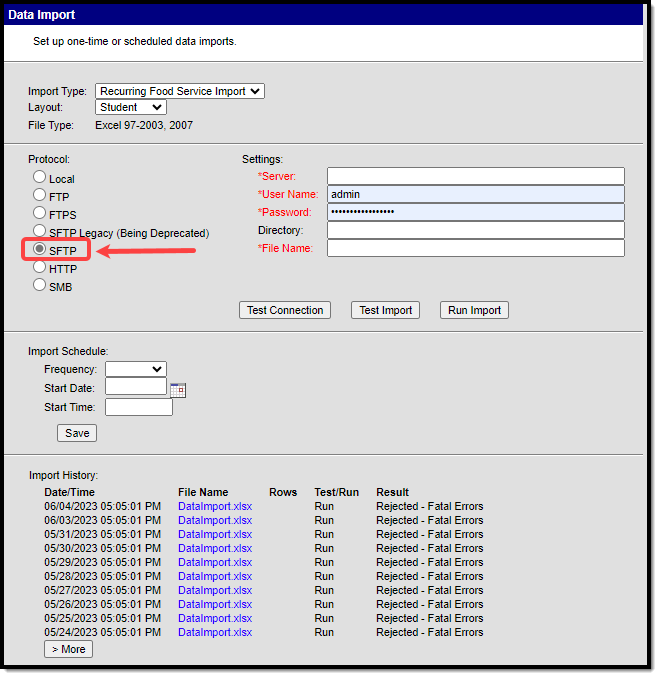
SFTP
An updated SFTP library was added to the Data Import Wizard to ensure support of modern key exchange algorithms. The previous SFTP protocol still exists within the tool as SFTP Legacy (Being Deprecated).
Existing SFTP configurations will continue to work in the old SFTP protocol however, users will NEED to transition to the SFTP option to avoid disruption when SFTP Legacy is deprecated.
The SSH File Transfer Protocol (SFTP) can be used to establish a secure Infinite Campus-to-server data connection for importing third-party data into Infinite Campus.
Users may create and save an Import Schedule to have files import automatically. See the Establishing an Import Schedule Section section for more details.
To import data via SFTP:
- Select the Import Type.
- Select the Layout. See the Understanding File Layouts section for more information.
- The File Type is established during the initial implementation with Infinite Campus.
- Select the SFTP protocol radio button.
- Enter the address of the SFTP server in the Server field.
- Enter your User Name for the SFTP server.
- Enter your Password for the SFTP server.
- Enter the Directory where the file is stored (if necessary).
- Enter the File Name. It is critical the name of the import file remains the same each time it is replaced on the server. This ensures the Data Import tool is able to properly identify it each time it is scheduled to import the file.
Click the Test Connection button to ensure connection with Infinite Campus is correct.
Users are highly encouraged to test the connection prior saving Data Import settings.
Select the Test Import button to perform a test run of importing the data included within the file. A separate window will appear, displaying import results and any errors/warnings which may have occurred.
This option is only a test and does not import data into any Infinite Campus database.
To import data into Infinite Campus immediately, select the Run Import button. An Import History log will appear within the Import History section, detailing what data was imported and any errors/warnings which may have occurred.
For more information on Import Schedule options, the Establishing an Import Schedule section.
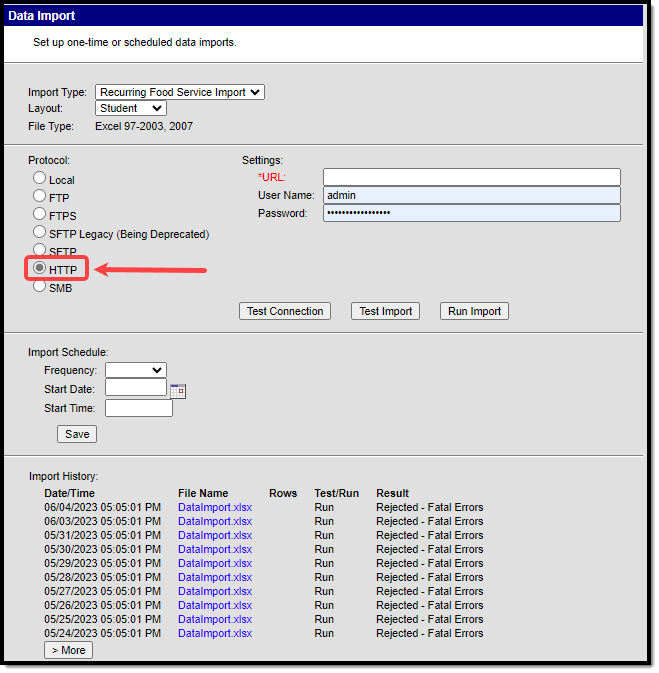
HTTP
The Hypertext Transfer Protocol (HTTP) can be used to establish an Infinite Campus-to-server connection for importing third-party data into Infinite Campus.
Users may create and save an Import Schedule to have files import automatically. See the Establishing an Import Schedule Section section for more details.
To import data via HTTP:
- Select the Import Type.
- Select the Layout. See the Understanding File Layouts section for more information.
- The File Type is established during the initial implementation with Infinite Campus.
- Select the HTTP protocol radio button.
NOTE: Although this button is named HTTP, users may enter a URL beginning with HTTPS for a secure file transfer.
- Enter the URL where the import file exists.
- Enter your User Name for the HTTP server.
- Enter your Password for the HTTP server.
Click the Test Connection button to ensure connection with Infinite Campus is correct.
Users are highly encouraged to test the connection prior saving Data Import settings.
Select the Test Import button to perform a test run of importing the data included within the file. A separate window will appear, displaying import results and any errors/warnings which may have occurred.
This option is only a test and does not import data into any Infinite Campus database.
To import data into Infinite Campus immediately, select the Run Import button. An Import History log will appear within the Import History section, detailing what data was imported and any errors/warnings which may have occurred.
For more information on Import Schedule options, the Establishing an Import Schedule section.
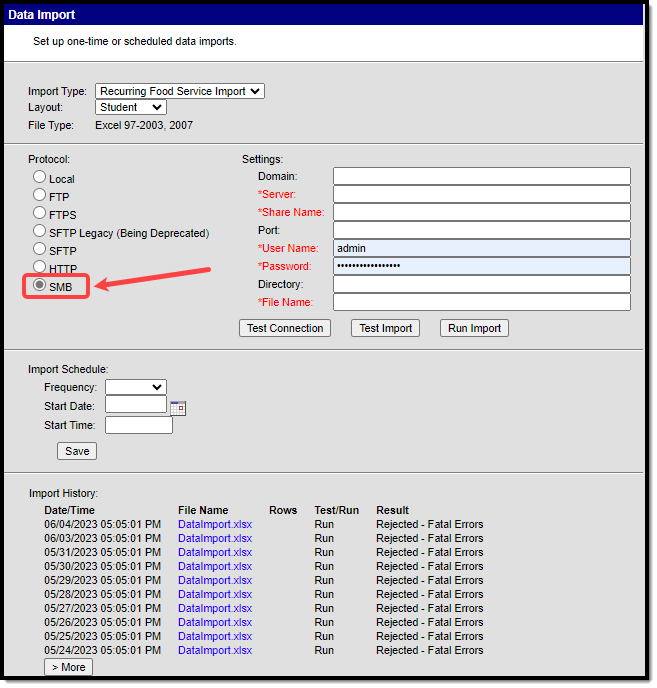
SMB
The Server Message Block (SMB) protocol can be used to establish an Infinite Campus-to-server connection for importing third-party data into Infinite Campus from a Windows file share.
Users may create and save an Import Schedule to have files import automatically. See the Establishing an Import Schedule Section section for more details.
To import data via SMB:
- Select the Import Type.
- Select the Layout. See the Understanding File Layouts section for more information.
- The File Type is established during the initial implementation with Infinite Campus.
- Select the SMB protocol radio button.
- Enter the Domain hosting the server containing the import file.
- Enter the address of the Server.
- Enter the Port (if necessary).
- Enter your User Name for the domain and server.
- Enter your Password for the domain and server.
- Enter the Directory where the file is stored (if necessary).
- Enter the File Name. It is critical the name of the import file remains the same each time it is replaced on the server. This ensures the Data Import tool is able to properly identify it each time it is scheduled to import the file.
Click the Test Connection button to ensure connection with Infinite Campus is correct.
Users are highly encouraged to test the connection prior saving Data Import settings.
Select the Test Import button to perform a test run of importing the data included within the file. A separate window will appear, displaying import results and any errors/warnings which may have occurred.
This option is only a test and does not import data into any Infinite Campus database.
To import data into Infinite Campus immediately, select the Run Import button. An Import History log will appear within the Import History section, detailing what data was imported and any errors/warnings which may have occurred.
For more information on Import Schedule options, the Establishing an Import Schedule section.
Establishing an Import Schedule
In order for third-party data to automatically update Infinite Campus on an hourly, daily, weekly or monthly basis, an Import Schedule must be established. The Import Schedule determines when and how frequently the data file is retrieved from the external system and imported into Infinite Campus.
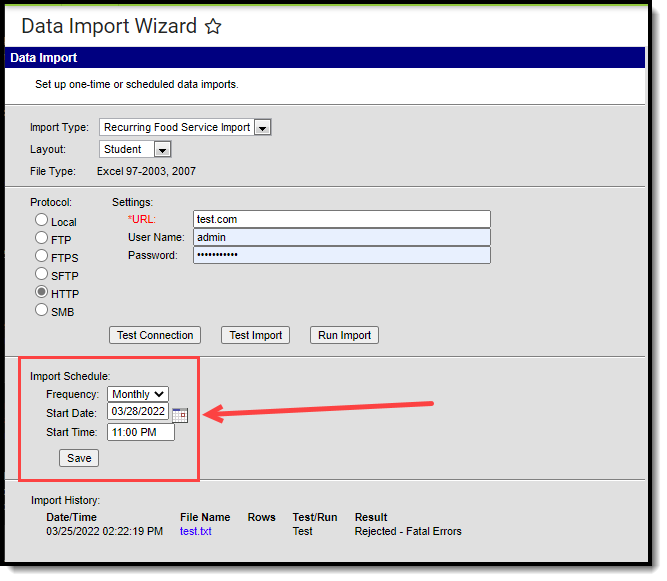
The Frequency determines how often the Data Import tool will import the file into Infinite Campus (Hourly, Daily, Weekly, Monthly).
The Start Date and Start Time fields indicate the first day and time in which data will be imported and is used as the starting point for establishing the import frequency (i.e., a Frequency of Daily with a Start Date of 01/11/2012 and a Start Time of 10:22 AM means the file will be imported on that date and time and every subsequent day at 10:22 AM).
Viewing the Import History
Every time a file is imported into Infinite Campus, a Data Import Report is created, detailing what information was changed within Infinite Campus as well as any errors/warnings produced by the file. The Import History section will show results for the last 50 data files imported. Data Import Reports for imports not included in the list of 50 remain archived in the Infinite Campus database.

To view a Data Import Report, select the hyperlinked file name within the Import History section (see Image 9).
If the Result column (also shown in the Status field in the report) shows a value of System Error! this means an issue occurred on the Infinite Campus server and is not due to the import file. When this occurs users should attempt to import the file one or two more times and contact Infinite Campus if the error does not go away.
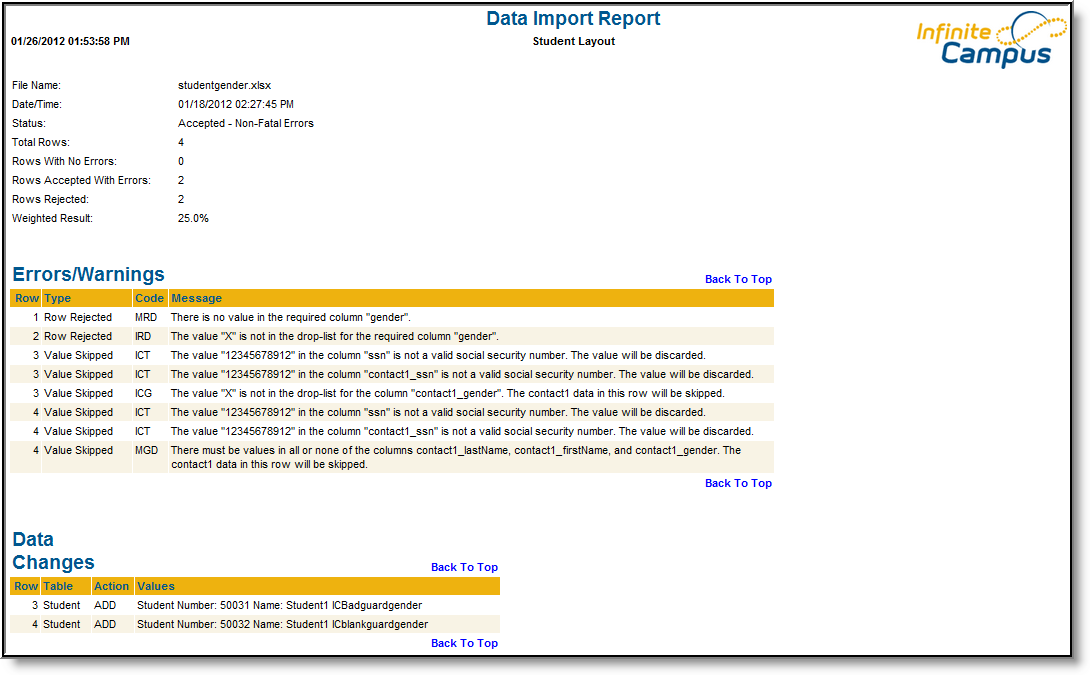
The Errors/Warnings section describes all data within the import file rejected by the Data Import tool. See the and Messages section for detailed information about each potential code and message a user may receive.
The Data Changes section describes all data added or updated within Infinite Campus.
Errors/Warning Codes and Messages
The following table describes all Codes and Messages reported within the Data Import Report. Items within quotations indicate the space is filled with data specific to the import file (i.e., "number" means that part of the message is a number based on the import data).
Code | Description | Message |
|---|---|---|
ADT | After Decimal Truncation | The column "column name" can hold up to "number" digits after the decimal point. The value "value" was truncated to fit the column. |
BDT | Before Decimal Truncation | The column "column name" can hold up to "number" digits before the decimal point. The value "value" was discarded. |
DSC | Duplicate Source Column | The file contains more than one column named "column name". |
DUP | Duplicate Row | Duplicate of row "number". |
EDC | Extra Data Columns | The first row had "number" column names, but this row has "number" columns of data. The extra data will be discarded. |
EF | Empty File | The file is empty. |
EFE | Excel Formula Error | The column "column name" contains a formula with an error. The value will be discarded. |
EFH | Excel Formula Error Header | Column "column name" of the header row contains a formula with an error. |
EME | Exceeded Max Errors | More than "number" errors were found. The file has been rejected. |
EOF | Unexpected End Of File | The file ended in the middle of a row. There might be a formatting error, or the upload may have been interrupted "number" rows were processed. Please check the file, and send it again if needed. |
ESC | Extra Source Column | The column "column name" is not recognized. |
FKV | Foreign Key Violation | The value in the column "column name" is not found in the "table name" table. |
ICC | Invalid Character Count | A total of "number" non-printing characters were replaced with spaces. |
ICT | Invalid Campus Type | The value "value" in the column "column name" is not a valid "type". The value will be discarded. |
IDT | Invalid Data Type | The value "value" in the column "column name" is not valid for the data type "type". The value will be discarded. |
IDV | Invalid Drop List Value | The value "value" is not in the drop-list for the column "column name". The value will be converted, but it will not work correctly in the Infinite Campus application. |
IRD | Invalid Required Drop List Value | The value "value" is not in the drop-list for the required column "column name". |
IRS | Invalid Rows To Skip Size | The number of rows to skip is more than the number of rows in the file. |
KST | Key String Truncation | The keyed column "column name" can hold up to "number" characters. The value "value" is too long for the keyed column, and will be discarded. |
MCN | Missing Column Name | Column # "number" does not have a name. |
MDC | Missing Data Columns | The first row had "number" column names, but this row only has "number" columns of data. The row will still be saved, the rest of the columns will be empty. |
MFD | Missing Record Delimiter | The record delimiter is missing. This row was discarded. |
MGD | Missing Required Group Data | There must be values in all or none of the columns "list of column names". The "table name" data in this row will be skipped. |
MHR | Missing Header Row | The spreadsheet does not have a header row. Please include column names on the first row of the spreadsheet. |
MLD | Missing Last Delimiter | The last row of the file does not have a record delimiter. The file was still processed, but please check the row counts. This could be a sign that the upload was interrupted. |
MOC | Missing Optional Column | The optional column "column name" is missing. The file will still be processed. |
MRC | Missing Required Column | The required column "column name" is missing. |
MRD | Missing Required Data | There is no value in the required column "column name". |
NDT | Not Delimited Text | This does not appear to be a delimited text file. |
NEF | Not Excel File | This does not appear to be an Excel file. |
NFW | Not Fixed Width | This does not appear to be a fixed width text file. |
NPT | No Parent Table | The parent table "parent table" has not been loaded yet. For now, the "child table" table will be saved, but it will not be converted until the "parent table" table is loaded. |
NT | Number Truncation | The column "column name" can hold up to "number" digits. The value "value" was discarded. |
RDC | Missing Required Data Columns | The first row has "number" column names, but this row only has "number" columns of data. This row will be skipped, because at least one of the remaining columns is required. |
ST | String Truncation | The column "column name" can hold up to "number" characters. The value "value" was truncated to fit the column. |
