Tool Search: MT Data Upload
Districts that do not use Campus to manage their district data can use the State Edition Upload tool to upload files containing their district's student information to the State System. Files uploaded with the tool must conform to the File Specifications noted in the following information.
 Montana Upload Wizard
Prior to uploading a file, a calendar for the current year and all required grade levels for that calendar must be setup within the Montana State Edition user interface. If this is not done, an error message will be displayed when an upload is attempted.
Additionally, the upload tool assumes that a School/Year has only one calendar and one schedule structure defined within the State Edition. If multiple calendars or schedule structures are created for that school/year, an error will display when an upload is attempted.
Upload Layouts
See the following pages for detailed information on the available upload layouts.
- Student Demographics
- Student Enrollments
- Program Participation
- Career and Technical Education (CTE)
- Fall Enrollment Count
- Spring Enrollment Count
- English Learner (EL)
- End of Year Attendance Totals
- Section 504 Participation
- Term of Employment Upload
- Course Upload
- Roster Upload
- Section Upload
- Staff History Upload
Upload Wizard
The Upload Wizard provides three actions that can be selected. These actions are chosen in the Work to Perform dropdown list.
Action | Description |
|---|---|
Validate and Test | In this mode the file will be uploaded and all data validation will be performed to ensure that the file conforms to the file specifications section. Additionally, a lookup will be performed on the District, School and Student Number to make sure the named District, School and Students actually exist. No data will change as a result of this action. A report will be generated listing errors and their corresponding line numbers and fields of error. |
Upload File | This mode will insert or update data for each record from the file that has no errors. If a row has an error, it will be displayed in the report generated after the upload completes. |
Types of Imports
The following is a selection of imports that can be uploaded using the Upload Wizard. Each type will report a different Record Type, noted below.
Record Type | Import | Description |
|---|---|---|
SD | Student Demographics | Imports student demographic data |
EN | Enrollments | Imports student enrollment information |
PP | Program Participation | Imports student participation in school programming |
CT | Career and Technical Education | Imports career and technical education information |
AF | Attendance - Fall Count | Imports attendance data for the Fall reporting period |
AS | Attendance - Spring Count | Imports attendance data for the Spring reporting period |
AT | Attendance - Test Window | Imports attendance data for the test window |
AA | EOY Attendance Totals | Imports data on students who were enrolled for at least one day. |
| LP | EL | Imports EL-specific data en masse. |
| TE | Term of Employment | Imports staff employment and assignment data. |
| CU | Course | Imports course data. |
| RU | Roster | Imports roster data. |
| SU | Section | Imports course data. |
| SH | Staff History | Imports course data. |
Uploading Files
- Select the desired Import Type from the dropdown list.
- Select the appropriate action as defined above in the Work to Perform dropdown list.
- Locate the file to upload by selecting the Browse button in the File field.
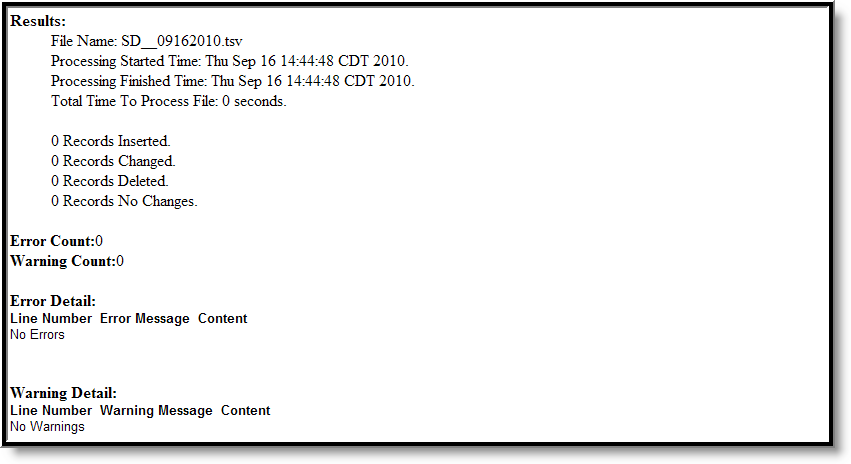
The Validation Report is available in the Batch Queue once the file has completed the upload. Users can access the report by selecting the Get Report icon in the Batch Queue Detail editor .
Initiate upload of the file by selecting the Submit to Batch button. Selecting this will send the extract to the Batch Queue where it will generate in the background when the system is able to process the request.
Access the upload verification report by clicking the Get the report link in the Batch Queue List. Users can also access the report by heading to the Batch Queue Admin tool or by selecting the link within the Notifications message that appears once the extract is generated.
 Upload Confirmation
Retrieve New Student State ID File
When importing Student Demographic data, any students who were imported but did not have a Student State ID value within the import file were automatically given one during the import process. The Retrieve New Student State ID File option allows users to review these new Student State IDs for the last 10 Student Demographic imports. The Refresh State ID File button refreshes the Student State IDs drop list and allows users to retrieve the latest Student State ID files.
This option is only relevant to users importing Student Demographics files. If you are importing via any other Import Type, ignore this functionality as it does not pertain to your imported data.
For more information about this process, see the Retrieving New Student State ID Files section of the Student Demographics Upload article.
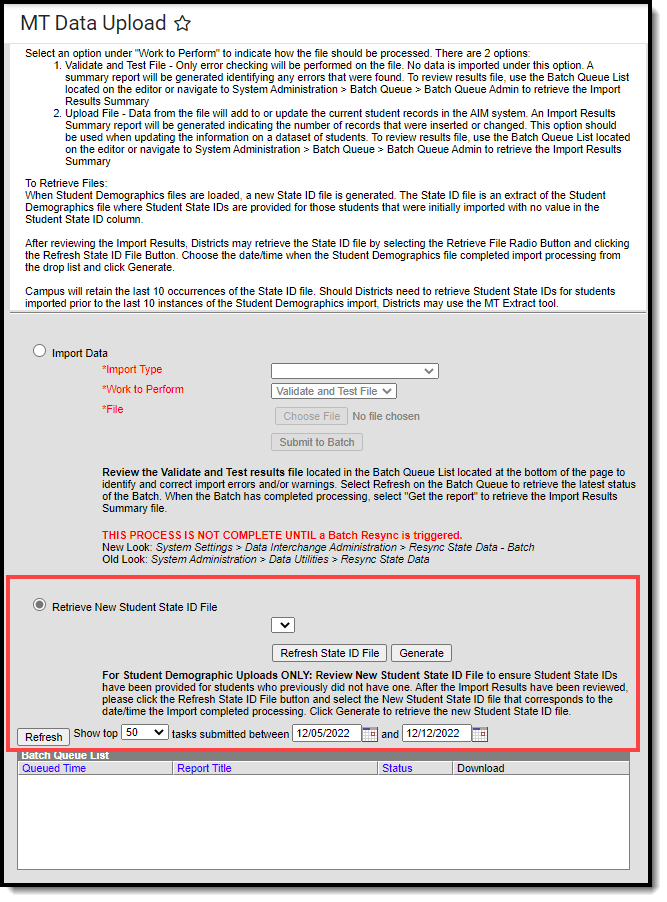 Retrieve New Student State ID File
