Classic View: Attendance > Attendance Letters
Search Terms: Attendance Letters, Letters
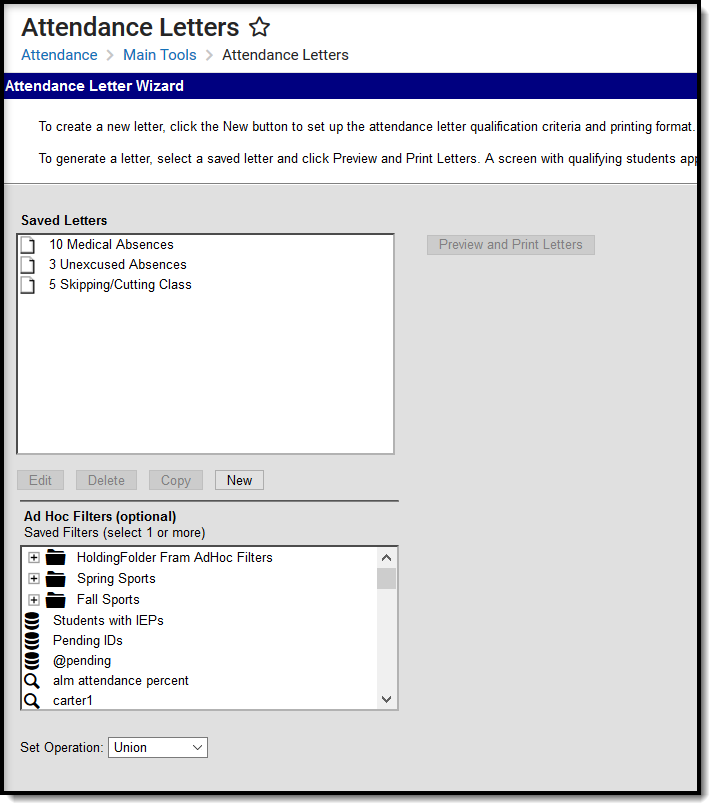
The Attendance Letter Wizard allows users to generate a letter to be sent home for instances when a student meets the entered criteria, based on the entered effective date. Letters can be printed for any given effective date. A letter will be generated for each student that crosses the trigger total on the effective date by summing the selected status/excuse counts.
The information in this article is for Kentucky users only. Non-Kentucky users should see the Attendance Letter Wizard page for guidance.
Attendance Letter Wizard
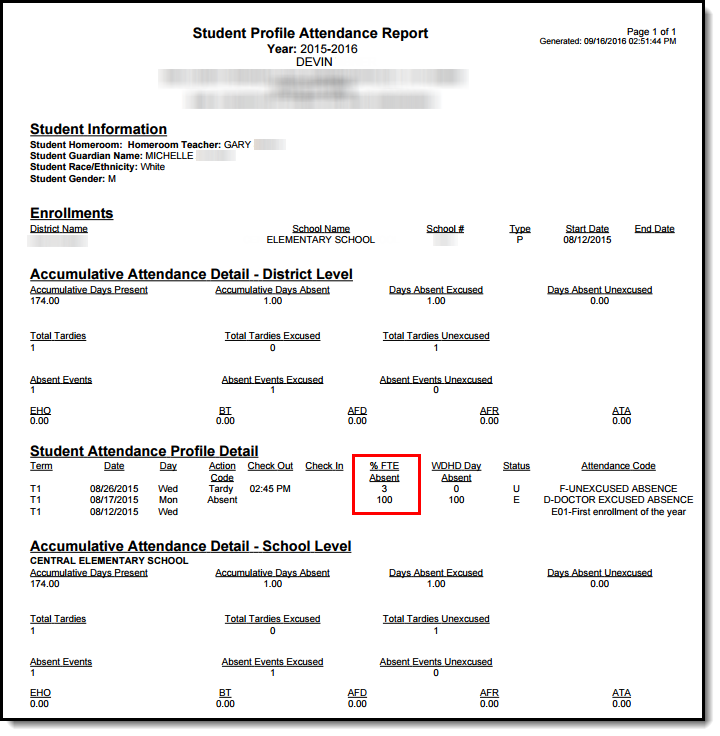
To learn absent totals for individual students and assist in rectifying information within attendance letters, you should access a student's Attendance Profile. Once open, review the student's %FTE Absent for each day and identify what each percentage means based on the following three categories:
- 85% or higher will count as 1
- 35% to 85% will count as .5
- 35% and below will count as 0
Going through each day that qualifies on your letter should help you come up with a total number for the student.
Creating a New Attendance Letter Template
To create an attendance letter template, complete the following steps:
Step 1. Create a New Letter Template
To create a new letter template, click the New Letter icon in the bottom right-hand corner (see Image 2).

Creating a New Letter
Step 2. Enter Letter Criteria
In order for a student to be reported in an attendance letter, that student's attendance entries must cross the Trigger total on the effective date. This is done by adding the selected Status and Excuse counts that are multiplied by the entered weight. The following sections describe each available Report Type:
- Entering Criteria for By Status/Excuse Report Type
- Entering Criteria for By Local Attendance Code Report Type
Entering Criteria for By Status/Excuse Report Type
Select the Status/Excuse option in the Attendance Type dropdown list.
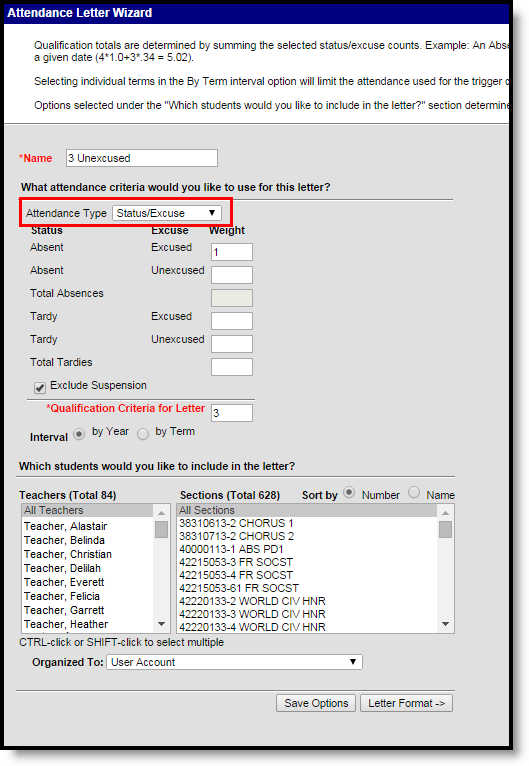
Creating a New Letter - By Status/Excuse
- Enter a Name for the letter.
- Select the Status/Excuse as the Attendance Type. Status and Excuse fields will appear below.
- Enter the Weight for each status and excuse combination for which to report attendance data.
- Enter the total Qualification Criteria for Letter value. This is the total from the combination of weight criteria entered. See the example below for more information.
- To exclude suspension attendance records from being included in report data, mark the Exclude Suspension checkbox.
- Choose the Interval to determine how far back the query should look to pull attendance entries - the entire school year or the current term. This is based on the Calendar values.
- If the letter should be generated for a particular group of teachers or sections, select the relevant groups in the Teachers and Sections fields.
- Select which users are allowed to access this letter template via the Organized Todropdown list.
- User Account - Only the user who created the letter template is allowed to access and modify the letter format.
- Student Information System - Group Assignment - Only users with a Product Security Role of Student Information System - Group Assignment are allowed to access the letter format.
- Student Information System - Login as User - Only users with a Product Security Role of Student Information System - Login as User are allowed to access the letter format.
- Click the Save Options button. Select the Letter Format button to save field data entered above and proceed to creating the letter format.
For example, the following will cause a student letter to generate:
- Absent Unexcused has a weight of 1.0
- Tardies have a weight of .34
- The letter has a trigger of 5.
If a student receives 4 Unexcused Absences and 2 tardies (4*1.0 + 2*.34 = 4.68), a letter will be generated on the day that the attendance values exceed a total of 5.
For this example, a letter will not generate as the total is not greater than or equal to 5. If the student were to receive 2 additional tardies, the letter would generate, making the calculation as follows:
4*1.0 + 4*.34 = 5.35
Total fields are also available for Total Absences and Total Tardies.
- If Total Absences is chosen, the user cannot enter excused or unexcused absences.
- If Total Tardies is chosen, the user cannot enter excused or unexcused tardies.
Entering Criteria for By Local Attendance Code Report Type
You can also report attendance data based on local attendance codes by selecting the By Local Attendance Code radio button.
This tool only looks for instances of the Local Attendance Code with an absence of 1. If the attendance code is applied when a student checks out during the day but not enough for a full day absence, the code does not pull in this section.
Absences are counted as follows:
- 85% absent or higher will count as 1
- 35% to 85% will count as .5
- 35% and below will count as 0
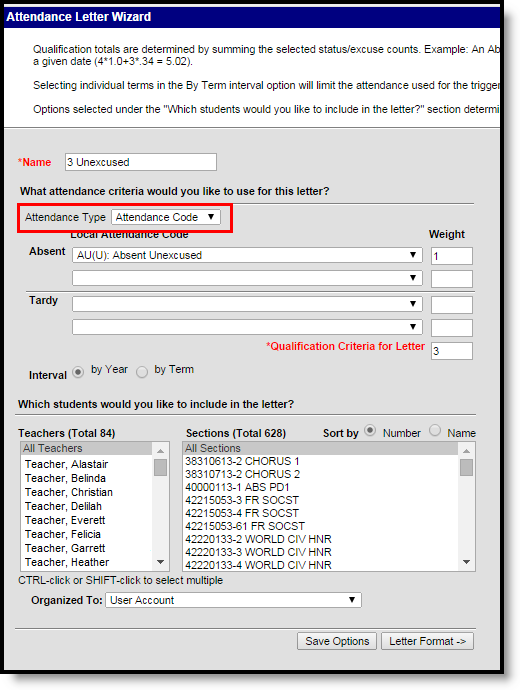
Creating a New Letter - By Local Attendance Code
- Enter a Name for the letter.
- Select Attendance Code as the Attendance Type from the dropdown list.
- Select each Absent and Tardy Local Attendance Codes you wish to trigger attendance data.
- Enter a Weight for each Local Attendance Code selected.
- Enter the total Qualification Criteria for Letter value. This is the total from the combination of weight criteria entered. See the example below for more information.
- Choose the Interval to determine how far back the query should look to pull attendance entries - the entire school year or the current term. This is based on the Calendar values.
- If the letter should be run for a particular group of teachers or sections, select the relevant groups in the Teachers and Sections fields.
- Select which users are allowed to access this letter template via the Organized Todropdown list.
- User Account - Only the user who created the letter template is allowed to access and modify the letter format.
- Student Information System - Group Assignment - Only users with a Product Security Role of Student Information System - Group Assignment are allowed to access the letter format.
- Student Information System - Login as User - Only users with a Product Security Role of Student Information System - Login as User are allowed to access the letter format.
- Click the Save Options button to save field data entered above. Select the Letter Format button to save field data entered above and proceed to creating the letter format.
For example, the following will cause a student letter to generate:
(Absent Amount * Absent Weight) + (Tardy Amount * Tardy Weight) = Threshold. Student must cross this threshold on the day the attendance letter is generated.
- The first Absent Local Attendance Code has a weight of 1.0
- The first Tardy Local Attendance code has a weight of .34
- The letter has a trigger of 5.
If a student receives 4 Unexcused Absences and 2 tardies (4*1.0) + (2*.34) = 4.68, a letter will be generated on the day that the attendance values exceed a total of 5.
For this example, a letter will not generate as the total is not greater than or equal to 5. If the student were to receive 2 additional tardies, the letter would generate, making the calculation as follows:
(4*1.0) + (4*.34) = 5.35
Step 3. Create the Letter Format
Once attendance letter trigger criteria is entered, the format of the letter generated must be created.
Creating the Letter Format
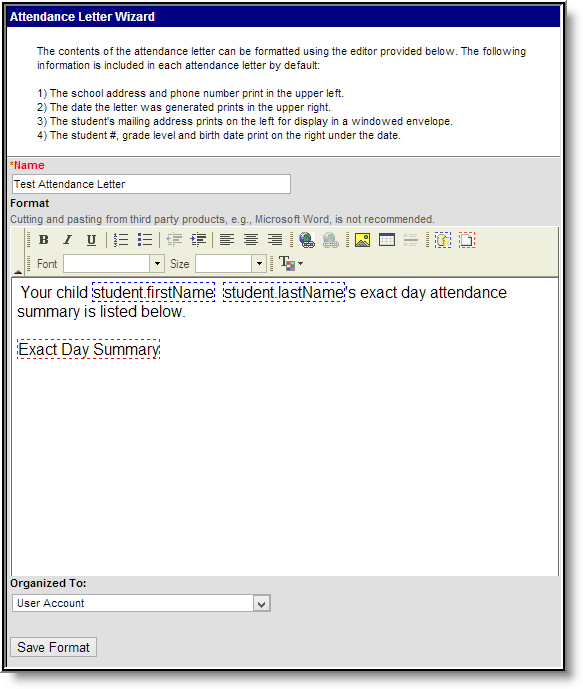
Enter letter information within the WYSIWYG editor just as you would write a letter within any word processing program.
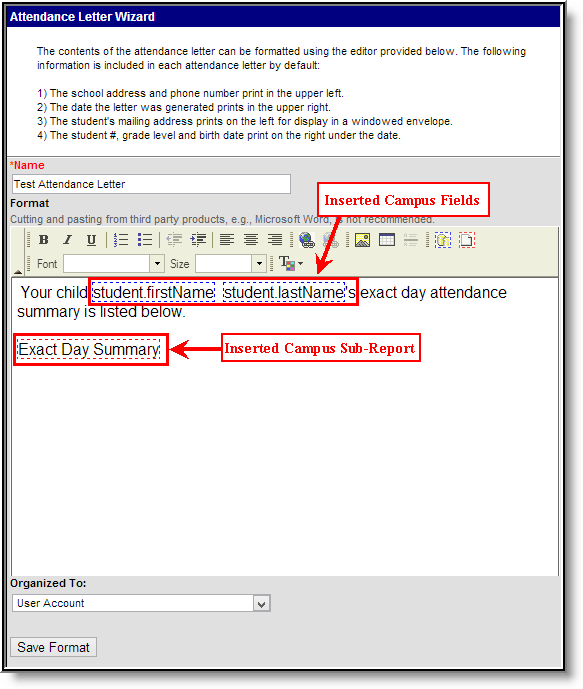
To dynamically generate student information specific to each reporting student, Campus Field Property and Campus Sub-Reports can be inserted into the letter. Information for Images 6 and 7 describe this process.

Adding Campus Fields to the Letter Format
Information specific to each reporting student can be automatically generated within the letter by selecting the blue box to access the Campus Field Properties editor (see Image 6). Within this editor, expand each area and select Campus fields to report student-specific data.
For example, if student.firstName is selected, the letter will uniquely insert the student's name for each letter generated. See image 8 for an example of inserted Campus fields.

Adding Campus Sub-Reports to the Letter Format
Sub-reports can also be inserted into the letter by selecting the red box and accessing the Campus Sub-Report Properties editor (see Image 7). Campus sub-reports are canned reports which when inserted into the letter, will dynamically generate report data for each student who meets trigger criteria. See Image 8 below for an example of an inserted sub-report and Image 10 for an example of a generated sub-report.
Example of a Letter Format
The example above is a letter format which will dynamically insert the reporting student's name (student.firstName, student.lastName) as well as Exact Day Summary sub-report data.
Inserting an Image into a Letter
To include images on letters (using the available letter wizards), only .JPEG images can be used. However, if you have trouble with a .JPEG image in FOP, try opening it with an image processing program (such as Photoshop or Gimp) and then save it. Specifying 24-bit color output may also help.
For the PDF and PostScript renderers, most .JPEG images can be passed through without decompression. Grayscale, RGB, and CMYK color spaces render properly; however, for other output formats, the .JPEG images have to be decompressed.
Generating an Attendance Letter
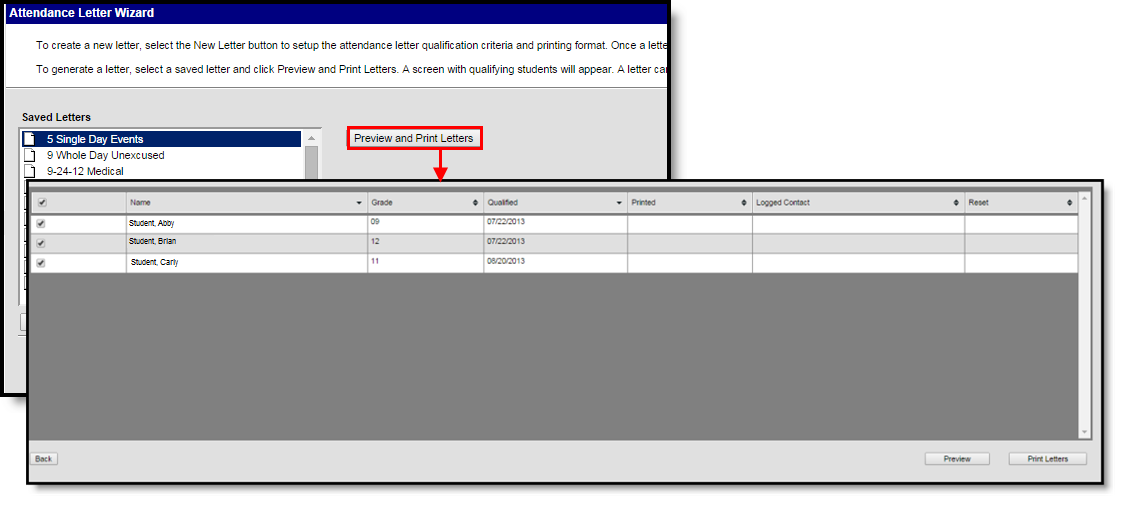
After creating the letter and writing the body of the letters, letters can be printed. Select the desired letter from the list of saved letters and click the Print and Preview Letters button. A list of students who met the criteria of the letter are listed.
Printing a Letter
This grid lists the following:
- Names of the student meeting the letter criteria,
- The students' grade level
- The date the student first qualified for the selected letter,
- The date the letter was printed,
- Whether a PLP Contact Log was recorded for the student
- An X to essentially delete the record of a letter printing for the student
If no students meet the criteria of the letter, this grid only lists the headers of the grid and no students.
Preview Attendance Letters
Click the Preview button to review the letters prior to printing them. The Preview includes a header page (page 1) that summarizes the letter and lists the students included in the generation, along with their mailing address. The following pages (page 2, and continuing) are the actual attendance letters.
Preview letters include a Preview watermark, making it very clear it is not the official attendance letter to be sent.
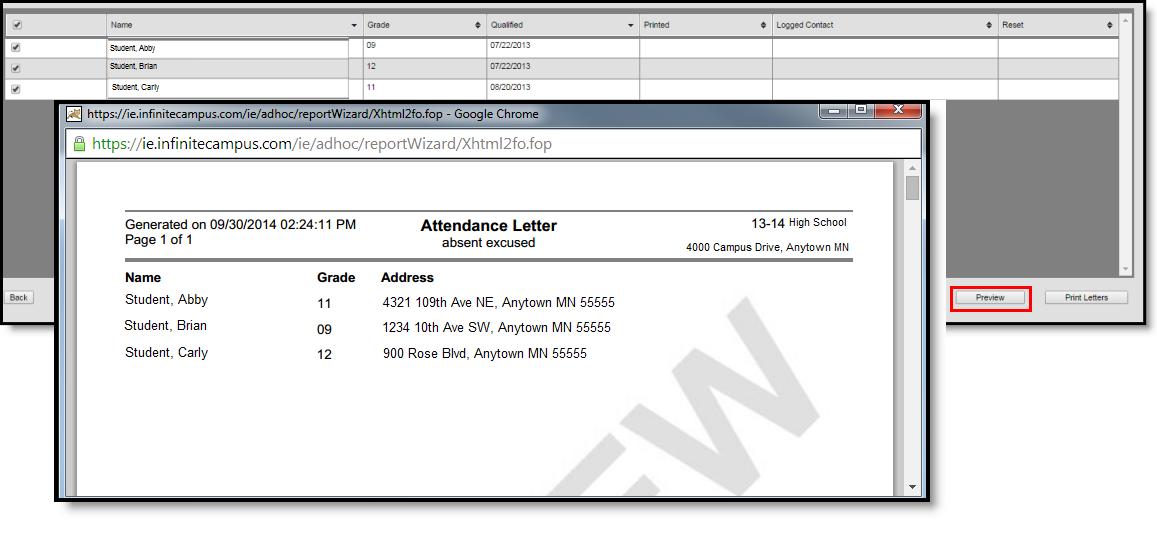
Preview Letters - Header Page
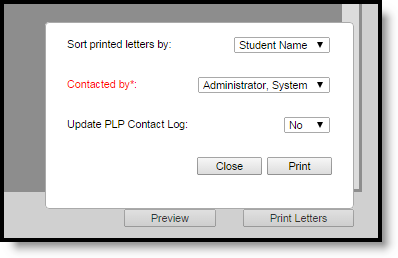
Print Letters
After reviewing the letters using the Preview option, and it's time to print letters, click the Print Letters button. The same header page and body of the letter prints, just without the Preview watermark. When the Print Letters button is chosen, a pop-up window displays.
- Choose how the letters sort (Sort printed letters by) - by Student Name or Zip code.
- Select the name of the staff person who printed the letters in the Contacted By dropdown. This is required entry, and is limited to those individuals who have the Behavior Admin checkbox marked on their District Assignment record and the current user.
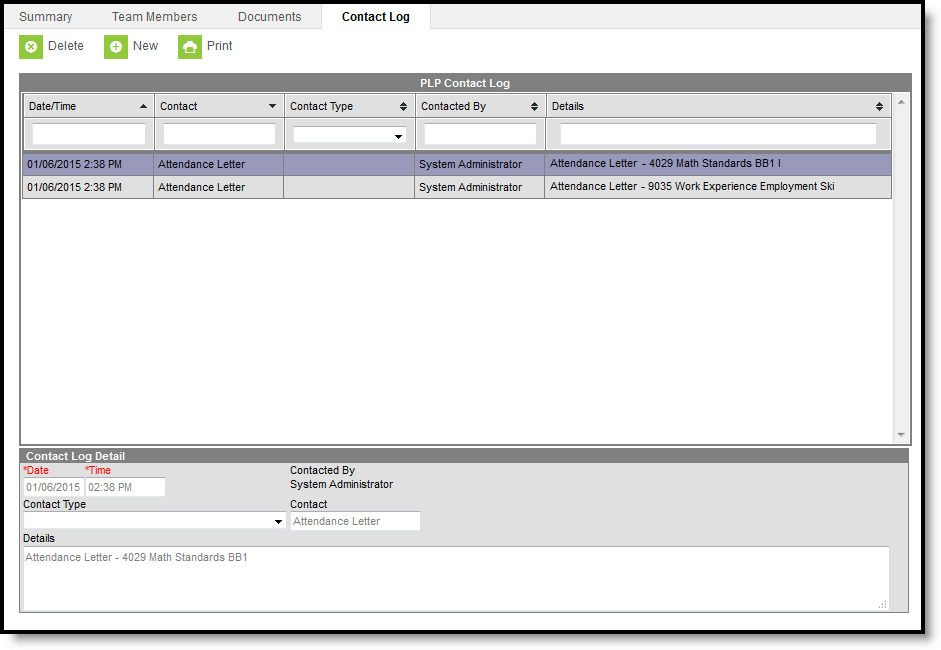
- Determine if a PLP Contact Log record should be recorded (Update PLP Contact Log)by choosing Yes or No. If Yes, a Contact Log record is automatically created and saved for the student; if No, no contact log item is saved.
- Choose to Close this window or Print.
Print Letters Dialog
If a Contact Log item is recorded, it displays as such. If a user determines the student should not receive the letter after letters print, resetting that student's record removes the contact log entry.
Manage Attendance Letters
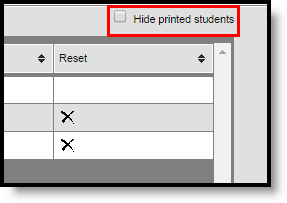
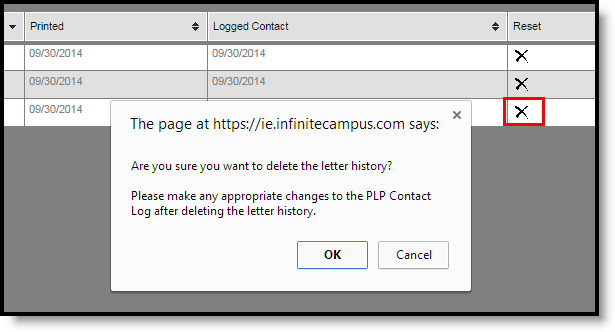
- After letters have printed, the list of students for whom a letter printed now display in gray text, indicating the letter was printed. The date of the printed letter now displays in the Printed column and an X displays in the Reset column. If a Contact Log record was recorded, the date of that contact displays in the Logged Contact.
- If a letter was printed for a student but the student should not have received the letter, click the X in the Reset column. A dialog box displays, verifying this is the action that is needed. Click OK to continue or Cancel to not remove the X. Once the X has been removed, the student's name displays in normal text, with dates removed, and a future letter can be printed when desired.
- These columns sort first by student name. They can be resorted as needed by clicking the arrows in the column headers.
- Students who have already received a letter can be hidden. Mark the Hide printed students checkbox in the upper right corner of the page. Then, only those students who have not previously received the selected letter are listed.