Custom Forms can be set up with eSignature functionality to allow parents/guardians and/or students to electronically sign documents that are made available on Campus Parent and/or Campus Student. This document provides an overview of how the eSignature process works for Custom Forms.
In order for eSignature Custom Forms to display on Portal, the following setup must be done:
- Mark the Display Custom Form on Portal AND the Request eSignature options on the Custom Forms Upload step.
- Mark the Portal Preference for the Module the form is in at System Administration > Portal > Preferences > Display Options on the Documents section.
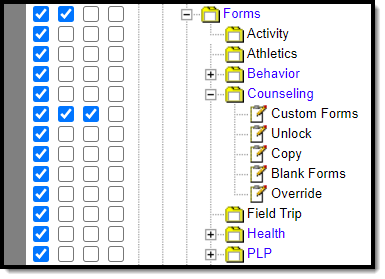
- Mark the Guardian, Mailing, and Portal checkboxes on the Relationships tool for the person to receive the Custom Form.
See each section of the document below for detailed instructions.
Custom Form Portal Setup
User: Custom Forms Administrator
Classic View: System Administration > Custom Forms > Publish step
Search Terms: Custom Forms
Portal options are available on the Upload step of the Custom Forms process. When the Display Custom Form on Portal option and Guardian eSignature Request and/or Student eSignature Request option is marked, a request for an electronic signature is sent to the student and/or parent/guardian(s) on Campus Parent and/or Campus Student. When the Guardian Fill out Form and/or Student Fill out Form option is marked, guardians and students can also enter data into the form.
Only PDFs created using Adobe Acrobat Professional or Adobe DC are supported for Custom Form creation. See the Custom Forms Setup document for additional information on managing and creating Custom Forms.
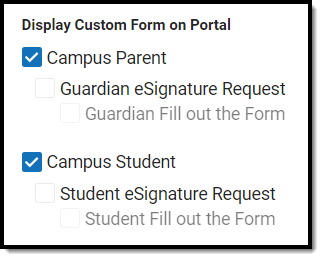 Display Custom Form on Portal Options
Note: Custom Form eSignature functionality does not require a pin to complete.
Portal Display Options
User: Custom Forms Administrator
Classic View: System Administration > Portal > Preferences > Display Options > Documents
Search Terms: Display Options
The Display Option must be marked per module for custom forms to display on the Portal for parents/guardians and students. Select the Student & Parent option under the Custom Modules section for each module you want to display on Portal.
Portal preferences are set by school. See the Portal Preferences Display Options documentation for additional information.
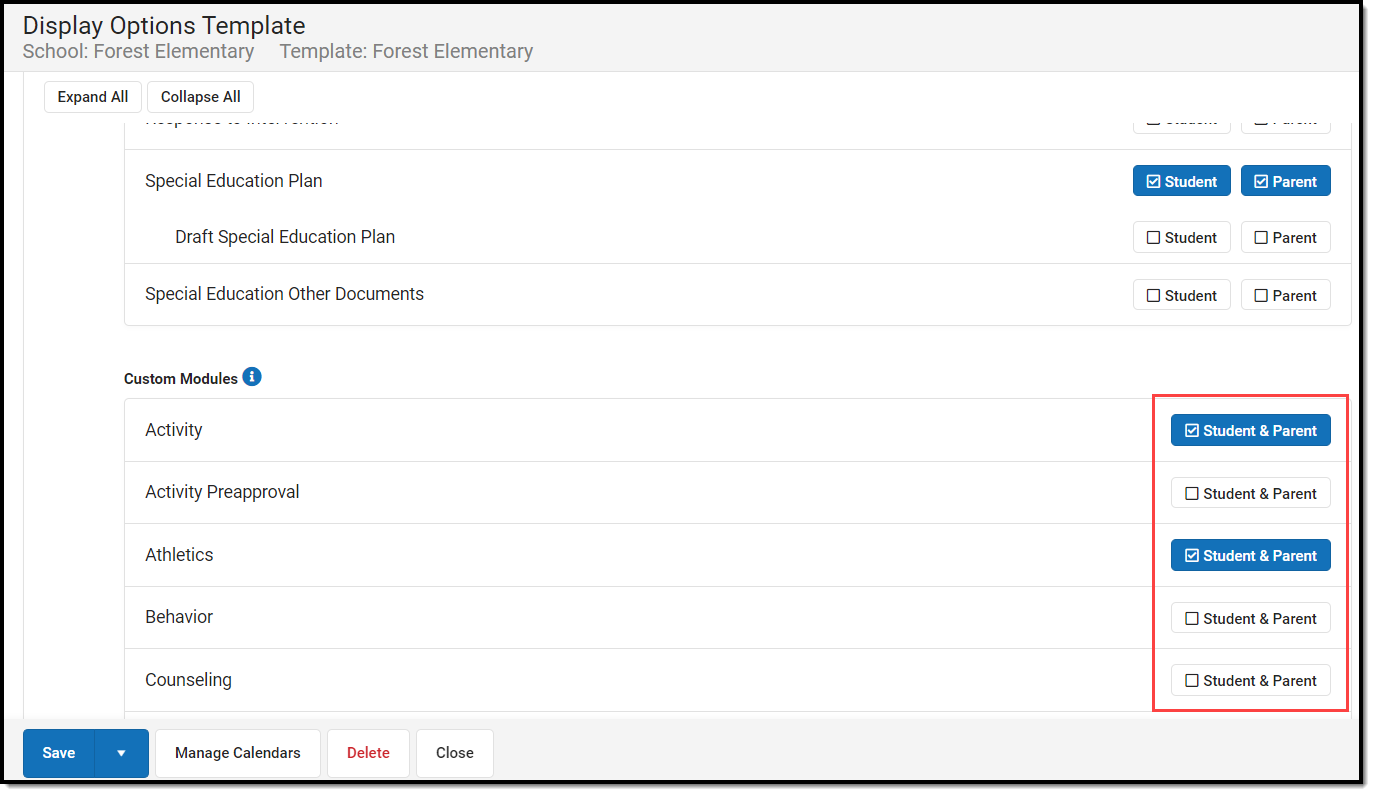 Document Display Options for Custom Forms
Relationship Setup
User: Custom Forms Administrator
Classic View: Census > People > Relationships
Search Terms: Relationships
Parent/Guardian(s) receive the eSignature request(s) when the Guardian, Mailing, and Portal checkboxes are marked on the Relationships tool for the student. The Parent/Guardian must have a valid Portal account in order to receive eSignature forms. The order of the Parent/Guardian(s) names is determined first by the Emergency Priority on the Relationships tool. When no Emergency Priority is entered, the names display in alphabetical order.
 Relationship Checkboxes for eSignature
Tool Rights
User: Custom Forms Administrator
Teachers/Form users must have appropriate tool rights to create custom forms using the Forms tool. There is not a separate tool right for eSignature forms. When users have the Module Custom Forms Read, Write, and Add rights, they can create new custom forms for a student, including eSignature forms.
Overriding eSignatures requires a separate tool right. Students must have the Student Information > General > Forms > Module > Custom Forms = Write and Override = Read in order to override an eSignature.
 eSignature Tool Rights
Send Forms
User: Teacher/Forms User
Classic View: Student Information > General > Forms
Search Terms: Forms
The Review Participants button displays after an initial save. When finished entering data into the form, click the Review Participants button to verify to whom the form is being sent. The Form Detail also allows the user to select when the Form is sent and when the form becomes read-only on the Portal.
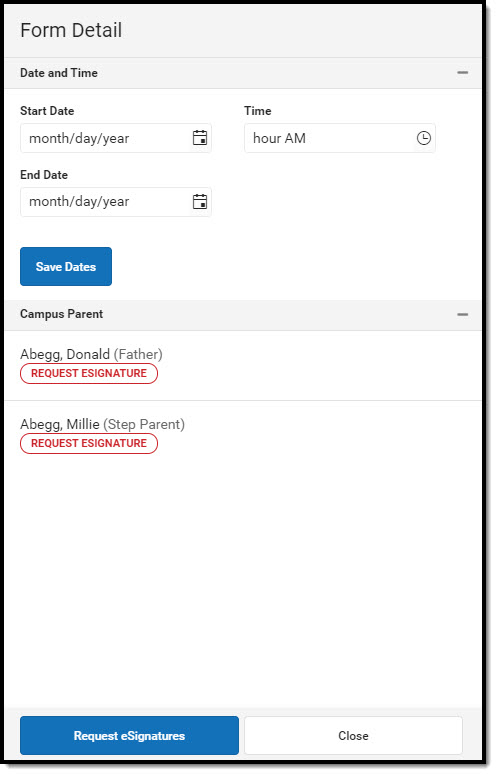 Review Participants Side Panel
Request eSignature(s) Process
- Enter data into the form.
- Click Review Participants.
- Optional: Select a Start Date and Time when the form is available on the Portal, after eSignatures have been requested.
- Optional: Select an End Date when the form becomes read-only on the Portal.
- Click Request eSignatures.
- Click Request eSignatures or Cancel. Requesting eSignatures make the form read-only. You are not be able to make additional changes after requesting signatures.
After the eSignature Request(s) have been sent, the Review Participants button can be used to see who has signed the form or not as well as perform additional tasks.
Once an eSignature request has been sent, users cannot delete the form and the form becomes read-only.
Campus Parent and Campus Student
User: Parent/Guardian or Student
Path: Portal > Documents
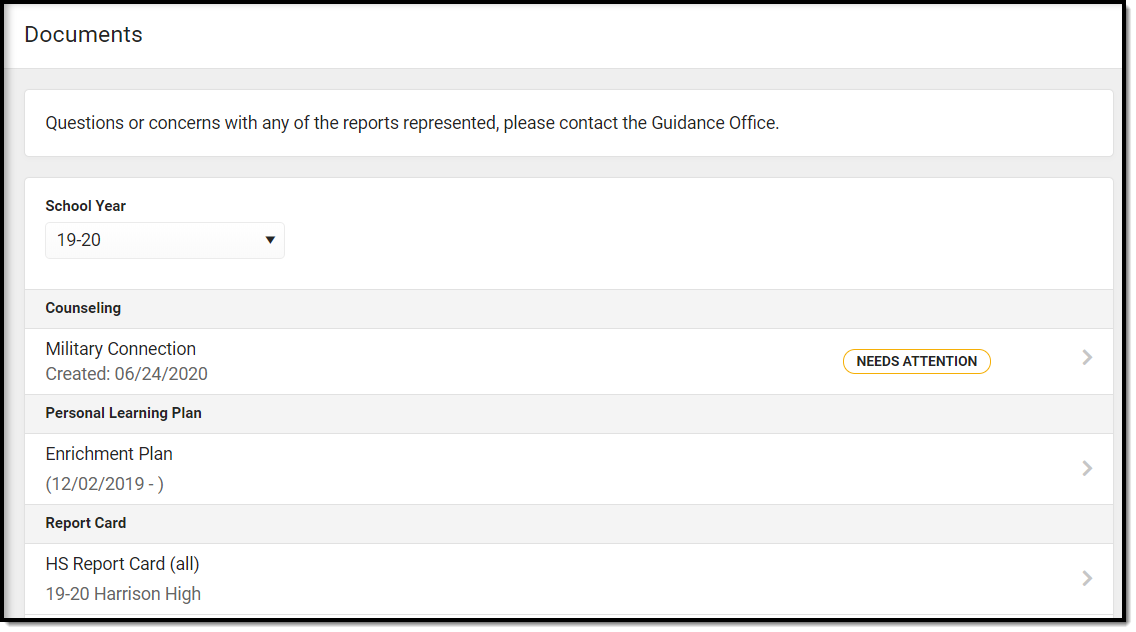
Upon login, the Documents Need Attention section displays any documents that require a signature. Notifications can also be received notifying the user a document is available to sign and/or fill out. Click on the document name or navigate to the Documents tool to Sign or Decline the form.
A status displays next to the name of the form on the Documents tool. This indicates the document is pending action by other users, including additional signatures needed or completion by the district.
When one person Declines a form, no other user can eSign the form.
 eSignature Document on Campus Parent/Campus Student Portal
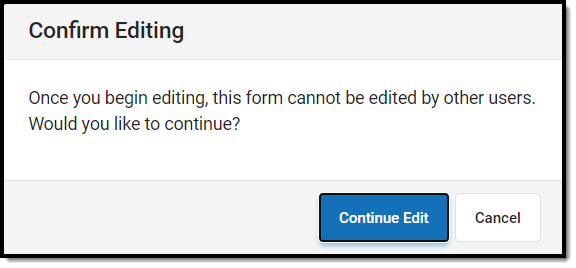
Certain forms may require data entry as well as a signature. Only one user can edit the form, even when multiple users have the ability to edit. A warning displays indicating the form will become read-only for other users until you finish editing and sign the form. Other users can view a read-only version of the form while you edit.
 Confirm Editing Warning
The Next Action button navigates you to the next required field or the eSignature line when no other fields are required.
Once all edits are made, sign the form and click Submit.
Override eSignatures
User: Teacher/Forms User
Classic View: Student Information > General > Forms
Search Terms: Forms
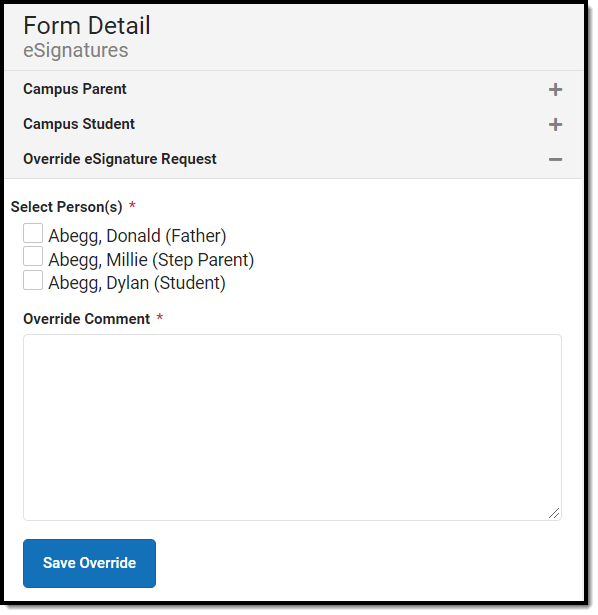
The Override eSignature Request option forces the eSignature to be signed so the form can be completed. This option can be used when for any reason a parent/guardian or student is unable to eSign or a paper form is signed and submitted instead of the virtual form.
 Override eSignature Request
- Click Review Participants after the eSignature request(s) have been sent.
- Mark the checkbox for the person whose signature is to be overridden.
- Enter an Override Comment.
- Click Save Override. The Status of this form after the user Completes the form is Locked & Overridden.
 Example Overridden eSignature
Contact Log
User: Teacher/Forms User
Classic View: Student Information > General > Forms
Search Terms: Forms
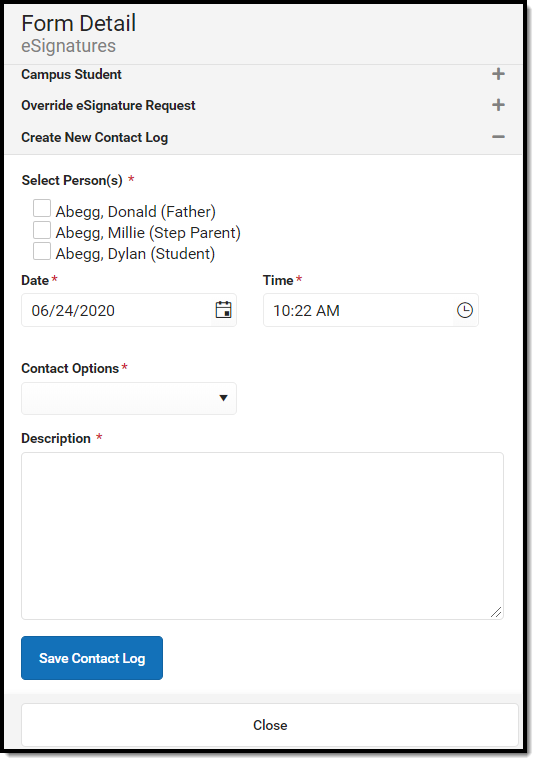
The Custom Forms Contact Log is used to document any interactions between the participants of the Custom Form.
 eSignature Contact Log
- Click Review Participants after the eSignature request(s) have been sent.
- Mark the checkbox for the person who was contacted.
- Select the Date and Time when the contact occurred.
- Select the Contact Options from the dropdown. This dropdown is populated from the Attribute Dictionary > ContactLog > Contact Type.
- Enter a Description of the communication.
- Click Save Contact Log. Multiple Contact Log records can be saved per form. Contact Log records can be created any time after the eSignature request(s) have been sent, including after the form is Completed.
Complete eSignature Forms
User: Teacher/Forms User
Classic View: Student Information > General > Forms
Search Terms: Forms
Once eSignatures have been returned or overridden, the form can be completed. Click Complete to finish the eSignature process.
eSignature Custom Forms do not sync to the state for State Edition users when completed.
